Do-it-yourself removal and replacement of VAZ 2108, 2109, 21099 drives
If you hear a crackling or crunching sound when cornering, then you will probably need to remove the drives and replace the CV joints of the VAZ 2108, 2109, 21099 yourself.
This usually occurs on cars with high mileage, but it also happens on relatively new cars due to use on our roads. It's all about the wear of the bearings, they need to be changed. You will need: left and right drive shaft assemblies, hub wrench, pliers, flathead screwdriver, socket and wrench set, lifter.
It is important to know! Before starting work, drain the gearbox oil. If the hub nut comes off, the car must stand on its wheels with chocks under them.
Unlock the hub nut.
Use a hub wrench to remove the hub nut. Loosen the wheel nuts.
Raise the car and remove the front wheel. We completely unscrew the hub nut and use a screwdriver to pull out the washer.
Use pliers to disconnect the steering end from the swing arm.
Unscrew the fixing nut and press out the steering tip.
Unscrew the two steering knuckle bolts and remove the front arm.
Next, all that remains is to remove the inner CV joint from the gearbox. We replace VAZ 2108, 2109, 21099 with a new CV joint and drives.
Source
Development of pickup truck production
The country's first traveling passenger car with a carrying capacity of up to 0.5 tons based on a serial one was produced in 1972. It became a utility vehicle under the designation IZH-2717. The small truck immediately gained great popularity and was produced for almost 30 years, and in total about 2.5 million copies were manufactured. Due to its body shape, the car received the popular nickname “Heel”, which then passed on to other models of similar cars.
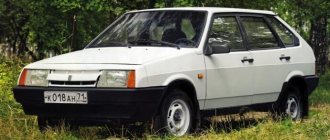
In the late nineties, with the growth of small and medium-sized businesses, the demand for small pickup trucks based on passenger cars increased sharply. This allowed VIS to increase the number of vehicles produced, as well as the number of modifications. also tried to return to the market of heeled cars, but the VAZ-1706 (“Lada Shuttle”) model, produced on the basis of the 2108 model, lasted on the assembly line for only three years.
How to remove drives on VAZ 2108, 2109, 21099
If VAZ cars of older brands experience a crunching sound when cornering, the most likely cause is damage to the bearings in the CV joint. Over time, they lose strength, crumble and cause characteristic sounds when driving. To get rid of the problem, you will have to remove the drives.
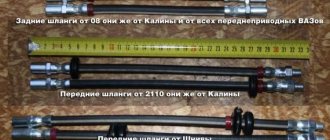
The right drive shaft has part number 2108-2215010, and the left one has part number 2108-2215011.
Drive removal instructions:
- Before you begin the drivetrain removal procedure, you will need to drain the oil from the transmission.
- Unlock the hub nut.
- Place chocks under the car wheels.
- Break off the hub nut without unscrewing it.
- Loosen the nuts that secure the wheel and raise the car on a lift.
- Remove the front wheel, unscrew the nut and remove the washer using a screwdriver.
- After this, you will need to disconnect the steering tip from the swing arm.
- Tighten the nut that secures it and press the tip out of the lever.
- Unscrew a couple of bolts and remove the lever.
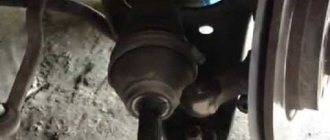
- Remove the outer CV joint from the hub, and then the inner CV joint from the box. To remove the inner CV joint, you need to slightly pry it from the gearbox side.
- After this, all that remains is to replace the old CV joint with a new one.
Source
Methodology and algorithm of repair work
- Jack. In order for the problem unit to be replaced, you must first hang the wheel, removing the weight load from it. To do this, the vehicle is raised with a jack. If the replacement is carried out in a car service center or a specially equipped garage, then use a lift that will allow you to raise the car to a comfortable height.
- Puller. Replacing a hub or bearing on a VAZ-2108 requires the use of two different pullers, the sizes of which - 3 and 6 cm - correspond to the diameters of the rotation support races.
- Pliers.
- Wrenches for 12 and 30.
- The front wheel is removed from the side of the defective unit. To do this, the car is secured with the handbrake and the mounting bolts are loosened. Then, on a jacked-up VAZ-2108, the bolts are completely unscrewed and the wheel is removed.
- The brake disc is removed.
- The caliper does not unscrew completely. It will have to be secured in this position, for example, with wire.
- After this, using a puller, we dismantle the hub along with the bearing.
Before pressing or stuffing the rotation support, the seat is treated with grease. The fit inside the glass must be done extremely accurately, otherwise everything will have to be redone.
Sources
- https://vashalada.ru/mashiny/vaz-2108/zamena-podshipnika-stupicy-vaz-2108-svoimi-rukami.html
- https://zubilovaz.ru/zamena-podshipnika-zadnej-stupicy-vaz-2108
- https://expertvaz.ru/2108/podshipnik-stupicy.html
removal and installation of front wheel drives on VAZ 2108, VAZ 2109, VAZ 21099 cars
Remove the crankcase protection from the vehicle and drain the oil from the gearbox.
1. After removing the protective cap, loosen the hub nut.
2. Loosen the wheel bolts and hub nut. The hub nut is tightened with a large torque, so it is recommended to use, for example, a piece of pipe as a lever.
WARNING When unscrewing the hub nut, the VAZ 2108, VAZ 2109, VAZ 21099 must stand on the ground! Loosen and tighten wheel bolts only with the vehicle on the ground. The tightening torque of the bolts is 65-95 Nm (6.5-9.5 kgf-m).
3. Brake the VAZ 2108, VAZ 2109, VAZ 21099 car with the parking brake, install thrust bars under the rear wheels of the car and lift the front part of the car, installing reliable supports. Remove the front wheel from the car. After this, completely unscrew the hub nut.
4. Using a screwdriver, remove the thrust washer.
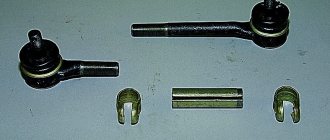
5. Remove the cotter pin from the tie rod ball joint nut to the swing arm.
6. Unscrew the nut securing the steering rod ball joint.
7. Using a puller, press the tie rod ball joint pin out of the strut swing arm.
8. Unscrew the two bolts and disconnect the ball joint of the front suspension arm from the steering knuckle.
9. Pull the steering knuckle with the strut...
10... and remove the splined shank of the outer ball joint from the hub.
11. Using a pry bar, press the inner CV joint shank out of the gearbox.
If you intend to remove both front wheel drives, after removing one of the drives, insert a technological plug into the gearbox instead (for example, an old internal CV joint) and only then remove the second drive. Otherwise, the differential side gears will move and it will be impossible to insert the CV joints during assembly.
12. Remove the front wheel drive shaft.
Possible malfunctions of the front wheel drive, their causes and solutions
Cause of front wheel drive malfunction Method for eliminating front wheel drive malfunction Noise, knocking from the front wheel when the vehicle is moving Wear of hinge parts
Deformation of the wheel drive shafts Replace worn or damaged joints Replace the wheel drive shafts Lubricant leak Damage or rupture of the protective cover of the inner or outer joint Replace the lubricant in the joint and the protective cover
Source
Production of cars "VIS-AUTO"
It produced its first models with a pickup body based on the VAZ-2105 and VAZ-2107. These were rear-wheel drive models in a three-door design, with a capacity of 2 people, a load capacity of 750 kg and a body volume of 1850 liters. The basic configuration of the “heel” was designated VIS-2345. In addition to the basic model, modification 23452 was produced - an isothermal van, and an exotic version 23454 - a truck tractor for transporting a semi-trailer.
The next development of pickup trucks was the VAZ Heel 2347 based on the 2114 model. The car had a two-door design and was designed for 2 passengers. Had the following configurations:
- cargo van - one rear door, body volume - 2.9 cubic meters. m, loading - 0.49 t;
- isothermal van - double hinged rear door, with a cargo compartment volume of 3.2 cubic meters. m, with a lifting capacity of up to 0.35 t.
The “Heeled” VIS (VAZ) 1705 based on the 2109 model was produced in small quantities. It had a load capacity of only 300 kg and a body volume of 2.3 cubic meters. meters.
Basic procedure
First of all, you should put the car on the parking brake and secure the rear wheels with blocks. After this, while the car is on the ground, the hub nut is loosened. You will first need to remove the protective cap. It should also be taken into account that this nut is tightened quite tightly, so you will have to make a significant effort. At this point you can loosen the wheel bolts.
Next, you need to raise the front of the car by placing the body on supports. After this, you can unscrew the wheel bolts completely, removing the wheels, and remove the hub nut stop washer. The next step is to disassemble the steering rod, or rather its tip. The fastening bolts of the lower part of the steering knuckle support are screwed together, after which it is necessary to turn the steering wheel in the direction from which the replacement is being made until the extreme position is reached.
Next, the spitz end of the outer CV joint of the VAZ 2109 is pulled out from the hub, after the steering knuckle and strut have been pulled out. The next step is to press out the inner CV joint secured in the gearbox, for which it is better to use a pry bar.
It is important to pay attention to the fact that if it is necessary to carry out work on all CV joints, it is recommended that after removing one drive, install a retainer in the box, which can be an old similar part of the inner CV joint. Otherwise, the gears will shift, making it impossible to install the CV joints in place.
If traces of oil were observed in the area of the gearbox during operation of the vehicle, then the seals on the CV joints will also need to be changed. Next, you need to clamp the drive shaft with a vice, remove the clamps from the hinges and unscrew the boots if they are intact. It is enough to cut off torn anthers with a knife.
The CV joints are knocked off the shaft with a hammer and drift, with the main forces being applied to the hinge cage. The same is done for the outer CV joint.
If you only need to replace the boots, the joint should be washed with gasoline to get rid of old grease and traces of dirt. The new boot is placed on the shaft, but it is important to keep in mind that the right shaft is longer than the left. In addition, it is better to immediately replace the lubricant in the CV joint, making sure there is enough of it.
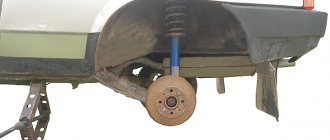
Front axle
The front axle has an independent telescopic suspension, which uses both hydraulic shock absorbers and coil springs. The wishbone is the lower one with braces. The chassis is equipped with a stabilizer bar. The suspension device of the VAZ 2109 is almost identical to that of the VAZ models 2108, 21099.
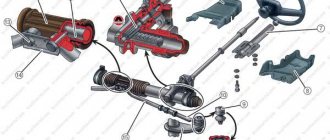
Components and parts of the front axle chassis
The front axle of the VAZ 2109 is perhaps the most complex element of the chassis, this is due to the fact that the car’s transmission is front-wheel drive, but the number of main components in its structure is not so large. This:
- Rack with shock absorbers;
- Rounded fist;
- Cross arm;
- Stretch marks;
- Mounting units for the chassis to the body and transmission;
Description of the front suspension design
The chassis of the front axle of the VAZ 2109 contains quite a lot of elements, but everything is typical for cars of this class and its design has something in common with many cars of the same type. The main part is a telescopic stand with a hydraulic shock absorber. A coil spring with a stroke buffer is installed on top of the hydraulic cylinder. The upper support is also made of polyurethane and ensures the rack swings and vibration damping. The device for fastening the rack to the body (with three bolts) allows you to dampen vibrations. There is also a ball bearing inside the support, which ensures that the stand rotates together with the wheel. At the bottom of the steering knuckle there is a ball joint for connection with the lower suspension arm.
To compensate for the forces, there are stretchers with rubber-metal hinges. To install the wheel hub, a double-row thrust bearing is mounted in the steering knuckle. The hub is secured with one bolt. The suspension device also includes a stabilizer; it is connected to the lower suspension arms through struts with rubber hinges.
The design of the rear axle chassis of the VAZ 2109 is much simpler, this is explained by the fact that, unlike a classic rear-wheel drive car, it does not have transmission-related parts. And the load taken by the chassis is much less than that of a truck.
Rear axle chassis parts
Due to the milder operating mode (compared to the rear-wheel drive of previous models), the designers had the opportunity to simplify the design and design of this unit of the VAZ 2109. Thus, in the rear suspension of the chassis there are no stretch marks and parts for transmitting rotational force to the wheels, stabilizers (since their role is played by the beam), this slightly worsened the dynamic parameters of the car, but significantly increased reliability. The diagram of this chassis unit includes:
- Trailing arms;
- Central beam;
- Brackets for fastening the vehicle axle to the side member;
- Hydraulic shock absorbers;
- Springs (pair);
- Flanges for mounting wheels.
Rear axle design
The main element of the rear axle of the chassis of the VAZ 2109 is a beam, which in turn consists of three parts - two trailing arms and a connector. These three units are connected by welding with reinforcing linings. Brackets for installing car shock absorbers and flanges for installing wheel axles are welded onto the arms.
In the front part, hinges are installed with a lever; bolts pass through them to secure the chassis to the hinges mounted on the body side members. The shock absorbers of the rear axle of the VAZ 2109 are hydraulic with added coil springs. In their upper part, through rubber-metal bushings, they are fixed in the parts of the car body.
Replacing CV joints: practical recommendations
On the advice of specialists, the CV joint should be completely replaced. An exception may be anthers or other small elements of this type. In addition to lubrication, all the clamps in the CV joint must also be replaced with new ones, and during assembly, monitor the cleanliness of the work to prevent dirt particles from getting into the hinges.
To install the CV joint in place, it is better to use a hammer and a wooden spacer, watching your movements so that they are not strong and not sharp. Those. Simply place the spacer and tap it until the part snaps into place. If you neglect this and hit the part itself, you will simply damage it.
Once the hinge is in place, its boot is installed. First of all, the clamp is clamped onto the shaft using pliers. In this case, you will need to equalize the pressure in the part; to do this, just use a screwdriver to pick up the edge of the boot and unscrew it. After this, the clamp is clamped from the outside. The plastic plug must be installed at the end of the shaft, not forgetting about it. The remaining steps are performed in the reverse order in the same way as the CV joints were removed before.
Replacing the outer CV joint of a VAZ 2109 may seem complicated and time-consuming, so you can always turn to professionals for help. They encounter such a replacement quite often, so it won’t be too difficult for them.
Replacement of CV joint of VAZ 2109.
The CV joint is one of the simplest devices in a car: it consists of just one ball bearing that rotates transversely to the axis (not lengthwise!). In its shape, the CV joint is externally very similar to a grenade, which is why many car enthusiasts call it that way - “grenade”. The car needs a “grenade” in order to transmit torque to the wheels, which means that breakdown and replacement of this part is not uncommon, especially if your trips are accompanied by knocking, crunching or crackling noises. Let's talk about replacing the CV joint. And in order not to be unfounded, let’s consider this procedure using the example of “nine”.
Repair tool
To independently remove CV joints on a nine or any other car, you need to have the following tool on hand:
- A socket wrench for “30” or a socket with a strong wrench.
- Hammer and chisel.
- Balloon wrench.
- Set of spanners and sockets.
- Penetrating lubricant such as WD-40.
- Capacity of at least 5 liters.
- Marker or metal scriber.
- Jack, support and wheel chocks.
Replacing the VAZ 2109 CV joint: is it necessary?
Having decided to replace the CV joint on your car, do not rush to proceed immediately; perhaps only minor repairs are required.
So, first of all, check the drive shaft play by simply shaking it by hand. Next, inspect the CV joint itself - turning the wheels completely to the right or left, look under the car, paying special attention to the boots. If you find cracks, traces of grease, ruptures or other violations of the integrity of the structure on them, be sure to replace the CV joint covers. After all, if this work is not done in a timely manner, it becomes necessary to replace the entire assembly. If in your case such a need has “ripened”, well, prepare the car.
Instructions for replacing the CV joint on a VAZ 2109 with your own hands.
Preparatory stage of work.
Before starting any repairs that require lifting the front part of the car, the latter must be firmly secured, for which you need to engage the gear, tighten the handbrake, and support the rear wheels with wheel chocks.
Next, in our case, the protective cap is removed, the hub nut is loosened, and then the wheel bolts are unscrewed.
Now that all the preliminary work has been completed, you can safely begin replacing the CV joint according to the instructions below.
Symptoms of a problem
In particular, the breakdown is indicated by:
- the appearance of noise in the front (where the racks are located) when driving;
- a fairly strong vibration is felt in the cabin (it usually occurs if the lubricant dries out or if the bearing is excessively dirty);
- a crunching or metallic grinding sound is heard (element breaking).
To confirm your suspicions, test the node in the following simple way:
- the problematic side is lifted on a jack;
- remove the wheel;
- the disc is scrolled manually.
Its smooth movement indicates serviceability; the presence of the characteristic sound of rolling balls indicates that the bearing has become unusable.
When starting to replace the above-mentioned part, choose one of the methods described in this article that is most suitable for you.
Sequencing.
1. Using a jack, lift the wheel on the side where the CV joint is worn.
2. Unscrew the wheel mounting bolts and remove the hub nut thrust washer.
3. Unscrew a pair of lower ball joint mounting bolts from the steering knuckle.
4. Then turn the steering wheel very strongly towards or away from the direction in which the replacement will take place.
5. Having slightly pulled the steering knuckle with the strut, carefully remove the splined end of the outer CV joint from the hub, and then use a pry bar to push the inner CV joint out (from the gearbox).
6. Secure the drive shaft in a vice and remove the clamps from the CV joints (internal, external). Turn the boot inside out. If there is damage on the latter, then you don’t have to worry about dismantling it and just cut it off with a knife.
7. Now, using a hammer, knock the CV joint off the shaft and install a new one in its place. Then repeat all the previously performed steps in reverse order, not forgetting:
- lubricate the CV joint well before installing it,
- replace the old hub nut with a new one,
- touch the edge of the new hub nut after tightening (to prevent unscrewing),
- install a plastic plug at the end of the shaft.
That's the entire replacement procedure. As you can see, nothing complicated.
I recommend reading:
All-terrain vehicle with VAZ2108 engine
The snow and swamp vehicle was manufactured in 2012.
The all-terrain vehicle "Boar" was built as a full-fledged all-terrain all-wheel drive all-terrain vehicle on low-pressure tires. This is, so to speak, a professionally manufactured all-terrain vehicle for sale. About 250,000 rubles were spent on construction. Another 13,000 was spent on registration and registration. The price of an all-terrain vehicle is not small in the end, but it is much cheaper than buying a ready-made all-terrain vehicle of this class and internal filling.
I registered this way: I first called the organization that certifies such equipment. I prepared photos and videos of the all-terrain vehicle in advance, since it can only be delivered there on a trailer, and for certification they only needed photo and video confirmation. In general, after four hours, after paying 10,000 rubles, I received a document that says that my car can drive on public roads. And the next day I paid for the receipts for registration, insured it with MTPL by presenting documents for the engine, an application and a couple of checks for the components of the all-terrain vehicle. And already with insurance, having presented all the documents, I registered with the State Technical Supervision Authority and received a number.
Now about the design of the all-terrain vehicle. Dry weight turned out to be 1350 kg. Vehicle dimensions: height 2400 mm, length 4300 mm, width 2450 mm, distance between axles 2300 mm, ground clearance 410 mm. Weight distribution on the front axle is 705 kg, on the rear axle 645 kg. The carrying capacity of the all-terrain vehicle is 400 kg. The body frame is welded from a 20*30mm profile. The cladding is made of 1mm thick duralumin sheets. The sheets are secured with aluminum rivets at 5cm intervals; the outside of the body is painted beige.
The inside of the body is covered with sound-insulating material, which also provides thermal insulation. The floor is made of ribbed aluminum. Three doors are homemade; the side ones have locks from VAZ2108 doors. The body and suspension are mounted on a supporting solid frame made of iron sheets 3-4mm thick.
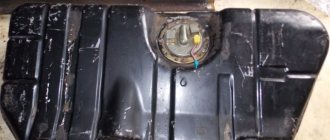
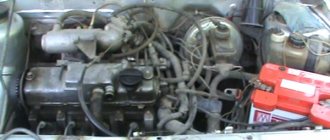
The engine is from a VAZ2108 with a power of 70 l/s, a five-speed gearbox. Transfer case VAZ2121NIVA. Front axle from UAZ469 with differential from GAZ31029. Rear axle from GAZ31029. All-wheel drive with differential locks. Suspension on springs, shock absorbers from UAZ. The brake system with a vacuum booster VAZ2108 is dual-circuit. Power steering, metering pump used from an auto grader, executive cylinder from a GAZ66, pump from a UAZ Hunter. The fuel tank with a capacity of 60 liters is installed under the frame at the rear, with the fuel filler neck on the outside. At the front and rear there are bumpers made of a metal pipe with a diameter of 57 mm, in front there are two towing loops and a socket for a removable electric winch, and in the rear there is a headlight from a UAZ469.
Transfer case on axles, the subframe is bolted to the frame, the transfer case is turned upward and hangs on three pillows
The heating stove is from a Muscovite, the VAZ2105 instrument panel has two temperature gauges, one shows the engine temperature, the other in the radiator. The tachometer, fuel level, charging and oil pressure indicator lights, high beams, turn signals, and transfer case lock lights work.
The all-terrain vehicle has gone through all sorts of mud and swamps quite well, the chassis copes well, nothing breaks, the axles support the load from such wheels - the main thing is not to tear the car and use a reduction gear. Low-pressure tires on the TRECOL all-terrain vehicle, size 1300/600.
Replacement of the VAZ-2109 CV joint. Replacement of external and internal CV joints of VAZ-2109
The VAZ-2109 CV joint is replaced if it is damaged. Excessive wear is noticeable by the fact that an extraneous crunching sound appears when making turns. If the hinges are completely worn out, then even with straight-line movement the sound will remain. To prevent damage, it is worth monitoring the condition of the anthers. They are made of rubber, but are constantly exposed to dirt, water, dust, and therefore can break down within a couple of years. Cracks appear on them, through which dust particles penetrate onto the inner surface of the hinges.
Causes and breakdowns
In reality, the resource of the CV joint turns out to be significantly less, which is caused by operating conditions, poor quality of roads, driving habits and other factors.
The CV joint is popularly called a “grenade,” which is due to the external similarity of the element to this explosive device.
Here's what you should know about grenade malfunctions:
- Practice shows that the most common cause of CV joint failure is dirt, dust, and sand that enter the mechanism through a damaged boot;
- Sometimes the problem of a non-functioning grenade can be solved by replacing the boot. This is possible if the CV joint itself has not yet worn out due to exposure to contamination;
- If the damaged boot is not detected in time, the grenade will be completely worn out within literally 200 kilometers;
- If the CV joint fails, a strong crunching sound appears when cornering and accelerating. Such a symptom indicates the need to urgently replace the CV joint;
- The cost of new grenades is quite affordable; they are available at any auto parts store. But you should purchase those that meet the technical requirements of the VAZ 2109;
- If you have at least a little experience in repairing cars yourself, it is quite possible to replace a grenade with your own hands.
Old and new element
How to remove the drive
The drive of the front wheels is carried out using two axle shafts, at the ends of which there are hinges. They provide equal angular velocity, therefore they are abbreviated as CV joints (constant velocity joint). There are internal and external CV joints. The latter are installed in the front wheel hubs. They fit into the slots and are secured on the outside with a nut. But replacing the VAZ-2109 CV joint must be done correctly, and this is what we need to talk about.
It is best to carry out the work one at a time - first on one side, then on the other. The fact is that both drives cannot be removed from the gearbox at the same time. First, use a 30mm wrench to unscrew the hub nut, having previously unlocked it. To simplify the work, remove the tie rod end, unscrew the ball joint and release the brake hose. By pulling the hub towards you, remove the outer CV joint from the splines. You pull the inner one out of the box, after draining the oil.
Volkswagen Golf Syncro
The all-wheel drive installation of this car has its roots in Togliatti. After all, it was these components that were used to create and assemble all-wheel drive VAZs. These cars were called "Victoria". But, unfortunately, they did not go further than prototypes. To assemble an SUV yourself according to this scheme, you will need:
- Angular reducer;
- Rear axle gearbox;
- Viscous coupling;
- 4 axle shafts (VAZ).
This is enough to assemble a fully functional off-road vehicle. A feature of this type of transmission will be the transmission of force to the rear wheels through a viscous coupling. It works as follows. The coupling contains silicone fluid. As the load on the rear wheels increases, it heats up, its viscosity increases, and more torque is transmitted to them. Therefore, despite permanent all-wheel drive, the torque supplied to the wheels will vary depending on conditions.
To attach the rear axle shafts you will have to find a subframe from Golf Syncro. The cardan transmission is assembled from two axle shafts. From the box, torque is transmitted using an angular gearbox; it transmits force to the rear wheels through a viscous coupling. To attach these elements you will have to use a special plate. It should be done by an experienced turner. Perhaps this is the only thing that cannot be done in a simple garage. This plate is secured with bolts. You should also make a suspension for a homemade cardan. You can use the standard one from the classics.
How to remove the outer hinge
If you plan to replace the internal CV joint of the VAZ-2109, then you only need to leave the axle shaft. But if you only need to change the external one, then it is enough to remove only it. To do this you need to get rid of the anther. Since installing a new hinge involves replacing the anthers and lubricant, you can simply cut the old one with scissors. It won't get any worse, especially if it has cracks and damage.
Now, holding the drive axle shaft in a vice and lowering the outer hinge down, you need to strike it with a hammer. If you are planning only cleaning and the CV joint will be put back, then you need to use a piece of board so as not to damage the surface of the hinge. The fact is that the axle shaft is attached to the CV joint using a ring that expands inside and holds it in this position. Only a sharp and strong blow can knock down the hinge.
How to remove the inner CV joint
In essence, you do exactly the same as in the previous case. Apply several sharp blows with a hammer, only now on the inner CV joint. Attaching the axle shaft to the hinge is exactly the same, but follow the basic requirement - try not to damage it if you plan to put it back. Quite rarely, this element fails, so replacing the internal CV joint of the VAZ-2109 is done infrequently. Much more often, new boots are installed, but this will be discussed below.
How to replace anthers
There is nothing complicated about this, but it is worth noting that if you drove a car with a torn boot, then dirt got under it. It mixed with lubricant, resulting in a very strong abrasive that can wear away metal. The result is an increase in gaps and the appearance of a terrible crunch. On a VAZ-2109 car, the CV joint boot is replaced much more often than the joints themselves. But, due to the specific design, it is necessary to completely remove and disassemble the drive.
Fortunately, you only need to remove the outer CV joint to change both boots. But fresh rubber is very hard, putting it on the axle shaft will be problematic. Before replacing the boots, be sure to wash the hinges and press new grease into them - this will increase their service life. By the way, the drive repair kit includes CV joint, lubricant, boot and clamps. The latter need to be mentioned separately - it is not always possible to use the worm type, since the adjusting bolt can cling to the gearbox or hub.
Signs of wear or damage to the undercarriage
Leaks under the car in the area where suspension parts are located. Vehicles of the VAZ 2109 model, as a rule, already have a long service life (and the design of the hydraulic cylinders is designed for a certain resource, which they may have exhausted long ago)
There is a high probability that the oil seal or shock absorber rod mirror may wear out, so pay attention to possible leakage of hydraulic fluid (in principle, you need to be careful about any leaks from the car);
Knocking when driving, yawping along the road is the most common sign of a malfunction. As a rule, this indicates wear or loosening of the components; carefully inspect the suspension, or best of all, contact a workshop;
When acting on the suspension (try pressing on the hood or, conversely, lifting your car, experienced auto mechanics, when first getting acquainted with passenger cars, not only the VAZ 2109, roughly assess the condition of the chassis), the suspension does not provide sufficient resistance - the first sign of malfunction hydraulic cylinders
There can be many reasons - insufficient amount of fluid, leakage due to wear of the seals, fluoroplastic bushing, wear of the rod, malfunction of the valve mechanism. It is necessary to replace worn parts, replenish the oil in the cylinders, or eliminate the malfunction of the valve mechanism;
When driving (especially on uneven roads), hard shocks with a characteristic sound occasionally appear, which can even be felt on the steering (the so-called “breakdown” of the suspension). The appearance of this symptom indicates that the springs (most often the rear chassis) have lost their properties due to metal fatigue; hydraulic shock absorbers may also not work properly. In any case, it is necessary to inspect the structure of your suspension and make repairs.
We have not yet mentioned the uneven wear of tires - if your wheels are adjusted for wheel alignment and balanced, and the CV joints (since the VAZ 2109 is assembled according to the front-wheel drive scheme) work correctly, then the reason is the chassis, there is a breakdown somewhere, unnecessary backlash or wear.
In conclusion, it should be noted that although the chassis of the VAZ 2109 is not subject to such overloads as a similar truck unit, its design is still quite complex and requires constant attention; fortunately, the suspension design allows for maintenance and repair without large material costs.