Sound insulation and vibration insulation of a car are very important for getting rid of acoustic discomfort. Constant noise, both airborne and structural, interferes with good acoustics, does not allow you to hear your interlocutor well, quickly tires you, that is, deprives the trip of any comfort. Noises penetrate the cabin from everywhere: through the doors, underbody, engine compartment, roof, trunk. Noise and vibration insulation not only absorb vibration and prevent outside noise from entering the car interior, but also act as insulation, preventing cold from penetrating inside and keeping heat out of the car. Even foreign cars, not to mention domestic cars, including VAZ, need sound insulation (or “Shumka”).
Soundproofing a VAZ 2115 with your own hands is a fairly simple procedure, for which you will need material, a spacious room, time and, of course, knowledge. It is best to completely soundproof the car, but if you decide to do only certain sections, the result will certainly make itself felt.
As a rule, the fight to reduce noise in the cabin begins with the doors. Next, the engine compartment is soundproofed to eliminate the noise of a running engine. Soundproofing the hood of the VAZ 2115 will enhance this effect and inside the cabin, the engine at idle speed will be completely silent. The most complete sound insulation is achieved by laying vibration and noise insulating materials on the bottom, wheel arches and trunk.
Today, manufacturers of not only budget cars for some reason ignore vibration and sound insulation of the roof. There are several simple tricks to check whether your car has sound insulation or vibration insulation in the ceiling. A lack of sound insulation can be recognized if a hum and rattling is heard from the ceiling while driving, or music is hard to hear during rain. In winter, if the snow on the roof of a running car melts, there is no sound insulation or does not provide the desired effect.
Soundproofing the ceiling is the simplest procedure, which is easiest to do yourself.
Before you start soundproofing your roof, you need to buy:
- vibroplast (3 sheets 2 mm thick, good quality, for example, Noico),
- splen (2 sheets 4 mm thick).
The work to replace the sound insulation of the VAZ 2115 ceiling takes place in several stages
- Remove the trim, visors, handles, and lampshade in order to provide access to the iron base of the ceiling.
- Degrease the ceiling with white spirit.
- Proceed with vibration isolation, preferably with outside help, since it will not be very convenient to do it alone.
- The process consists of cutting off the required piece of vibroplast and removing the protective film. Afterwards, the pieces of vibroplast are applied to the ceiling and carefully rolled out with a roller for more reliable gluing.
- Apply splen on the layer of vibroplast, glue it and also roll it out with a roller. If everything is done carefully and thoughtfully, one sheet will be enough for the entire ceiling.
- Then, upon completion of the vibration and noise insulation work, everything is assembled in the reverse order and secured in place.
But soundproofing the floor of the VAZ 2115, in contrast to soundproofing the ceiling, is one of the most difficult procedures. Firstly, everything that is in the cabin must be dismantled, and secondly, there are a lot of different shaped elements for which it is necessary to prepare patterns for patterns.
Try to protect yourself from noise and you will certainly feel how much more comfortable it has become in your car. Quiet music, a calm conversation with your interlocutor will bring pleasure, and rain knocking on the roof will no longer irritate you while driving.
Domestic cars cope well with imperfect road surfaces and are affordable, but sometimes suffer from engineering flaws. Among the significant problems is the low efficiency of the standard sound insulation of the VAZ 2115. The result: increased noise in the cabin and discomfort when driving. Solving the problem yourself will not be difficult, unlike professional dry cleaning of the interior, if you choose the right materials and follow the instructions below.
Content
Do-it-yourself noise insulation
The soundproofing of the floor will consist of two layers:
— We put a vibration filter as the first layer. For better adhesion to the metal, before installation, heat the adhesive layer with a hairdryer. Next, we try to cover the entire floor with vibration protection, leaving no areas with exposed metal. Using a roller, we smooth the material, preventing the formation of air bubbles, which could cause the vibration filter to peel off;
— the second layer of glue is a sound insulator. The technical process is similar to installing vibration isolation. Apply sound insulation with glue to the vibration filter in an overlapping manner, also heating it with a hairdryer and rolling it out with a roller. Please note that the wires running along the floor of the car must be routed over the new sound insulation, otherwise it will be difficult to reach them in the future. At this point, the installation of new sound insulation is considered complete.
Sources of noise and solutions
Before starting soundproofing work, it is important to determine the source of the noise. There are 3 of them in total:
- External - the sound of cars passing by, road stones and raindrops. Soundproofing of the ceiling, floor, doors and other body elements will be required.
- Internal - creaking of the steering column, rattling of the dashboard and door handles. Remedy: lubricate the working mechanisms, strengthen the dashboard fixing bolts.
- Technical - hum in the engine compartment, vibration and knocking of the driveshaft, creaking wheels. The solution comes down to repairing problem areas.
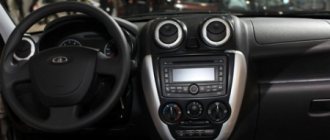
Dashboard VAZ 2114
Cars of the Samara 2 family are equipped with a modern VAZ 2114 instrument panel, which is also called the “European panel”. The designers worked on it so that it allows for good forward visibility, a pleasant appearance, combines information content and ergonomics, and at the same time helps the driver cope with ordinary everyday needs. And they mostly succeeded. A block of instruments and sensors installed in front of the driver’s eyes, behind the steering wheel, provides him with the maximum possible amount of information:
- In the central part there are two dial instruments, on the left there is an engine speed indicator, by which the driver determines what load the power plant is working with at a particular moment and, if necessary, corrects this process by switching speeds; in the window under the arrow there is a digital clock. On the right is a speedometer or an indicator of the current speed of the car, in the window under the arrow there are digital readings of the kilometers traveled for the entire period of operation of the car and for the last trip;
- In the upper part, between the dial instruments, there is a turn signal indicator lamp with green arrows pointing left and right;
- In the lower central part there is a red “stop signal” triangle, and below it CHECK ENGINE is a red signal for engine emergency conditions according to information from the electronic on-board unit;
- In the left middle part of the instrument block there is a dial gauge for the engine temperature, or as it is called in the literature, a coolant temperature sensor, above it there is an icon that lights up when the engine overheats. Below it are icons for the throttle, oil pressure, handbrake and battery;
- In the right middle part there is a dial indicator for the presence of fuel in the fuel tank, above it is an icon for a fully filled tank, below it is an icon for the minimum amount of fuel in the tank, as well as icons for low beam, low brake fluid level and high beam.
Ergonomics is ensured by the convenient arrangement of instruments and information icons for visual perception of information, as well as keys, buttons and levers for manipulating them. A standard on-board computer is installed in the central part of the panel, usually a Gamma, Multitronics, Prestige or State computer. The location for its installation was chosen very well and with its help the driver receives expanded information about the state of the operating engine systems and vehicle components.
This information is reflected not only on the BC display, but is also transmitted through other control or information lamps and signs located on the instrument cluster and in other places on the dashboard. In addition, the on-board computer display displays other information, for example about the timing of the next inspection or maintenance.
The glove box, which can be closed, is conveniently located and has a backlight and a fairly large niche underneath it. The central beard also has a niche for storing something and an ashtray. The air duct outlets are quite well made, allowing for efficient glass blowing and preventing fogging.
During the operation of a car, problems constantly arise with malfunctions or failures in various systems. In order to get to some of them, it is necessary to remove the VAZ 2114 panel. Even to remove the instrument panel, you need to figure out how to remove the dashboard on the VAZ 2114 (instrument panel).
In addition, on the VAZ 2114 the panel must be removed completely if there is a need to repair air ducts and the stove, or the car owner wants to completely glue and seal the joints of the panel structure so that it does not creak.
Preparatory procedures
Soundproofing work to reduce the noise level in the interior of the VAZ 2115 is reduced to 3 stages. First, the sequence of areas for sound insulation is determined. Then the necessary tools and materials are selected. Then they begin to “make noise” of the body.
Regardless of the sequence of sound insulation, a complete disassembly of the interior will be required. Drive the car to a garage or other place with sufficient space for work. Remove all seats, remove the central tunnel, visors, dashboard air ducts, steering casing and belt fixing elements. Next, the instrument panel and steering wheel are disconnected. The last step will be to dismantle the standard sound insulation of the doors, ceiling and floor. Upon completion of the disassembly, clean the interior from dirt and dust, and treat traces of paint with a solvent.
Trunk trim
One of the last stages is the trunk trim. The material for the trim is usually chosen according to the taste of the car owner. However, the following materials are most often used for reupholstery:
According to most car enthusiasts, carpet is the most acceptable because it is cheap, durable, and also looks good.
The trunk can be reupholstered in several ways:
Using a furniture stapler. This method is a quick way to line the trunk. To cover it, you will need to stretch the fabric and secure it with staples on the back side of the part.
Using glue. For cladding using this method, it is advisable to use special furniture glue. To reupholster using this method, you need to apply glue to the structure and wait until it dries a little. Then you need to apply the material and level it using a rubber roller and spatula.
Regardless of whether glue or a furniture stapler is used, each part is sheathed individually.
Materials and tools
The key point is to select the optimal soundproofing material. There are ready-made kits for shielding external noise. However, all of them are modified and more expensive versions of scrap materials. For example, bitoplast is a recycled foam rubber that is perfect for soundproofing doors and ceilings. For thermal insulation, it is better to choose isolon sheets (5 mm thick and 1 m2 in area). A vibration absorber - vibroplast - will help reduce vibration of the dashboard and doors. You will need 6 sheets of 90x40 cm.
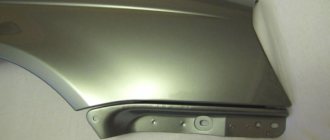
Soundproofing VAZ 2115: hood
The hood cover shields the noise of the engine compartment and is processed quite simply: Measure the parameters of the cover and prepare a cardboard sample (pattern). Using the patterns, cut out the vibration and sound insulation material.
Warm up the vibroplast with a hairdryer and apply to the cleaned and degreased surface of the lid. Cover the vibroplast with a layer of foil and cover it with a heat-insulating sheet, including the end sections.
If desired, glue factory sound insulation over the finished layer.
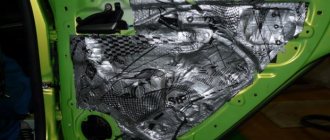
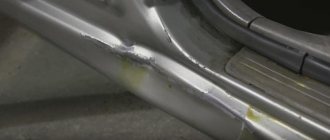
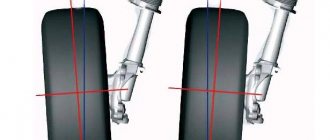
Door processing
After thorough cleaning, the door frame is covered with a vibration absorber. Consider ventilation and drainage openings to avoid moisture accumulation, which will render the soundproofing components unusable.
Wrap mechanical parts and wiring with anti-squeak madeleine to reduce friction and shaking. Seal the cracks with sealant.
Apply a layer of vibration material and cover it with soundproofing sheets on top.
Cover the finished layer with a decorative coating or old sheathing.
Soundproofing the doors will protect against external noise and increase the sound of the interior acoustic systems.
Trunk soundproofing
The procedure is identical to processing the hood:
Remove the old upholstery.
Clean the underbody and inner wheel arches.
After installing the vibroplast, apply bitoplast or other noise-absorbing material.
Recommendations. The area of the wheel arches and the bottom of the trunk should be shielded with 2 layers of vibration absorber. The measure is relevant when using powerful speakers, subwoofers and other acoustic systems.
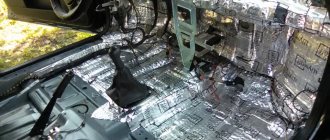
Floor treatment
Once the seats and center console are removed, the floor mats are removed and the area is thoroughly cleaned, begin soundproofing the floor.
Remove old coating.
If metal areas are oxidized, wipe the surface with white alcohol, then apply paint. After drying, apply the vibration material in 2 layers, leaving the areas of the mounting bolts open.
Then insulate the floor with sound absorber.
Reassemble the seats and console in reverse order.
When the floor treatment is completed, they begin to rustle the ceiling.
Ceiling treatment
Remove the old trim by removing material from the trunk or front passenger compartment.
Install a heated vibration damper (vibroplast) and roll the surface with a roller.
Cover the top of the ceiling with any soundproofing layer.
Finally, insulate the sound insulation with a decorative coating.
Dashboard
The most labor-intensive stage of soundproofing the interior of a VAZ 2115. After dismantling the dashboard, mark the fastening points and screw the bolts back in, remember or schematically write down the location of the pads.
Remove traces of dirt, dust and degrease the inner surface.
Glue the walls of the dashboard with a layer of vibroplast.
Disconnect the hoses and electrical wiring of the stove, then remove the heating element.
The stove installation area is hermetically sealed with a heat-insulating coating.
Next, apply sound insulation overlapping.
Install the stove, connect the electrical wiring and hoses.
How to remove carpet on a car floor?
Well, if you wait, I’ll post it from Elsa. In general, from experience, if you carefully pry everything off, you won’t break anything. If you first pull the panel back a little, you can often see where it hangs. But in Elsa there is no information in one place - there is a different layout for each (almost) panel, it will take time, but it’s already night, and tomorrow is a holiday...))). It may be enough to remove the front seat, just don’t forget about the wiring. Or do you want to take everything off? - this is a hemorrhoid, the carpet is solid...
Well, here's something: -Removing and installing the floor lining on the driver's side:
– Turn off the ignition.
– Remove two screws -1- (1.5 Nm). – Remove the trim from the mountings and disconnect the wiring harness from the footwell lighting. – Press the two latches -arrows- and remove the diagnostic connector from the trim.
001npv.jpg
Removing and installing sill trims – Remove the side supports: - vehicles with rear side airbags → Chapter. — vehicles without rear side airbags → Chapter Sedan – Remove the wheel arch trim → Chapter. Variant – Remove wheel arch trim → Chapter. All vehicles – Detach the door sill trim from the front part of the sill and the door seal surround. – Release the guide -1- from the lower trim of the B-pillar. – Detach the sill trim from the rear part of the sill and the door seal surround. – Release the guide -2- from the lower trim of the B-pillar. – Move the tongue -3- to the side and remove the seat belt. NoteBefore installation, check the integrity of the fastening brackets. Replace damaged staples.
002por.jpg
Removing and installing wheel arch trim, station wagon: – Fold the rear seat cushion forward. – Remove side support: t vehicles with rear side airbags → Chapter. t vehicles without rear side airbags → Chapter – Remove screw -1- (1.5 Nm). – Detach the bracket -2- from the body flange. – Remove trim -3- from door seal edge -4-. – Remove the trim from the mountings in the sill trim -5-. – Pull out the trim in the direction of travel under the C-pillar trim -6-.
003ar.jpg
Removing and installing lower A-pillar trim on the driver's side Remove the sill trim in the transition area to the lower part of the A-pillar trim → Chapter. – Remove the side covers of the front panel → Chapter. – Remove center trim of A-pillar → Chapter.
– Remove the hood release handle -1- → External fittings; Repair group55. – Remove clip -2-. – Detach the trim from the body -arrow A-. – Remove the trim from the edge of the door seal. – Move in direction -arrow B- to remove trim from mounting. Note: Before assembly, check the condition of the clips -2- and replace any damaged ones.
004va.jpg
Removing and installing the B-pillar lower trim Removal – On vehicles with an interior security sensor, turn off the ignition. – Remove the sill trim → Chapter. – Remove upper trim of B pillar → Chapter.
– Unscrew the two screws -1- (4 Nm). – Remove the trim -3- from the edge of the door seal. – Remove the trim in the area of the guide -2- from the mountings in the body. – On vehicles with an interior monitoring sensor, disconnect the wiring harness from the sensor.
005vb.jpg
Well, it’s clear from the seat:
006sv.jpg
Well, won't it help? Personally, I would limit myself to removing the front seat and clean it directly in the car. It is best, of course, to clean the steam generator using chemicals, a brush and a vacuum cleaner. You can use perchlorethylene, but you need a friend from the dry cleaner and chemical protection during work... And the most harmless way is to take LOC from Amway, a stiff brush and walk it three times and dry it... Resuscitator of the site and forum. Register and take part in discussions.
Necessity of execution
Is the notorious sound insulation really necessary? Now let’s figure it out:
- In most domestic cars it is simply absent, and if present, it is only in places and the quality leaves much more to be desired
- There are rumors that there is a need for it only if you equip the car with speakers with a subwoofer (see Connection diagram for a subwoofer and speakers: its features), of course, the sound of music is significantly improved
- However, in addition to this, sounds, creaks and extraneous noises subside, which makes it possible to talk, and not yell, as before
- Today it is known that increased noise affects the nervous system and constricts blood vessels, causing stress on the heart and angina pectoris.
- And everyone wants comfort, like in the interior of an expensive foreign car.
- Therefore, my answer is unequivocal - of course it is necessary!
Car carpet replacement
Replacing car carpet is not so easy. The product must follow the shape of the car floor, which has many protrusions and depressions. If you decide to make a car carpet with your own hands, then you need to be patient.
To make car carpet you will need the material itself, a tool for cutting it, a powerful sewing machine, an overlocker, adhesive and a hair dryer.
First of all, you need to dismantle the old flooring. To do this, you must first remove the seats and all removable parts located in the cabin. Old flooring must be removed in such a way as to preserve its integrity as much as possible. We will need it when creating the pattern.
The pre-prepared car carpet must be laid out on a flat surface. An old car carpet or pattern is laid on it. All contours of the pattern need to be traced. This is the most important stage of the work. Once the material is cut, it will be extremely difficult to fix anything. Using a cutting tool, you need to cut out the new floor covering along the contour.
After the material is cut along the contour, it is necessary to make holes for fastenings for seats, gearboxes, etc. In those places where the product will lie curved, it is necessary to make trimming.
All that remains is to thread the edges of the product and sew the parts. You should try to hide the seam as much as possible under synthetic pile. The final result largely depends on what material was chosen.
The next step is laying the product. All holes must be aligned. After installation, the car carpet should be slightly wetted and stretched. In this case, all folds formed during installation should be smoothed out.
To smooth out wrinkles formed on the material in the manufacture of which polymers were used, it can be slightly heated. It is better if the product dries in a stretched state. Therefore, it is advisable to dismantle it and fix it in a tense state until it dries completely. Then, perform final installation using a special adhesive for fixation.
Related article: Making a curtain for a doorway with your own hands: master class
You can also make several car mats that will decorate the interior of the car. To make them, you should take thick material. First of all, we make a paper pattern. Then, we transfer it to the car carpet and cut out the product along the contours. We process the edges using an overlocker. You can trim them with a leather border. This is where the making of car mats with your own hands ends.
Where to begin
You should start by choosing the scope of work:
- Completely soundproofing a car with your own hands in one step is difficult, financially expensive, and takes a lot of time - about a week
- Therefore, you can start gradually, in parts, with breaks.
- For the first training, choose the hood or trunk, then you can start processing the interior, again, you can do it in parts
- For example, first make noise on the floor, another time on the ceiling, on the third approach on the doors and finally on the dashboard
- The final step would be to treat the outer arches and the bottom of the car
After selecting the scope of work, select the necessary tool and place for the operation:
- If performing outdoors, as shown in many photo reports, it is better to have a fenced area, otherwise passers-by will steal tools and materials
- The set of tools is standard for any processing area - solvent or alcohol; cotton gloves; roulette; shoemaker's knife; ruler; scissors; clean rags; construction hair dryer; hard roller for rolling material; sets of keys and screwdrivers
Sound insulation of the hood
And so, let’s start with the easiest section, and at the same time practice:
- If you purchased sheet material, then you need cardboard to cut patterns from it
- Then, using these patterns, cut out the material, after which you can glue
Attention: The surfaces must first be washed and degreased, only then the material must be glued.
- The trunk lid is processed in the same way
They start with vibration isolation, it is glued in the space between the stiffeners
- If you purchased a ready-made kit for hood soundproofing, then all you have to do is stick them on
- Heat the vibration damper (it is the first layer) with a heat gun, apply it, and roll it with a roller to the treated area between the stiffening ribs
- Then noise insulation is applied, also known as thermal insulation (a foil layer is required)
- Adheres to the entire surface, including the ribs
- Standard Shumka can be glued with a third layer
Tip: When you don’t have a hair dryer at hand, you can warm up the engine, with the hood closed, the hood will become hot, you can apply vibrating material to it, be careful not to get burned.
Soundproofing doors
We start by applying vibration insulation to the panel
Vesta raised floor in the trunk
The luggage compartment of the Lada Vesta in the SV Cross configuration has a raised floor (removable floor). It consists of two panels that are interchangeable with each other. If you fold down the rear seats and create a flat floor, you can use raised floor panels on the rear and front sides.
Under the raised floor there are two interchangeable organizers, as shown in the picture. The volume of the luggage compartment can be increased to transport large cargo. To do this, the organizer frames are installed on top of the raised floor.
Raised floor panels cannot be used without the support of the organizer, otherwise they may be damaged.
If the panel is installed at an angle, it is prohibited to drive the vehicle. This may damage the panel. When installing or removing the removable trunk floor, be careful not to injure yourself.
Self-production
After buying a car, you want everything in it to be convenient and comfortable. But this car only has a double floor in the luggage compartment in the Luxury version. Making a raised floor with your own hands is not difficult. Stock up on patience, materials and tools. After this, the trunk of your Lada Vesta will be fully equipped.
It can also be ordered as an additional option at the dealership. But it will cost 12-15 thousand rubles. Therefore, it is more rational to do everything yourself.
You will need plywood 10 mm thick, a board 6 m long, 8 cm wide and 20 mm thick. Almost the entire length of the board is used for the entire frame. You also need to buy carpet from a fabric store - a material for interior trim of the body. To do this, you need a piece 1.5 m wide and 2 m long. In addition, you will need staples for a stapler measuring 8 mm. The money spent on materials costs approximately 1,500 rubles.
The most important thing is to do everything according to size:
- First, make 2 frame frames 900x440 mm from a prepared board 80 mm wide. Fasten the parts with self-tapping screws.
- Cut out the false floor itself from plywood according to the drawing, also 2 pieces.
After this, all that remains is to try everything on in place, then carefully cover it with carpet. You can use different glue, for example, “Moment” or No. 88. You should end up with something similar to what is shown in the photo below. The first photo shows frames covered with carpet. You can make the number of partitions at your discretion, depending on what you will put in these compartments.
Here you see two parts of the raised floor itself, also covered with black carpet. You can also make holes in them at your discretion: round, oval, rectangular. They serve for ease of grip by hand. It is better to cover the holes with suitable furniture fittings so that their edges are closed.