Correct wheel alignment or wheel alignment is the key to ensuring that your car will handle you perfectly on the road in almost any conditions. But a novice car enthusiast most likely does not know what this parameter is, which also needs to be adjusted correctly. In the article below we will give an answer to this question, and at the same time we will find out why the wheel alignment is still disturbed, and what signs can be used to determine that it is time to go to a service center to have it adjusted. And at the same time, we’ll figure out how to perform a wheel alignment yourself, without the help of third-party specialists.
When and why do you need it
Manufacturers recommend that owners of foreign cars carry out the procedure every 30,000 km, and owners of domestic cars - every 15,000 km. The period may be reduced if the car is operated in difficult conditions and often drives on bad roads. In some cases, an unscheduled procedure may be required:
- if the disc is crushed when entering a hole at high speed;
- if the chassis was repaired;
- if shortened springs were installed on the car or the ground clearance was changed for other reasons, auto buffers were installed;
- if when driving you clearly feel the car “pulling” to the side;
- if the tires begin to wear out much faster;
- if the steering wheel does not return well after negotiating a turn.
What will you get from the wheel alignment results?
- The directional stability of the car will improve. When driving in a straight line, the vehicle will move only forward, without moving to the side.
- The car will become more maneuverable, strong drifts will disappear, and control will be simplified.
- Fuel consumption will be reduced and tire service life will increase.
Depending on the purpose, one or another type of wheel camber can be selected
Instructions on how to perform the operation yourself
Do-it-yourself car seat reupholstery step-by-step instructions
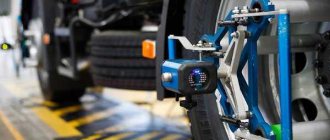
Wheel alignment adjustment stand
To carry out the operation you will need the following tools and components:
- standard set of motorist tools;
- a flat concrete platform, preferably with an inspection hole;
- plumb cord;
- ruler;
- chalk.
First, set the wheels to the straight position. We adjust the steering wheel by standing on the side of the car and watching the wheels. We make chalk marks on the top and bottom of the wheel along the diameter.
Next, we take a plumb line and apply it to the wing, measuring the distance from the top and bottom edges of the disk to the place where the plumb line is applied.
The difference between the distance values should be equal to plus/minus 3 mm.
After this, you will need to roll the car forward a little so that the chalk marks rotate 90 degrees. We repeat the measurement again, in the same way as before.
The video explains what wheel alignment is and how adjustment occurs:
This repeated procedure is carried out for the purpose of purity of measurement, because neither the wing, nor the platform, nor the wheel itself can be considered an ideally level reference point.
After this you will need to remove the wheel. And then loosen the bolts securing the steering knuckle bracket and shock absorber. The steering knuckle then needs to be moved outward or inward by the distance that we obtained during the measurement process.
After which we put the wheel and bracket in place.
This procedure will help you set the wheel camber angle correctly. And even here errors are allowed, but they should be as follows:
- for rear-wheel drive cars +1…+3 mm;
- for front-wheel drive models −1…+1 mm.
Wheel toe angle and its adjustment
Wheel alignment is also carried out by adjusting the wheel toe. To do this, use a special telescopic ruler. Again, you need to work on a perfectly flat area and set the wheels in the “straight” direction.
Now on the inside of the tire, closer to the disk, we put chalk marks. We install the ruler in such a way that it does not touch any parts of the suspension, body, etc., but rests its ends against the marks. Then we fix the ruler. In this case, “0” will need to be compared with a fixed scale pointer.
Video - how to do wheel alignment correctly:
We roll the car forward a little, and the ruler moves back, again without touching any parts. We check the readings. If the distance between the wheels has become smaller, you need to shorten the steering rods. If it becomes larger, the steering rods need to be lengthened. The length of the rods is adjusted using a special coupling.
The adjustment carried out in this way will allow you to safely get to the nearest car service center.
What is better - manual or computer adjustment?
This question worries every novice motorist, and I can’t count how many disputes there are in garages and services on this topic! After consulting with experts, we answer it. So, manual adjustment is much better and more accurate. The fact is that the stand will provide the opportunity to get the ideal option only if it is perfectly adjusted and configured itself. And this is not so easy to do. Thus, adjusting wheel alignment by hand will be faster, more efficient and more reliable than using a computer.
Computer or manual wheel alignment
However, if you do not want to do it yourself, then it is important to find a good specialist in this field with extensive experience and good recommendations.
Adjusting camber and toe without visiting a car service center
Preparation
Do-it-yourself flocking of the car interior, step-by-step instructions
Prepare the following items:
- telescopic ruler for checking wheel alignment;
- chalk;
- cord with a plumb line;
- standard set of motorist keys.
Ruler for measuring toe. Once upon a time, every car was equipped with it
Work should be carried out on a site without uneven surfaces. It is advisable that there is a lift on it, but a pit will do.
First you need to determine how accurate the existing wheel alignment indicator is. To do this, we put the car on a flat area, turn the steering wheel in one direction until it hits an obstacle, and make a chalk mark in the middle of it. Then we rotate the steering wheel in the opposite direction (also as much as possible), counting the number of revolutions and circles required for this. Divide the result by 2 and turn the steering wheel back to the resulting number of revolutions. If, as a result, the steering wheel is set to your usual position, everything is in order. If not, you will have to start adjusting the rack.
Adjusting the steering rack yourself
- Remove the steering wheel by unscrewing the nut.
- Fix the control element in the previously determined optimal position.
- Locate the nuts on the tie rod ends and loosen them. Unscrew one of them a little, counting the number of revolutions needed for this. Then tighten the second nut the same number of turns.
That's it, the car is ready for wheel alignment adjustment.
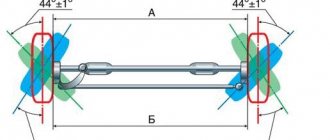
Toe-in (with diagram)
- The car must be parked on a level surface. The wheels are pointing forward. It is best to do the work in a pit.
- Place a mark on the inside of the left and right wheels - they should be located next to the discs.
- Create a pre-tension in the ruler. Place it between the wheels so that the measuring device rests on the marks, but does not touch other parts of the car.
- Shake the ruler. Align the pointer with the division “0” (zero).
- Leaving the ruler on the wheels, roll the car forward a little. The measuring device must turn together with the wheels without contacting the body and suspension elements.
- Look at the line. Have the readings changed? If not or have changed slightly (up to 1 division), then the toe-in is fine. If the difference is greater, adjustment is needed.
- Loosen the locknuts on the tie rods. Turn the clutch to change the length of the pull.
- Tighten the locknut and take the reading again. Repeat until you get the desired result (i.e. zero to ±1).
Rotate the locknut to set optimal toe-in
Collapse: tips for doing it yourself
This process is more difficult than adjusting toe.
- Raise the car so that its wheels do not touch the ground.
- Set the wheels to straight driving position.
- Use chalk to mark the highest and lowest parts of the wheel rim.
- Place a cord with a weight on the wing so that it and your marks are located in the same plane. Measure the distance from the cord to each mark (you need to measure the distance from the cord to the disk, i.e., be guided by the bottom of the mark). Write down the result.
- Roll the car forward a little so that the wheels turn 90 degrees. Make new marks at the top and bottom, repeat the procedure with the weight and ruler. Write down the result again.
So you need to measure the distance from the wheel to the cord with a plumb line
The difference in the distances between the cord of each of the marks should be ± 1 mm for cars with front-wheel drive and ± 3 mm for cars with rear-wheel drive. If this is so, everything is in order with the collapse. If not, follow these steps.
- Raise the car with a jack. Remove the wheel. Remove the 2 bolts that attach the shock absorber bracket to the steering knuckle.
- There is a special bolt on the steering knuckle. When you turn it, the part will move inward or outward. Your task at this stage is to place the fist in such a way that the wheels are in the correct position.
- Tighten the bolts and put the wheel in place. Roll the car forward a couple of meters. Hang the cord again and measure the distance from it to the marks. If the distance returns to normal, you have successfully adjusted the camber. If not, remove the wheel and repeat the steps with the steering knuckle until victory.
Video: How to check and adjust wheel alignment on a VAZ 2110
The main thing that is required for independent wheel alignment is accuracy and precision. Carefully monitor each indicator; the success of the entire work depends on the correctness of the measurements.
Symptom 8: The steering wheel does not return after turning
This is another non-obvious sign of incorrect wheel alignment. The steering wheel may not return to “zero” after turning due to incorrect alignment of the wheels - it will be more difficult for them to turn to a straight position, which is why the steering wheel will remain in place, and you will have to turn it yourself.
Other possible causes of the problem:
- low fluid level in the power steering reservoir;
- overtightened steering rack;
- defective steering rack parts.
What to do: look at the fluid level in the power steering reservoir - if it is low, add more. Check the steering rack: if the steering wheel begins to turn tighter, it is overtightened and can be loosened a little, but so that there is no large play. Check the condition of the steering rack at a service station. If everything is in order, adjust the position of the wheels - your wheel alignment is broken.
Must-know information
Optical stand for wheel alignment adjustment
If you suddenly find yourself in a distant locality where there is no car service, and a breakdown occurs, do not despair. Even if you need to replace the shock absorber yourself or repair the suspension, after which you must carry out wheel alignment, using these instructions, you can do everything yourself.
First of all, you will need to find some kind of garage. For example, the premises of a former state farm would be suitable, where, however, you cannot find a stand, but you can find a ruler, albeit an ancient one, for adjusting the toe angle.
What is it for
Before performing an operation, you should know why it is necessary. Is it not possible, without adjusting the angle, to get to the nearest city, where experienced craftsmen will get down to business at a car service center? It turns out that everything is not so simple. You can get there, but how? Improper camber will lead to the fact that even a few kilometers of driving can lead to baldness of the tread on one wheel. In addition, driving such a car is very difficult and dangerous.
What is positive and negative wheel alignment?
Parameters that every driver must know
What is collapse? Not every motorist, even those who have traveled many kilometers, knows this. By the way, wheel camber is the angle located across the plane of rotation and the vertical of the wheel. If this angle is less than the normal value, the wheel will be directed inward to the vertical of the upper part. If the angle is greater, the wheel will look outward, relative to the vertical.
As for wheel toe, it is called the angle between the plane of rotation of the wheel and the direction of movement. This angle is measured in degrees or millimeters.
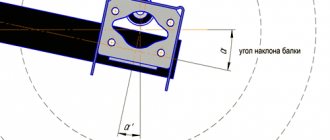
Transverse and longitudinal angle
In addition to the parameters described above, the driver should also be aware of the different axle angles.
Thus, the transverse angle of inclination is the value that is measured between the projection of the steering axis relative to the vertical of the transverse plane of the wheel.
On the contrary, the longitudinal angle of the axle is the value that is between the vertical and the projection of the wheel's turning axis on the longitudinal plane. This angle is also called caster, and it should be equal to 6 degrees. And after proper adjustment, the caster will ensure self-alignment of the wheels due to speed.
Axle angle (caster)
There are longitudinal angles of inclination of the rotation axis. They are adjustable. They can change the value under the influence of the weight of the cargo in the trunk of the vehicle. The tolerance for the left and right sides cannot exceed 0°15′-0°40′.
There are also transverse angles of inclination of the rotation axis. They are unregulated.
Usually, when they talk about the angle of an axle at a tire shop, they mean the longitudinal angle of the steering axis. It is located between the plane perpendicular to the surface of the road surface and the planes of symmetry of the wheel. Caster shows the deviation of the wheel position relative to the shock absorber strut.
Signs of the need for such work on a car
There are several signs and symptoms that can help you understand that it's time to adjust your wheels.
When driving, the steering wheel is in the central position, and the car leans to the side. The steering wheel is turned to one side, but the car still drives in a straight line. If you just bought a car, be sure to contact a car service for an alignment. Masters at the store's internal service station must carry out the procedure before selling, but in practice this does not always happen. Ideally, it is better to ask about this before purchasing. When changing tires, stop by a service station to check the wheel alignment.
You may not have to do it, but there is a possibility. Also, pay attention to fuel consumption and tire wear rates. If these parameters have increased, perhaps the problem is in the condition of the wheels.
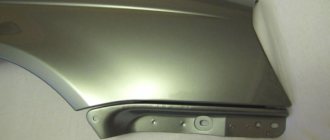
Uneven tire wear is one of the signs that a wheel alignment is needed.
Rear wheel alignment
Is it necessary to perform a rear wheel alignment in a front-wheel drive car? Yes, but you need to keep in mind a small nuance. If the rear wheel is turned outward, the rear axle will be pulled to the side of the road, which will lead to severe skidding when cornering. If the wheel is turned towards the center of the turn, the car will have difficulty turning.
However, a slight reduction of these parts of the car to one another only benefits the driver, since it will be easier to move in a straight line, and the suspension will be able to better “steer” in a certain direction even with strong gusts of side wind, which is a constant help for a novice driver.
So, if the undersides of the rear wheels are slightly turned towards each other, this is normal. But their discrepancy needs to be eliminated.
Chassis problems and setting wheel parameters
Be sure to perform a wheel alignment if the chassis of the vehicle has been repaired
It is especially important to do this when replacing the following parts:
- silent blocks;
- tie rod ends;
- suspension arms.
Theoretically, when replacing upper and lower ball joints, springs and shock absorbers, there is no need to resort to the procedure, but some experts recommend performing it when working with absolutely any chassis component. Just in case.
What should the installation angles be: negative and positive values?
The optimal value for a passenger car is either zero or slightly negative (i.e., the wheels should point slightly outward with their bottoms). Positive values can be set from 0 to 4.5 degrees. Sports cars use a negative value of -0.5 to -5.5 degrees. Thanks to this, a high level of grip is achieved and cornering stability is increased.
Negative angles have disadvantages. So, when driving in a straight line, the inner edge of the tire will wear out faster, and instability may occur during acceleration and braking on a straight path. The best option is to set the indicator at -0.5 degrees.
Positive and negative camber
Important clarifications on the procedure for measuring wheel alignment angles
The proposed method only makes it possible to determine wheel alignment angles (AWA) in order to get an idea of the current wheel alignment and camber parameters. Further work on their adjustment can be carried out either with your own hands (if you have the appropriate experience and knowledge) or in a car repair shop.
It is assumed that the measurements are carried out with a working suspension and normal tire pressure. Therefore, the corresponding work related to the diagnosis and repair of the chassis is not considered.
It is also necessary to take into account that this article does not discuss what the toe-off and camber angles should be. We will only talk about the process of their measurements. The results obtained must then be compared with the factory values, which may differ for cars of different brands and models.
Before measuring the toe-in and camber angles, it is necessary to place the car on a flat, hard surface - for example, on the concrete floor of a garage. When driving onto a work site, keep the steering wheel in the zero position. In this case, the wheels will be as close as possible to the position in which they are when the car is moving on a straight road.
If the car is raised on a jack or lift after stopping, this will lead to unloading of the suspension, then the wheels will not be level enough on the floor. To eliminate such errors, you will need turntables or sliding platforms, which most car owners do not have. Therefore, it is strongly not recommended to lift the body before taking measurements. The car's suspension should be under the usual load.
Measurements should begin by determining the vanishing angles, since these are the parameters that are adjusted on most car models. This characteristic is determined for each of the four wheels, so it is sometimes called “semi-toe.” Individual toe-off is measured relative to the longitudinal axis of the vehicle. It can be built in several ways, let's look at it in more detail.
Anti-roll bar
Modern sports cars have a fairly low suspension height and a low center of gravity. Accordingly, their body roll is usually barely noticeable. However, even in low-slung cars, body roll remains a problem because drivers like to corner without body roll, at high speeds, and with full vehicle control. As a first approximation, stiffer suspension springs are installed to reduce body roll. There is really no reason to use additional stabilizers, since the car is usually quite light and roll can only be dealt with by the correct choice of springs. The main argument against installing stabilizers is the partial loss of independent wheel suspension properties, and the stiffer the stabilizer, the greater the loss.
If the car is structurally equipped with a stabilizer bar (often due to the fact that the donor car has such a suspension design), there is no need to add stiffness to the stabilizer; select the stiffness of the suspension springs. On eco-vehicles with a high center of gravity, there is often no alternative to a stabilizer or other devices that reduce body roll.
When installing the stabilizer, you can use relatively soft suspension springs. However, you need to stay within the limits of good roll control when driving at high speed on winding roads. The stabilizer is made of spring steel and works like a torsion spring: the greater the car roll, the stronger the resistance of the stabilizer (naturally, within the strength of the material). Typically, the stabilizer is activated when the body rolls more than 3-4 degrees and prevents further growth of the roll, while the stabilizer only works when driving in corners and on uneven roads. In other words, in the absence of a stabilizer, due to the installation of medium or low stiffness springs, body roll can reach 7 degrees or more.
On cars with a low center of gravity, you can install relatively soft suspension springs and a lightweight stabilizer, but when braking, the front of the car will “dive” unless a special anti-dive suspension design is used. Remember, the front suspension springs should always be stiff enough to prevent excessive body dive when braking.
When installing a stabilizer, you need to ensure its rigidity so that it is minimally necessary to prevent body roll, or at least the roll is within acceptable limits (the stiffer the stabilizer, the more independence of the wheel suspension is lost).
Loose or worn stabilizer mounts will reduce the effectiveness of the stabilizer.
- Introduction
- Chapter 1. Chassis
- Chapter 2. Suspension height
- Chapter 3. Suspension geometry
- Chapter 4. Suspension springs and shock absorbers
- Chapter 5. Camber, longitudinal and transverse angle of inclination of the steering axis
- Chapter 6. Ackermann angles, wheel toe, “shock control” and anti-roll bars
- Chapter 7. Rear suspension
- Chapter 8. Brakes
- Chapter 9. Vehicle Settings
- Chapter 10. Testing and adjusting the vehicle
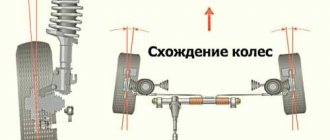
What is wheel alignment
Wheel camber is the angle between its central plane and the road surface. It directly affects the quality of the clutch and the accuracy of car control. If everything is set up correctly, the wheels will turn exactly where you point it.
Toe-in is the difference in the distances between the extreme front and rear points of the rims. It is measured in millimeters or degrees. Toe-in affects tire life. If it is incorrect, the tires will quickly become unusable.
Another important parameter of the wheel is caster, i.e. the longitudinal inclination of the kingpin. It affects the accuracy of car control and the ability of the wheels to self-balance. If the caster is not adjusted correctly, steering difficulties will occur.
Wheel alignment is the adjustment of the listed parameters to ensure controllability and reduce tire wear.
Wheel alignment adjustment on a stand in a car service center
Firstly
No matter what modern equipment is in a car service center, without a good specialist it is a pile of scrap metal. And here problems can arise:
- How much do you trust this specialist;
- How accurately will the work be carried out (when the equipment was checked for compliance with metrological standards) and whether such accuracy is worth the money;
- What guarantees will you be given for the work performed?
Also read - What is better: mechanical wheel locking or electronic locking?
What is camber, toe and castor
Despite the fact that the operation is called “wheel alignment,” there is another parameter that greatly affects the controllability of the car. What do these names mean? Camber is the deviation of wheels in a vertical plane. Toe is the deviation in the steering angle of the wheels. Castor - the inclination of the shock absorber strut.
If the camber is done correctly, the contact patch of the wheels with the road is maximum, which provides the best traction and control while driving. If the camber is incorrect, the contact patch of the wheels is reduced, grip and controllability deteriorate, and tire wear also increases. Correct wheel alignment ensures a minimum level of lateral loads while driving, which increases vehicle controllability, reduces driving resistance, and also increases tire life. The correct castor ensures optimal distribution of dynamic loads, making the car more controllable.
What is needed to adjust the wheel alignment
To make your own wheel alignment or camber you will need:
- suspension diagnostics, repair if necessary;
- a special stand, pit tracks, an inspection hole or just a flat area;
- a device for measuring camber and toe angles. If you don't have it, you will need:
- ruler;
- long rail;
- rope;
- masking tape;
- several wooden blocks;
- calipers;
- a set of keys;
- adjusting washers;
- WD-40 liquid;
- jack;
- car repair manual.
Tools and prerequisites
The work area should be level, without slopes. An inspection hole is needed. The car must be positioned so that the wheels are aligned. Tools you will need:
- Plumb cord.
- Chalk.
- A ruler, or better yet a caliper.
- Telescopic ruler.
- Wrenches and screwdrivers - for removing the wheel.
Please note that this work is done with a completely serviceable chassis - so that there are no broken bearings, shock absorbers, etc. Otherwise, the wheel play will not allow adjustment, and after repair it will still have to be repeated.
What is wheel alignment
Car wheels have an installation angle
This concept has existed for a long time, and over time, due to the increase in automobile speeds, engineers were forced to pay more and more attention to the development of the suspension in order to improve driving safety, as well as create the necessary comfort for the driver
The result is that the inclination of the wheels relative to the vertical changes, which worsens handling, moves the car to the side when driving, and also reduces the service life of the tires.
Camber angle
The exact definition is the angle between the vertical plane and the straight line along which the wheel rotates.
Or, in other words, the angle of inclination of the wheel relative to the side of the car.
Toe angle
The exact definition is the angle between the trajectory of the car and the plane along which the wheel rotates.
Or, in other words, this is the difference in distances between wheels in one axle, measured at the two extreme points of the wheel.
Let's imagine two imaginary lines: one vertical, and the other directed along the rotation of the wheel.
Why do a wheel alignment and how often should it be done?
Some motorists mistakenly believe that wheel alignment in a car needs to be adjusted only in case of repair/replacement of some suspension elements, as well as in case of “inadequate” behavior of the car on the road. In fact, you should adjust the wheel position much more often:
- every 15-20 thousand kilometers, i.e. twice a year (in order not to miss the time for such replacements, experts recommend adjusting the wheel alignment at each seasonal change of tires/wheels);
- in case of uneven and/or too rapid wear (abrasion) of tires;
- immediately after purchasing a new car, because, as practice shows, dealers very often miss this point during pre-sale preparation;
- if the car has different turning radii to the right and left;
- after tuning the suspension - changing the ride height through the use of thicker rubber bands or special stands;
- every time you replace ball joints, steering rods, ends, springs, struts, silent blocks, steering rack/gearbox, pendulum arm;
- when the steering wheel is in a crooked position;
- when the car behaves “incorrectly” on the road - swimming along a rut, belated steering, constantly “moving” to the side;
- when the steering wheel stops returning to a straight position after turning.
If you don’t do this and drive with a broken wheel alignment, you may face the following troubles:
- the edges (external - with positive toe-in or internal - with negative toe-in) of the tires will instantly wear off;
- when cornering, the car will roll, and when accelerating/braking on a straight line, the car will behave unstable, and this is a direct threat to the safety of everyone who drives this car, so you need to approach wheel alignment adjustment responsibly: if it is not possible to carry it out at the service station, do it at least with your own hands - there are many ways to do this, let’s name the simplest of them.
Sign 2: Uneven tread wear
Uneven tire wear is a sign of improper alignment in three out of five cases. With positive camber, the outer side of the tread is “eaten up”; with negative camber, the inner side is “eaten up”. This is due to the fact that the load on the tires is distributed unevenly - the wheels are tilted on one side, the tread wears off more actively on the road.
Other possible causes of the problem:
- transportation of heavy loads - in this case, one-sided uneven wear appears, that is, only one side is worn on all wheels;
- damaged suspension bushings, springs, ball joints.
What to do: have your wheel alignment adjusted at a service station. Replace damaged tires - uneven wear affects handling. If you think the problem is damaged bushings, springs, or hinges, check them and replace them if necessary.
What operations can you do yourself?
The only operation that cannot be done correctly on your own is fine adjustment of the castor. If the accident has not changed the geometry of the body, then symptomatic adjustment of the castor can be done. When the car does not listen well to the steering wheel, turns unsteadily and with a delay, you just need to increase the caster for 20–40 minutes. If, during sharp acceleration, the steering wheel begins to be pulled out of your hands, the castor needs to be reduced. It must be remembered that an increase in castor leads to an increase in wheel camber. You can also adjust the wheel alignment yourself. If the body is damaged as a result of an accident, which led to a violation of its geometry, then any adjustment of the suspension is pointless. You will spend a lot of time, and the result will be extremely doubtful. Therefore, after even a minor accident, be sure to check the body geometry on a special stand.
Important points
After adjustment, drive the car on a flat road. If the car pulls to the side, you can try changing the wheelsets - moving the front to the rear, and vice versa. If after this the car pulls, but in the opposite direction, then the problem is not the incorrect camber, but the tires that require replacement.
Do-it-yourself wheel alignment
When you set the steering rod parameters, count how many revolutions you make. If an error occurs, you will know how to return to the previous toe position.
Adjusting wheel alignment at home
On the front axle.
The alignment of the steered wheels is carried out by changing the length of the steering rods. This is done by rotating the clutch and steering tip.
Procedure.
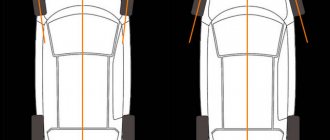
1. The car is set to the parking brake, the wheels should be pointed straight and the steering wheel should be level (preferably fixed)
2. Along the perimeter of the car, a cord is well stretched parallel to the sides of the body (for convenience, parallel to the thresholds of the car), which serves as a guide for aligning the wheel relative to the direction of movement.
3. Next, take a larger protractor and measure the angle. If a protractor is not at hand, you can use the method of measuring the distances from the wheel to the cord (on average, on passenger cars, the toe angle is 0-0.25 degrees, which will be approximately the same as 0-1 mm on a ruler for each wheel).
4. The locknut is loosened and by rotating the steering rod, the required distance is set to create the desired angle.
5. After the angles are set and tied to the direction of movement, you can measure the distance between the wheels. Measurements are taken at the front and rear of the wheels, and the difference between them will be equal to the toe angle (0-2 mm in millimeters, if the difference in the distances between the wheels is 5 mm, the rubber will be completely consumed in 1000 km). To measure, you will need a special rod; if you don’t have one, then you can get by with a regular tape measure or make a rod yourself.
How to make a measuring rod
To measure wheel toe angles, you can make your own, by purchasing at a hardware store, a telescopic crossbar for curtains in a shower stall or bathtub. First, just apply a scale to it and that’s it, the rail is ready.
Common mistake!!!
By setting the value of the toe angle of the wheels along the rack and not linking it to the line of the direction of movement of the car, you will get a crooked position of the steering wheel, and it is also possible to deviate from straight-line movement. This completes the procedure for adjusting the toe of the front wheels.
Adjustment on the rear axle
Unlike the front axle, where the wheels are steerable, the toe adjustment of the rear wheels is carried out according to a different algorithm. Rear toe-in is adjustable only on vehicles with independent rear wheel suspension. Adjustment occurs by rotating eccentric bolts, which change the distance of the rod or lever to the hub, and also, in rare cases, by adjusting the rods by rotating the couplings. The toe angle of the rear wheels for most passenger cars is 0-0.5 degrees, and in rare cases 1-1.5 °. The wheels are almost parallel to each other.
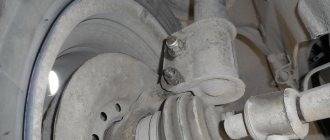
Camber Angle Adjustment
Deviation of wheel position readings from a vertical straight line most often occurs in cars with multi-link suspension. On cars with a primitive McPherson, by and large, there is nothing to regulate, with the exception of cars with a special design.
Angle measurement process:
— the car is installed on a perfectly flat surface, there should be no tilts in either the vertical or horizontal plane. - take a plumb line with a cord and apply it to the top of the wing or wheel arch of the car. - further, measurements are made with a regular ruler at two points, from the cord to the car wheel. The resulting difference in distances will be the camber angle of the wheel. On average, a difference of 10 mm = 1 ° can be called, comparable to a tire size of 15-17 inches
- use keys and adjusting mechanisms to change the position of the wheel.
- similarly measure and adjust the camber angle on the other side of the car.
Important!
When setting the toe-in and camber angles, it is necessary to roll the car forward and backward at a distance of 1 meter. This is done to relieve tension in the tires and suspension. After rolling, measurements are taken again for control purposes. If there are no changes or they are not significant, everything is left in place.
What is more accurate and better for indicating wheel alignment angles, a computer stand or a hand tool?
— To the surprise of all motorists, a computer stand, only in ideally calibrated conditions, can give reliable and accurate results. Unfortunately, there are not many such stands; for the most part, adjustments are required more by equipment than by cars. Also, the qualifications and education of the specialist who carries out the adjustment process plays an important role here.
In practice, it has been confirmed more than once that a much better adjustment of wheel angles occurs through mechanical measurements and manual setting of values, because the human factor plays a large role here, and a “protractor,” electronic or “wooden,” is only a tool...
Sign 6: “tight” steering wheel
If you need to exert force to turn the steering wheel, this may indicate that the camber angle is too large. In this case, the car may not “drive”, and there will not even be uneven wear.
Other possible causes of the problem:
- low air pressure in tires - less than 1.2 atmospheres;
- the steering rack or pendulum arm is overtightened;
- tight steering rods or ball joints are installed - they will gradually “develop” themselves;
- The tire width is greater than the width recommended by the manufacturer.
What to do: Check the air pressure in your tires. Check the condition of the steering rack and pendulum arm - if they are too tight, you need to loosen them yourself or at a service station. Measure the width of the tires, compare it with the recommended parameters - if it is larger, replace the tires. If all else fails, have your wheel alignment adjusted at a service station.
When to adjust the angle
The instructions described above will help you carry out your own measurements and adjustments.
But knowing when to perform such an operation is also very important.
Typically, after replacing any car suspension part, this operation must be carried out. A roll invisible to the naked eye is caused, for example, by replacing the upper support cup of even one rack. Such a roll gives about two millimeters, and this is already a reason for an immediate operation to adjust the angle.
If possible, the car should be regularly placed on a stand, where specialists will take the necessary measurements. The technician at such a stand will quickly find gaps that are imperceptible to the touch and much more and offer to carry out the appropriate work.
Suspension
A car's suspension is an important part. And even if you don’t do anything to it and drive super carefully, it will still sag over time. This will reduce ground clearance. The suspension itself is designed in such a way that the toe and camber angles will depend on the position of the wheel. Therefore, once a year, usually in the spring, experienced drivers always check and, if necessary, adjust the camber angle.
New springs
If new springs were installed on the car, the camber should be adjusted immediately after repair. And then again a month later. This is done due to the fact that the ground clearance decreases by two to three centimeters during this time. And it is advisable to change the springs before winter in order to minimize tread wear due to constantly changing camber angles.
Clearance
Adjustment of camber angles should also be carried out after changing the ground clearance using spacers or other devices. After the wheels are changed to a larger or smaller size, there is no need to perform a wheel alignment, since this does not change the angles. But it is highly not recommended to put wheels or rims of different sizes on a car!
In addition, wheel alignment is usually done after heavy equipment weighing 30 kg or more has been installed on the vehicle and its rear axle. Or in the case where a load weighing 100 kg was installed on the front axle, the angle adjustment must also be carried out.
The instructions described above will help you not only learn how to make a camber yourself, but also save a lot of money. As you know, the price for such services in car services is high. Although once a year you can carry out an inspection on a 3D wheel alignment stand, where specialists will identify faults.
Why adjustment is needed
Based on everything that has been said above, it is not difficult to guess that one of the reasons why you should still monitor the correct alignment is your safety. A car that has the correct wheel alignment angles is maneuverable and obedient, holds the road well, does not skid, it sensitively and - most importantly - reacts correctly to steering movements.
Why do you need wheel camber adjustment?
Also, a correctly set toe and camber angle will allow you to save a little on tires and consumables, as it keeps them in good condition longer, will allow you to get rid of rapid wear, and will protect suspension parts from destruction. And the tire tread, and the bearings in the hubs, and all sorts of rubber parts - everyone will say “thank you” for the good camber.
Volumetric camber adjustment