This type of malfunction, such as non-working brake lights on a VAZ 2107, is a common situation that every owner of this car brand faces. The reasons why the brake lights on a VAZ 2107 do not light up are factors such as depleted bulbs, a short circuit in the wiring, or oxidation of the contacts. Driving with bad legs is not only prohibited, but also dangerous, so we'll learn how to find and fix the problem yourself.
The brake lights on the VAZ 2106 do not light up: the reason
- If the fuse links are also working, we are looking for a relay. And it is located behind the instrument cluster. We remove it by carefully prying it around the perimeter with a flat screwdriver.
- Unscrew the speedometer cable and move the instrument cluster towards you.
- Using a 10mm wrench, unscrew the relay mounting nut. We remove the device.
- Since it is quite difficult to check the relay at home, we install a known-good device in its place. We check the operation of the circuit. If this does not help, we replace the steering column switch (serial part number 12.3709). Trying to repair it is a very thankless task, especially since there is no guarantee that after repair it will not fail the next day.
- Use a slotted screwdriver to pry off the cover on the horn switch. Let's take it off.
Conclusion
The Zhiguli 2106 car has a fairly simple electrical circuit, so it is not difficult to find and fix headlight faults. To do this, you just need to adhere to the recommendations outlined above, and also be able to handle a device such as a multimeter.
You can find additional useful information on the topic discussed in the video in this article.
If your high beam has completely disappeared, then it is unlikely that the problem is incandescent lamps - the simultaneous failure of two lamps is only possible if the generator voltage relay-regulator is faulty, which will most likely affect not only the headlights.
First, check the fuses - find the fuses corresponding to the high beam lamps in the owner's manual, remove them and make sure that they have not blown.
The next step will be to check the functionality of the steering column switch - this malfunction occurs quite often on rear-wheel drive VAZ cars.
Headlight adjustment
It is generally accepted that headlights perform their function if the road in front of the car is well lit and oncoming drivers are not blinded. To achieve such operation of lighting fixtures, they must be adjusted correctly. To adjust the VAZ-2107 headlights you need to:
- Place the car on a flat, strictly horizontal surface at a distance of 5 m from a vertical screen measuring 2x1 m. The car must be fully fueled and equipped with all the necessary equipment, the tires must be inflated to the required pressure.
- Draw a marking on the screen on which line C will indicate the height of the headlights, D - 75 mm below C, O - the center line, A and B - vertical lines, the intersections of which with C form points E, corresponding to the centers of the headlights. J is the distance between the headlights, which in the case of the VAZ-2107 is 936 mm.
- Move the hydraulic corrector regulator to the extreme right position (position I).
- Place a load weighing 75 kg on the driver's seat or place a passenger there.
- Turn on the low beam and cover one of the headlights with an opaque material.
- Achieve alignment of the lower boundary of the beam with the E–E line by rotating the adjusting screw on the rear side of the headlamp.
- Using the second screw, align the break point of the upper border of the beam with point E.
The same must be done for the second headlight.
Body size values and checking compliance with specified parameters
There are engineering definitions of such concepts as body and geometric dimensions of a car. These include benchmarks between key points, as well as the shape and spatial arrangement of window and door openings. Now let's consider the issue of checking compliance with the parameters.
Vehicles that have been involved in road traffic accidents are checked. During the procedure, body parts and vehicle elements are checked for violations of symmetry, alignment and parallelism to each other
The following elements are examined with special attention: car diagonals, pillars, roof (diagnosed by the relative position of parallel doorways), symmetry, parallelism and correspondence of the front and rear windows of the vehicle
Rear lights VAZ 2106
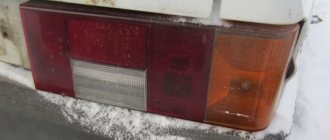
Each of the two rear lights of the “six” is a unit consisting of several lighting fixtures that perform separate tasks.
Rear light functions
Rear lights are used for:
- designations of vehicle dimensions in the dark, as well as in conditions of limited visibility;
- indicating the direction of movement of the machine when turning, turning;
- warnings to drivers driving behind about braking;
- lighting the road surface when reversing;
- car license plate lights.
Rear light design
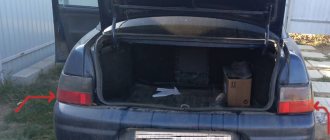
The VAZ 2106 is equipped with two rear headlights. They are located on the rear of the luggage compartment, just above the bumper.
Each headlight consists of:
- plastic case;
- lantern dimensions;
- direction indicator;
- brake light;
- reversing lamp;
- license plate light.
The headlight housing is divided into five sections. In each of them, except for the middle one, there is a lamp installed that is responsible for performing one or another function. The body is closed with a diffuser (lid), made of colored translucent plastic, and also divided into five parts:
- yellow (turn indicator);
- red (dimensions);
- white (reversing light);
- red (brake warning light);
- red (reflective).
The license plate illumination is located in the inner protrusion of the housing (black).
18.26. Replacing interior light bulbs
| EXECUTION ORDER |
| 1. Remove the ground wire from the battery. |
LAMP THAT TURN ON WHEN THE DOOR IS OPENED
Removal
| EXECUTION ORDER |
| 1. Using the blade of a thin screwdriver as a lever, remove the lamp from the socket and disconnect the electrical connector from it. |
| 2. On models where the lamp that turns on when the door is opened is combined with a reading lamp, remove the lampshade to access the lamps. |
Installation
| EXECUTION ORDER |
| 1. Installation is carried out in the reverse order of removal. |
GLOVE BOX LIGHT
Removal
| EXECUTION ORDER |
| 1. Using the blade of the screwdriver as a lever, remove the light from the socket and disconnect the electrical connector from it. |
| 2. Remove the light bulb from the lantern. |
Installation
| EXECUTION ORDER |
| 1. Installation is carried out in the reverse order of removal. |
LUGGAGE COMPARTMENT, ENGINE COMPARTMENT AND EDGE LIGHTING LAMP
Removal
Removing the light bulb from the engine compartment light
EXECUTION ORDER
1. Using the blade of a thin screwdriver as a lever, remove the flashlight from the socket and disconnect the electrical connector from it. 2
Using caution, remove the light bulb from the spring contacts of the light (see Fig. Removing the light bulb from the engine compartment light)
Removing the light bulb from the engine compartment light.
Installation
| EXECUTION ORDER |
| 1. Installation is carried out in the reverse order of removal. |
CIGARET LIGHTER LIGHT
Removal
| EXECUTION ORDER |
| 1. Remove the ashtray/cigarette lighter assembly from the instrument panel and disconnect the electrical connector from the cigarette lighter lamp. |
| 2. Pull to remove the lamp from the socket. |
Installation
| EXECUTION ORDER |
| 1. Installation is carried out in the reverse order of removal. |
CLOCK LIGHT
Removal
Removing the socket with the clock light bulb
| EXECUTION ORDER |
| 1. Take off your watch. |
| 2. Turn the socket with the light bulb and remove it from the back of the clock (see Fig. Removing the socket with the clock backlight bulb). |
| 3. Pull to remove the lamp from the socket. |
Installation
| EXECUTION ORDER |
| 1. Installation is carried out in the reverse order of removal. |
ON-BOARD COMPUTER DISPLAY LAMP
See corresponding description above.
HEATER CONTROL PANEL LIGHT
Removal
Removing the socket with the heater control panel light bulb
| EXECUTION ORDER |
| 1. Remove the heater control panel. |
| 2. From the back of the instrument panel, pull out and remove the socket with the light bulb (see Fig. Removing the socket with the light bulb for the heater control panel). |
| 3. Pull to remove the lamp from the socket. |
Installation
| EXECUTION ORDER |
| 1. Installation is carried out in the reverse order of removal. |
MIRROR LIGHT IN THE SUN VISOR
Removal
| EXECUTION ORDER |
| 1. Lower the sun visor and, using the blade of a thin screwdriver as leverage, remove the lens assembly from the mirror. Remove the backlight from the spring contacts. |
Installation
| EXECUTION ORDER |
| 1. Installation is carried out in the reverse order of removal. |
Replaceable tips
Speaking about replacing faulty components of an electrical circuit, it is worth saying a few words about the correct replacement of light bulbs.
This must be done in the following order:
Turn off the ignition and remove the key from the lock. Open the hood. Unscrew the headlight (to do this, unscrew the bolts on both sides) and remove it. Remove the contact group by disconnecting it from the reflector (this procedure should be performed very carefully). When you find the spring clips, undo them. Remove the faulty light bulb. Insert the new bulb into the empty cartridge.
Rearranging and installing the headlight unit is carried out in the same sequence, but in reverse order. If necessary, a similar procedure can be performed with the second block. It is worth noting that it is highly advisable to replace lamps not with bare hands, but with light gloves. The glass of the flask is quite thin, and under high pressure it can burst right in your hands.
Troubleshooting procedure
Lamps fail most often. It's best to start with them. If they are working properly, remove the plugs from the frog and connect them together. The plugs should have +12.
If there is no voltage, check the fuse. If the fuse is intact, check connector Ш12. By applying 12V to pin 3 of the Ш12 connector, voltage should appear. Check the voltage at the fuse contacts. If there is voltage on the fuse on both sides, we try to apply +12 directly to the frog plug. If the lights come on, change the fuse box.
The fuse box can only be repaired in specialized workshops. In this case, the board track could have burned out.
When there is voltage at the frog plugs, but the lights do not light up, we check 12V directly at the contacts of the lights board. If there is voltage, but the lamp does not light, check the connector contact. When there is voltage at the board contact, but the lamp does not light up, remove the lamp and check for the presence of 12V directly on the current of the conductive surface of the base. If there is voltage and the contact is clean, check the housing part of the base. If necessary, replace the flashlight board.
It is extremely rare for the brake light wire to break. The wiring harness comes out from under the instrument panel and runs along the floor of the car under the carpet. Both brake lights are connected in parallel. We check the integrity of the wire from the frog to the lights. If necessary, replace a separate stop wire.
Brake lights on VAZ 2106 fuses do not light up
We will look at the direct algorithm, but we will check the entire chain.
From the tools and means we will need:
- key to 7;
- key to 8;
- 24mm head with extension and ratchet;
- screwdriver with a Phillips blade;
- flat blade screwdriver;
- multimeter;
- marker;
- anti-corrosion liquid such as WD-40, or equivalent;
- sandpaper (fine).
The diagnostic procedure is as follows:
- Using a screwdriver, unscrew all five screws securing the luggage compartment trim.
- We remove the upholstery and put it aside.
- Depending on which headlight is faulty (left or right), we move the side trim of the trunk to the side.
- Holding the diffuser with one hand, unscrew the plastic nut from the trunk side with your hand.
- Remove the diffuser.
Replacing the sensor
And now it’s time to consider the process of replacing the reverse sensor on various VAZ cars - from 2106 to 2115. Here are the instructions.
VAZ 2107
Let's start with the VAZ 2107 car. On VAZ Classic models everything is done exactly the same.
Advice! Before replacing the sensor on any car, clean the gearbox housing from dirt to make it easier to find the sensor and to prevent dirt from getting into the oil.
- First, we look for the sensor - it is located on the right side of the gearbox, if you look at the car as it moves. It is very difficult to make a mistake - this is the only part in the gearbox where two wires fit.
Sensor location on Classic
- If the wires are broken, then look for protruding contacts.
- If the wires are still on the sensor, then disconnect them.
- Next, you will need a 22 key. They need to unscrew the sensor. For convenience, it is better to take a longer wrench, since over time the sensor will stick to the crankcase.
- If you cannot unscrew the reverse sensor using a wrench (head), then you need to do this using a hammer and chisel.
Note! The gearbox housing is very fragile. Therefore, be extremely careful not to damage it with hammer blows.
- Then clean the seat from dirt using a knife.
- Remove the metal washer along with the dirt and replace it with a new one.
- Insert the sensor and tighten it using the same wrench until it stops.
- Next you need to put the wires back on. If necessary, crimp the contacts with pliers.
- And now, the replacement of the reverse sensor on the VAZ 2107 is completed!
Some people have a question about oil - whether it will leak or not. In this case it will not leak.
VAZ 2109
VAZ 21099 replacement reverse sensor
Let us remind you that this point applies to the Samara family as a whole, and not just to the VAZ 2109 car:
- Remove the protection from the car engine, if any.
- The location of the sensor on a VAZ 2108 and similar cars is slightly different than on a Classic, since the car has front-wheel drive.
- As the vehicle moves, the sensor is located on the left side.
- If the Classic had to be driven into a viewing hole, then cars with front-wheel drive can simply be lifted under the left front wheel using a jack.
- Again, the electrical wiring leads to the sensor.
- Remove the wires.
- To remove the sensor you will need an extended 22mm socket and a wrench.
- Using the head, remove the sensor.
VAZ 2109 replacement of reverse sensor
Remember! Replacing a reverse sensor on a front-wheel drive vehicle is characterized by small oil leaks from the gearbox housing.
- Prepare a container and, as soon as you unscrew the sensor, place it so that the oil does not spill on the floor.
- Insert the new sensor as quickly as possible.
- Screw it in by hand first and then tighten it using the same socket and ratchet.
- Connect the electrical wiring wires.
- Add the required amount of oil.
Problem with fuse for brake lights
In a car's electrical circuit, a malfunction often occurs due to fuses that may fail. There are several ways to check fuses in a car, including visually or using a multimeter. In this case, there is one “household” method for diagnosing the brake light fuse.
You can make sure that the brake lights are not on due to a failed fuse. To do this, just start the car and press the horn. If the sound is heard, then the fuse is good and the brake light malfunction is due to another reason. If there is no sound, you need to determine from the fuse block diagram which one is responsible for the brake lights and horn, and then replace it.
Please note: This verification method is not suitable for all car models. On some cars, different fuses are responsible for the brake lights and horn, and if one of them fails, the other will continue to work properly
Checking the light bulbs
The most common scenario is trivial: a light bulb or even two has burned out (this also happens, for example, when a car gets caught in a heavy downpour). Well, or in case of abnormal contact closure. So, we disassemble the sidelights from the inside and take out the brake light bulbs. If they turn black/cloudy/stained, we change them immediately without further discussion.
If the defect is not visually detected, then the best option would be to take a good-quality spare light bulb and replace it with the problematic one. In this case, the brake pedal should be in the pressed position (by the way, if you are checking alone, you can put something heavy on it, for example, a brick). If a new lamp lights up, then this is exactly the problem. No - let's move on.
Checking contacts:
It is possible that the contacts in the socket have oxidized and do not give a good light bulb a chance to light up. This reason can be detected visually by removing the lamp and inspecting the socket. To clean the oxides, we rotate the lamp in the socket or, to be sure, we treat the socket from the inside with a small piece of sandpaper. You should also check the contacts leading to the cartridge; damage may occur or the cartridge needs to be replaced. If this is okay, we continue checking the contacts in the wire block for oxidation.
Manual stripping may be required. Or try putting on and taking off the spare part several times in a row (this will remove the oxide layer if it is not too large).
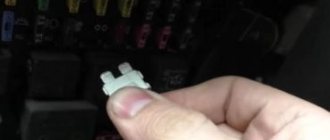
DSS:
For VAZ owners, the brake light sensor is one of the most vulnerable points in the system. This may be why the lights don't light up. You can check for a malfunction using a fairly simple method: remove 2 wires from the frog and connect them directly with a piece of wire. If at the same time the brake lights come on, then the DSS needs to be changed - it is not working.
By the way, many experienced VAZ owners begin a general check to identify such faults with this sensor, since it fails quite often.
Tuning the rear lights of the VAZ-2107
You can add exclusivity to your “Seven” using one of the taillight tuning options available today. You can modify the rear lights using:
- use of LEDs;
- applying a tinting layer;
- installation of alternative lights.
Tinting of lamps is done with film or special varnish. Unlike tinting the headlights, for which you can get a fine, in this case the state traffic inspectorate usually has no questions about the rear lights. The main thing is that the color of all signals complies with the requirements of the traffic police: clearance and brake lights must be red, direction indicators must be orange, and the reversing light must be white.
Video: how the rear lights of the “Seven” are transformed after tuning
Using LEDs allows you to:
- reduce energy consumption;
- increase performance;
- increase information content;
- increase the brightness of the rear lights compared to standard lighting equipment.
Instead of the basic rear lights of the VAZ-2107, tuning enthusiasts, as a rule, install:
- sports version with four round and two rectangular lamps;
- skylain option with three round and two rectangular lamps;
- so-called “cilia”;
- other modifications.
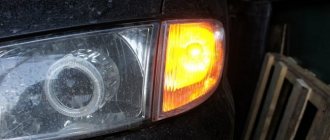
Replacing the lamp in the sidelight:
Note! Before we start replacing, let's look at what a sidelight is. Firstly, it is installed under the front headlights of the car, by the way, this is where the name “Sidelight” comes from. It contains two lamps, one of which is inserted into the turn signal, which is indicated by the letter “B”, and the other is inserted into the side light, which is indicated by the letter “A”!
To replace these lamps, you will need to stock up on: A screwdriver, as well as a lamp that goes to the side light A12-5 (shown on the right in the photo), as well as a lamp that goes to the turn signal A12-21-3 (shown on the left in the photo) !
1) First, unscrew the two screws that secure the diffuser and then remove it.
2) Next, select the lamp that you will replace, they are both replaced in the same way, so for example, removing the turn signal lamp works like this. First, you will need to press lightly on the light bulb that you are going to replace, and then turn it slightly counterclockwise until the protrusions that are present on the base of the lamp coincide with the grooves, and after matching, remove this lamp from the socket.
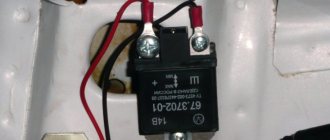
Relay for low and high beam VAZ 2106 - what it is responsible for
A node such as a relay is a kind of switch that allows, using nodes with low current (buttons and switches), to turn on nodes with high current (in our case, the headlights of a car)
If this unit did not exist, the button could simply melt due to high load, so the importance of the relay is very great
In the photo: Most VAZ 2106 relays look something like this, the size and position of the contacts may differ slightly
Electrical equipment
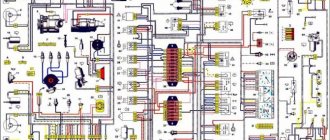
The original instructions for the VAZ 2103 contained a colored insert with an electrical diagram
Dashboard
In addition to the external differences in the appearance of the models and the richer interior decoration, the dashboard of the VAZ 2103, luxurious for those times, immediately caught the eye.
But the interior wiring of the VAZ 2103 itself was inherited from the “kopek”, including the notorious fuse block.
Tachometer in the center – Italian trace of sporting spirit
It should be noted that other manufacturers, for example UAZ, also experienced problems with low-quality components - see the article Verified wiring diagram for UAZ 452
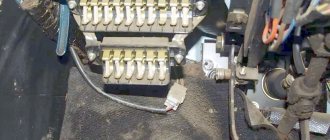
Fuse box
The VAZ 2103 wiring diagram was a classic version, where the role of the second wire was played by the metal body of the car, and all the main components of the electrical circuit were protected by fuses arranged in one group.
Structurally, this unit was not bad:
- Spring-loaded contacts firmly held the plastic guides;
- Due to this, contact between metal plates and fusible inserts was ensured;
- On the cover of the block there were images of circuits (a kind of instruction), which are protected by one or another fuse;
- In case of a short circuit, it was easy to replace the fuse with your own hands.
The photo below shows the unit with the cover removed. Thanks to it, the wiring in the car is reliably protected, but the unit itself is unreliable.
An old unit that should be replaced with a more modern one
Other tuning ideas
As mentioned above, all lamps in lanterns can be replaced with LED ones. And not just remove incandescent lamps and install LED ones, but use LED modules or strip. Otherwise, the appearance of LED lights will not differ from ordinary ones. Installation of LED modules may look like this:
And using an LED strip you can do this:
You can simply tint the lights, completely changing the appearance of the car, and it is easier to apply the tint to the outside of the glass. This will allow you not to disassemble the light devices or even remove them from the car.
Tinted rear lights VAZ 2112
And finally, a short video demonstrating the capabilities of LED modules that can be used to tune the rear light fixtures of a VAZ 2112.
This concludes the conversation about the rear lights of the VAZ 2112. Now we can easily remove these lighting devices, if necessary, repair them, modify them, or simply replace a burnt-out light bulb in the lanterns.
Previous Replacing car lamps How to remove the tail lights of a VAZ 2110 - replacing lamps, ideas for tuning Next Replacing car lamps Replacing lamps and tuning tail lights of a VAZ 2114
Diagram and device of optics VAZ 2106
Vehicle lighting includes front and rear lights. There are four front ones: two external and two internal. External ones are used for low beam and high beam on VAZ. The internal ones turn on only together with the high beams. The taillights are multi-colored lights that serve as an indicator of reverse gear, dimensions, brakes, etc. The lighting system also includes daytime running lights (DRL),
Six lighting scheme
The sixth model's optics scheme includes:
- headlights;
- two relays for the low and high beam register;
- speedometer with high beam indicator;
- a switch that turns on either high or low beam;
- generator;
- fuse box;
- battery;
- external lighting switch;
- ignition key.
Some modifications of the 2106 have a rear fog lamp installed. The exterior lighting switch is located on the instrument panel. The turn signals of the VAZ 2107 are turned on using a switch on the steering column. The flashing of the VAZ turns is ensured by a relay breaker. On the dashboard, the blinking of the VAZ turn signals is reflected by the blinking of the corresponding light bulb.
The VAZ 2106 headlights are adjusted on a horizontal surface 5 meters from the screen or wall.
Markings for adjusting the light
Before adjusting, you should check the tire pressure and rock the car so that the suspension springs are installed. It is advisable to place a load weighing about 75 kg on the front seat or ask an assistant for a net. This is necessary to take into account the driver's weight. The corresponding markings are made on the screen, according to which the optics are adjusted. The adjusting screws are located on the back side of the optics under the hood (the author of the video is Engine Repair! And interesting!).
Headlight faults and repairs
During operation, the owner of a VAZ 2106 does not always notice that the headlights are gradually becoming paler, forcing the driver to look closely at the road. The reason is the inevitable clouding of the lamp bulb after a certain time, so experts recommend getting into the habit of regularly replacing the lamps of the front lighting devices. If individual lamps or lights in the car do not light up, this may be due to:
- failure of one of the fuses;
- lamp burnout;
- mechanical damage to the wiring, oxidation of the tips or loosening of the electrical wires.
If the high or low beam does not switch, then most likely the high or low beam relay has failed or the contacts of the steering column switch have oxidized. In both cases, as a rule, replacement is required - respectively, a relay or a switch. It is also necessary to replace the three-lever switch if its levers do not lock or switch.
Experts recommend getting into the habit of regularly replacing headlight bulbs on your VAZ 2106
How to disassemble a headlight
To disassemble a VAZ 2106 headlight (for example, to replace the glass), you need to heat the sealant around its perimeter with a hairdryer, then remove the glass with a thin screwdriver or knife. A hairdryer is a convenient tool in this case, but not necessary: some people heat the headlight in a steam bath or in the oven, although this risks overheating the glass. The headlight is assembled in the reverse order - a layer of sealant is applied and the glass is carefully installed in place.
Replacing light bulbs
To replace a VAZ 2106 headlight bulb, you must:
- Remove the plastic cover using a flat-head screwdriver.
- Use a Phillips screwdriver to loosen the fastening screws of the rim holding the headlight.
Use a Phillips screwdriver to loosen the fastening screws of the rim holding the headlight.
- Turn the rim until the screws come out of the grooves.
The rim must be turned until the screws come out of the grooves
- Remove the rim and lens.
The diffuser is removed along with the rim
- Remove the headlight from the niche and disconnect the power cable plug.
The headlight should be removed from the niche, and then disconnect the power cord plug
- Remove the clamp.
To replace the headlight bulb on a VAZ 2106, you will need to remove the special lamp mounting clamp
- Remove the lamp from the headlight.
A failed lamp can be removed from the headlight
Reassembling the structure after replacing the lamp is performed in the reverse order.
Headlights corrector
A device such as a headlight range control is not used every day, but it can be useful, for example, when driving at night with an overloaded trunk. At the same time, the front part of the car “lifts up”, and the low beam is more like high beam. In this case, the driver can use the corrector to lower the beam of light down. In the opposite situation, when the corrector is configured for a loaded trunk and the car is empty, you can perform the opposite manipulation.
If the car is not equipped with a corrector, you can install this device yourself. Based on the type of drive, correctors are divided into hydraulic and electromechanical. The hydraulic one consists of the main cylinder and headlight drive cylinders, as well as a pipe system and a manual regulator, which is installed on the instrument panel. Electromechanical - consisting of a servo drive, wires and a regulator. The headlights are adjusted using a hydraulic corrector by changing the pressure of the working fluid (which must be non-freezing) in the cylinders. The electric corrector changes the position of the headlights using a servo drive, which consists of an electric motor and a worm gear: after applying voltage to the electric motor, the rotational movement is converted into translational motion, and the rod connected to the headlight by a ball joint changes its angle.
Video: operation of the electromechanical headlight range control on a VAZ 2106
Periodic cleaning is required not only on the outside, but also on the inside of the VAZ 2106 headlights. If you need to get rid of dirt and dust accumulated during operation, you can use one of the many special cleaning products
It is important that the product does not contain alcohol, which can damage the coating of the reflector and the optics will have to be changed. In some cases, toothpaste or cosmetic micellar nail polish remover may be sufficient to clean the surface of the headlight.
To wash the inside surface of the headlight without removing the glass, you need to remove the lamp from the headlight, pour water diluted with a cleaning agent inside and shake well several times, then rinse the container with clean water and dry.
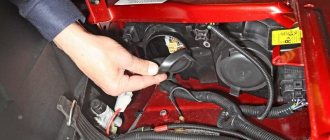
Removing and replacing rear lights
The procedure for replacing rear lights is as follows:
First you need to turn off the ignition, open the hood and disconnect the terminals from the battery. Then open the trunk of the car and remove the protective cover on the headlight, disconnect the mount and disconnect the wiring connector from the contacts on the board. Be careful not to damage them. Using a socket wrench size 8, you need to unscrew the four nuts that secure the taillight
Having done this, under the nuts of the studs you will be able to see the tips of the ground cable. Next, you need to carefully remove the taillight from its seat. To change the diffuser, it must be removed from the optics body. The procedure for installing and assembling optical elements is performed in reverse order.
Headlight faults and repairs
An unpleasant feature of the headlights on a VAZ is the gradual decrease in the quality of light. In 70% of cases, drivers notice that the lamps have stopped shining normally when the glass on the headlight has already become cloudy by 30 - 40%. Clouding of the bulb on a halogen lamp is the second reason for the decrease in illumination. If the headlights and headlights in your car stop working, there may be several reasons:
- The light bulb itself burned out.
- The fuse or fuse box has failed.
- Burnout, rupture of the electrical wire.
- Oxidation of contact tips, current does not pass through the circuit.
- Loosening of the electrical wire fasteners.
- A breakdown of the switching relay or oxidation of a specific contact of the steering column switch is observed if there is no switching from high beam to low beam and vice versa.
The six is equipped with a three-lever switch for adjusting the headlights. If the levers sink and do not lock, the part must be replaced.
How to disassemble a headlight
Analysis is carried out in 10 minutes. The glass is glued to the reflector, you need to heat the sealant that holds the block around the perimeter, then use a flat screwdriver or knife to pry the glass and remove the element. Installation of glass is carried out using soft glue in the reverse order.
Some drivers heat the headlight with a hairdryer, lamp, or steam bath. If you use a lamp, there is a possibility of overheating the glass. Acrylic parts may further become cloudy if the temperature exceeds 70 degrees.
Replacing light bulbs
Replacing low beam bulbs begins with dismantling the headlight trim. The plastic cover must be pryed off with a screwdriver and removed from its seat. The block is located closer to the edge of the car and is carried out in stages.
Before starting any work related to replacing lamps, checking electrical wiring, or repairing headlights, you must remove the negative terminal from the battery:
- Loosen the three mounting screws holding the headlight rim. Do not remove the screws completely.
- Take the headlight in your hand, turn the loose rim, the screws should come out of the grooves.
- Remove the rim, take out the diffuser; the element is held by the rim and falls out along with it.
- Pull the headlight with the block out of the niche, remove the plug of the power supply wire.
- Disconnect the fastener.
- Remove the used bulb from the headlight.
Install the new part and reassemble the headlight in the reverse order. After installing a new element, it is necessary to correct the geometry of the light beam.
Headlight corrector and repair
A luminous flux corrector, or more simply a headlight corrector, will allow you to adjust the headlights if the vehicle's ground clearance has changed due to a loaded trunk. In this state, the car tilts backwards, the high beam headlights lose adjustment, blind oncoming drivers and do not illuminate the first 10 meters in front of the car. The light from nearby lamps poorly illuminates the roadside and is scattered.
The adjustment is carried out manually; the part will allow you to lower the light beam down when the trunk is loaded and align the beam for normal mode. For the VAZ 2106 there is an option to use electric correctors. The position of the reflector is adjusted through a servo drive, which changes the angle of inclination of the reflector through a worm gear.
Common causes of failure
In the photo: VAZ 2106 headlight high beam relay Most often, the low and high beam headlight relay on a VAZ 2106 car fails for the following reasons:
- When the battery is working properly, there is no charging current, which is why it does not charge. This happens when the wires are poorly connected to the relay terminals or when the circuit from the generator to the battery is broken. Eliminated by fixing the wire in the circuit, checking and adjusting the voltage regulator and relay regulator.
- Insufficient charging current with a discharged battery or high current with a fully charged battery is caused by a malfunction of the voltage regulator. It can be eliminated by adjusting the device or replacing it.
- Burning and burnout of lamps with excessive heat occurs when the adjustment of the relay regulator is violated or the contacts are closed. Eliminated by disconnecting and cleaning the closed contacts, adjusting or replacing the voltage regulator.
- High discharge current after stopping the motor. Occurs when the relay-regulator contacts close (contacts sintering, armature spring breaks) or the electrical wire short circuits. It is repaired by finding and eliminating a short circuit with the battery disconnected, checking and adjusting the current limiter, opening and cleaning the contacts, replacing the spring and adjusting its clearance and tension.
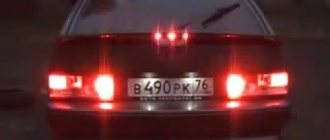
External signs of a breakdown of the VAZ 2106 light relay include the following aspects:
- The low and high beam headlights stopped working.
- Dimensions and turn signals stopped working
And there may be several reasons for its failure:
- failure (burnout) of the contact plates inside the relay (popularly called “nickels”), reduction in their contact area, “sticking”;
- breakage (burning) of the retracting and/or holding winding;
- deformation or weakening of the return spring;
- short circuit in the pull-in or holding winding.
If you find at least one of the listed signs, then the next step to fix the problem is to conduct a detailed diagnosis.
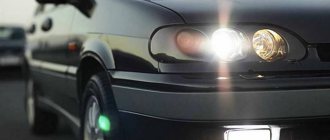
What to do if the headlights blink at idle
Based on the principle of operation of electrical devices in a car, it is concluded that the light blinks at idle speed of the engine when the generator malfunctions. But this needs to be checked accurately, for which the following is done:
- The engine starts and the headlights turn on. The car should run like this for up to 20 minutes.
- The measuring procedure is performed using probes connected between ground and terminal “B+”.
- The values that you received must be written down on a piece of paper, and then checked with the numbers indicated in the technical documentation of the vehicle.
Experts say that for most cars the normal voltage is 14-16 Volts. Even with minor deviations, there is a possibility of the voltage regulator breaking down. To solve this problem, it needs to be replaced.
Important! Following basic safety rules when checking your generator will protect you from negative consequences for your health. Therefore, it is prohibited to check by short circuit, connecting terminals “B+” and “D+”, etc.
d.
Based on the test results, you can get the following indicators:
- The voltage is below normal - a possible solution is to tighten the belt drive that goes from the motor pulley to the generator.
- Voltage higher than normal usually indicates loss of generator functionality.
Non-standard reasons
Sometimes the headlights don't come on for very unusual reasons. For example, one car enthusiast’s Niva car stopped turning on its low beam after dismantling faulty headlight cleaners. Of course, he was not immediately able to determine that the breakdown was caused by his actions. But, as it turned out, the low beam went out due to the lack of motors that were necessary for the normal operation of the headlights. To solve the problem, the car owner created an imitation of the presence of motors, shorting the wires in the places where they should have been, only after that the problem was solved.
The example given above shows that if you have checked both the wires and contacts, but the low beam lights do not light up, remember what manipulations you recently carried out with your car. Perhaps after the last “pumping” of the car the problem appeared. After all, by making any changes to the design of the car, you can automatically disrupt the operation of the complex system of its functioning, designed at the manufacturer.
If you are sure that nothing has been changed in the car, you need to contact a service station for help in repairing headlights. After all, you can spend an indefinite amount of time and effort searching for the cause of a breakdown.
Knowledge of how to find the cause of the low beam not working and fix this breakdown yourself will also help in the opposite situation, when the high beam does not light up, but the low beam turns on without difficulty. In this case, in addition to the problems listed above, there is a malfunction of the steering column switch, due to which, by the way, only one of the headlights may be on. The best solution in case of such a breakdown is to replace it.
Fault localization
Understanding the operating principle allows you to determine exactly why the brake lights may not light up:
The fuse has blown. In the diagram, the fuses are marked with the letter F (from English - Fuse) and the serial number of the seat in the fuse block, for example, F3;- poor contact at connectors;
- the light bulbs have burned out, but since the lights are connected in parallel, the likelihood that 2 lamps will burn out at once is extremely low;
- poor contact on the negative terminal of the lights. In this case, problems may begin not only with the feet, but also with the lighting of the remaining lamps in the lanterns;
- Damage to the negative track in the lamp board. From the total mass directly to the brake light lamp, the minus goes along a special path on the board. The path may collapse from water or mechanical impact;
- malfunction of the brake light switch, the so-called frog;
- broken wiring, oxidation of contacts.
Troubleshooting algorithm
To detect a fault in the electrical network, you will need a multimeter or a tester, which you can make yourself. Previously, we told you how to use a multimeter, so we won’t focus on that.
The sequence of searching for the cause of the breakdown:
- Check the fuse for the brake light circuit. The location diagram of the fuse links can be found in the repair and operating manual for your car; often the symbol of the protected circuits is located on the back of the cover covering the fuse mounting block. If the installed fuse of the required rating immediately blows, there is a short circuit (short circuit) in the circuit. Please note that the fuse can protect not only the feet, but also other circuits. Installing a fuse with an increased rating is fraught with the risk of a car fire;
- If oxidation is detected on the terminals, clean the contacts mechanically or use an aerosol contact cleaner.
- Having turned on the ignition first and holding the brake pedal depressed, check whether there is power on the positive wire that goes from the limit switch to the rear light connector. If there is power, there is a malfunction in the lights themselves;
- check whether the positive signal is coming from the mounting block to the limit switch. If + comes, but when you press the brake pedal it does not appear on the second terminal of the limit switch, then the problem is in the “frog”;
- If there is no + at the limit switch terminal, examine the circuit up to the mounting block. If the wire is intact and securely fastened in the connectors, then the problem is in the mounting block.