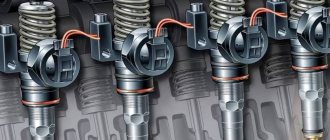
The injectors of a diesel engine, as well as an injection engine, periodically become dirty. Therefore, many owners of cars with a diesel engine are wondering - how to check the injectors on a diesel engine? As a rule, if they are clogged, fuel is not supplied to the cylinders in a timely manner, and increased fuel consumption occurs, as well as overheating and destruction of the piston. In addition, burnout of the valves and failure of the particulate filter are possible.
Diesel engine injectors
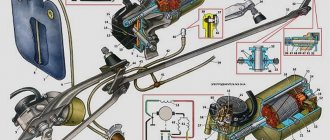
Design and principle of operation
The main function of the fuel supply system is to inject fuel in certain doses under pressure.
There are two main types of nozzles:
- simple;
- electrically controlled.
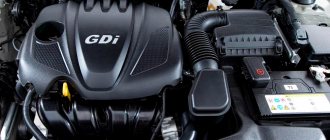
In a standard diesel injector, the atomizer is the main part. It can have several holes, be adjusted in different ways and supply diesel fuel. For example, simple diesel power units are equipped with elements with a single-hole atomizer and a needle. But GDI engines are equipped with nozzles with many holes, usually from 2 to 6.
You can imagine the normal operation of injectors like this. Diesel fuel flows from the tank to the fuel injection pump under low pressure. Then the fuel injection pump sequentially pumps fuel under strong pressure to the injection elements. They open under pressure. As soon as the pressure drops, the diesel injection is also switched off.
Electrically controlled injectors are created as a result of the progress of diesel fuel systems. Here, diesel fuel is supplied to the cylinders according to the same principle, only the nozzles do not open under pressure. An electromagnetic valve controls this entire process. It is not on its own, but is controlled directly by the car's ECU. Without a corresponding signal from there, fuel does not enter the atomizer.
Electromechanical control has many advantages. Thus, in Common Rail diesel injectors, up to 7 injections can occur in one cycle, which a priori increases engine power. Thanks to high-precision distribution in such systems, the combustible mixture is uniformly dosed, atomized and burned more efficiently.
Pump-injector systems have also recently become popular. There is no fuel injection pump; each cylinder has its own nozzle.
Pump injector device
How to care
It is worth noting that if the car is expensive, then the spare parts for it are expensive. Therefore, when buying a new, good car, be prepared to maintain it. In order for Common Rail to work correctly, it must be flushed periodically.
Today, on the shelves of car stores there are many different products not only for diesel engines, but also for gasoline ones, so the question of what to wash with should not arise. In fact, Russian detergent manufacturers do not achieve the desired level of quality.
This company produces high-quality products that can be found on the counter of your nearest automobile store. The period between cleanings should be 15-20 thousand kilometers. After each cleaning, it is recommended to fill the tank with valve protectant.
Symptoms of a problem
Despite extreme precision, diesel injection systems are very fragile. This is the reason for their rapid failure. This is especially true for electronic and electromechanical injectors, which cannot tolerate low-quality fuel, aggressive driving style and clogging.
The first obvious sign of a faulty injector is increased, unnatural agility of the car. The electronics incorrectly determine the dosage and overfill the fuel. This does not last long: the process takes the opposite effect. The smokiness of the exhaust increases, especially when the gas pedal is sharply applied. Oil consumption increases, into which diesel fuel begins to leak.
The second sign is unstable idle speed. The car will begin to start worse in the morning, and when warmed up, it will smoke. Competent diagnostics of diesel injectors must be carried out taking into account these factors.
Thus, the “symptomatic series” can be briefly described as follows:
- jerks and jolts while driving;
- engine idle mode is unstable;
- Excessive amounts of smoke are released from the exhaust system;
- there is a loss of traction or a sharp increase in it;
- individual cylinders fail.
Diesel engine injector pressure
The higher the pressure of diesel engine injectors, the finer the diesel fuel is sprayed. Thus, a GDI engine has an average injector pressure of 1000-2050 bar. In addition, depending on the quality of the atomizer and the fuel system, the injection time may vary - from 1 to 2 milliseconds.
Proper maintenance of a diesel engine involves, first of all, adjusting the injection start pressure. This is done on a special stand, adjusted with a screw with the nozzle cap removed and the lock nut unscrewed. The pressure will increase when screwing in the screw, and decrease when unscrewing.
Below are approximate readings of the standard pressure of various systems:
- classic injector - 400-1000 kg/cm2 flows through the fuel injection pump;
- Common Rail - up to 1600 kg/cm2 is provided through the fuel injection pump;
- pump nozzles - 1200-2050 kg/cm2.
Recovery stages.
1. For simplicity and convenience of disassembling the engine system, it is worth removing the pressure in the fuel line. To do this, you need to remove the fuel pump conductor. After this, we start the engine and wait until it finishes its work on its own. The procedure is repeated until the engine stops starting.
2. In order to gain free access to the nozzles for cleaning or replacement, you will need to dismantle the following elements:
- Air filter conductor.
- Injector conductor holders. The main wire clamp can be found under the thermostat tubes closer to the front glass.
- Idle speed controller lock.
- Throttle position drive.
- Vacuum conductor from the fuel system pressure controller.
- Gasoline supply conductor.
- Gas pedal cable.
3. Remove the plate clamp that holds the fuel conductors. After this, carefully dismantle the ramp with nozzles. The nozzles are fixed tightly enough, so you need to remove the ramp with little effort. We lift the element and fix the conductors on the glass cleaner leash.
4. In order to dismantle the injectors, it is necessary to unfasten the electrical connector fixing brackets and the element holders. It is first necessary to cover the working surface with a rag, since after dismantling the element some amount of the fuel mixture will spill out.
The gap in the ramp should be sealed to prevent foreign materials from entering.
When the injectors are removed, you can begin to restore them.
5. Connect the injector output to a relay and a 12-volt light bulb. In this case, the lamp will act as a charge absorber. The restoration of injectors is carried out under a certain pressure, so all fasteners must be securely fixed. You can make a system through which the composition for washing the element will move using several simple methods.
One method is to make a system from a rubber tube attached to the top of the sprayer. The simplest way is to supply the cleaning mixture using a syringe.
6. Remove the rubber ring of the seal and place the hose on the tail of the element.
7. We power the conductors from the battery.
8. Press the button to spray the mixture and wait for the pressure to be optimized.
9. Turn the nozzles away from you and press on the sprayer.
As a rule, to thoroughly clean the element, it is worth repeating the procedure at least twice. When the spray pattern becomes uniform, nozzle cleaning is complete.
If there is no desire to restore an internal combustion engine element and you decide to replace the element, then after dismantling, the injectors are changed and the elements are assembled in the reverse order.
Thus, we will restore the productivity of the motor and increase the service life of the propulsion system.
Despite regular maintenance and washing of elements, modern manufacturers still recommend replacing injectors every 100,000 km. Changing injectors or washing them are simple, but very useful maintenance procedures for the propulsion system. The modern car enthusiast is provided with several methods for servicing injectors. You can clean the injectors using a special composition or ultrasound in a specialized service. You can also restore or replace a used element with your own hands.
Regardless of the choice of technique, the main thing remains timely diagnosis and regular maintenance of the car.
Checking the injectors in a specialized workshop will cost an order of magnitude higher than restoring the elements yourself. By doing the work yourself, you remain confident in high-quality and honest service.
The choice is yours!
Checking diesel engine injectors yourself
The usual method of diagnosing clogged injectors is as follows:
- increase engine idle speed to the limit;
- loosening the nuts in the places where the high-pressure rail is fixed, deactivate the injectors one by one;
- listen to the engine running.
If you turn off a working injector, the power unit will begin to act up. Conversely, if you disconnect the faulty injection element, no changes will be observed. In addition, you can check the injection elements by pressure. It is necessary to probe the fuel lines for shocks or increased temperature. A clogged fitting will be hot, since the injection pump constantly pumps fuel here, but due to the blockage of the channel, it does not pass through.
The next test option is through the return drain. A faulty injector will dump more fuel into the return system than necessary. Because of this, the injection pump loses its ability to produce the required operating pressure, which causes difficult starting and poor engine performance.
Before diagnosing this type, you need to prepare the following tools:
- medical syringes 20 ml;
- drip system.
As a rule, to speed up the work process, a system of droppers is prepared, rather than a single syringe with a tube. This makes it possible to check all the injectors at once. The pistons should be removed from the syringes and the dropper tubes should be connected to the necks.
You can find the problem injector like this:
- connect the dropper system with syringes to the return drains of the injectors - the standard wires need to be removed;
- start the engine;
- wait until a certain amount of diesel fuel is filled into the syringe.
Here are the conclusions drawn after this:
- the nozzle is considered fully operational if no fuel has entered the syringe within two minutes or the amount of fuel is 2-3 ml;
- partially faulty, requiring repair if the volume of diesel fuel exceeds 10-15 ml;
- completely faulty, requiring replacement if the amount of drainage exceeds 20 ml.
Despite the wide popularity of these testing methods among diesel operators, without hydraulic equipment it is extremely difficult to see a full picture of what is happening. In reality, the volume of fuel discharged by an injector depends on many things. For this reason, diagnostic methods by calculating the amount of backflow or shutdown will only allow one to judge the throughput capabilities of the sprayer.
Diesel fuel spray quality
A normally operating injector, at the moment of fuel supply, produces a single, short and “heaped” injection, which is accompanied by a sharp sound. A common situation is that the injector (spray) nozzle holes may be partially clogged or worn out. Then the nozzle requires cleaning or replacement.
We recommend reading the article on how to choose the right oil for a diesel engine. From this article you will learn about the main parameters and criteria when choosing diesel engine oil, taking into account the individual characteristics and operating conditions of the engine.
In this case, the part must be mounted on a testing stand and directed with the nozzle to a specially prepared place. You need to put clean paper in this place in order to simplify the diagnostic process. Next, sharp fuel injection is carried out. After this, you can see on the paper traces or breaks in the sheet from the jets of diesel fuel. The total number of such marks after injection should be identical to the total number of holes in the nozzle structure. If there are fewer marks on the paper, then some of the holes are clogged and the diesel injector nozzle (spray) needs to be cleaned.
Traces of diesel fuel on the paper should have the same density, and also be located at an equal distance from the center. An important function of the injector is not only supply, but also ensuring the most uniform spray of diesel fuel around the circumference.
The holes are cleaned after disassembling the injector. Cleaning without disassembling the element is not recommended due to the fact that dirt and deposits will remain inside. The sprayer and other parts must be thoroughly washed in kerosene. The resulting carbon deposits, which are located on the outside of the component elements, are carefully removed with a wooden scraper. The holes themselves are cleaned with a small piece of thin and soft steel wire.
Please note that the diameter of the wire must be at least 0.1 mm smaller than the diameter of the nozzle holes. If the nozzle holes increase their total cross-section or the correct shape of the holes is disrupted, this will lead to a decrease in the rate of fuel exit from the nozzle. The spray quality will automatically deteriorate.
The nozzle must be replaced if the diameter of the nozzle holes is increased by only 10% of the maximum allowable. Another reason for replacing the nozzle is a 5% difference in hole diameters. After cleaning or replacing the nozzle, the nozzle is reassembled.
Testers for more detailed diagnostics
One of the well-known devices is called a maximeter. This is a perfect nozzle in all respects, equipped with a spring and scale. With its help, you can adjust important parameters, including pressure. Some motorists use a regular, known-to-work injector instead of a maximeter. The indicators taken with its help are compared with the data of the nozzles used in the engine.
Checking algorithm using a maximeter:
- all injectors of the car are dismantled;
- a tee is connected to the free fitting of the injection pump;
- loosen the union nuts on all other fittings;
- the maximeter and the nozzle being tested are connected to the tee;
- the decompression mechanism is activated;
- crankshaft rotation starts.
Under ideal conditions, both injectors should show the same pressure results at the beginning of injection. In case of deviations, the sprayer needs adjustment.
In general, the operation of injection elements is influenced by mechanical characteristics. But their verification is possible only on a professional stand.
In particular, they test on it:
- the amount of fuel passing through the element;
- fuel pressure;
- spray pattern.
Testing using a bench is the most accurate diagnostic method, allowing you to determine the degree of damage to injection elements and the feasibility of repair.
Correct adjustment of nozzles
If the nozzle is repairable, it is adjusted to restore the original needle tightness. If it dangles freely, fuel flows out through the gap that appears. For a fully operational atomizer, a leakage rate of no more than 4% of the total amount of fuel supplied to the cylinder is acceptable. In addition, diesel injection elements can leak due to poor sealing in the needle cone area.
Adjustment of diesel engine injectors for density is carried out by changing the spring tension. The optimal permitted displacement is 10 kgf/cm2. If a leak is observed, the needle is rubbed in with special GOI paste. For better effect, the abrasive is diluted with kerosene.
Cleaning (rinsing) instructions
As mentioned above, a common problem with diesel injectors is their clogging. To restore the performance of the injection elements, cleaning is carried out.
It can be done in two ways:
- without dismantling the injectors;
- with removal.
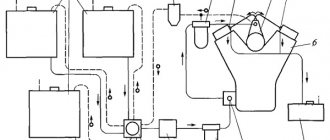
In the first case, a special additive is added to the fuel, which can clean the injector of deposits. However, this method rarely gives results, especially for diesel cars. Solvent cleaning is much more effective. But here you have to build a small autonomous system from a fuel filter, bottles, pressure gauge and compressor. This work requires caution, as the pressure must be constantly monitored, otherwise the plastic bottles will burst.
As for complete cleaning, it is only possible by removing the injectors from the engine.
Elements can be washed using:
- ultrasound;
- chemical composition.
Ultrasonic cleaning is more effective, but requires a special stand. In addition, this option has its drawbacks: this washing option is contraindicated for some types of nozzles.
Chemical processing is much simpler. As a rule, carb cleaner is used. It connects to your phone charger. Then a small circuit is constructed and the injection system is simultaneously flushed. Using a carburetor cleaner, you can wash out medium-hard deposits. However, it cannot remove fossils and old deposits: ultrasound must be used here.
Disadvantages of common rail
Repairing common rail injectors with your own hands
Among the main disadvantages that may arise when operating a diesel engine equipped with this system is the high demands on fuel quality. The very thin spray channels of the injector can be blocked by tiny solid particles in the fuel. Also, due to the complicated design of injectors, their replacement will be required much earlier than parts installed on conventional diesel engines. Fuel equipment, the purchase of which will be required already during the first major overhaul, will not be cheap, and even if you carry out independent repairs of common rail injectors, you will need to spend considerable financial resources on the purchase of spare parts, tools and equipment for repair and diagnostic work. It is very difficult to set up and repair common rail with your own hands in a garage, and a workshop with qualified specialists may not be in the immediate vicinity of the vehicle’s parking lot. Self-adjustment of such a system is possible only if you have knowledge of the design of a diesel engine.
Causes and methods of eliminating fuel leaks from a fuel injector
The diesel system is checked for leaks as follows:
- the nozzle, the place where it is screwed in and the nut securing the tube are wiped dry;
- the designated areas are wiped with chalk;
- the engine starts and immediately turns off;
- there will be a leak in the place where the chalk has darkened.
As a rule, it leaks from under the fuel pipe. In this case, replacing it will help. If the injector is sweating, then it is thoroughly checked, and if there is a place between the injection element and the head, the copper o-ring must be replaced.
There are several reasons for diesel leakage from the nozzle. The most common one is the loosening of the washer located under the problematic injection element. You need to replace it and check the entire system again.
Subtleties of installation of the injection system
Before screwing in the nozzle, the thread must be machined.
Graphite and copper greases are suitable for these purposes. The surface must first be cleared of debris. To start screwing correctly, it is recommended to first twist the nozzle in the opposite direction. This will help center the threads. Only after correct installation can the screwing process begin.
As soon as the hand effort becomes insufficient, you need to use the key. The tool must control the torque. Tightening by eye leads to deviation of the force from the norm, which can lead to damage to the cylinder head and injector.
The final step is to install all the tubes in place
It is important to secure all fasteners correctly so that vibration does not damage the lines. The last step in installing the injectors is to get rid of any air pockets in the fuel line.
This is done according to the instructions for the car.
Table: performance of Bosch injectors
| Injector marking | Performance | Nominal pressure | |
| cm³/min | grams/min | ||
| 0-280-150-001 | 264.9 | 190.5 | 3.0 |
| 0-280-150-002 | 264.9 | 190.5 | 3.0 |
| 0-280-150-003 | 379.9 | 273.3 | 3.0 |
| 0-280-150-007 | 264.9 | 190.5 | 3.0 |
| 0-280-150-008 | 264.9 | 190.5 | 3.0 |
| 0-280-150-009 | 264.9 | 190.5 | 3.0 |
| 0-280-150-015 | 379.9 | 273.3 | 3.0 |
| 0-280-150-023 | 352.1 | 253.3 | 3.0 |
| 0-280-150-024 | 379.9 | 273.3 | 3.0 |
| 0-280-150-026 | 379.9 | 273.3 | 3.0 |
| 0-280-150-035 | 320.6 | 230.6 | 2.0 |
| 0-280-150-036 | 379.9 | 273.3 | 3.0 |
| 0-280-150-041 | 480.3 | 345.5 | 3.0 |
| 0-280-150-043 | 379.9 | 273.3 | 3.0 |
| 0-280-150-044 | 337.9 | 243 | — |
| 0-280-150-045 | 400.4 | 288 | — |
| 0-280-150-100 | 185 | 133.1 | 3.0 |
| 0-280-150-105 | 190.2 | 136.8 | 3.0 |
| 0-280-150-112 | 190.2 | 136.8 | — |
| 0-280-150-114 | 190.2 | 136.8 | — |
| 0-280-150-116 | 190.2 | 136.8 | — |
| 0-280-150-117 | 190.2 | 136.8 | — |
| 0-280-150-118 | 190.2 | 136.8 | — |
| 0-280-150-119 | 190.2 | 136.8 | — |
| 0-280-150-121 | 178.1 | 128.1 | 3.0 |
| 0-280-150-123 | 191.3 | 137.6 | — |
| 0-280-150-125 | 192 | 138.1 | 3.0 |
| 0-280-150-126 | 192 | 138.1 | 3.0 |
| 0-280-150-128 | 167.1 | 120.2 | 3.0 |
| 0-280-150-129 | 191.3 | 137.6 | — |
| 0-280-150-130 | 192 | 138.1 | 3.0 |
| 0-280-150-133 | 191.3 | 137.6 | — |
| 0-280-150-135 | — | 147.4 | 3.0 |
| 0-280-150-136 | 191.3 | 137.6 | — |
| 0-280-150-150 | 190.2 | 136.8 | 3.0 |
| 0-280-150-151 | 240.7 | 173.1 | 2.0 |
| 0-280-150-151 | 304.8 | 219.2 | 3.0 |
| 0-280-150-152 | 236.5 | 170.1 | — |
| 0-280-150-153 | 236.5 | 170.1 | 3.0 |
| 0-280-150-154 | 236.5 | 170.1 | 3.0 |
| 0-280-150-157 | 214.4 | 154.2 | 2.5 |
| 0-280-150-157 | 239.9 | 172.6 | 3.0 |
| 0-280-150-158 | 239.9 | 172.6 | 3.0 |
| 0-280-150-159 | 255.9 | 184.1 | — |
| 0-280-150-160 | 199.7 | 143.6 | 3.0 |
| 0-280-150-161 | 180.8 | 130 | 3.0 |
| 0-280-150-162 | 180.8 | 130 | 3.0 |
| 0-280-150-163 | 180.8 | 130 | 3.0 |
| 0-280-150-164 | 180.8 | 130 | 3.0 |
| 0-280-150-165 | 233.3 | 167.8 | 3.0 |
| 0-280-150-166 | 213.4 | 153.5 | 3.0 |
| 0-280-150-166 | — | 185.7 | 3.0 |
| 0-280-150-200 | 300.6 | 216.2 | 3.0 |
| 0-280-150-201 | 236 | — | 3.0 |
| 0-280-150-203 | 185 | 133.1 | 2.5 |
| 0-280-150-204 | 168.2 | 121 | 2.5 |
| 0-280-150-205 | 170.3 | 122.5 | 2.5 |
| 0-280-150-206 | 168.2 | 121 | 2.5 |
| 0-280-150-207 | 171.3 | 123.2 | 2.5 |
| 0-280-150-208 | 144 | 103.6 | 2.7 |
| 0-280-150-209 | 168.2 | 121 | 2.5 |
| 0-280-150-210 | 135.1 | 97.19 | 2.5 |
| 0-280-150-211 | 147.6 | 106.1 | 3.0 |
| 0-280-150-213 | 346.8 | 249.5 | 3.0 |
| 0-280-150-214 | 188.1 | 135.3 | 3.0 |
| 0-280-150-215 | 214.4 | 154.2 | 2.5 |
| 0-280-150-215 | — | 187.3 | 3.0 |
| 0-280-150-216 | 214.4 | 154.2 | 2.5 |
| 0-280-150-217 | 168.2 | 121 | 2.5 |
| 0-280-150-218 | 312.1 | 224.5 | 3.1 |
| 0-280-150-219 | 168.2 | 121 | 2.5 |
| 0-280-150-220 | 148.2 | 106.6 | 3.0 |
| 0-280-150-221 | 148.2 | 106.6 | 3.0 |
| 0-280-150-222 | 168.2 | 121 | 2.5 |
| 0-280-150-223 | 224.4 | 161.4 | 2.48 |
| 0-280-150-226 | 190.2 | 136.8 | 3.0 |
| 0-280-150-227 | 190.2 | 136.8 | 3.0 |
| 0-280-150-230 | 183.9 | 132.3 | — |
| 0-280-150-231 | 148.2 | 106.6 | — |
| 0-280-150-233 | 148.2 | 106.6 | — |
| 0-280-150-234 | 190.2 | 136.8 | 3.0 |
| 0-280-150-235 | 190.2 | 136.8 | 3.0 |
| 0-280-150-237 | 152.9 | 110 | 3.0 |
| 0-280-150-238 | 190.2 | 136.8 | 3.0 |
| 0-280-150-239 | 224.4 | 161.4 | 2.48 |
| 0-280-150-252 | 260.1 | 187.1 | — |
| 0-280-150-254 | 260.1 | 187.1 | 2.5 |
| 0-280-150-255 | 255.9 | 184.1 | — |
| 0-280-150-257 | 190.2 | 136.8 | 3.0 |
| 0-280-150-300 | 190.2 | 136.8 | 3.0 |
| 0-280-150-302 | 190.2 | 136.8 | 3.0 |
| 0-280-150-303 | 190.2 | 136.8 | 3.0 |
| 0-280-150-306 | 520.2 | 374.2 | 3.0 |
| 0-280-150-309 | 190.2 | 136.8 | 3.0 |
| 0-280-150-310 | 190.2 | 136.8 | 3.0 |
| 0-280-150-314 | 190.2 | 136.8 | 3.0 |
| 0-280-150-315 | 190.2 | 136.8 | 3.0 |
| 0-280-150-318 | 190.2 | 136.8 | 3.0 |
| 0-280-150-319 | 190.2 | 136.8 | 3.0 |
| 0-280-150-320 | 190.2 | 136.8 | 3.0 |
| 0-280-150-321 | 190.2 | 136.8 | 3.0 |
| 0-280-150-322 | 190.2 | 136.8 | 3.0 |
| 0-280-150-323 | 190.2 | 136.8 | 3.0 |
| 0-280-150-324 | 190.2 | 136.8 | 3.0 |
| 0-280-150-325 | 190.2 | 136.8 | 3.0 |
| 0-280-150-326 | 190.2 | 136.8 | 3.0 |
| 0-280-150-327 | 190.2 | 136.8 | 3.0 |
| 0-280-150-334 | 190.2 | 136.8 | 3.0 |
| 0-280-150-335 | 300.6 | 216.2 | 3.0 |
| 0-280-150-351 | 746.2 | 536.8 | 3.0 |
| 0-280-150-352 | 270.1 | 194.3 | 3.0 |
| 0-280-150-355 | 388.9 | 279.7 | — |
| 0-280-150-355 | 300.6 | 216.2 | 3.0 |
| 0-280-150-357 | 300.6 | 216.2 | 3.0 |
| 0-280-150-360 | 270.1 | 194.3 | 3 0 |
If you have any questions, leave them in the comments below the article. We or our visitors will be happy to answer them