November 27, 2017 Lada.Online 92 918 0
The headlights of a new vehicle are set correctly by the manufacturer. However, during operation a situation may arise when it is necessary to adjust the direction of the headlight beams. To do this, it is not necessary to contact specialists; adjusting the headlights is not difficult with your own hands. Let's look at the features of this event using the Lada Priora car as an example.
Adjusting the direction of headlight beams
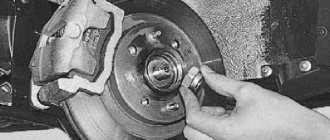
We adjust the direction of the headlight beams on a fully fueled and equipped car, with normal air pressure in the tires. We install the car on a flat horizontal area at a distance of 5 m from the screen (you can use a garage wall, a sheet of plywood or hardboard measuring 1x2 m).
Scheme for adjusting the direction of headlight beams
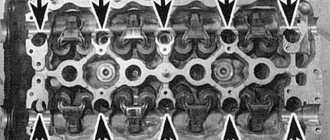
. We draw a horizontal line 1 on the screen at a height equal to the distance from the center of the headlights to the floor. Below it, 65 mm, we draw a parallel line 2. We draw on the screen a vertical center line 0 (the distance from it to the center of the left and right headlights should be equal) and lines corresponding to the centers of the headlights (AE and BE). Set the headlight range control switch to position “0” (single driver or driver with a passenger in the front seat) and turn on the low beam headlights. Cover one of the headlights with opaque material. We insert the “6” hexagon into the regulator socket through the hole in the upper cross member of the radiator frame.
By turning knob 1, located closer to the axis of the car, with a hexagon, we change the position of the light beam of the headlight in the vertical plane. By turning regulator 2, located closer to the car's fender, we change the position of the light beam in the horizontal plane. When adjusting, the upper boundary of the light beam should coincide with the lower horizontal line (see Fig.), and the break point of the beam (the point of intersection of the horizontal and inclined sections of the light flux) should coincide with the vertical line corresponding to the center of this headlight. Similarly, we adjust the direction of the light beam of the other headlight.
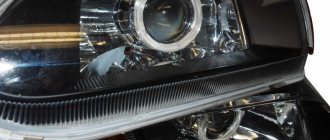
Location of light beam direction regulators on the headlight housing
: 1 - regulator of the light beam in the horizontal plane; 2 - regulator of the light beam in the vertical plane
Owners of cars from the domestic automobile industry have a kind of hobby for repairing, minor modernization, and tuning their combat vehicle. Such work as: removing a headlight, replacing optics with a new one, failure of lighting devices - on Priora deserve a separate discussion. The headlights on the Priora are equipped with bulbs that burn out once a season. Lada Priora cars also have a problem: sometimes the headlights sweat, which means you need to remove them and glue them. Adjusting the headlights is not the least important in traffic safety; for this purpose, an electronic and manual corrector is provided. The factory headlight of the Priora car (Bosch and Kirzhach) underwent changes during restyling; in addition, there are many Chinese analogues, for example, black headlights. Tuning is also problematic without removing them from the mount. The price of headlights varies - starts from 5,000 rubles for a factory headlight. Read the article to the end and find out the subtleties in this matter!
practical guide
To adjust the headlight you will need:
— a flat horizontal area (preferably near the wall of a house, a fence or at a gate);
— tape measure 5 m long;
— a sheet of cardboard (to cover the headlight when adjusting).
We carry out the work with an assistant.
Screen marking diagram for adjusting the light of the headlights: A - vertical line indicating the location of the center of the low beam lamp of the left headlight; B - vertical line indicating the location of the low beam lamp of the right headlight; B - horizontal line indicating the location of the low/high beam headlight lamps; G - line indicating the height of the rise of the horizontal border of the light beams; O - center line; l is the distance between the low beam lamps of the headlights; h - distance from the surface of the platform on which the car is installed to the center of the low beam headlights
It is advisable to carry out the adjustment in the dark. The vehicle must be in running order (fully fueled and without additional cargo). Since it is not easy to find a suitable surface as a screen, it is easier to use a 1x2 m plywood board with markings applied to it. In this case, it is necessary to prepare a stop or stand to install the shield vertically.
Priora car headlight: Bosch and Kirzhach - what is the difference
Let's highlight two manufacturers (not taking into account the copies of Chinese origin) that have a number of differences. Popularly known as kirzhach, bosh. There is a significant difference between them: Kirzhach - a corrugated inner surface of the well, a cast low-beam lamp reflector without a cutout, glass (plastic) attached with a refractory sealant. The marker lamp is located at the bottom of the reflector well. Two separate plugs for the rear of the optical device. The device from the Bocsh brand has a smooth inner surface of the well, a low-beam lamp reflector with a cutout, and a low-melting sealant is used to fix the glass (plastic). The size lamp is placed in the upper part of the well; one plug from the rear of the lighting unit is used. Minor differences in design, quality of parts, presence of a chrome-plated rim of the signal amplifier of the rotary element. The number of taillight design variations available to the buyer is numerous.
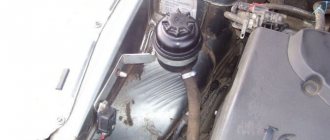
The damper drive does not work
It is impossible to check whether the Priora recirculation valve is working (on cars with the Panasonic climate system) by viewing errors in the operation of the system - the corresponding codes are simply not provided. Therefore, it is necessary to perform the following actions in accordance with the algorithm described in the diagnostic card:
- Use a multimeter to measure the voltage level between ground and contact No. 1 going to the mode switch;
- if the obtained value corresponds to the on-board network voltage, there is an open circuit in the recirculation switch section;
- otherwise, you need to measure the voltage between ground and contact No. 2 of the recirculation button when it is pressed;
- if the measured value is equal to the on-board network voltage, the switch itself is faulty, and then it must be replaced;
- otherwise, use a multimeter to measure the state of the recirculation key;
- if the value is equal to the on-board network voltage, there is an open circuit in the area between the mode activation key and the SAUKU heater controller;
- if not, we proceed to measuring the voltage in the area between ground and contact No. 1 of the damper solenoid valve (the button for turning on the recirculation mode must be pressed);
- if the obtained value corresponds to the voltage of the on-board network, there is a break in the electrical circuit in this area;
- otherwise, there will be an open circuit in the ground circuit of the damper drive valve.
The pinout of the Priora recirculation button is described in detail in the circuit diagram of the Panasonic climate control system. If the recirculation malfunction is caused not by an open circuit or a breakdown of the solenoid valve itself, but by a malfunction of the damper, replacing it can be quite difficult for an unprepared car owner.
If you go to a car service center, it will cost a pretty penny (about 10 thousand rubles), since the technicians will tell you that you need to remove the entire stove, drain the antifreeze, and also remove freon from the air conditioning system. You can do this yourself, and without draining the antifreeze and pumping out the refrigerant. Therefore, it makes sense to describe the procedure for replacing the vacuum drive if the Priora interior air recirculation damper does not work:
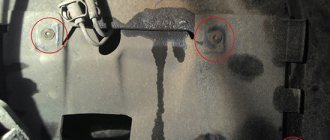
first you will need an L-shaped screwdriver - it is not sold in stores, but it is not difficult to make by bending any existing one made of fairly soft metal
We use it to unscrew the lower screw, which is located very inconveniently - there is a hole there large enough to stick your hand through and perform the necessary manipulations; the top screw is hidden behind the plastic of the stove body - it needs to be drilled exactly opposite the screw; disconnect the damper rod, for which you need to pull it to the left with a little effort; now the drive is free, all that remains is to pull it out (pull it a little to the left and press in the direction of the engine compartment - it should fall down), you need to pull it out carefully, since it can cling to surrounding parts; the procedure for inserting a new vacuum drive is also quite tedious - first we try to insert the valve into its normal place; the second step is to get the drive tube into the hole located in the lower part of the heater; put the hose on the valve itself; we tighten the screws in the reverse order (you will have to tinker with the bottom one, so you don’t have to tighten it - the valve will be held quite securely even without the bottom screw)
As you can see, you can replace the flap drive of the Priora recirculation system yourself.
Source
Why film
The main reason is failure, failure to perform the direct functions of the device. There may be a lot of reasons for replacing the headlights on a Prior. Broken outer glass, loss of tightness, fogging of lenses from the inside, deterioration of the reflector itself, breakdown of fixing elements. Replacement, repair of old contacts, installation of a new type of light bulbs. To solve them, you will have to unscrew the entire module from the car body, which will make it more convenient to repair and modernize optical devices. The block is not completely dismountable: to separate the glass from the body, it is better to heat the joint with a hair dryer until the sealant softens. Next, remove the melted sealant as much as possible using improvised means. We try to separate the glass with a screwdriver, clean all the separated parts from the old glue with a knife and sandpaper. The glass is seated back onto the sealant.
Polishing headlights on Priora
As their service life increases, sand, small stones, dirty water, and road chemicals negatively affect the light conductivity of the outer glass of lighting fixtures, and overall efficiency decreases. The solution will be restoration and polishing of the glass surface. When you decide to polish glass, thoroughly study the technical side of the process, materials, stages of work - everything affects the result. If you are not confident in your abilities, it is better to entrust the work to professionals, otherwise the result of the work done may be worse than the original result. If, nevertheless, you decide to polish the optical devices of your car, first remove the entire module, remove dirt, and protect surfaces that cannot be treated.
For polishing use:
- Abrasives;
- Sandpaper (1000 - 4000 units);
- Circles: felt, fabric, foam rubber;
- Polishing pastes.
First, a rough layer of plastic is removed with a depth equal to the depth of chips and scratches. As a result, the protective layer of varnish applied by the manufacturer will be erased, which must be restored after polishing. Applying a special varnish is a rather technically complex process. Another option is to stick a protective film, otherwise the result of your work will disappear in a couple of months. Change the sandpaper to finer sandpaper every 2 - 3 minutes. We monitor the removal of traces left by the previous number of abrasives. After each change of sandpaper, you must thoroughly wash the surface. The dried surface is ready for polishing.
Important: polish the tool used at low speeds to avoid overheating and clouding of the plastic; it will be impossible to restore this.
Using polishing wheels, we bring the glass surface to the desired shine. Polishing is often carried out due to varying degrees of wear on the vehicle's optical devices, for example, one headlight was damaged in an accident and was replaced with a new one.
Why do Priora headlights sweat?
The most common problem with the optics of domestic cars is moisture getting inside. The headlight sweats due to loss of sealing of the unit. The back cover has lost its tight fit relative to the surface of the case. To fix the problem, it is better to remove it entirely. Open all existing plugs and dry thoroughly in a warm, dry room. Seal the gaps between the covers and the body (use different types of seals, silicones, sealants). Some car enthusiasts advise spraying a small amount of alcohol inside. After drying, reassemble and install on board your car.
How to remove a taillight on a Priora and glue vinyl
Car enthusiasts often have a desire to highlight the uniqueness of the vehicle on the road in every possible way. To achieve the goal, the owners are upgrading the taillights on the Priora. They change the color of the vinyl film glued on top and install additional LEDs. Additional modifications to the design of the light signaling system must comply with safety standards.
It will be easier to work by removing the rear light. What is not difficult:
- You need to disconnect the wiring connector going to the light on the trunk side;
- unscrew the three plastic wing nuts;
- remove the lantern;
- pull out the wires along with the rubber seal through the mounting hole.
How to remove a headlight on a Priora without unscrewing the bumper
When carrying out any kind of tuning, installation, or dismantling of the main lighting fixtures, you will inevitably have to remove the entire light fixtures. Before installing the front and rear lighting devices, be sure to disconnect the wire from the terminal and the wiring harness going to the lighting unit itself. Dismantling the front bumper completely is not necessary; it will be enough to disconnect the upper part of one side from the car body. Thus, installation of front optical modules will be simpler and less labor-intensive. What tools will you need?
Installation of anti-fog equipment
It is impossible to install PTF without dismantling the previous headlight model. For these purposes, the plugs are removed from the bumper, the old headlights are taken out, purchased ones are put in their place and secured with screws. If the size of the holes is not enough for installation, then it is necessary to disconnect the bumper and carry out installation work. If the bumper did not previously have places for fog lights, then they can be made using a sharp knife.
Then you need to lay the wires from the headlights along the cable under the hood in the form of a bundle, which is secured with a clamp. It should be shorter on the left side than on the right. The output of the wires to the control panel is most often installed through the hole behind the fuse box.
The negative wires need to be connected to the car body, after which the crankcase protection (and bumper) is secured in place.
Imported kits often do not include wires, connectors, and plugs, without which it is impossible to install the PTF, so they need to be purchased additionally.
Adjusting Priora headlights using a corrector
Adjusting the light beam is extremely important for safe, comfortable driving. If you have a suitable place and desire, you can carry out the procedure yourself at home. You will need to place the car on a flat horizontal surface at a distance of five meters from the wall to the car. Check the operation of the manual corrector located directly on the back of the block (small movable wheel). At the level of the middle of the headlights, draw a horizontal line on the wall (L. 1), approximately 65-75mm. Below we draw a line (l. 2). Two vertical lines in the middle of each headlight (l. A) (l. B), another vertical line strictly in the middle between them. There should be 1 person in the car, the tire pressure should be within normal limits and be the same everywhere. The low beam turns on, we try to adjust the light. Close one headlight tightly. We turn the corrector wheel until the horizontal and oblique beams of light intersect at the point of intersection of lines A. and B. with line L. 2. Electronic adjustment in the car interior should be zero.
What will be required to complete the work?
It is also possible to independently adjust the position of the light, and no special equipment is required. It is enough to place the car on a flat area in front of the wall - the so-called screen adjustment.
The peculiarity of this adjustment comes down to proper preparation of the machine and adherence to a certain technology.
It is not so difficult to prepare a car for this operation - you just need to provide the workload on the axles of the latter.
It needs to be refilled, and the tank should be more than half full.
You should also check the tire pressure - it should be the same in all wheels and correspond to the norm.
If the car is loaded most of the time, then you need to provide additional weight in the trunk.
It is also necessary to have someone behind the wheel, or to ensure that the weight in the driver's seat is approximately equal to the weight of the driver himself.
As for the platform on which the adjustment will be made, it must be level.
You can check this in the simplest way - put the car on a platform, and then measure the height from the floor to the lower edge of the headlights - if there is no significant difference, the platform will do.
The wall in front of the car must be strictly vertical. If the unevenness of the wall is very obvious, then you can put a sheet of plywood on it.
In our case, no special tool is required.
But there are exceptions, for example, on the Grant fret, a 6-point hex wrench is used to adjust the headlights.
On other models, a smaller screwdriver may be needed.
Such troubles can occur frequently, so please read the instruction manual first.
Rules for replacing headlights
Experienced auto mechanics know how to remove rear and front headlights. To do this you will need the following tools:
- key to "10"
- Phillips screwdriver.
The wire is disconnected from the negative terminal of the battery. Then the front bumper of the Priora is removed. The latch is released and the wiring harness block is disconnected from the headlight. Having unscrewed the side screw securing the lighting element, unscrew its 4 latches. Removing the casing involves the subsequent dismantling of the upper mounting bolts. Thus, the headlights on the Priora have been removed. Installation of these devices is carried out in reverse order.
The rear lights on the Priora are removed in the same way. Initially, the wires are disconnected from the negative terminal of the battery. Next, the trunk lining behind the lighting unit is folded back. The clamps are released and the rear harness block is disconnected from the wiring of a similar lamp.
Having turned the upholstery to the side on the side of the last element being replaced, first unscrew its fastenings. Unscrew the 3 nuts of the studs on which the rear lights are attached. The wiring is displayed. The lamp itself is removed. The installation process of dismantled devices is carried out in reverse order.
Necessary tool
How to adjust Priora headlights manually in the field
FTAROY CHANNEL “To the point” (for frostbitten +18) SUBSCRIBE...
Adjusting the headlights
Lada Priora
, subscribe to my channel.
- First of all, we park the Priora car on a flat area five meters from a flat wall. Fill the tank with fuel until it is full and use a pressure gauge to equalize the pressure in the wheels. After inspecting the headlights, thoroughly wash them from contamination. We check that the headlight bulbs are working properly. If necessary, we install new ones.
- After the preparatory procedures, we proceed to adjustment. We move the lighting width control lever to position “0”. This position corresponds to the load of the vehicle with the driver. Turn off the lights and rock the car from side to side. Thanks to the rocking, all suspension elements will take a standard position. We ask a colleague (about the same weight as you) to sit in the driver’s seat of the car.
- For further adjustment, draw a special marking on a flat wall. The center line should be drawn so that the distance from the center of each headlight to the axle is identical. We mark the centers of each headlight with dots on the wall and draw two lines vertically through them. Draw a straight line between the lines and mark it with the letter “A”. Below, at a distance of 12 and 22 centimeters, draw two more lines in parallel.
- With the low beam on, close one of the headlights. The top point of the light spot from the headlight should coincide no higher than the horizontal center line. Also, the boundaries of the light beam of the fog lights are located along the same line.
- We make sure that the intersection of the inclined and horizontal sections of the boundaries of the light fluxes (at the point where the light beam breaks) coincides with a line that is drawn vertically and passes through the point marked as the center of the headlight. If deviations in the luminous flux are detected, we adjust the headlights with a hexagon of 6 millimeters by rotating the horizontal and vertical position screws. These screws are located under the hood in the headlights.
Which is better, Lada or Mercedes?
There is a special offer on our website. You can get a free consultation with our corporate lawyer by simply submitting your question in the form below.
Optics on a car is one of the components of the safety of the driver and passengers; visibility on the road depends on its quality. Like any car part, the optics on a Lada Priora car sometimes require replacement. The article describes the reasons for replacing optics, how to properly replace and adjust the headlights on a Priora.
In what cases is it necessary to replace and adjust headlights?
The main reason why optics are replaced is their failure and the inability to perform their functions: high-quality road lighting. In addition, the lamps in the lanterns are changed. Bosch lamps are in demand. Bosch brand xenon produces better quality light and has a longer service life.
Bosch xenon lamps
Optics should be changed for the following reasons:
- the headlight sweats, its ventilation is impaired;
- cracks, chips on glass;
- reflector malfunction;
- faults in electrical connectors;
- defects in fasteners;
- tuning
During the replacement process, you can not only restore the functionality of the flashlight, but also improve its performance characteristics by replacing halogens with xenon.
Using xenon in lamps, the driver receives better lighting. At the same time, tuning of the headlights is also carried out: lens glass is installed, black headlights look impressive.
LED lamps are installed in the parking lamps, as well as in fog lamps.
Front lights with lenses
To make your car tuned, you need to know how to remove the front and rear optics.
Replacing headlights from A to Z
The toolkit for the procedure for replacing headlights on a car consists of:
- socket wrench to “10”;
- Phillips screwdriver;
- flat screwdriver.
Replacing a headlight on a Priora begins with disconnecting the negative terminal of the battery (the author of the video is the channel In Sandro's Garage).
Before removing the headlight on a Priora, you need to remove the bumper. Then you need to remove the headlight covers from above. Next, pressing the latch, the block with wires is disconnected. When the headlights are removed, you can change the bulbs, for example, with Bosch xenon ones. The glass version of the optics can be replaced with a lens one.
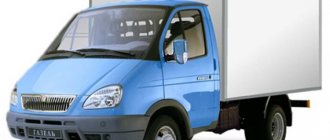
Niva urban pickup photo
The rear lights of Priora 2 are removed in the same way. The upholstery is dismantled and the wires are disconnected. Now you can remove the rear lights of Priora 2.
Tail lights on Priora
To disassemble and replace the headlight glass, you will need the following materials and tools:
- industrial dryer;
- thin screwdriver;
- new glass;
- new lamp;
- sealant.
Before disassembling the headlights on the Priora, you need to place them on a clean, dry surface. Then heat the glass until the sealant begins to melt. Next, the glass should be pryed off with a screwdriver and separated from the body. The next step is to remove the old sealant.
Before changing the light bulb and replacing the headlight glass, the seat must be lubricated with a fresh layer of sealant. Then the glass is carefully placed and pressed firmly. After 12 hours you can assemble the lantern.
Setting up lighting elements
Auto mechanics know how to adjust headlights on a Priora. It is necessary to take into account that their incorrect adjustment can lead to a real threat to traffic safety at night. In this case:
- the roadway is poorly lit,
- Drivers of oncoming cars are blinded.
Scheme for adjusting headlights on a Lada Priora car
To prevent the situations described above, it is recommended to promptly and correctly adjust the lighting elements. To do this you will need the following tools.
Adjusting the headlights begins with choosing a location. Lada Priora is installed on a flat area at a distance of 5 m from a smooth wall. After filling a full tank of gasoline, check the tire pressure using a pressure gauge. If there is a deviation from the norm, it is adjusted to the minimum value. If the headlight is sweaty or dirty, then it is wiped and washed accordingly.
Next, the functionality of the light bulbs is checked. To do this, the light is turned on. If faulty lighting elements are identified, they are replaced with new ones. The next step is to move the headlight beam adjustment lever to the zero position. The headlights turn on and the car rocks from side to side. This action will allow the suspension parts to take the appropriate position.
Special markings are drawn on the wall. The center line is drawn in such a way that the distance from the centers of the lighting units to it is the same. Then the centers of each headlight are located. They are marked on the wall with dots. 2 vertical lines are drawn through them. A straight line is drawn between them and o. Parallel to it below, at distances of 12 and 22 cm, 2 more lines are drawn.
Next, the low beam is turned off and one headlamp is closed. The upper part of the light spot should coincide with the middle horizontal line “B” (see Diagram for adjusting headlights on a Lada Priora car). It should be taken into account that the intersection points of the inclined and horizontal sections of the boundary of these spots coincided with a vertical line, which was drawn through the point corresponding to the center of the lighting device.
Adjustment of lighting elements provides for some deviations. In this case, their horizontal and vertical position is adjusted. To do this, tighten the screws located under the hood of the car.
general information
Headlight settings are lost for a variety of reasons - from off-road conditions to minor traffic accidents.
Symptoms can also vary, for example, problems with low beams most often arise due to a broken relay or fuse.
Let’s also make a reservation that the headlight corrector installed on Grants can only compensate for the different load of the car, however, the car owner must level the horizontal plane independently.
The main reason for adjusting the headlights is the lack of light when illuminating the road, which has several possible reasons:
- Typically, a car that comes off the assembly line is adjusted to the weight of the average car owner (75 kg). If your body weight differs from the weight specified in the settings, then it is better to carry out the adjustment immediately after purchasing the car;
- If the hydraulic corrector breaks down, which results in bending of the headlights and difficulty making adjustments;
- After driving off-road;
- When buying a used car, since in this case the headlights were adjusted by the previous owner of the car to suit his own needs and weight.
Let's take a closer look at hydraulic correctors. These devices are installed on cars by the manufacturer and are designed to adjust the headlights higher or lower, depending on the degree of load on the car.
Since they do not have automatic adjustment, the adjustment must be carried out independently; the controls for the corrector are located at the light switch.
The zero position corresponds to a car with one person in the cabin (driver).
The operating principle of the device is as follows:
- the corrector cylinder is controlled using a handle;
- the cylinder is responsible for adjusting the pressure level in the tubes going to the pusher;
- the pushers are located directly in the headlights, and the higher the pressure in the tube rises, the more actively the liquid located in the inside of the pusher will press on the rod;
- The most important position for adjusting headlights is the position in which the rod is located.
If the corrector breaks down, which often results in one of the headlights stopping responding to it, the pusher needs to be repaired - it is its failure that in the vast majority of cases leads to a malfunction of the device as a whole. There are two methods for repairing a pusher. The first of them does not provide for its subsequent adjustment; to implement this technique you will need:
- Remove the broken pusher from the headlight;
- Warm up the pusher tube (this will give it greater elasticity), and then remove the pusher from it;
- Tighten the self-tapping screw from the side of the tube (be sure to screw it at an angle, the degree of protrusion of the rod directly depends on the depth of the screw);
- Then adjust the length of the screw to get the final result you need.
The second method involves returning the hydraulic corrector to a fully functional state. To do this you need:
- Remove the pusher from the headlight;
- After warming the tube, remove it from the pusher;
- Try to move the pusher using pliers (the device will not function if there is not enough liquid in it or there is no proper pressure);
- When the rod moves, antifreeze is pumped into the pusher (using a conventional syringe), after which the system is put back together;
- If there is no movement of the rod, you should pump a small amount of antifreeze into the pusher (to the required level), and try to develop the rod;
- The optimal level of liquid inside the pusher can be determined both experimentally and by comparing a faulty hydraulic corrector with a working device.