Generator rotor commutator 2110 KZATE
Delivery to regions
- Delivery of an order worth over 5,000 rubles is free if the delivery cost does not exceed 500 rubles; in other cases, delivery of goods is paid upon receipt of the goods.
- Delivery to the transport company is FREE.
- The timing, cost and method of delivery depend on the weight, dimensions and cost of the ordered product.
- Delivery options can be selected by the online store manager.
Orders are processed daily from 07:00 to 19:00 (Moscow time).
Order of shipment to regions of the Russian Federation:
- Place an order in the online store (on the website or by calling 8-800-234-96-34).
- Pay for the cost of the goods in any convenient way (card, Yandex.Money, QIWI, Webmoney, by bank receipt).
- After receiving the money (usually money arrives instantly), we will almost immediately deliver the order to the transport station.
Online store managers will help you choose the cheapest and fastest method of order delivery; you can trust our specialists who have studied all the nuances of pricing of transport companies.
Phone: 8-800-2005-888 Website: https://www.russianpost.ru Coverage: delivery is possible to any location in Russia Opening hours: Mon-Fri from 10 to 19, Sat from 11 to 16, Sun - closed Calculate shipping cost Track cargo
Business lines Phone: Website: https://www.dellin.ru Coverage: 500 cities in Russia Opening hours: Mon-Fri from 10 to 19, Sat from 11 to 16, Sun - closed Calculate delivery cost Track cargo
Attention - This delivery method must be ordered from a consultant! Phone: 8 800 200-50-55 Website: https://www.emspost.ru Coverage: delivery is possible to any location in Russia Opening hours: Mon-Fri from 10 to 19, Sat from 11 to 16, Sun - closed Calculate shipping cost Track cargo
PEK Phone: Website: https://www.pecom.ru Opening hours: Mon-Fri from 8 to 20 Sat from 10 to 16, Sun - closed Calculate delivery cost Track the cargo
SDEK Phone: Website: https://www.edostavka.ru/ Opening hours: Mon-Fri from 8:30 to 19, Sat from 10 to 16, Sun - closed Calculate delivery cost Track cargo
Navigator stores (Tolyatti, Syzran and Dimitrovgrad)
In most cases, the order can be picked up almost immediately at any of the 15 stores of the Navigator network. The goods are issued only upon presentation of an identification document (passport, driver's license, etc.).
If you cannot decide on the choice of transport company or do not know which transport companies deliver goods to your city, we will be happy to advise you.
If you cooperate with a transport company not represented in this list, then write to us and we will deliver your cargo to any transport center within the city of Tolyatti.
The order will be shipped within 1 to 5 business days, depending on the availability of the ordered product.
Replacing the slip rings of the VAZ 2110 generator on your own
Replacing the slip rings of the VAZ 2110 generator is necessary if there are various types of defects on their surface. Because of them, the rings cannot efficiently perform their most important function - tightly connecting the parts to each other so that contact occurs between them. Very often, individual parts of the generator break. If you change it completely, you will have to spend a considerable amount of money. Therefore, you can repair it by replacing broken parts. On a VAZ 2110, replacing the slip rings of the generator is a simple procedure and you can handle it yourself.
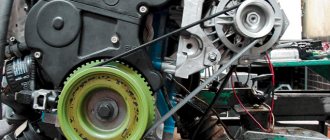
Replacing the rotor with rings
Replacement on the VAZ 2110 generator
Sometimes it is not possible to replace the rings separately. The rotor also has to be replaced. This situation occurs when the rings reliably “stick” to the rotor. But you can try to restore the rings by placing them in a sulfuric acid solution. They cannot be kept in solution for a long time, as whole particles may disintegrate. To replace the rotor and rings, you must:
- Place markings on the covers of the generator (to make it easier to assemble them later, otherwise you can confuse their location).
- Remove the plastic casing. This is easier to do after the three latches securing it are bent away.
Note: you need to bend them very carefully, as they are quite delicate. Moving too quickly can cause them to break.
- Remove the two screws that secure the electronic voltage regulator.
- After this, you will have access to the generator relay. It must be removed, otherwise it will interfere with the work process.
- Remove all fastenings of the unit and condenser.
- Then unhook the three winding tips coming from the stator.
- Remove the block and capacitor. If you need to replace the capacitor, you need to unscrew the nut that secures it. Then remove the washer along with the bushing. Now it’s the turn of the wires that attach the capacitor to the contact bolt. After this, you can remove and replace the capacitor itself.
- Unscrew the generator coupling bolts. There are four of them in total. There are usually flat washers and spring washers underneath the screw heads. They are very small, but perform an important function. You can’t lose them, otherwise you’ll have to buy new ones, but finding them on sale is not easy.
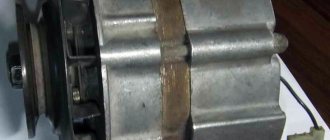
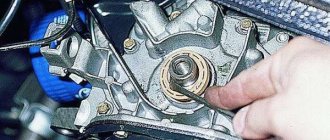
- Remove the generator cover from the side where the slip rings are located. In this case, you can help slightly with a screwdriver, as if pulling the lid towards you.
VAZ 2110 in the generator slip rings
- Remove the nut securing the generator pulley. Remove the washer and pulley.
Note: the rotor must be stationary. To prevent it from spinning, it should be clamped as much as possible, and a small piece of plywood should be placed under it.
- Disconnect the thrust washer.
- Remove the generator rotor.
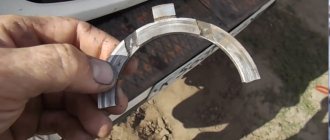
- It has a spacer ring that needs to be removed.
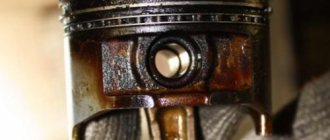
- At this stage, you need to carefully inspect the slip rings. It is possible that they will also have to be replaced. If they are worn out or there are scratches on their surface, then replacement cannot be avoided (by the way, it is not necessary to install new rings - they can be thoroughly sanded).
- A multimeter should measure the resistance of the rotor winding.
Note: if this tool shows that there is a break in the rotor winding, then it urgently needs to be changed. You can also try to rewind it, eliminating the break. But this process is quite complicated.
- You should also check if there is a short circuit between the winding and the rotor housing. To do this, you need to use a 220 V lamp. One of its wires must be connected to the body, and the other must be connected in turn to each of the slip rings. Moreover, if there are no short circuits, the lamp will not light.
- Insert the new rotor into place.
- Assemble everything in the opposite order.
About the principle of operation of a car generator
The operation of the Lada Kalina generator unit is based on the following principle: an alternating current is induced in the stator winding, which is subsequently transformed into direct current through a rectifier module located on the body of the unit. The generator cover is also equipped with an electronic voltage regulator and a brush holder. The rotor of the device receives torque from the crankshaft pulley. The transmission link is a poly V-belt.
The basic characteristics of the generator set include the following parameters:
- maximum generated current – 85-90 Amperes;
- operating range of on-board voltage – 14.4-15.1 Volts;
- rotation ratio of the motor and rotor – 1:2.4;
- right-hand direction of rotation.
The housing of the unit is held together by pins that tighten the stator with the covers. The mounting sockets of the indicated covers contain bearings, which ensure the ability of the rotor to rotate. The rear bearing is installed inside the cover with a minimum gap. The front element is equipped with the ability to slide along the surface of the rotor shaft. It is fixed inside the front cover with a slight interference fit, and a pressure plate covers it from the outside. The back of the device is protected by a plastic casing.
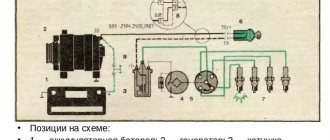
Let's move on to the switching diagram of the generator with the on-board network. The connection diagram is very simple. After turning on the ignition, power begins to flow to the voltage regulator through the battery discharge lamp circuit. When the motor starts, the excitation winding is supplied with supply voltage from three diodes mounted in the rectifier unit.
Using the indicated signal lamp, the generator unit can be checked. If the device is working properly, the lamp lights up when the ignition is on. It goes out when the engine starts. When this phenomenon is not observed and the lamp continues to shine, the generator set should be diagnosed for the presence of malfunctions. In some cases, replacement is required, and many are interested in how to remove the generator?
1 way
First, you need to check whether voltage is supplied to the battery. To do this, you need to take a voltmeter, the next step is to start the car, and connect the device itself to the terminals. If at the same time the device itself shows a low indicator of the incoming voltage and the car volts drop when the engine is started, then this indicates that the generator is not working properly. And it's best to change it.
Method 2
You need to start the car and leave it in working condition for a while. Then the choke is removed halfway, the negative terminal is disconnected from the battery, and if it stalls, this will confirm that the generator needs repair or complete replacement. On cars with injection and carburetor engines, this method of checking cannot be done for one reason: the diode bridge on them can completely burn out.
3 way
If the battery charge light comes on while the engine is running, then in most cases this means that the generator does not recharge the battery, but rather takes all the charge from it. And this also indicates a malfunction of the generator.
Possible malfunctions and ways to eliminate them
So, why does the generator unit heat up and hum, and how can you protect the unit from exposure to water?
We suggest that you familiarize yourself with the main causes of unit malfunctions:
- Brush wear. This problem is relevant for many generators, not only “decimal” generators. When the brushes wear out, they will need to be replaced.
- Pulley damage or failure will also require repair. If the pulley starts to work incorrectly, the unit will not be able to produce the required amount of voltage. Failure of this element is usually associated with wear of the teeth. In addition, various wear-related damage may occur on the device itself.
- Slip rings and the commutator are two components that also often wear out. If these components fail, the unit will not be able to perform its assigned functions. If the brushes wear out, the unit will be forced to operate with high power consumption, which leads to its overheating.
- Voltage regulator. As stated above, if this element fails, the voltage in the vehicle’s on-board network will increase, and this will not result in anything good.
- Short circuit of the winding of the stator mechanism. If such a malfunction occurs, you will either have to rewind the windings, which is very labor-intensive, or completely replace the stator. The second option is more appropriate.
- The hum and appearance of third-party sounds during operation of the generator unit may be due to wear of the bearing devices. The unit will not be able to work properly, and it will also begin to heat up over time.
- Failure of the rectifier unit.
- Worn drive belt. This item belongs to the category of consumables, so sooner or later it will wear out in any case. When worn, the belt must be replaced.
- Broken or damaged power wiring.
Alternator slip rings (alternator slip rings).
As every car enthusiast knows, the electrical equipment of any vehicle includes such an important part as a generator. This device is used to convert mechanical energy that comes from the engine into electrical energy. The generator is paired with a voltage regulator, and together they make up the generator set.
As a rule, modern cars are equipped with alternating current generators. Based on the requirements for any generator, the most suitable generators are AC devices.
In this article we are not going to talk about the generator as a whole, but will touch only on a small part of it - slip rings , without which the operation of the entire generator is impossible. We will try to tell you what slip rings are, as well as how they can be easily and quickly replaced in case of wear or some kind of malfunction.
1. What are generator slip rings?
Slip rings are characterized as a peculiar type of electrical contacts, which are a conductive ring with brushes that fit tightly to it. Thanks to these brushes, the electricity generated in a rotating electrical machine is supplied from one part of the circuit to another part using a sliding contact.
As a rule, slip rings are used in cases where electrical energy cannot be transmitted directly using special wires, for example, at the moment of supply to a rotating shaft.
Today, slip rings are widely used in mechanical engineering, in electric motors, and even in robotics, in order to transmit information and control signals. Compared to the commutator unit, slip rings, which are used in electric motors, are much more popular among users, since they wear out much less during operation.
Like all other tools in a car, depending on the chosen technological solution, slip rings can be divided into two types: concentric and longitudinal rings. Typically, the material from which slip rings are made is hard metal. In some cases, slip rings can also be coated with a wear-resistant and environmentally resistant coating, which can be gold-plated or silver. Today, there are also cases where liquid metal slip rings were put into operation, which are mercury current collectors that provide the transmission of high currents and have low resistance.
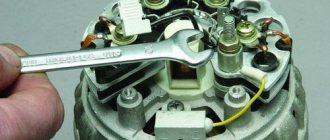
2. Replacing the slip rings of the generator No matter how high-quality and durable the generator is, sooner or later, over time, some of its elements still become unusable. Of course, you can purchase a new generator, but in practice, repairing the generator yourself is quite easy and does not require any special skills or specialized tools, and it will also save you a considerable amount of money. Failure of slip rings can cause major malfunctions of the rotor itself, and then of the entire generator, so you should be very careful to ensure that the slip rings are in normal working condition. As practice shows, the most common malfunction of the generator rotor is wear of the slip rings. Based on the fact that it is not always possible, or simply impossible, to find new rings for all rotors, you almost always have to replace even a completely working rotor with a new one. What can cause wear on the rotor rings? There are a huge number of different factors. The most common is the introduction of copper particles into the brush material and further work “copper on copper”. You can also quite often observe this situation: when you replace the brushes and a new rotor, at the very first revolution of the rotor you hear a sharp creak. Further, if you make several turns and then remove the brushes, you will see one or several places where copper is embedded, and a torn strip will be clearly visible on the ring. In this case, if you leave everything as is, you risk rapid wear of the rotor. Your first aid in this case will be grinding in and impregnating the brushes with oil . As practice shows, a brush soaked in oil will last you much longer; moreover, in such a situation, the contact ring is subject to less wear. There are many instructions in which, for unknown reasons, they strongly recommend wiping all oily slip rings and brushes with gasoline, justifying all this by the fact that the oil on the brush worsens the contact. In practice, as we have already said, everything is exactly the opposite: neither the current nor the voltage on dry and oiled brushes changes. A special experiment was carried out on this matter, which proved the correctness of the above statement. It was carried out according to this system: while working directly on the load with dry brushes and measuring all possible parameters, a few drops of oil were applied to the rings and the instruments were monitored. One could have expected anything from this experiment, including hydroplaning of the brush, but nothing of the kind happened, so we came to the conclusion that an oiled brush does absolutely no harm. If there is any malfunction or wear of the slip rings, you need to promptly replace them with new, functional ones. But before you make a replacement, you need to decide on the choice of ring. As practice shows, not all rings can boast of proper quality and reliability. As a rule, experts do not recommend using copper rings, as they are quite unreliable. By their nature, they can work until the last minute, or they can wear out in a very short period of operation. It is better to choose steel rings, because, as is known, the coefficient of friction of graphite on steel is much lower than on copper, and based on this, steel rings practically do not wear out; the same can be said about brushes, which in this case are subject to wear much less than on copper rings. If we take into account the electrical indicators, we can say that there is no particular difference between steel and copper slip rings; the resistance of a graphite brush is disproportionately greater than the resistance of steel. If you simply haven’t found suitable rings, don’t rush to get upset and buy a new rotor, which will cost you a considerable amount of money. Try to make a "knight's move" and replace the voltage regulator. You just need to place a few washers under it in such a way that the brushes move from the thinned part of the rings to the whole one. Of course, this is not the best way out of the situation, but the generator can still operate in this condition. If you are a motorist who is not looking for easy ways in life, the most suitable solution for you would be to buy new slip rings that will not require a lot of money from you. Whatever one may say, if you have already removed the old rings, and damaged them while removing them, there is no other choice. As every knowledgeable auto mechanic knows, you will need to remove the rear alternator bearing before attempting to replace the slip rings. In the case when the diameter of the shaft is quite small, when removing the rear bearing, experts under no circumstances recommend using a puller for this, which, as a rule, can damage the shaft. Therefore, you should not take risks, but it is better to use this method, already tested in practice, with which you will not have to purchase a puller, and the shaft will survive. So, look at the instructions given below and at the same time get to work. First, using a large open-end wrench, remove the generator bearing. Next, we clamp the rotor in a vertical position and hook the outer ring of the bearing directly with the lower horn of the key. You can also, of course, pry the bearing cover in a circle with a screwdriver, but when performing this operation you need to make sure that the bearing itself does not warp at the time of removal. Once you have managed to remove the bearing, proceed to remove the plastic cross-shaped plug using a straight screwdriver. Next, you need to straighten the two contacts that you will see under the casing and release the leads of the rotor winding. The tools for performing these operations will be a screwdriver and pliers. Finally, we get down to breaking off the contacts and after that we remove the old shank. Once the bearing is removed, you can begin replacing the slip rings. First, you need to carefully release the rotor winding terminals from the ring clamps and equally carefully remove the rings. After this, we carefully remove any remaining glue. As a rule, at this stage everyone understands why you should not use a puller when removing a bearing. So, after this operation, we press the new slip rings onto the shaft. As a rule, most specialists put new slip rings on the rotor using a hammer (there are also cases when you need to use a file). In the event that the rings suddenly turn out to be a little shorter than the original factory ones, you can use a plastic sleeve, which will need to be placed on the shaft. It is very important here to avoid any distortion, as otherwise the brushes can deteriorate very quickly. Next you need to solder the winding leads to the ring tracks. After this, it is necessary to carefully and carefully apply the sealant in order to protect the soldering from oxidation. Then we put the protective cover in place and, using the old bearing as a mandrel, carefully press the new bearing into place. In the same way, we press the shaft into the new bearing. Next - it's a matter of small things. It is necessary to clean the stator winding terminal terminals. After this, all that remains is to screw the terminals to the diode bridge and lubricate them with lithol to protect them from oxidation. In everyday life, there is also the option of soldering new slip rings onto old ones. If you choose this technology, you first need to remember that before soldering the rings, you need to tin them using an active flux, for example, with “soldering acid” (zinc chloride) and rinse them thoroughly with soda. As a rule, the remains of copper rings are tinned with rosin. After this, you need to heat the new contact rings with a soldering iron until the solder melts, and as a result you will see how they smoothly and freely fit onto the remains of the old rings and, after cooling, are soldered quite firmly. After that, you just have to take care of their groove and then grind the rings. It is better to base the machine on the rear bearing fixed in the steady rest - this way you will get the maximum guarantee of the smallest displacement of the rings relative to the rotor axis, which will eliminate the possibility of the brush coming off the ring and breaking the chain at high speeds. Once you have installed the slip rings, you can begin assembling the generator. In this case, it is necessary to carefully ensure that the rotor can rotate freely and easily, and also to ensure that it does not touch the housing or stator. We tighten the pulley and... voila! You can laugh that your generator is already assembled. But all your efforts don’t end there. After you have installed the alternator back on the car, you need to measure the voltage level in the alternator when the car engine is turned on. If he has reached the norm, then congratulations! You did everything right and the rings are in their place. As a rule, after replacing the slip rings in the generator, the viability of the latter will last for at least several years. Ideally, you can immediately modify the generator in order to increase the voltage in the car network.
PHOTO (examples) of slip (slip) rings on the generator rotor:
You can order from our partner for foreign cars
For domestic ones - for VAZ on the Avtomagnit website
Manifolds for BOSCH generators
Table of markings of slip (slip) rings on the generator rotor:
| No. CARGO | To the generator | ø internal hole, | ø external (copper rings), mm | Width (height), mm | Application |
| mm | |||||
| 237323 | Ford | 5 | 14 | 10 | Ford Connect |
| 239930 | B.O. | 5 | 14 | 43 | |
| 239718 | ND | 6 | 15 | 46 | |
| 233937 | Ford | 6 | 16 | 38 | |
| 235160 | VAZ | 6,5 | 13,9 | 48 | VAZ-2110 |
| 138441 | HI | 7 | 17 | 45 | |
| 232295 | VALEO | 7 | 15 | 43 | |
| 135172 | B.O. | 7 | 16 | 52 | |
| 232854 | Iskra | 7 | 16 | 52 | SKODA FABIA |
| 135298 | VALEO | 8 | 24 | 18 | |
| 232401 | Delko | 8 | 15 | 20 | CHEVROLET96540542 |
| 136682 | Delko | 9 | 16 | 21 | |
| 135179 | VALEO | 9 | 15 | 28 | |
| 138421 | VALEO | 9 | 15 | 28 | |
| 135173 | ND | 9 | 15 | 23 | |
| 131819 | ND | 9 | 15 | 24 | |
| 131817 | L.U. | 9 | 25 | 11 | |
| 230090 | VALEO | 9 | 15 | 48 | |
| 130843 | Delko | 12 | 23 | 25 | |
| 135140 | MI | 12 | 23 | 30 | |
| 133409 | MI | 13 | 23 | 28 | |
| 133924 | Delko | 13 | 26 | 23 | hexagon inside |
| 231400 | Motorola | 13 | 27 | 32 | |
| 233938 | Ford | 13 | 27 | 37 | |
| 131219 | Motorola | 14 | 26 | 14 | |
| 136305 | Ford | 14 | 27 | 37 | |
| 135536 | NIKKO | 14 | 23 | 30 | |
| 135054 | HI | 14 | 28 | 29 | |
| 138439 | HI | 14 | 23 | 30 | steel |
| 233235 | HI | 14 | 27 | 29 | |
| 137571 | HI | 14 | 28 | 33 | |
| 131054 | CAV | 15 | 31 | 24 | |
| 138413 | MI | 15 | 33 | 31 | steel |
| 130842 | VALEO | 15 | 30 | 21 | |
| 131815 | VALEO | 15 | 30 | 28 | |
| 133055 | VALEO | 15 | 27 | 32 | |
| 133349 | VAZ | 16 | 33 | 22 | |
| 133401 | B.O. | 17 | 33 | 22 | VAZ |
| 132642 | L.U. | 17 | 27 | 24 | Nissan |
| 133402 | B.O. | 17 | 28 | 23 | |
| 235764 | B.O. | 17 | 28 | 22 | |
| 138440 | HI | 17 | 32 | 28 | |
| 137313 | MI | 17 | 33 | 29 | |
| 137315 | HI | 17 | 33 | 29 | |
| 133410 | HI | 17 | 35 | 28 | |
| 130841 | Ducellier | 17 | 36 | 23 | through hole |
| 131814 | VALEO | 17 | 31 | 28 | |
| 131818 | VALEO | 17 | 32 | 23 | 2 rings |
| 233498 | VALEO | 17 | 30 | 31 | |
| 134492 | VALEO | 17 | 30 | 28 | |
| 137574 | VALEO | 17 | 30 | 38 | |
| 233936 | Delko | 17 | 30 | 33 | hexagon inside |
| 131816 | DCL | 17 | 30 | 28 | |
| 138438 | ND | 17 | 32 | 25 | steel |
| 135315 | ND | 17 | 33 | 31 | steel |
| 233118 | Delko | 17 | 27 | 32 | |
| 132295 | Delko | 17 | 30 | 28 | |
| 133351 | Valeo | 17 | 34 | 23 | |
| 233281 | Delko | 18 | 30 | 33 | |
| 233191 | Ford | 18 | 32 | 33 | |
| 231368 | Mando | 18 | 34 | 31 | |
| 230490 | MI | 18 | 34 | 28 | |
| 231567 | MI | 18 | 34 | 31 | steel |
| 130561 | Delko | 18 | 30 | 28 | |
| 233220 | Motorola | 19 | 40 | 22 | 2 rings |
| 133925 | Motorola | 19 | 40 | 22 | 2 rings |
| 136000 | B.O. | 20 | 33 | 22 | |
| 233787 | MI | 26 | 42 | 29 | steel |
| 133408 | ND | 33 | 25 | 18 | steel |
Steel rings and their advantages
Replacing slip rings on a VAZ 2110 generator
There is no point in installing copper rings, as they wear out very quickly. Therefore, it is better to opt for steel rings, which have a number of advantages:
- They hardly wear out, so the brushes remain in almost perfect condition for a long time.
- They are easy to install.
Note: by the way, for more reliable fixation, they are first lubricated with a flux solution, and then washed with soda.
- Once installed, they are securely fixed, remaining motionless in all situations.
Troubleshooting
The first step is to determine whether your generator is actually the source of the problem. To check, you need to carry out a series of sequential activities.
- Start the engine and let it warm up to operating temperature.
- Increase the crankshaft speed to approximately 3 thousand rpm.
- Turn on all the headlights, activate the high beams, start the heater, emergency lights, heated glass, and wiper blades. That is, all electricity consumers should be turned on as much as possible.
- Measure the voltage on the battery.
- If the device shows less than 13V, then a short circuit or break has most likely occurred in the generator windings.
- Another option is a breakdown of the voltage regulator, oxidation of the contacts of the excitation winding ring.
You can check for breaks and the condition of other elements of the generator only by dismantling it. But if you don’t have any experience in disassembling a generator, then you shouldn’t try to go there with your own hands. Replace the entire assembly or entrust the repair to professionals.
Delivery to regions
- Delivery of an order worth over 3,000 rubles is free if the delivery cost does not exceed 500 rubles; in other cases, delivery of goods is paid upon receipt of the goods. If the delivery cost exceeds 500 rubles, we make a discount of 500 rubles on the delivery cost.
- Delivery to the transport company is FREE.
- The timing, cost and method of delivery depend on the weight, dimensions and cost of the ordered product.
- Delivery options can be selected by the online store manager.
Orders are processed daily from 08:00 to 20:00 (local time).
Examination
It happens that the generator begins to act up ahead of schedule and the battery does not charge properly. Actually, it serves to ensure the operation of the source of electricity to power all cars - the battery.
We advise you to rely not only on our instructions, but also on video lessons that will allow you to carry out repairs and replacements with your own hands, even without much experience.
Troubleshooting
The first step is to determine whether your generator is actually the source of the problem. To check, you need to carry out a series of sequential activities.
- Start the engine and let it warm up to operating temperature.
- Increase the crankshaft speed to approximately 3 thousand rpm.
- Turn on all the headlights, activate the high beams, start the heater, emergency lights, heated glass, and wiper blades. That is, all electricity consumers should be turned on as much as possible.
- Measure the voltage on the battery.
- If the device shows less than 13V, then a short circuit or break has most likely occurred in the generator windings.
- Another option is a breakdown of the voltage regulator, oxidation of the contacts of the excitation winding ring.
You can check for breaks and the condition of other elements of the generator only by dismantling it. But if you don’t have any experience in disassembling a generator, then you shouldn’t try to go there with your own hands. Replace the entire assembly or entrust the repair to professionals.
Generator replacement and repair
Replacing the VAZ 21124 generator
As it becomes clear, there can be no talk of any normal operation of the vehicle if the generator is faulty. This part must undergo technical inspection every 15 thousand kilometers. If comments are identified at the diagnostic stage, they should be addressed urgently.
Dismantling the generator
Replacing the VAZ 2112 generator
Removing the generator on your own will not be difficult. Let's consider the algorithm of actions:
- First of all, you should disconnect the negative cable from the battery.
- We take the keys for 10 and 13.
- We find the wire that goes to the generator and disconnect it.
- We also unscrew the nut securing the wire to the positive terminal.
- Remove the output wire.
- Now you need to remove the generator tension bar.
Signs of a generator malfunction
The generator on the VAZ 2110 has an average resource of about 80-100 thousand km, after which failures in its operation are possible. There can be many reasons for breakdowns: generator bearings, brushes, windings, etc.
As a result of malfunctions, a weak current is supplied to the on-board network. In this case, it is important to pay attention to the following signs:
- a battery icon appears on the dashboard (indicating that the battery is not charging);
- when the lights are turned on, the headlights burn dimly or the light pulsates (unstable voltage);
- turning on additional equipment causes the dashboard backlight to dim;
- the load on the on-board network leads to the heater fan working weakly, etc.
Ultimately, the lack of spark at the spark plugs will cause the engine to stall. In such a situation, it is necessary to remove the generator, since after dismantling the device, you can disassemble the generator, check it, repair it (for example, replace the brushes) or completely replace it with a new or working device.
What causes rings to wear off?
Alternator rings for VAZ 2110
The following generator parts can cause slip ring failure.
Stator
- On its inside there should be no traces from the rotor that would appear during its operation. Otherwise you will have to change it.
Note: You also need to check the bearings, as this problem often appears when they are broken. Sometimes even the generator cover can also get broken. This problem urgently needs to be fixed by replacing the damaged part with a new one.
- After this, you should check whether there is a break in the stator winding. It needs to be checked in the same way as the rotor.
Generator VAZ 2110
Of course, if you are sure that the stator is completely intact, then you should not carry out such manipulation. But if there is even the slightest suspicion that it is malfunctioning, then it is better to check it. A faulty stator can lead to rotor failure again.
Bearing
- See if the generator bearing located on the rotor rotates correctly. It should rotate freely on the slip ring side without jamming.
- If it dangles too much or, on the contrary, is very tightly clamped, then it needs to be compressed.
Lid
- The generator cover on the slip ring side may have damage, cracks or other defects.
- In this case, it needs to be replaced, otherwise it will have a bad effect on the contact rings, leading to their abrasion.
Dismantling
To disassemble, remove and repair or replace the generator, you will need to do the following.
- Drive onto an inspection hole or overpass to have access to the bottom and engine compartment.
- Remove the battery, otherwise it will not allow you to get to the nut that holds the generator you are looking for.
- Next, the same nut and adjustment bar are removed. Here you will need a 17 mm wrench. Use an extension cord. This will make the task easier; you will have to apply less force to unscrew the fastener.
- In the engine compartment, remove the shield that performs dirt protection functions.
- Now the drive belt is removed and the wires are disconnected.
- Be sure to remove the protective cap and use a 10mm wrench to unscrew the nut that holds the tip and positive cable of your battery.
- There is another nut on the fixing bracket, which will also have to be unscrewed.
- That's it, you can remove the generator. Just remember to pull out the long bolt first.
- When removing, keep an eye on the buffer sleeve. It won't be good if you lose it.
Dismantling work
This completes the procedure for removing the generator. You can proceed with partial repairs or complete replacement of the unit.
Belt
Often, the solution to a poorly functioning alternator is simply adjusting the belt.
Belt
- For the device to work effectively, it is necessary to ensure normal deflection of the belt;
- The deflection size should be 6-10 millimeters with a force of 98 N or 10 kgf;
- To adjust or replace the belt, you need to move the generator slightly to the side, towards the cylinder block;
- By rotating the adjusting bolt, you can adjust the belt tension.
If this measure does not help, you will have to pay attention to the voltage regulator and brushes.
Brushes and regulator
It is not recommended to repair the generator brushes, as well as the voltage regulator if they are worn out.
Experienced specialists advise purchasing a complete unit that includes both elements. Replacement is completed in a matter of minutes.
Brushes
How to remove a generator without air conditioning from a Priora with power steering: detailed instructions with photos and videos
Without much further discussion, let's get straight to the point. For ease of work, it is recommended to install the vehicle on an inspection hole, if available. However, this is not a prerequisite, since you can reach the generator mount from below and without a hole. Be sure to begin dismantling work by first removing or disconnecting the negative terminal from the battery. This will protect the car from shorting the wiring.
On a Priora without air conditioning with power steering, the process of dismantling the generator is performed in the following sequence:
- First of all, using a key set to “17”, you need to loosen the bolt securing the tensioner pulley. There is no need to remove the bolt together with the roller if you do not plan to replace them. Remove the alternator belt from the pulley and move it to the side.
- Using a wrench set to “13”, unscrew the nut of the upper mounting of the generator. If necessary, hold the bolt with a key set to “13” on the other side. After unscrewing the nut, remove the bolt from the upper mounting of the generator. The photo shows it already removed.
- Now we move on to unscrewing the lower mount of the generator. To do this, we first remove the engine protection (if it is, and if not, then it is better to install it after completion of the work). We move down and unscrew the nut with a wrench at “13” of the lower generator mount. After this, we pull out the bolt, which is impossible to do on Priors with power steering. It will definitely rest against the engine mount bracket.
- And this is where the fun begins. Further actions throw everyone involved in the dismantling into a stupor. To remove the bolt, you need to remove the spacer sleeve from the side where the nut is located, as indicated in the instructions class=”aligncenter” width=”600″ height=”494″[/img]
- However, in practice this does not work, and after removing the bushing, the bolt still cannot be pulled out. That is why there are already proven methods on what to do correctly in this case in order to remove this bolt. The first method can be called anti-vandal. To implement it, you need to install a jack under the engine and jack it up.
- Next, in the engine compartment, we find the rear engine mount (aka guitar) and use a “15” key to loosen fastening No. 1 in the photo below. Having unscrewed the nut of bolt No. 2 (also with a key set to “15”), we pull it out (we do not pay attention to the air conditioner pipe, these instructions are specifically for Priora without air conditioning).
- We perform the same procedure with the front engine mount. Unscrew the nut with a 15mm wrench and remove the bolt. At this point, the engine must be secured with a jack so that it does not fall down.
- Unscrew the right support nut using a 17mm wrench. There is no need to remove the right airbag unless you plan to replace it. If you need to replace it, it is secured with two bolts with a Torx-E10 socket head.
- Next, slowly and carefully jack up the engine until the power steering pump pulley rests on the right cushion bracket.
- You can now remove the lower alternator mounting bolt. After this, the unit is removed. We’ll look at how best to do this a little later. For now, the second option is how to remove the lower bolt of the generator on a Priora. This method, unlike the first, is called vandal. To implement it, you will need a metal file (not a hacksaw, but only a blade).
- The blade is used to saw the bolt leg. There is no need to cut completely, but until it bends to be removed from the seat. If you cut the bolt completely, a new problem will arise. The rest of it will be difficult to get.
- We remove the bolt from the seat after bending it, and now all that remains is to disconnect the wires from the generator and begin dismantling it.
- In this case, it is important to purchase a new bolt to replace the deformed product. The original part has the number 21100-3701376-00 and standard dimensions M8×110. The bolt is installed back on the other side so that next time you don’t have to worry about removing it.
- Disconnect the “D+” wire connector from the device. After this, we move the rubber protective cover aside and use a “10” key to unscrew the contact nut “B+”. The negative terminal on the battery must be disconnected (check again).
- Now we remove the generator. If the engine has not been jacked up, then it is better to remove the device from below in the gap between the engine and the radiator.
- If the engine has been jacked up, the generator can be removed from the engine compartment.
Further actions with the removed generator depend on the type of its malfunction. After repair or in case of replacement, installation is carried out in the reverse order.
Below are video materials that show how to remove a generator on a Priora with power steering without air conditioning by lifting the engine.
And also a video instruction, which shows in detail how to saw off the lower mounting bolt of the generator on a Priora with power steering (without air conditioning), and remove the device from below.
Another method of removing a generator on a Priora is described in the video below.