Every car owner knows that in order to prolong the life of the power unit of the Lada Priora and any other car, it is necessary to promptly replace filters and engine oil, as well as other consumables. The fuel filter, as recommended by the manufacturer, should be replaced every 30 thousand km, but as experienced car owners advise, it is better to shorten this interval, since most cars are operated in difficult conditions, which include driving on dirt roads, the dust from which settles in machine components and low-quality fuel.
In this material, we invite you to study the information on how and when the fuel filter is replaced on the popular Lada Priora in our country, which has 16 valves. Below we will tell you where the filter we need is located, and how to change it yourself.
What is a filter for?
A fuel filter is installed in cars to protect the engine from various debris and water getting into it along with the fuel. Since there can be anything in the car’s tank, from rust to water. All this can appear in the tank when refueling at low-quality gas stations.
It consists of a housing and a filter paper part. This part allows fuel to pass through itself very well, but retains particles of dirt and water. You should never completely rely on the filter and it is best to refuel your car at reliable and proven gas stations.
When is it time to change
You can buy yourself a new TF literally as soon as you purchased the car from the showroom or took it from your hands. But after how long can it or should it be changed?
If you change the TF on a used car as soon as you re-register it, nothing bad will happen. It is not known what kind of filter was there before and how many kilometers it has already traveled and how long ago the previous owner changed it.
The frequency of TF replacement can vary significantly depending on a number of factors:
- vehicle condition;
- driving style;
- terms of Use;
- fuel system operation;
- the quality of repairs performed regarding the engine and fuel system;
- the quality of the gas stations where the previous owner of the used car refueled;
- engine's type;
- motor power, etc.
Only the specific instruction manual can answer you. And how often the TF changes depends on you specifically.
In general, I’ll tell you, many people believe that on diesel cars the TF is changed every 30 thousand kilometers, and on gasoline cars - from 60 to 100 thousand kilometers. And some automakers even say that the filter installed from the factory will last as long as the car itself.
Alas, these numbers are far from the truth. Why? It's simple. Ideal operating conditions are taken into account here. That is, smooth roads, high-quality fuel, measured driving style, and so on. Which of these do you have? Personally, I have problems on all counts, since driving on our roads in this way is impossible, even with a strong desire.
Therefore, the reality is that diesel filters are changed every 10-30 thousand kilometers, and gasoline filters - 20-60 thousand. Yes, there are exceptions when the car is rarely used, the driver is extremely careful and refuels at the best gas stations. Here the filter can really last 50-100, or even more than thousands of kilometers.
I will give one piece of advice that is far from bad. Take into account the mileage and compare it with the operating conditions of the vehicle. This way you will understand exactly how often you should change the TF.
A car is such an advanced invention that it itself will show signs indicating the need for replacement.
Filter failure
It is recommended to check and replace the filter every 20 thousand km. Rapid contamination is facilitated by low-quality dirty fuel, which can completely clog the filter as a result of which it will stop passing gasoline, which will lead to the engine stopping.
When water appears in the car tank, there is a possibility that it will enter the filter element, which may result in the element becoming clogged. This happens especially often in winter. When the car is parked on the street, the water that gets into the filter freezes in it, blocking the fuel path to the engine. Which also leads to the engine stopping or the inability to start it.
How often to change the oil filter in a car
To understand how often to change the oil filter in a car, you need to pay attention to the following:
- Engine Features
. Everything matters: what fuel it runs on, what the compression is, engine operating temperature, pressure, friction force of parts - these indicators significantly affect oil contamination. Therefore, in different engines, oil filters are stressed according to their characteristics. Powerful engine? This means you need to change the oil filter often. - Filter element
. It uses a special porous material similar to paper. It is laid in an accordion to increase the filtration area. The better the filter element and the larger its area, the longer the filter will be able to perform its function. As soon as it is completely dirty, the bypass valve will start working, which means it’s time to change the filter. How often this should be done depends on the rate of contamination. - Terms of Use
. One of the most important criteria that determines how often the filter needs to be changed. The change time depends on the mileage of the car, but it is necessary to note the fact that with the same mileage for cars with different purposes, filter wear can vary significantly. Thus, the oil filter of a city car will be much more loaded than that of a car that travels mainly on highways, which means that it may need to be replaced often.
According to the rules, you need to change the filter as often as you change the oil in a car engine. Each brand of car has its own oil service life, but usually it is within 10,000-15,000 km.
But there are times when it is necessary to change the oil filter ahead of time:
- After a major overhaul of a car engine, when the cylinder head (cylinder head) or sump is opened, the filter is changed along with the oil, regardless of whether they have expired or not.
- When the engine lubrication system is washed with a special compound, a temporary filter is installed, preferably a cheap one, since it cannot be used after the procedure is completed. After washing, they install a good quality part for regular work until the next shift.
- Happy owners of cars with powerful engines practice changing the filter ahead of time in order to avoid breakdowns. After all, it’s better to play it safe and spend extra money on a new filter and oil than to pay a considerable amount for repairing an engine with the latest technology.
- If the car has been sitting for a long time. Even if fresh oil was poured into it before downtime, it has an expiration date and loses its lubricating properties, and also releases oxidation products that impregnate the filter materials. Therefore, if you decide to drive a car that has previously been parked for at least a couple of years, be sure to fill the engine with fresh oil and install a new filter.
Fuel filter differences
The filters of front-wheel drive VAZ cars are practically the same. The only differences are in the fittings of the filter itself. On newer Lada cars, most often with a 1.6-liter engine, they began to install filters on plastic fittings.
Filter on plastic fittings
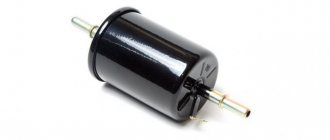
On older models, most often, such as VAZ 2109-2115 with 1.5 liter engines, filters were installed under a threaded fitting. That is, the tube fitting was screwed into the filter using threads.
Filter on threaded fittings
Of course, there are no differences in replacement, except that when working on cars with a 1.6 engine, fewer keys will be required.
When is the best time to replace an element?
Ideally, it is best not to wait until some malfunction appears that forces you to change the fuel fine cleaning element. Considering that the cost of the filter is low, and the replacement operation can be performed independently, you can set the interval to 10 thousand km. Signs that indicate the need for replacement:
- A situation often arises when, due to the fault of a clogged fine fuel filter, failures in engine operation occur, especially when accelerating the car. Sometimes the car may even stall, and starting the engine will then be difficult.
- The second sign of a clogged fuel filter can be increased noise from the electric fuel pump. When driving, this sound is almost impossible to hear, but when idling in the interior of the Lada Priora, you can hear a high-pitched buzzing sound. This indicates that the pump is operating under increased load; in normal mode, no extraneous sounds are heard.
If such signs appear, it is better to change the filter on the Priora, given that the cost of the issue is low. The fact is that a clogged element not only resists the flow of fuel, but also begins to let debris particles pass further along the path, into the injector nozzles. There, particles settle on work surfaces and form a film of dirt, which leads to their production.
After the first cleaning of the injector, the dirt film will disappear, but the wear on the surfaces will remain, and the injectors will simply begin to leak. Surely many Lada Priora owners have noticed a phenomenon when, after ultrasonic cleaning of the injector, engine performance became worse. This is the result of a long drive without replacing the fuel filter; now you will have to change the injectors as well.
Replacing the fuel filter
The first thing you need to do is relieve the residual pressure in the car's fuel system.
To do this, you will need to remove the fuel pump fuse (F3 - 15A). This fuse is located under the center console near the front passenger. We remove the fuse and start the car. The car will run until the remaining fuel is used up. After which the engine will stop.
Replacement process
Required tool:
- Open-end wrench set to “10”;
- Two open-end wrenches set to “17” (when replacing the filter on a car with a 1.5 liter engine);
- Rags;
Replacement:
- We find the fuel filter under the bottom of the car, remove the plastic fittings from it by pressing on the lock buttons and pull it away from the filter, the fitting will come out quite tightly.
- In 1.5 liter engines, the fitting must be unscrewed with two keys at “17”, positioning them as if they were scissors.
- On threaded fittings, it is necessary to check the condition of the O-rings and replace them if necessary.
- Next, using a “10” key, loosen the filter mounting clamp and remove it.
- Installing a new fuel filter
IMPORTANT The arrow on the filter must be directed towards the left wheel of the car in the direction of travel.
- Next, we assemble everything in reverse order.
Don't forget to put the fuel pump fuse back in.
We start the engine and check the tightness of the system.
The process of replacing the fuel filter of Lada cars is completed. Smooth roads everyone.
Where is the filter located on Priora and which one to choose
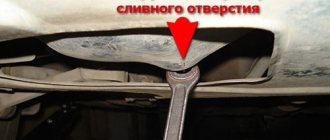
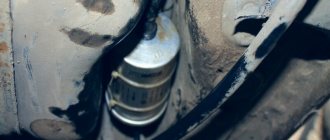
The fuel filter is located at the rear of the vehicle, above the rear beam next to the gas tank. It is supported on a special bracket. To replace the filter, you will first need to relieve the pressure in the system so that when you remove the filter, gasoline from the system does not spray you and everything around.
Which filter to choose
Depending on the year of manufacture, fuel filters with or without a latch were installed on the priors. A domestic filter from BIG is installed from the factory. If it is not possible to purchase it, there are analogues.
- Filter BIG-320BK without latch from 250 rub.
- Filter Poliston PT-320 with latch
- Filter BIG-3198 with latch
- Filter SCT ST 342 with latch
- Filter GUR-320BK with latch
All filters mentioned above are designed for a 1.6 liter engine. The choice of filter depends on the type of filter being installed, with or without a latch, as well as on your financial capabilities.
How to replace faulty devices
The power system filters are replaced by first disconnecting the battery. The replacement sequence for car modifications with different engines is the same. It is more convenient to remove a fuel module with a coarse filter when there is little fuel in the tank.
To work you will need:
- screwdriver;
- socket wrench 10;
- 0.5–1 liter container for draining gasoline from the filter.
Before removing the fuel filter or opening the gas tank, relieve the fuel pressure.
Fuel pressure relief algorithm
Proceed according to the sequence below:
- Turn off the ignition.
- Remove the right floor channel lining panel.
- Remove the fuel pump fuse.
- Start the engine and wait until it stops after running out of fuel.
- Turn on the starter for a few seconds.
- Turn off the ignition.
- Replace the fuse.
Photo gallery: relieving fuel pressure on the Lada Priora
To remove the fastening of the floor channel cover, use a Phillips screwdriver. Carefully remove the right panel of the floor channel lining. Remove the fuel pump fuse from its original place.
Replacing the device: photo and procedure
To replace a faulty part in a garage, follow the recommendations below:
- Place the machine on the inspection hole.
- Relieve pressure in the fuel system.
- Disconnect the battery.
- Squeeze the clamps of the supply (left) hose and disconnect it.
Squeeze the clamps of the inlet (left) hose, then disconnect it
Using the same principle, disconnect the outlet (right hose).
Disconnect the outlet (right) hose from the fuel filter
Loosen the clamp bolt. Please note that the head of the 10mm wrench bolt is located behind the clamp, in front of the 13mm nut. It is welded and cannot be unscrewed.
Loosen the clamp bolt
Holding the holes of the fittings with your fingers, remove the filter from the clamp. Drain the gasoline from the filter into a container.
Holding the holes in the fittings with your fingers, remove the filter from the clamp
Install the fresh filter with the arrow pointing towards the outlet hose (towards the starboard side). Tighten the mounting bolt. Place the fuel hoses and secure the position by pressing the hoses against the filter until they click. Restore power. Turn the ignition on and make sure the new filter is seated correctly. Make sure there are no gasoline leaks.
Please note that there is no difference in the procedure for replacing filters on an eight- and sixteen-valve engine.
Video: how to remove the Lada Priora fuel filter in a garage
After the launch of the new model, cars of the Priora and Lada 110 families were produced in parallel for some time, but Priora quickly supplanted its predecessor model: in March 2007, the Priora sedan, VAZ-2170, was launched, in February 2008 - the VAZ-2172 hatchback, and in May 2009 - VAZ-2171 station wagon. Later, small-scale modifications were also produced - the extended Priora Premier, the three-door Priora Coupe and the sporty Priora TMS.
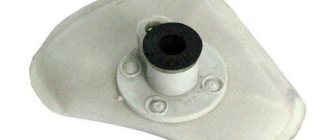
How to install the electric fuel pump strainer correctly
To dismantle the part yourself, proceed as follows:
- Relieve pressure in the fuel system.
- Disconnect the battery.
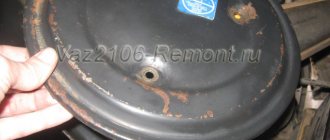
- Unscrew the fastenings of the hatch under the rear seat, open access to the fuel unit.
Unscrew the fastenings of the hatch under the rear seat, open access to the fuel unit
Clean the fuel cap from dust and dirt to prevent contamination of the gas tank.
Clean the fuel assembly cover from dust and dirt
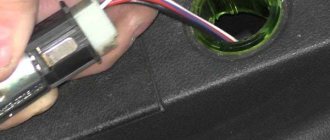
Disconnect the power connector.
Carefully disconnect the power connector
Release the spring clips and disconnect the fuel hoses.
Press out the spring clips that hold the fuel hoses in place, then disconnect them
Unscrew the fastening nuts and remove the retaining ring.
During the dismantling process, be sure to check the technical condition of the parts.
Carefully remove the fuel assembly.
Remove the fuel assembly by holding it with both hands
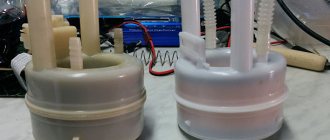
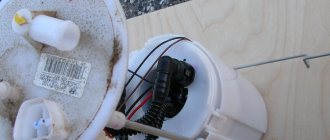
Press out the four clasps of the assembly cup and remove the fuel pump assembly.
If everything is done correctly, the fuel pump assembly will be in your hands
Use a screwdriver to remove the strainer. Install a new filter. Reassemble the unit and install in reverse order of disassembly. Restore power. Turn on the ignition and check the operation of the fuel unit.
Replacement instructions
Before starting this operation, it is necessary to perform decompression; this is a very important step and cannot be neglected. Decompression can be done in two ways. The first is to simply remove the fuse that controls the fuel pump. The second is to turn off the ignition, remove the fuel pump terminal, start the engine and wait until it stalls.
Since the location of the filter differs on different engine variants, there are two schemes for replacing it.
Replacement for injection engine
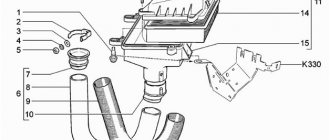
1. First of all, as mentioned above, it is necessary to perform decompression; 2. Next you need to disconnect the battery from ground; 3. This is followed by dismantling the air filter;
4. then you need to remove the fitting bolts and disconnect the hoses;
5. The next step is to remove the mounting bolt and dismantle the filter itself;
6. Now you need to carry out the above operations in reverse order with a new filter.