The breather “SMOKES”...Or the effect of breather ON IDLE STABILITY!
When was the last time you cleaned the crankcase ventilation? If it’s been too long, clean the system; it won’t take long! To understand whether it’s time to clean the system or not, you will have to remove the breather and if everything is dirty, then clean the system, and go inside the hoses with a rag to remove all the dirt! .Guys...Strong breathing damages idle speed...swimming, stalling and its absence... ˜ Dear subscribers! We recommend that you visit the website - https://minibk.ru. Here you will find information about a multifunctional device that allows you to measure fuel consumption, including gas, if the car is equipped with an LPG system, measures temperature and on-board voltage, and can answer the question - “What time is it now?” The developer of the device is our friend Alexey Tretyakov, an excellent specialist in the field of microelectronics and just a good person.
Engine knock
If at one point you begin to hear extraneous knocks and noise when the engine is running, you need to pay serious attention to this. It is best to stop right away and try to find out the reasons. Indeed, in some cases, continuing to operate the engine can be very dangerous.
Let's look at the most common problems associated with knocking
Indeed, in some cases, continuing to operate the engine can be very dangerous. Let's look at the most common problems associated with knocking.
The main bearings are knocking. This is very dangerous, so you need to turn off the engine immediately. You will have to tow the car to the repair site. The problem can be easily recognized: the sound has a low pitch. It comes from the bottom of the crankcase and increases when you press the gas pedal. The oil pressure sensor turns on.
The connecting rod bearings are knocking. You need to turn off the engine immediately. His further work is very dangerous. You will have to go to the repair site in tow. The sound is resonant, has a metallic tint, a medium tone and a certain rhythm. Intensifies with increasing load.
Piston pins are knocking
You must continue to operate the engine very carefully. It is better to go slowly and immediately to the place of repair. The sound has a high metallic tone with sharp shades, rhythmic
If you disconnect the spark plug, it disappears immediately
The sound has a high metallic tone with sharp tones and is rhythmic. If you disconnect the spark plug, it goes away immediately.
Cylinders or pistons are knocking due to wear. You can continue driving, but without putting too much load on the engine. It is better to immediately go to the repair site. The sound is very similar to the knocking of clay dishes. It sounds more clearly until the engine has warmed up to operating temperature. As the engine warms up, it gradually quiets down.
Valves knocking
You can continue to move carefully, but it is better to head straight to the repair site. There is a dull noise with metallic knocks
Knocks are especially audible at low and medium speeds. It comes from the side where the valves are located.
Engine knock
You should immediately go carefully to the repair site. Sounds occur during acceleration
The problem is resolved by installing a later ignition. The problem may arise due to poor ignition control, due to the use of low octane fuel, or due to engine overload as a result of early engagement of a high gear. You also need to check if there is carbon deposits in the combustion chambers.
Oil in the air filter and bellows, cause and solution.
No, this is not normal, the oil flies because the breather is too dirty and all the emulsion and this oil flies into the engine when it is running, after cleaning the crankcase ventilation, the oil will stop flying and if you constantly keep this system clean, it will not harm the engine! The Auto_Repair channel will help you troubleshoot your car yourself. We do not waste your time, but try to make our videos as informative and short as possible to save your time. No water, just the essence. On our channel you will find various information on car repair and operation. No water, just the essence. There are also many more interesting experiments in the plans, subscribe to the channel, write comments, like, we are always happy to have live communication. Our peculiarity is that the material is presented in an accessible way, even a child can understand it, but if we miss something, feel free to ask, we are always happy to help.
Engine knock
If at one point you begin to hear extraneous knocks and noise when the engine is running, you need to pay serious attention to this. It's best to stop right away and try to find out the reasons
Indeed, in some cases, continuing to operate the engine can be very dangerous. Let's look at the most common problems associated with knocking.
The main bearings are knocking. This is very dangerous, so you need to turn off the engine immediately. You will have to tow the car to the repair site. The problem can be easily recognized: the sound has a low pitch. It comes from the bottom of the crankcase and increases when you press the gas pedal. The oil pressure sensor turns on. The connecting rod bearings are knocking. You need to turn off the engine immediately. His further work is very dangerous. You will have to go to the repair site in tow. The sound is resonant, has a metallic tint, a medium tone and a certain rhythm. Intensifies with increasing load. Piston pins are knocking
You must continue to operate the engine very carefully. It’s better to slowly go straight to the place of repair
The sound has a high metallic tone with sharp tones and is rhythmic. If you disconnect the spark plug, it goes away immediately. Cylinders or pistons are knocking due to wear. You can continue driving, but without putting too much load on the engine. It is better to immediately go to the repair site. The sound is very similar to the knocking of clay dishes. It sounds more clearly until the engine has warmed up to operating temperature. As the engine warms up, it gradually quiets down. Valves are knocking. You can continue to move carefully, but it is better to head straight to the repair site. There is a dull noise with metallic knocks. Knocks are especially audible at low and medium speeds. It comes from the side where the valves are located. Engine detonation. You should immediately go carefully to the repair site. Sounds occur during acceleration. The problem is resolved by installing a later ignition. The problem may arise due to poor ignition control, due to the use of low octane fuel, or due to engine overload as a result of early engagement of a high gear. You also need to check if there is carbon deposits in the combustion chambers.
Crankcase ventilation - system modification.
The stock engine produced in '71 is equipped with an additional (narrow) tube for crankcase gases and is connected to the air housing. I disconnected it from the body and plugged it, and directed the main hose from the breather into the beam. In general, anyone who more or less understands engine design knows that the so-called “crankcase gases” are removed from it through vacuum in the intake system. Naturally, not only “gases” get there, but also oil vapors, which is extremely undesirable, since the throttle valve becomes dirty and the combustion of the fuel-air mixture worsens. So I decided to improve the ventilation system.
Tell me, doctor, is there any way to do without surgery?
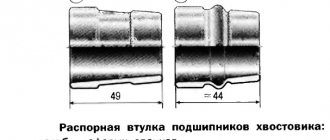
First of all, you need to drain the oil from the bridge. To do this, we turn out both plugs - both the drain and the filler. Next, disconnect the driveshaft from the bridge. When separating the axle and cardan flanges, be careful - sometimes oil accumulates in the cavity between the flanges. If this happens, then check the axial play of the flange by rocking it along the axis with your hand. There shouldn't be any play. If there is noticeable movement (in fact, play of more than 0.05 mm is already very harmful for the bridge), it is worth once again carefully inspecting the traces of oil on the crankcase. Perhaps the oil leaked not through the cuff, but through the gaps in the splines of the loose flange? In this case, it is worth trying to eliminate the play and observe the bridge in operation. If the leak stops, then that was the reason.
Axial play of the flange is eliminated by tightening the nut. When handling a flange nut, you should always remember that it does more than just hold the flange. This is the most important element in adjusting the drive gear bearings, and improper tightening can have serious consequences, ranging from noise to axle jamming. Having inserted two bolts into the holes of the flange, we insert the mounting between them so that, holding it, we prevent the rotation of the flange when the nut rotates. Pull the nut just enough to select the gap. The thread pitch is 1.25 mm, which means that when you turn the nut one turn, it will move along the axis by the same 1.25 mm. If the flange play is minimal - 0.05 mm, then it is enough to turn the nut 1/25 of a turn, that is, only 15 degrees.
Overtightening the nut loads the drive gear bearings with a large axial force, as a result they overheat and may fail. To be sure that we did everything correctly, we need to measure the moment of resistance to rotation of the drive gear. To do this, you need to remove the rear wheels and brake drums, unscrew the axle shaft mounting bolts and pull off the axle shafts, disengaging them from the differential gears. Then we tightly wind the thread onto the flange shaft and pull its free end with a steelyard, measuring the force at which the flange rotates evenly without jerking or acceleration. A less accurate result is obtained by another method, when the steelyard is hooked to a hole in the flange and also pulled evenly. In this case, care must be taken to ensure that the force is directed perpendicular to the radius of the flange circumference. You can also use a torque wrench, evenly rotating the drive gear shaft by the nut, but with such a movement it is difficult to follow its readings. We multiply the measured force value by the radius value, thereby obtaining the moment of resistance to rotation. The torque value should be in the range of 6–9 kgf.cm.
You can try to do without removing the axle shafts and measuring the torque on the flange. Experienced mechanics can do this. To do this, tighten the nut exactly until the play is eliminated and a little more. After this, we put the driveshaft in place and make a test drive in a mode sufficient for the bridge to warm up to operating temperatures (several tens of kilometers along a country road). After this, we check by hand the heating of the axle housing in the area of the drive gear bearings. If the hand tolerates heat, then we assume that everything is in order. If the bearings have become so hot that a drop of water on the crankcase hisses, then we have overdone it and now we definitely cannot do without a good adjustment. You cannot reduce the moment of resistance to rotation of the drive gear simply by loosening the nut. The fact is that a deformable spacer sleeve is installed between the bearings, which, when the nut is tightened, gives the structure the necessary rigidity. By tightening the nut, we compressed the bushing more than necessary, and it will no longer be able to lengthen back. When we loosen the nut, the bushing will no longer be a “spacer”, so it must be replaced
You should also pay attention to the bearings. If a blue color appears on the rolling surfaces, it means they are overheated and also require replacement.
Completing of the work
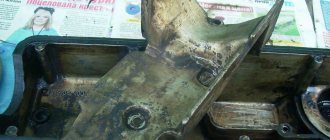
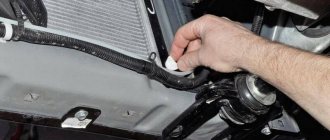
Cleaning the breather on the VAZ 2101-VAZ 2107 is carried out during a scheduled engine oil change. Unscheduled cleaning should be done if oil begins to leak through the gaskets or the outlet hoses are cracked, which indicates an increase in gas pressure in the crankcase. The crankcase exhaust hoses are disconnected, one of which goes to the carburetor, and the second to the air filter. Next, the nut holding the breather is unscrewed, for which the dipstick for checking the oil level in the engine is first removed. After removing the cover, sediment formed as a result of engine operation can be seen in the opened space. It can almost completely block the lumen, significantly complicating the movement of crankcase gases, which leads to an increase in pressure in the system.
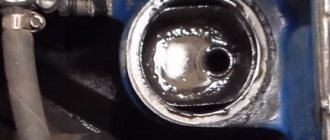
After removing the lid, the opened glass must be thoroughly washed; at its bottom, a 13 nut holding the pin will appear, which can be carefully unscrewed with an open-end wrench. If problems arise with this, you can screw two 13mm nuts onto the top of the stud, which need to be counterlocked. Then, using these nuts, carefully, so as not to break them, the pin is unscrewed.
The glass, as a rule, sticks to the place of attachment, so it is better to tear it off with two small pliers, grabbing it by the edges. The removed parts of the breather must be placed in a container of sufficient volume filled with kerosene, gasoline or other washing liquid. A trimmed plastic bottle with a volume of 5-6 liters is perfect.
While the glass is being washed, the place where the breather is attached is thoroughly cleaned with a rag containing cleaning liquid. When working, you need to be very careful so that dirt and rag particles do not get inside the engine. The hole where the pin is screwed in should not be cleaned too thoroughly so that dirt does not get into the engine from it. After cleaning, there should be no soot or other deposits left on the surface of the breather.
Classification
Carburetor for VAZ 2101
A large number of classic Zhiguli models use the VAZ 2101 carburetor in various modifications. There are several modifications of manufactured carburetors, which differ not only in the size of the installed jets, but also in the presence or absence of a vacuum corrector system.
The VAZ 2101 carburetor of all modifications is intended only for VAZ 2101 and 21011 engines, where an ignition distributor without a vacuum corrector is installed. On cars of later production systems are installed that are already equipped with vacuum correctors. It should be remembered that the use of carburetors for VAZ 2101, 21011 and 2105 engines without a vacuum regulator cannot be used on other engines and vice versa. The carburetor of the VAZ 2103 and VAZ 2016 is used in a similar way - only on models where there is no vacuum corrector.
Maintenance at home is a rather complex procedure that requires certain skills, knowledge and tools. You can independently adjust the idle speed, replace gaskets, clean jets, fuel channels, and also visually check the operation of the accelerator pump and, if necessary, replace it. But it is advisable to carry out final adjustments and adjustments in a car service center that has diagnostic equipment for checking the level of carbon monoxide in the exhaust gases.
Why is cleaning necessary and its frequency?
When the ventilation system is clogged, an emulsion containing soot and oil residues settles inside the engine, resulting in the creation of excess pressure, leading to damage to the seals. This leads to loss of sealing and oil leaks, which can be seen during an external inspection of the engine block. Crankcase gases are gases from engine cylinders that are not discharged through the exhaust valve, but are squeezed out into the crankcase through the gaps of the pistons and piston rings when the engine is running. This process occurs especially intensively in worn-out engines with high mileage. For VAZ 2101-2107, these are mileages of 80-100 thousand km.
If the crankcase ventilation is not cleaned in a timely manner, the operation of the fuel supply system will be affected. In carburetor engines, the air filter and the carburetor itself become dirty; in injection engines, the throttle assembly, inlet pipe and sensors become dirty. All this leads to a decrease in power, problems with operation, and in some cases a complete stop of the engine. To avoid this, additional elements are introduced into the ventilation system to clean crankcase gases from emulsions containing oil.
If the crankcase ventilation system is not cleaned in a timely manner, the hoses crack due to excess pressure. This causes excess air to be sucked into the engine. Carburetor engines are not so sensitive to this problem, but in injection systems the quality of the mixture sharply deteriorates, the stability of the engine is disrupted and its power is reduced.
The best option is to clean the crankcase ventilation on a VAZ classic immediately before changing the oil. This frequency allows you to keep the system in order, change cracked hoses on time, extend the life of the engine, and reduce fuel consumption without loss of power.
Replacing the transmission breather. — logbook Lada 2109 1990 on DRIVE2
I still couldn’t get around to dealing with the gearbox breather, since oil snot from underneath it constantly fouled the entire bottom of the box. And then I was standing on a light tile and I saw that there was even a leak in the area of the checkpoint. I think, well, enough with wiping every time, it’s time to get serious about the breather. Access to it is not entirely convenient, but by placing the wheelbarrow on its side you can get there:
Zoom
Zoom
This photo shows that the entire box is covered in oil:
Zoom
I immediately bought a new breather so as not to bother with cleaning. Still, it hasn’t changed since birth:
Zoom
Well, I took it out, but it was troublesome to put it in. For good reason, you need to settle it with a mandrel over the entire area, but you won’t get anywhere. I had to use a long tube with a flattened end to slowly tap the breather around the entire circle. With difficulty, but I climbed in, it’s an infection! To be sure, I coated the perimeter under the seating collar of the breather with black sealant:
Zoom
Zoom
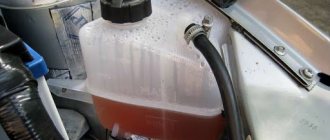
Then in the pit I checked the level in the box. I didn’t unscrew the plug completely, as oil immediately poured out from under it; it was apparently filled in with a reserve, for better lubrication of the fifth gear. At the same time, I wiped the box clean of smudges. I couldn’t resist and opened the old breather:
Zoom
Well, why was he snotty? It’s not clear, the spring is intact, the valve is rubber and elastic, “and what do you, little bastard, want?!” It's been a week since everything is dry. That's all the latest news, all the best to everyone, smooth roads and clean gasoline!
Oil pump
The oil pump (see Fig. 4) is a gear type, installed inside the crankcase and attached to the cylinder block with two bolts. The pump drive gear is fixedly mounted on the shaft, and the driven gear rotates freely on an axis pressed into the pump housing. The oil enters the pump through the oil inlet pipe, passing through the filter mesh. A pressure reducing valve is built into the body of the oil inlet pipe. When the pressure in the lubrication system increases above the permissible level, the oil presses out the pressure reducing valve, and excess oil is transferred from the pressure cavity to the oil receiver cavity. The pressure at which the pressure reducing valve operates is provided by a spring of appropriate elasticity installed at the factory. This pressure is not adjustable.
Oil leaked from the gearbox — Lada 2107, 1.6 l., 2006 on DRIVE2
I was driving home without thinking about anything and suddenly I smelled oil, since I can distinguish the smells of oil, I immediately realized that it smelled like transmission oil. Without hesitation, I went to the garage to the pit to see what happened. The picture was like this!)
Oil leak at gearbox
And all the suspicions were on the gearbox input shaft oil seal. After 3 hours of disassembly, removing the cardan and muffler, I saw that the oil seal was there like new. I began to think what it was, at first there were suspicions of a checkpoint sniffle, but it wasn’t like that, the snort was also clean. My friend Maxim, thanks to him for his help, stuck his hand into the upper part of the gearbox and removed a piece of the gasket. Well, I climbed up to disassemble the interior and take a look. I went online from my phone and looked up how to properly disassemble the slide. And this is what happened.
View of the gearbox with the rocker removed from the passenger compartment
Next, I began to examine the rocker itself and found the cause of the oil leak. Here it is, you can clearly see it.
The old rotten gasket fell apart
It was necessary to change it, but it was already 23:00 and the shops were all closed. As a result, I cut out a new gasket from the paranit and assembled this drawstring with difficulty. So I assembled it and now the leak has been fixed) All that remains is to put everything in its place))
drawstring assembly
Note: If you remove the rocker from the interior, there is a wide and narrow circle, each of which has 3 nuts, so you need to unscrew the wide circle, and under no circumstances touch the narrow one. The point is that if you untwist a narrow circle, then all the springs, plates and other parts will all fall into the inside of the gearbox, PAY ATTENTION.
Visual explanation)
Like and comment
Issue price: 0 ₽ Mileage: 81,500 km
Way to solve the problem
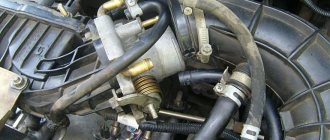
When starting to clean the breather, first of all we look for a device under the hood and remove the air filter from it. Before doing this, de-energize the car by disconnecting the negative terminal from the battery and turning off the ignition. There is an intake manifold under the filter - we will also dismantle it. After this, you can see the prompter itself - as a rule, its cover is secured with two bolts, which will have to be unscrewed. After removing the cover, the oil bumper will become visible - it is secured with a pin.
Read more: What is a lawn according to the law?
It is necessary to unscrew the nut located on the stud, but there is no need to remove the stud itself, because it will be difficult to put it back without dismantling the pan. We make a cleaning rod out of wire, which we use to clean the tube. There is a brush on the breather cover to extinguish the flame - we clean that too.
All that remains is to check the device. We start the engine, remove the plug from the oil filler neck, and cover the neck itself with your palm. You can feel with your hand whether there is pressure. Then the assistant should press on the gas until the speed reaches 100-130 km/h and check the compression again by applying the palm of his hand. A little pressure should already be felt.
To avoid problems with the release of working fluid through the prompter, it is necessary to constantly monitor its level. It is also important to pay attention to checking the filter and gearbox.
Owners of old domestic cars, after several years of ownership, can easily write a directory of “diseases” of a particular car model. One of these “sores” is an engine malfunction in which engine oil is squeezed out through the breather. This phenomenon is most often simply called by people: “oil is driven through the breather” or “oil is thrown out through the breather.”
The problem is quite unpleasant and is accompanied by a large number of engine-related problems. It is this problem, as you probably already guessed, that we will talk about in this article. You will learn why oil comes out of the breather and how to solve this problem. Go.
As a rule, the problem occurs with the onset of cold weather, the breather freezes and the oil is squeezed out. This manifests itself in the form of oil drips that are visible from the outside of the engine. Failure to respond to this phenomenon in a timely manner can lead to serious engine damage.
19/ ASSEMBLY OF TRANSMISSION VAZ 21074 — Lada 2107, 1.6 l., 2007 on DRIVE2
Five-speed gearboxes of the classic design since 2004 or after 2004 have received a number of changes and are slightly different from the previous ones.
This is how teeth should be. Spicy from top to bottom!
New fork, clutch and gears with 3rd gear synchronizer.
Fork and clutch for 5th gear and reverse gear. Also completely new.
The 1st and 2nd gear clutch and the 3rd and 4th gear clutch are the same. Clutch 5 and reverse are different. It is impossible to confuse them!
Secondary shaft.
Gearbox housing.
We start the secondary shaft. We install the bearing into the housing and screw the bracket.
Now we install the input shaft. Don't forget about the retaining rings, as well as the needle bearing inside the input shaft.
We put 1-2 and 3-4 gear forks. The forks are placed with the holes for the bolts facing up (in this case, the gearbox with the pan facing up).
We install the rod of the first and second gear, tighten the fork with a bolt (turn the shafts) and lay in a long cracker.
We put the 3-4 gear fork. We install the third-fourth gear rod. We do not thread it into the fork all the way and insert the cracker into the hole in the rod. Push in the rod and tighten the fork bolt. Similarly to the holder of the first-second gear rod, we install a short holder.
Now install the intermediate shaft.
The middle intermediate shaft bearing has an internal bearing race, which consists of two parts: a bushing and a ring. The bushing should be oriented inside the box housing.
We install bearings. Bearings should not dangle in the box body. They come in tightly. I used a tube with a large thick washer, having an internal diameter just enough to fit it onto the shaft. And using a hammer, he carefully pressed the bearings.
After installing each next part, rotate the primary and secondary shafts several times. They should rotate without jamming.
The intermediate shaft bolts are different so you can't mix them up. Just remember that the front one has a thick washer, and the rear bolt does not have a washer or Grover washer.
Assembling reverse gear and 5th gear.
Don't forget about the clever stopper!
Don't forget the ball.
Don't forget about gaskets without wings. You don't need to put sealant everywhere. It can bring with it not only good, but also a lot of bad.
We install the rear cover and clutch housing.
To fix the flange nut (elastic coupling) to the secondary shaft, I used thread sealant. The three of us unscrewed it, so I think it was intended that way.
This is how it turned out.
Can't fit more photos.
During assembly, do not forget to check that everything rotates and moves, and even switches.
The 5th gear spring is longer than the other two.
Don't lose the crackers and balls! ________________________________________
ATTENTION! BEFORE INSTALLING THE TRANSMISSION ON THE ENGINE, YOU MUST LOW THE REAR OF THE ENGINE DOWN.
Necessary tool
To clean the breather on a VAZ engine, check and replace the hoses, you don’t need any special skills or specialized equipment; a standard kit is enough. To complete the work you will need:
- set of keys No. 7-13;
- flat and Phillips screwdrivers;
- washing liquid, kerosene will do;
- container where washing will take place;
- rags;
- breather gasket;
- heat-resistant silicone-based sealant;
- if necessary, a set of new hoses will be required - separately for the carburetor and injector.
This tool can be found in any garage, so there are no problems with its selection. It is better to take rags that do not separate into individual elements, since during washing they can get into the engine.
avtoexperts.ru
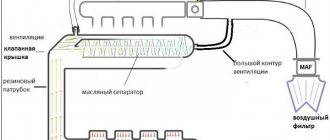
Among various auto systems, the crankcase ventilation system plays a significant role in the formation of the air-fuel mixture, stable and economical operation, full power delivery, protection of engine oil and extension of the life of the cylinder-piston group.
In the design of a car, the crankcase ventilation system is the “lungs” of the engine, necessary for its normal functioning. The system is called PCV (Positive Crankcase Ventilation). However, it is the one that is undeservedly given a minimum of attention and maintenance, and many car owners do not even know about its existence. In this article we will try to understand why this system is needed, how it works, its inherent faults and methods for checking its performance.
What are “crankcase gases”?
During combustion, the fuel-air mixture sharply increases in volume, creating enormous pressure inside the combustion chamber. The expanding gases from combustion force the piston to bottom dead center, causing the engine crankshaft to rotate. Some of the gases penetrate through the leaks between the rings and the cylinder mirror into the oil pan, where, mixing with oil vapor, they create pressure that aggressively affects the crankshaft seals and the pan gasket, and the oil dipstick channel.
The expansion stroke is repeated in each cylinder, constantly pumping the next portion of gases into the sump, and if the crankcase ventilation does not work, the gases will either squeeze out the crankshaft oil seals, or “knock out” the oil dipstick and expel the oil from the crankcase, with all that follows.
In addition, particles of unburned fuel, small fragments of soot, and moisture vapor are transferred to the sump along with the gas, which are mixed with the engine oil located in the engine sump. This, in turn, leads to oxidation of the oil, clogging it with wear products, reducing its performance properties and reducing its service life.
Troubleshooting
Read more: How to test the starter solenoid relay with a multimeter
Helpful advice! To distinguish stuck rings from a burnt-out valve, it is enough to perform several manipulations. After checking the compression in the cylinders, determine the cylinder with the lowest value. Then inspect the spark plug of this cylinder; if the rings are lodged in this cylinder, the spark plug will be covered with a thick oil layer. If the valve is burnt out, the spark plug will appear normal without any major abnormalities.
Finally…
The problem of oil escaping through the breather worries many motorists and causes a lot of trouble, but if the problem is detected in a timely manner and the right approach is taken, serious consequences can be avoided. It is important to ensure that the oil level is normal; as soon as you find that the engine is taking oil, monitor its level and constantly monitor it so that it does not fall below the permissible level. Also pay attention to the breather and filter; oil on the air filter in large quantities also does not bode well. Regularly monitor the condition of the engine and all systems, and also promptly correct any malfunction. This will save you from engine overhauls and unnecessary waste.
Any type of car engine has a complex structure. It includes various systems and mechanisms that interact with each other. To ensure the removal of gases formed in the internal cavities of the power unit, the diesel engine is equipped with an effective ventilation system.
breather!2107
Hello everyone, please don’t delete the topic, what should I do (the breather smokes terribly, it all stinks; the breather has already been brought out under the body closer to the rear axle and it still stinks in the cabin (what should I do for the first time? Then I’ll install another engine, maybe turn off the breather? Just don’t advice like making capital or changing rings for this engine for a while. engine 21011
Tags: breather 2107
Comments 53
don't try to plug it up, it will suppress oil from everywhere
As a temporary option, take it back to where the muffler is or do everything wisely, clean the ventilation channels and return it to the air filter.
I cleaned all the channels today and returned it to the Filter. One horseradish seems to be coming from the filter, causing a smell to appear in the cabin.
The motor means dead. Be patient, since the option is temporary, there will be an incentive to quickly solve the problem with the new engine)
Happiness does not lie in capital. happiness lies in cleaning the engine ventilation duct. Several people have already indicated what exactly needs to be done. If you’re too lazy to put your hands and head to the engine, then I can only wish that I could continue playing around with the hoses and breathing in muck.
I stuck the breather that had been installed under the bottom into the air vent before I did, so it poured oil into it properly. Then I just cleaned the lid and mesh, threw the hose outside again, and that’s it, no problem.
Disassemble the breather separator, clean it, wash it. Buy flame arresters 4 pcs. Place two pipes at the bottom, one after the other, two at the top in front of the pan. Coat the connections of the pipe with sealant, in the places where you tighten them with clamps and on the pan around the place where the pipe is attached. There won't be any smell if you do everything tightly. Check if there is any rubber on the pan or on the lid.
How can it stink in the pan? If only you smell it. I have little idea what condition the engine must be in for it to stink, and even from a pan
Well, I don’t know, there is a smell in the cabin
Leopold Stotch
How can it stink in the pan? If only you smell it. I have little idea what condition the engine must be in for it to stink, and even from a pan
+1 Only an oil sump and only in a regular place.
Why did you even remove it from its original place? Put it back in the pan and it won't stink anywhere.
he stank in the pan and threw oil
Install an oil sump. You can’t turn it off...
There are two options - endure or capitalize. If it were possible to drown it out, they wouldn’t do it at all.
I changed the rings and liners last year, but apparently it needs some capital. The last time there was capital was in 2000. Do you think capital is still needed?
did you look at the CPG and the knee? Well, it depends on what kind of rings you got. there was also a leak from the breather on my brother’s basin. Replaced rings and valve stem seals. Naturally, everything was washed. there are no problems. True, the mileage is only a couple of thousand.
VAZ rings. I changed it last August. There is no blue smoke, but white smoke comes out of the breather, but a little more. I installed a homemade oil catcher. Maybe the oil is of poor quality? I add liquid molly 15 to 40 mineral water. Maybe change to synthetics? Or order oil from Germany. I don’t know what to do anymore.
First, read smart books and forums. synthetics will leak immediately. this time. secondly, the basin will never move like that in its life, even from a mountain, so that the properties of synthetic oils are needed. Enough with the semi-synthetics. that's two. It’s unlikely that you’ll be able to pour semi-synthetics into a half-dead engine - most likely it will leak everywhere you can think of. that's three. I don't know what you have there. Only an autopsy will tell, but my brother also had no smoke from the chimney, and the carb was clogged up like crazy. They threw the breather into the atmosphere - the entire engine compartment was covered in oil. analysis showed many minor problems from the oil pump to valve wear. Everything was treated, the ride didn’t get any better, but the smoke from the breather disappeared, plus some minor improvements. The oil was filled with Gazpromneft mineral water.
Thanks for the advice.
drive and smell until you install a working internal combustion engine
Well, throw it away, don’t think about putting it in 07