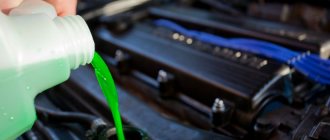
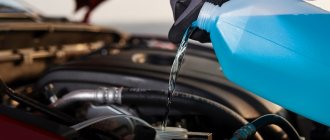
Instructions for replacing Coolant
On Kalinas with 8 and 16 valve engines, the coolant replacement is different. You can drain the old fluid from the radiator without any problems, but from the block on a 16-valve engine it is more difficult. You will have to unscrew the starter.
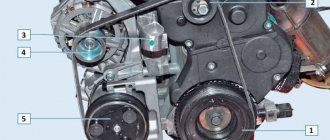
Replacing antifreeze on an 8-valve Lada Kalina engine
So, we relieve the pressure in the system by unscrewing the cap of the expansion tank. Then remove the engine protection to get to the drain plug.
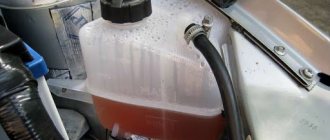
We take a container with a volume of 6-8 liters and place it under the drain hole located at the bottom right of the radiator. To make the pressure weaker, screw the expansion tank cap back on.
Unscrew the drain plug on the radiator and allow the liquid to completely drain from the radiator.
Draining fluid from the cylinder block on an 8 valve engine
On an 8-valve engine with a traction drive gearbox, draining the old coolant is quite simple. The drain plug is located under the ignition coil.
Using the “13” socket, unscrew the drain plug, place the container and drain the liquid.
Drain the liquid from the cylinder block on a 16 valve engine
To get to the drain plug you will need to remove the starter. If you do not remove the starter, but unscrew the plug and drain the liquid, it will flow directly onto it, which can lead to failure.
Disconnect the wiring block from the traction relay on the starter. Remove the protective cap from the positive wire, and using a 13 mm wrench, unscrew the nut and remove the wire.
Next, use a 13mm wrench to unscrew the three starter mounting bolts and remove it.
Now all that remains is to unscrew the drain plug and drain the coolant from the cylinder block.
After the liquid has been drained from the block, tighten the drain plug with a force of 25–30 Nm. We also tighten the radiator cap and fill the coolant through the expansion flank until it is full.
We start moving and begin to put pressure on all the pipes, thereby stimulating a better passage of antifreeze or antifreeze and filling the entire system. Do not forget to monitor the liquid level in the barrel, which should be between Min and Max.
What are the consequences of ignoring the replacement of the catalyst gasket?
One of the unpleasant features of operating Kalina with a damaged catalytic converter gasket is the increased noise level during operation of the exhaust system. In addition, the correct mixture formation is disrupted due to improper functioning of the oxygen sensor. All this causes the formation of carbon deposits on the elements of the power unit, timing mechanism, spark plugs, worsening their performance. Well, the most unpleasant moment is that after a short period, the exhaust gas neutralizer itself will simply fail.
Since the ceramic parts of the part are destroyed and clog small areas of the part with their fragments, reducing its permeability, more pressure will now be required for the free movement of gas mixtures through the collector.
How to choose a coolant?
Answering the question of what antifreeze to use in Priora, the manufacturer did not provide a large assortment to its users. It is best to use the Felix-40 cooler. You can use other brands, but this is not recommended. The engine system may wear out in a shorter period of time. As a result, you will have to contact the service for global repairs and replacement of parts.
If you are using antifreeze from another manufacturer, it is recommended to study its characteristics. It must meet international quality standards.
How to check the fluid level and how much will be enough?
To determine how many liters of coolant are needed to fill the tank, carefully read the vehicle's owner's manual. You will need approximately 7.8 liters. Some car owners prefer to fill a little less - 6 liters.
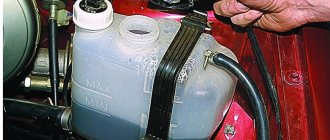
You can check the antifreeze level in the tank even on a cold engine. To do this, lift the hood lid. You will see a tank. There are two marks on it with a maximum and a minimum value. The fluid level must be within these marks.
How many liters of antifreeze does a Prior have 16 valves, which determines the choice of its color
The volume of antifreeze poured into a Priora car, according to technical documentation, is exactly 7.84 liters. For normal engine operation, only 6 liters of antifreeze can be poured into the Priora - as long as it is visible in the tank - this is for winter. In any case, it is highly recommended not to deviate from the manufacturer’s recommendations, and whenever the question arises of how much antifreeze is poured into the Priora, say the figure indicated in the passport.
Coolants are divided according to a special classification, and externally, without a label, they can be distinguished by color. In Russia, Volkswagen standards are often adopted. You can fill the Priora with red carboxylate antifreeze just like from the factory.
Replacing the coolant of a Lada Priora car
- The coolant should be replaced after seventy-five thousand kilometers or once every five years.
- If the coolant has changed color to a reddish color, replace it immediately, as this indicates that the inhibitory additives have already been used up and the fluid has become aggressive towards parts of the cooling system.
- The engine cooling system holds 7.84 liters of liquid.
If the cooling system is filled with antifreeze type coolant, it should be replaced every 40 thousand kilometers or 2 years of operation.
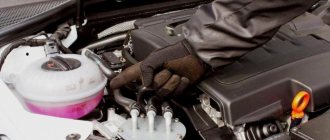
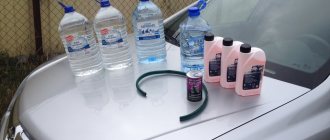
You will need: a 13mm wrench, a Phillips screwdriver, coolant, a clean rag.
Use coolants recommended by the manufacturer. Replace coolant only when the engine is cold. Coolant is toxic, so be careful when handling it.
note
When starting the engine, the expansion tank cap must be closed. Screw the cap tightly.
When the engine is running, the cooling system is under pressure, so coolant may leak from under a loosely tightened plug.
Place the vehicle on an inspection pit or lift.
- Unscrew the expansion tank cap.
- Remove the engine splash guard.
- It is not necessary to remove the engine crankcase protection, but in this case you will have to take measures against coolant leaks on the area under the car, since it will splash heavily when it gets from the drain holes onto the protection.
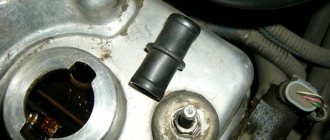
Place a container under the engine and remove the drain plug on the cylinder block.
After draining the coolant, wipe any traces of it from the cylinder block.
Place a container under the radiator, remove the drain plug on the radiator
- Wait until the coolant has completely drained from the system.
- The radiator drain plug is sealed with a rubber ring, do not lose it.
- Replace a torn or hardened ring.
- Screw the plugs into the cylinder block and radiator.
- Loosen the clamp and disconnect the coolant drain hose from the throttle body heating fitting.
- This is necessary so that as the engine cooling system fills, air comes out of it.
- If this is not done, due to the formation of air pockets, the coolant will not completely fill the system.
Fill the engine cooling system by pouring coolant into the expansion tank until it begins to flow out of the hose disconnected from the throttle body.
At this point, reinstall the hose and tighten the clamp.
Continue adding fluid until its level reaches the “MAX” mark on the wall of the expansion tank (after starting the engine, the coolant will displace the remaining air and the level in the tank will drop slightly). Close the expansion tank cap.
Screw the expansion tank cap tightly. When the engine is running, the expansion tank is under pressure, so coolant may leak from under a loosely screwed cap.
Install the engine splash guard.
Do not pour fluid into the expansion tank above the “MAX” mark, as when the engine warms up, its level in the tank rises significantly.
When the engine is running, monitor the coolant temperature according to the gauge.
If the arrow moves to the red zone and the fan does not turn on, turn on the heater and check what kind of air flows through it. If heated air flows through the heater, most likely the fan is faulty; if it is cold, it means that an air lock has formed in the engine cooling system. After this, turn off the engine.
To remove the air lock, allow the engine to cool and remove the expansion tank cap (be careful: if the engine is not completely cool, coolant may splash out of the reservoir). Start the engine, let it run for 3-5 minutes and close the reservoir cap
How to remove an air lock on a Priora
On a car, malfunctions occur in the cooling system, and an air lock may form. To remove air from the system, you need to use its hoses. This is done in one of two ways. In each case, you need to wait until the power plant has completely cooled down, and only then begin to troubleshoot the problem.
I Option:
It is best to wear thick gloves before work to avoid burns. Warm up the engine a little and be sure to turn off the car. Remove the tube and clamp from the heating when antifreeze flows. Put everything back in its rightful place and tighten the clamp again. Air will escape under the resulting pressure.
II Option:
A device such as the throttle assembly clamp needs to be loosened, then the tube must be removed from the heating. Next, open the lid of the special expansion tank of the cooling system located in the engine compartment, cover the neck with a clean rag and blow through it properly. You will see air coming out. You need to tighten the cap when the coolant appears directly.
Is it possible to mix antifreeze?
Is it possible to mix antifreeze from different manufacturers? The operating manual for the Lada car states: “The use of mixtures of coolants of different brands is not allowed.”
Is it possible to mix antifreeze of different colors, but from the same manufacturer? There is no definite answer, because... Some manufacturers color the coolant “to taste,” while others add color based on the chemical composition or additives. According to statistics, about 85% of motorists do not mix antifreeze of different colors. At the same time, 64% believe that if you mix antifreeze of different colors, nothing bad will happen. You can view and participate in the survey here.
The book on operation, maintenance and repair of the Lada Vesta car states:
Various dyes are added to antifreeze, giving the antifreeze a particular color that does not affect its operational and chemical properties.
Therefore, when choosing antifreeze, you should pay attention not to its color, but to its chemical composition (type), recommended by the car manufacturer. If the antifreeze is concentrated, then it should be diluted with distilled water in a certain proportion
They are usually indicated on the label attached to the container.
Mixing
Often people on forums wonder if it is possible to mix coolants. There is only one answer to this question - NO! Never mix different coolants, especially antifreeze and antifreeze. All these liquids have different chemical formulas and a reaction can occur between them under the influence of high temperature.
Consequences of mixing
It is allowed to mix antifreeze of different brands, but of the same colors.
How to change it correctly?
Next, we will look at how to correctly replace the working fluid of the cooling system in a Lada Priora car with an electronic pedal or with air conditioning. You can change the refrigerant at a service station, but this task is quite simple and anyone can handle it on their own. For the best effect it is necessary, we will talk about this below.
Preparation
Before you begin the process, prepare the following:
- fresh refrigerant in the required volume;
- seal for the drain cover if the old one is worn out;
- set of wrenches;
- clean rags;
- container for collecting used antifreeze.
The Lada Priora Repair and Maintenance channel provided a video that demonstrated the procedure for draining the working fluid from the cooling system.
Step-by-step instruction
How to replace antifreeze on a Priora:
- Drive the car into a garage with a pit; you will need a flat surface to perform the work. Wait until the engine cools down; the entire process is carried out cold.
- There should not be high pressure in the cooling system. To reset it, open the hood and unscrew the expansion tank cap. If the engine is hot, coolant may spray out of the hole, so use a rag when opening it.
- Dismantle the plastic protection of the power unit. To remove it you need to unscrew two fasteners on the sides. It is not necessary to dismantle the clamps, but removing them will make the task more convenient.
- If your car is equipped with a transmission with control cables, then it is necessary to dismantle the starter device. To do this, disconnect the negative terminal from the car battery. Press the fastening of the connector with the wiring and disconnect the plug from the output of the traction relay. Remove the protective cap from the nut securing the tip of the wire connected to the positive terminal of the battery. Using a 13mm wrench, unscrew the nut and remove the cable tip from the contact screw on the traction relay. Then use the same tool to unscrew the screws and dismantle the starter device. If the car's transmission is controlled by traction, then there is no need to dismantle the starter.
- Find the drain plug; it is located directly on the cylinder block. You need to place an old bucket or basin under it, into which the used refrigerant will be drained. Unscrew the cap and wait until the liquid comes out of the system. Also unscrew the protective valve under the radiator device; some of the substance will also flow out of it. When the draining is complete, you need to tighten both plugs. Don't forget to check the condition of the seal on the drain cap. If it is worn out or there are traces of defects, the ring must be replaced.
- Assess the condition of the refrigerant drained from the refrigeration system. If there are traces of deposits, wear products, or the liquid as a whole is very cloudy and viscous, it is recommended to flush all components. To do this, pour about 7.8 liters of distilled water into the system through the expansion tank. You can add vinegar or citric acid to it to remove dirt. The use of special cleaning agents is allowed. After filling, the engine starts, you can perform a test drive. Then the procedure for draining the refrigerant from the power unit is repeated. If the liquid is still dirty, then the washing is repeated until it comes out clear.
- Assess the condition of all pipes and lines of the cooling system. If there is damage or signs of leaks, the hoses must be replaced.
- The next step is to pour new refrigerant into the system. To prevent an air lock from appearing in the lines and eliminate air entering the system, it is recommended to slightly loosen the clamp of the pipe connected to the throttle assembly. The hose is then disconnected.
- The cooling system is filled with fresh antifreeze through the filler neck in the expansion tank. New refrigerant is poured in until it comes out of the pipe disconnected from the throttle. When this happens, the line is connected into place and the clamp is securely tightened. Then the refrigerant is added to the system to the required level.
- All previously dismantled components are reassembled in reverse order.
- The engine starts and the journey is carried out. Now you need to once again make sure that the fluid level is correct. Make sure there is no leakage from the drain hole.
Remove the cover on the expansion tank Unscrew the drain valve on the radiator cooling device of the engine Remove the starter from the car by disconnecting all fasteners
Which company is better
“Behind the Wheel” tested coolants in November 2022. Test results:
Keywords: cooling system Lada Granta | cooling system for Lada Kalina | cooling system for Lada Priora | cooling system for Lada Largus | 4x4 cooling system | cooling system for Lada Vesta | cooling system lada xray | Lada Granta engine | Lada Kalina engine | Lada Priora engine | Lada Largus engine | 4x4 engine | Lada Vesta engine | lada xray engine | Niva cooling system | Niva engine | universal article
8
3
Found an error? Select it and press Ctrl+Enter..
The main causes of malfunctions in the engine cooling system and methods for eliminating them
| Cause | Way |
| Motor overheating | |
| Low coolant level in the radiator | Add coolant |
| Thermostat valve stuck in closed position | Make a replacement |
| Coolant does not circulate well | Replace the pump or pump |
| There is a lot of debris in the radiator | Clean the radiator |
| Scale and deposits on radiator tubes, hoses and cooling jacket | After flushing the cooling system, the fluid must be replaced |
| The fan does not work due to a malfunction of the temperature sensor or other components | Check the electrical circuit. If necessary, replace fuses, resistors, relays or fans |
| Crack in the coolant tank plug | Replace the plug |
| The engine overheats and cold air comes out of the heater. | |
| Low coolant level, leaking or worn cylinder head gasket | Add coolant, replace gasket |
| The engine cannot warm up for a long time, the temperature is not stable | |
| Thermostat stuck closed | Replace thermostat |
| The coolant level is constantly decreasing | |
| Radiator depressurized | Repair or replace |
| Heater radiator is depressurized | Repair or replace |
| The coolant tank is depressurized | Replace the coolant |
| Coolant leakage through pipe connections | Replace hoses, pipes and tighten clamps |
| Worn water pump seals | Replace the pump |
| When parked, coolant leaks from the joint between the cylinder head and the cylinder block. | Tighten the bolts. |
Why is it flowing?
If the level of antifreeze in the coolant reservoir continuously decreases, then it is likely that there is a leak in the cooling system. In this case, you need to inspect the entire cooling system, find and repair the damage.
Examine the components and assemblies under the hood, and first of all the condition:
- coolant tank pipes;
- upper and steam exhaust pipe of the radiator;
- heater radiator pipes;
- throttle body hoses;
- thermostat hoses;
- connections of hoses and pipes.
If all connections are in order, then one of the nodes may be faulty, namely:
- coolant tank housing;
- engine radiator;
- heating radiator;
- thermostat;
- connections between the coolant pump (pump) and the cylinder block.
We also look for coolant leaks from the pump drain hole as a result of oil seal wear.
We monitor the antifreeze temperature using the indicator on the sensor.
Article number and cost of antifreeze for Priora
According to factory standards, coolant of different brands cannot be mixed in Lada Priora. The Lada-A40 brand is suitable for Priora, its catalog number is: 88888100005082. The cost of the liquid is approximately 550 RUR. rub. for 5kg. There is also a list of acceptable liquids:
- Antifreeze G-48;
- OZH-K Tosol-TS;
- Macra Cool Stream liquid Standard/Premium;
- 2 types OZh-40 Tosol-TS/OZh-65 Tosol-TS.
What types of car malfunctions can occur due to antifreeze?
When the coolant begins to drain, the owner of the Lada Priora should think about why this is happening. Antifreeze leaks often occur due to mechanical damage to the cooling system. In the worst case scenario, the engine overheats and the cylinder head gasket burns out.
The car owner noticed that antifreeze was constantly flowing, reasons:
- Leak between block and cylinder head. In this case, you can tighten the bolts better.
- When the radiator is damaged. You can try to replace it, but there are times when only repairs are required.
- The water pump has become unusable. The situation can be corrected by replacing the pump.
- The pipes are damaged. Initially, you need to tighten the clamps; if the problem does not go away, you can replace the hoses and pipes with new ones.
- The expansion tank of the automobile cooling system is damaged. There is only one option - replace the tank.
- Malfunctions can also be short-term in nature:
- There is scale on the cooling jacket; it can also be seen on the pipes and on the walls of the radiator. Flushing the system will help. Next, fill in new high-quality coolant.
- The existing antifreeze circulates poorly through the system. In certain cases, the pump, and in some cases the entire water pump, needs to be replaced.
- When the car owner first notices a low coolant level, he needs to top it up to the level. If the leak becomes regular, the system needs to be checked for leaks.
Preventative measures to prevent corrosion
We offer car owners a certain list of actions that will help prevent the entire preparatory and painting procedure described above:
- frequent car washing, not excluding the winter season (a plus will be the application of wax, which can significantly increase protection from adverse external factors);
- tracking the initial signs, their minor repairs to a minor area will eliminate large costs and time;
- providing the car with mudguards and fender liners;
- applying anti-corrosion material to the bottom of the car.
All recommendations for eliminating “bugs” and rust will help even a beginner cope with the repair. Correctly assess your strengths and do not put it off for later. A good result is only possible with the right approach.