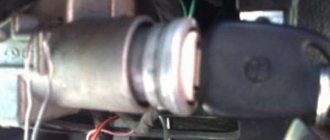
Egnition lock
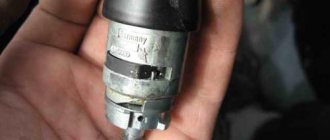
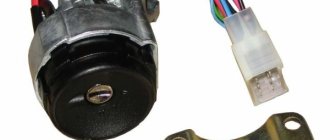
The ignition switch is a complex device designed to control the power supply to the vehicle systems, prevent the battery from discharging and ensure that the engine starts from the starter system. The castle includes two components:
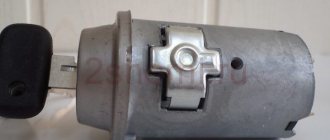
- mechanical, represented by a lock cylinder;
- electrical, which is a set of contacts that close electrical impulses when the key is turned in one way or another.
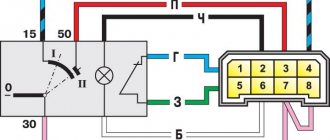
The ignition switch on the Lada Kalina has three modes:
- Mode "0". In this position, the key can be easily removed, and the lighting, emergency lights, and audio system work.
- Mode "1", fixed. It is no longer possible to remove the key from this position; when it turns on, the ignition system is turned on and power is supplied to all systems except the starter. But it is worth considering that keeping the key in mode “1” for a long time can lead to battery discharge. This position is used when turning on the starter, so that the running fuel pump pumps up the required pressure to ensure further ideal operation of the starter.
- Mode “2”—activation of the starter system.
The Lada Kalina ignition switch kit contains a key for the lock, which serves not only in its straight profile, but also as a key for the doors and trunk.
Where is the immobilizer located on Kalina?
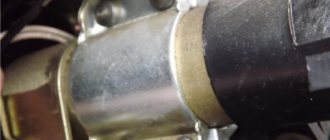
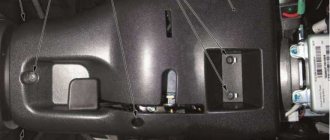
The immobilizer control unit on the Lada Kalina is located deep in the instrument panel in the area of the central air duct of the microclimate system. The loop antenna for the signal reader is located in the ignition switch. The chip itself is built into the head of the key and is automatically read when the key is inserted into the lock.
Device access
To access the block you will need the following tools:
- Phillips screwdriver
- plastic screwdriver for removing decorative elements on the panel;
- cardan extension and Phillips head (for block removal).
The sequence of disassembling the panel based on Kalina 1 without air conditioning:
- Disconnect the battery from the vehicle's on-board network.
- Open the ashtray and unscrew the four screws securing the housing, remove it from the socket.
- Remove the two plugs located on the sides of the panic button.
- Unscrew two more mounting screws located under the covers.
- Remove the temperature and airflow direction rotary switches.
- Pull the central pad towards you and remove it from the latches.
- Disconnect electrical connections from trim-mounted components.
- Remove the standard unit, secured in the plastic housing under the central air duct with two screws.
- Disconnect the electrical wiring plug from the unit by pressing the latch.
The photo shows the main stages of unlocking the immobilizer on a VAZ Kalina.
Ignition switch malfunctions
Like any electronic device, the ignition switch of the Lada Kalina is subject to frequent breakdowns. Malfunctions can occur for a variety of reasons, the most common of which are the following.
- Oxidation of contacts always leads to serious damage (usually due to moisture and dampness in the machine)
- Contact burnout , which occurs due to sudden voltage surges. Voltage drops usually occur when the power unit is started, during which the temperature inside the system rises sharply, causing the insulation to simply burn out. This is why it is so important to approach the launch issue wisely.
- Mechanical damage . If, when you are about to turn the key, you notice that it has become more difficult to do so than usual, it means that something happened to the lock cylinder, perhaps it was simply clogged with dirt or dust, or maybe there was a defect at the factory that came to light only now.
If the problem lies in burnout or oxidation, then when you turn the key in the lock, you will not see any reaction from the ignition system. In this case, you just need to replace the contacts without changing the entire lock; if the defect in the wires is not severe, then you can get by with cleaning the contacts.
Damage to the lock cylinder also occurs when someone tries to steal a car. In any case, the lock needs to be changed completely. But how to do it yourself?
If the problem is the spark plugs
The Kalina engine does not always start due to a faulty ignition switch. You can also start looking for problems with the spark plugs. What kind of candles are needed for Kalina? A17DVRM products are recommended. They can be replaced with A15DVRM. Candles of our own production can be replaced with imported analogues. Their brand largely depends on the engine:
Engine with 8 cl. Motor with 16 cl. A17DVRM AU17DVRM 14R-7DU 14FR-7DU RN9YC RC9YC BPR6ES BCPR6EC W20EPR Q20PR-U11 LR15YC DR15YC WR7DC FR7DCU. Candles have different prices in different regions of the country. A set of them costs from 200 to 500 rubles.
Some manufacturers' spark plugs may have a different number of electrodes. In addition to the standard single-electrode plugs, there are several electrode plugs. Standard single-electrode spark plugs are recommended for VAZ Kalina cars. Their duration depends on the operating conditions of the vehicle.
It is recommended to change spark plugs every 30,000 km. Many Lada Kalina car owners identify the following spark plugs as the best brands: Brisk, Denso, NGK. A fairly significant group of motorists singles out the A17DVRM spark plugs produced by Engels. To replace spark plugs on Kalina you will need a special spark plug wrench. The procedure is quite simple.
- The engine in the area where these products are located must be cleaned to prevent debris from entering the cylinders when the caps are unscrewed.
- Well-fitting strands are removed one by one from each candle.
- The candles are turned over and examined (image No. 4).
- The spark plugs are first screwed in by hand, then tightened with a wrench.
The ignition switch in a car is a reliable unit that can work for a long time and without accidents. But sometimes it needs to be removed for repairs or complete replacement. You can do it yourself. At the same time, you can check the functionality of parts that may not work.
The causes of engine malfunction may be hidden in the malfunction of other components and mechanisms of the car. These include the spark plugs, ignition coil and ignition module. The search for these reasons will be carried out professionally by an auto electrician.
Replacing the ignition switch yourself
Shear bolts
Unfortunately, the Lada Kalina cannot please you with its reliability and durability; many systems, including the ignition switch, fail within a couple of years, so in order to save on repairs at expensive car repair shops, it is better to find out how to do it yourself. So, having come to the conclusion that the lock needs to be changed, we buy a new lock, which costs around a thousand rubles. In the kit we will receive three cylinders (on the doors and trunk) and 2 keys. You also need to purchase four shear bolts , since the old ones will no longer be suitable after dismantling.
In addition to the product itself, we will need the following tools:
- chisel;
- two screwdrivers, a flat one for removing the clamps and a cross for the bolts;
- 10mm wrench or 10mm ratchet;
- key to 8.
Let's get started
1. First you will need to disconnect the battery cable from the negative.
2. Armed with a cross-head screwdriver, unscrew the fasteners on the steering column. To make it more convenient for you, we immediately warn you: there are two bolts on the right and left sides (3), two at the bottom in the middle (2), and two at the very bottom (1). There is also a self-tapping screw located directly under the steering wheel (4).
3. We take out the clamps holding the steering column switches. We dismantle the switches.
4. Now we need the help of a chisel. It is necessary to apply blows of medium power and unscrew the bolts. Bolts, as a rule, become very sticky after several years of use, so you will have to work hard. As soon as you notice that the bolts begin to move out of place, you can pick up pliers and continue to work only with their help.
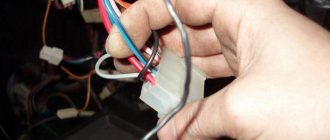
5. We need to get to the lock connectors, of which there are only two (main power and immobilizer antenna). The connectors are hidden under the console casing. To gain access to the connectors, you need to slightly pull the wiring harness away from the lock and pull them out.
6. Unplug the connectors, and then remove the ignition system switch.
Now we replace the old lock with a new one and reassemble it in the reverse order. But don’t forget that you need to do a little more magic on the doors and trunk, changing the lock cylinders.
Replacing door cylinders
To remove the old cylinders on the doors and trunk, you need to carry out a simple job consisting of several stages.
3. After removing the casing, you need to use a 8mm head to unscrew the iron figured holder (3 bolts).
4. We reach for the rods and, using a screwdriver, remove them.
5. We get to the bolts that secure the handle, the bolt is screwed in from the end, and if you look deep into the door there will be a nut number 8, unscrew that too.
6. Carefully pull out the door handle.
7. We take out the larva, having first found the latch and pressed it with something very thin.
The tailgate lock can be removed a little easier:
1. Remove the door trim and see the lock system.
2. Unscrew the two nuts by 8 and tear off the system in which the larva “sits” from the rod.
3. We disassemble it and take out the cylinder (when disassembling it is better to remember where and how everything is attached, there are many small parts.
Resynchronization of remote control codes
In cases where the remote control buttons are pressed outside the range of the radio channel, the “floating” code counter in the remote control goes out of synchronization with the counter in the system control unit. If the number of button presses outside the signal reception area of the system exceeds 1000, the system stops responding to remote control commands. In this case, the remote control training procedure should be repeated.
Updated August 01, 2013
Due to the increasing number of cases of lost training (master) keys for car owners of Kalina, Priora, Grant, Niva-Chevrolet, we are introducing a new type of service: registration of working keys in these cars, without a master key!
Usually in such cases, it is necessary to change a set of blocks: ECU (electronic engine control unit), APS unit, glass control unit, ignition switch complete with door cylinders and new keys, etc.
Now in our company you can register a working key with buttons without a training key, and for an additional fee you can receive a new training (red) key for your car. For this procedure, you need to come by car and leave it while the work is being carried out. The work includes dismantling the necessary units (ECU, APS, etc.) from the car, programmatically changing the data, installing the units on the car and registering the keys. We emphasize that a key registered in this way will cost more than registering the remote control yourself if you have a training key, but naturally cheaper than buying and replacing a set of blocks with new ones.
Update January 05, 2014
Attention! It is now possible to make a duplicate chip for autostart using a working key with remote control buttons! A master or training key is not required. The chip obtained in this way can be used both for installation in the immobilizer bypass unit to implement autostart, and for everyday use, starting the engine of Lada Kalina, Priora, Niva-Chevrolet cars
Such a duplicate is more expensive than a regular chip, which can be registered using a master key, but this is a real solution in cases where the master (training) key is lost
To create a duplicate, you need a car, a working key with remote control buttons (and it doesn’t even matter if it is partially faulty, for example, the buttons don’t work, etc., the main thing is that the ignition key starts the engine). The entire copying procedure takes 10-15 minutes.
Contact us by phone in contacts.
Bottom line
Replacing the ignition switch generally takes a little over an hour. To perform this work, you do not need fundamental knowledge or special auto mechanic equipment; you just need a little attention, careful study of simple instructions and a basic set of tools, such as a chisel, screwdrivers and a wrench. We hope that with this article we helped you save money on a car repair shop. We wish you good luck and good performance of the new ignition switch!
The ignition switch is an important component of a car. It controls the power supply and allows the engine to start. In Kalina, this element fails quite often. Replacing it is not difficult.
Causes of breakdowns
Faulty contacts are a common cause of ignition switch failure.
Being an electromechanical device, the ignition switch of the Lada Kalina most often fails for the following reasons:
- Due to sudden surges in voltage, contacts burn out. At the moment the unit is started, there is a sharp increase in temperature in the system, which leads to burnout of the insulating layer.
- Oxidation of contacts due to increased dampness in the interior can lead to breakdown.
- Mechanical damage . Exposure to dust and dirt, manufacturing defects and careless operation lead to increased wear of the unit.
Signs of breakdown
Another common malfunction is a broken return spring (sometimes it just flies off).
In this case, the “symptoms” depend on the cause of the malfunction:
- In case of mechanical failures, turning the key becomes more difficult . This indicates a malfunction of the lock cylinder.
- Oxidation or burnout is manifested by a lack of response from the system when the key is turned. In this case, troubleshooting can be reduced to cleaning or replacing contacts .
Replacement process
A new ignition switch can be purchased either separately or in a set with cylinders for doors and trunk.
The procedure for replacing the ignition switch on Kalina involves the following steps:
- Disconnect the battery cable from the negative side .
You can also remove the positive terminal, but it is better to disconnect the negative terminal. - Take a Phillips screwdriver and unscrew the bolts located on the steering column. 1st and 2nd bolts. 3 fastening bolt. 4 and 5 bolts.
- We dismantle the steering switch clamps.
We remove the switches themselves. We remove the plastic covers and gain access to the switches. - Unscrew the bolts using a chisel.
The fact is that after several years of use they get stuck significantly, and therefore you will have to work hard here. As a rule, the ignition switch is fixed with bolts with shear heads - you can’t do without a chisel. - As a result, you will have access to the lock connectors.
There will be only two of them here: the immobilizer antenna and the main power supply. They are located under the console cover. To gain access to the connectors, lightly pull the wiring harness away from the lock and then simply pull them out. Disconnect the terminal blocks. - Having opened the connectors, turn off the ignition switch.
- We install a new lock, and then perform reassembly. We tighten the bolts and check the operation of the ignition switch. We tear off the bolt heads to make sure that the lock works.
After installing a new lock, do not forget about the doors and trunk, you now have different cylinders.
To avoid having to deal with programming the chip of a new key, you can simply change the key in the key fob body.
Removing and disassembling the ignition switch Lada KalinaVAZ 11173-11183-11193
Communities Lada Priora Lada Priora Club Blog Ignition switch wires
We remove the ignition switch to replace its assembly, as well as to replace the contact group of the switch or the APS coil. Disconnect the wire terminal from the negative terminal of the battery. We remove the steering column switches (see “Removing the steering column switches”). The heads of the ignition switch mounting bolts are cut off. That's why..
...unscrew them using a chisel. Loose bolts can be removed using pliers.
Remove the bracket from the steering column...
...and the ignition switch. Use a slotted screwdriver to pry up the clamp of the APS coil wire block...
...and disconnect the coil wiring block from the APS block wiring block.
By pressing the block latch... ..disconnect the ignition switch contact block from the wiring harness block.
Using a Phillips screwdriver, unscrew the three screws...
...and remove the ignition switch bracket.
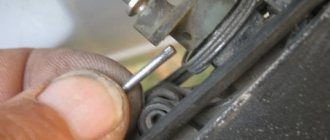
We take out the locking rod of the anti-theft device. Turn the key in the ignition switch...
...and remove the locking rod drive. We remove the rod spring from the drive...
...and a stopper with a spring. We push the cylinder out of the switch body...
...and remove the locking ball.
Remove the cylinder from the switch body.
We remove the locking ball spring from the hole in the cylinder.
Using a screwdriver we pry off the two plastic latches of the wire block cover...
...and open the lid. We mark the wires located in the block.
Using a thin awl or stiff wire, bend the locking tendrils of the wire tips...
...and remove the wires from the block.
Remove the insulating tube from the wires.
Squeezing the three plastic latches with a screwdriver… ..remove the contact group from the body…
...and bring the wires out through the holes in the housing.
Using a screwdriver we pry off the three plastic latches...
...and disconnect the contact group.
Remove the moving part of the contact group.
By pressing the moving contact and turning it counterclockwise...
...remove it from the body.
Remove the contact spring.
Using a screwdriver...
...remove the APS coil. We assemble and install the ignition switch in the reverse order. We install the moving part of the contact group like this...
...so that the wide protrusion of the movable contact is located opposite the protrusion on the cover with the fixed contact... ...and the protrusion on the lock cylinder must fit...
...into the recess on the body of the moving part of the contact group.
..
220
221
223 ..
Training procedure:
Carrying out the training procedure leads to the following consequences:
- the engine control controller activates the anti-theft function if it has not been activated;
- the system changes its password to a new one chosen at random;
- a new system password is written into the training key;
- all remote controls that were previously trained are erased from memory;
- The codes of those remote control units that were trained in this training procedure are stored in memory.
The training procedure is applied in the following cases:
- activating the anti-theft function in the controller (for example, in a new car or replacing a faulty controller);
- erasing old and training new remote controls if lost;
- changing the system password if the owner admits that his system password may have been read (for example, when selling a car from one owner to another)
- remote control training when replacing a faulty immobilizer with a new one.
Only new remote control units or those that were previously trained using the training key used in this training procedure can be trained. It is impossible to learn a remote control key from another car into your car.
Please note: Due to the importance of the training key, it is not recommended to use it for everyday use and should be kept in a safe place.
Before starting the training procedure, fill the car with at least 10 liters of gasoline so as not to get confused by the squeaks.
The purpose of the key and its capabilities
The remote control for a car is designed to remotely open and lock doors, turn on the alarm, block the trunk door, lower the windows and perform other actions. This key is also used as a coded electronic key for the immobilizer. The immobilizer can be disabled, then the car will be able to start from a “normal blank”.
Such a system is attached to the metal part of the key itself and is intended for connection to the car system by:
- Radio channel.
- Transponder channel.
Correct use of the key
Regular remote control key Lada Kalina
To use the remote control key in a car, it must first be trained (activated). To do this you need to use a training key. Also, using such a key, you can remove restrictions on starting the engine. It is possible to use such a key with two remote controls.
Key programming instructions for Lada Kalina, Priora, Granta, etc.
- Close all doors. Turn on the ignition with the training key and wait in the on state for at least 6 seconds.
- Turn off the ignition. The indicator light in the warning lamp unit should flash quickly (at a frequency of 5 times per second) while the learning procedure is being carried out correctly. If the lamp stops flashing quickly, it indicates an incorrect operation, an out-of-time interval, or a malfunction. Remove the training key from the ignition switch.
- Wait 6 seconds for the buzzer to emit two more beeps and turn off the ignition.
- If it is necessary to train the second remote control, then you should perform steps 3...4 again, using the second learning remote control to turn on the ignition. If not, continue from step 6.
- After turning off the ignition for no more than 6 seconds, while the indicator is flashing, remove the remote control, insert the learning key and turn on the ignition. The buzzer should beep three times. Wait 6 seconds until the buzzer beeps two more times.
Emergency immobilizer shutdown
To disable the immobilizer, a digital code is used, which must first be written into the ECU memory.
To do this, you need to follow the activation procedure described above and then follow these steps:
- Turn the red key to the on position and wait until the immobilizer warning light on the instrument panel goes out.
- Dial the numbers of the future six-digit code. For this purpose, all numbers from 1 to 9 are allowed. Installation is carried out by quickly pressing the accelerator pedal all the way. When pressed, the immobilizer lamp lights up, and when released it goes out. After dialing the number, press the accelerator pedal and hold it until the immobilizer indicator goes out (about 5-6 seconds). Then you can dial the second number and so on. If you made a mistake when dialing and saving, the immobilizer indicator will not go out, but will flash. In this case, the entire procedure is repeated again, starting with activation.
- After dialing and recording the last digit, the immobilizer indicator does not go off. The accelerator pedal must be held for another 10 seconds and released.
- Turn off the ignition and remove the red key from the lock.
In case of problems with starting, you need to disable the immobilizer using the previously registered code, for this you will need:
- Turn on the ignition system. When using a key with a damaged or unrecognized microcircuit, the starter may be briefly activated, which will not lead to starting, since the fuel supply and ignition circuits are disconnected. The immobilizer indicator on the instrument cluster is activated and flashing.
- Wait about a minute until the icon goes out.
- Enter the code by pressing the accelerator pedal. To enter a number, quickly press the pedal all the way down. The number of presses corresponds to the code number. To separate the numbers, use a long press on the pedal (about 6 seconds). In fact, the input procedure repeats the process of programming the code.
- After entering the sixth digit, the fuel pump circuit will turn on and the immobilizer indicator will also light up. If you enter an incorrect number, the icon will flash. In this case, the code entry procedure is repeated from the first digit.