02 March 2017 Lada.Online 56 565 4
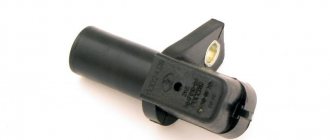
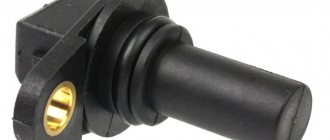
DPKV (crankshaft position sensor), also known as TDC sensor (top dead center sensor) is the only sensor of the engine management system, if which breaks down, the engine will definitely not start. This sensor has no mechanical moving parts, so it rarely fails. Most often, corrosion-damaged wiring is to blame for its failure.
What is a crankshaft position sensor on a vase
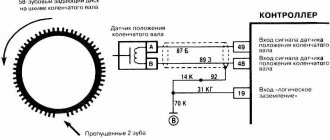
The induction type crankshaft position sensor is installed next to a special disk located in conjunction with the crankshaft drive pulley. The special disk is called a reference or master disk. Together with it, it ensures angular synchronization of the operation of the control unit. Skipping two teeth out of 60 on the disk allows the system to determine the TDC of the 1st or 4th cylinder. The 19th tooth after skipping should face the DPKV rod, and the mark on the camshaft should be against the bent reflector bracket. The gap between the sensor and the top of the disc tooth is in the range of 0.8-1.0 mm. The sensor winding resistance is 880-900 Ohms. To reduce noise levels, the crankshaft sensor conductor is shielded.
After turning on the ignition, the control program of the unit is in the waiting mode for the synchronization pulse signal from the crankshaft position sensor. When the crankshaft rotates, the sync pulse signal arrives instantly to the control unit, which, in accordance with their frequency, switches the electrical circuit of the injectors and the ignition coil channels to ground.
The control unit program algorithm works on the principle of reading 58 teeth passing by the magnetic core of the DPKV, skipping two. The skipping of two teeth is a reference mark for determining the piston of the first (fourth) cylinder in the top dead center position, from which the unit analyzes and distributes the switching signals that control the opening of the injectors and the spark on the spark plugs over the engine operating strokes.
The control unit detects a short-term failure in the synchronization system and tries to resynchronize the control process. If it is impossible to restore the synchronization mode (lack of contact on the DPKV connector, cable break, mechanical damage or broken master disk), the system issues an error signal to the instrument panel, lighting the Check Engine warning lamp. The engine will stall and it will be impossible to start it.
The crankshaft position sensor is a reliable device and rarely fails, but sometimes malfunctions occur due to the inattentive or negligent attitude of specialists servicing the engine.
For example, a VAZ-2112 has a 21124 engine (16 valves where the DPKV cable is located very close to the exhaust manifold) and the problem usually arises after a repair, when the chip on the cable is not secured to the bracket. When the cable comes into contact with a hot pipe, it melts, destroying the connection circuit and the car stalls.
Another example would be a poorly manufactured drive disc, the rubber coupling of which may rotate along the internal connection.
The electronic control unit, receiving a single signal from the DPKV, determines the position relative to the crankshaft at each moment of time, calculating its rotation frequency and angular velocity.
Based on sinusoidal signals issued by the crankshaft position sensor, a wide range of problems are solved:
- Determination at a given time of the position of the piston of the first (or fourth) cylinder.
- Control of fuel injection timing and injector open duration.
- Ignition system control.
- Control of variable valve timing system;
- Control of the fuel vapor absorption system;
- Ensuring the operation of other additional systems related to engine speed (for example, electric power steering).
Thus, the DPKV ensures the functioning of the power unit, determining with high accuracy the operation of its two main systems - ignition and fuel injection.
Before purchasing a DPKV to replace it, you need to clarify the type of device installed on the engine.
SIGNS OF SENSOR MALFUNCTION
DPKV breaks quite rarely, but if you are going on a long trip, you should have a spare device available. Signs of a malfunction that indicate that the DPKV has failed are as follows:
- The car doesn’t hold the speed well – it disappears or grows on its own;
- The fourteenth stalls at idle;
- The engine refuses to start;
- Feels a characteristic dip in traction during acceleration.
Also important news are errors 0335 and 0336 that appear on the dashboard. Crankshaft position sensor error 0335 indicates that the DPKV sends an incorrect signal to the ECU, and error 0336 indicates that the signal is completely absent.
There are three main reasons for device failure:
- Mechanical damage to the housing;
- A break or short circuit in the DPKV winding, which changes the pulse frequency to the ECU, which the system cannot decipher;
- Frequency devices may also not work properly due to wear on the crankshaft teeth.
Types of crankshaft sensors
Inductive (magnetic) DPKV
The device is based on a magnetized core placed in a coil. At rest, the magnetic field is constant and there is no self-induction emf in its winding. When the top of the metal tooth of the driving disk passes in front of the magnetic core, the magnetic field around the core changes, which leads to the induction of current in the winding. When the disk rotates, an alternating current appears at the output, and the frequency of the current varies depending on the speed of the shaft rotation. The work is based on the effect of electromagnetic induction.
A special feature of this sensor is its simple design, which operates without additional power supply.
Hall effect sensor
The type of these sensors operates on a microcircuit, placed in a housing with a magnetic core, and the drive disk creates a moving magnetic field with magnetized teeth.
The sensor provides high accuracy of signal output in all specified crankshaft rotation modes. A sensor operating on the basis of the Hall effect requires a constant voltage connection.
Optical sensors
It is based on the physical phenomenon of the photoelectric effect. Structurally, it is a light source with a receiver (photodiode). Rotating between the source and the receiver, the perforated disk periodically closes and opens the path to the light source, as a result the photodiode produces a pulse current that arrives in the form of an analog signal to the control unit (the system has limited use and was previously installed in the distributors of injection cars, for example, Matiz).
Malfunctions and diagnostics
From the described principle of operation it is clear that if it does not receive a reference signal from the DPKV or if it is distorted in the circuit, the controller will not issue commands to the injectors and spark plugs. Starting the engine and operating it with such a breakdown is impossible.
The design of the sensor itself is simple and reliable, so diagnosing problems should begin by checking the electrical circuits: the condition of the wires suitable for the part and their insulation, as well as the presence of a contact in the terminal block. The following symptoms may lead to troubleshooting:
- The engine does not start immediately, but only after cranking the starter for a long time, especially in cold weather or in high humidity.
- The power developed by the machine begins to drop after the engine has completely warmed up (10–15 minutes after starting).
- The appearance of dips in dynamics that cannot be explained by the road situation or the quality of gasoline. The motor may suddenly lose power, then suddenly start working normally again. At the same time, the controller lights up the “Check Engine” error lamp, which goes out by itself, then lights up again.
- The speed of the power unit floats spontaneously, and the idle speed is unstable.
- Fuel consumption has increased noticeably.
Removing and installing the sensor
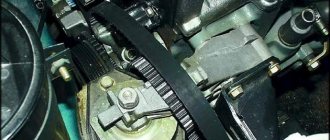
To diagnose and, if necessary, replace the sensor, you need to dismantle it. To understand where the part is located, look at the engine from the front.
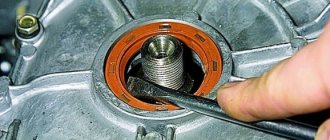
They are oriented towards the fan belt on the right side of the windshield, where the ring gear is aligned coaxially with the pulley. The DPKV is mounted on the oil pump ebb bracket and is secured with one 10mm wrench bolt. Carefully disconnect the terminal block, unscrew the bolt with a wrench or a socket and remove the part.
Functionality check
An auto electrician working in an equipped workshop will be able to check the serviceability of the sensor using measuring equipment (multimeter or oscilloscope). The resistance of the winding of the part is considered to be within the range of 550–750 Ohms.
In field conditions, when devices are not available, experienced drivers check the serviceability of the DPKV using a “folk trick”:
- The sensor is removed from the engine, reconnected to its connector and placed in a convenient place under the hood.
- They open the car doors so that from the front they can hear the hum of the running gas pump.
- Turn on the ignition.
- A steel tool (wrench) is brought to the DPKV magnet, which is magnetized to the end of the part.
- By sharply tearing the key away from the sensor with force, a current pulse is formed in its winding.
- If the part is working properly, the controller will recognize the impulse and give a command to turn on the fuel pump, which will be heard by sound.
When a malfunction is detected, the sensor cannot be repaired and requires replacement. It’s better to always have a spare one, because its price is less than 300 rubles.
How to check the VAZ crankshaft sensor
The VAZ inductive-type crankshaft sensor is checked with a multimeter for breaks inside the coil and the specified resistance, the value of which is in the range of 600-900 Ohms. It is also mandatory to check the DPKV wiring.
The test can be carried out by measuring inductance; for this you need to have three instruments: a voltmeter, a transformer and an inductance meter. The method is not complicated, but cumbersome and it is more efficient to buy a new sensor to check the performance of the engine.
The DPKV can also be checked by cranking the starter while observing the tachometer readings. Using a diode test, you can check for the presence of pulses at the injector connector.
Input impedance measurement
Multimeter
The easiest way is to check the dpkv with a multimeter and measure the resistance of its winding. To do this, you need to have an appropriate device that can cope with this. If there is no such device, then you will have to resort to amateur radio. So, having switched your multimeter to resistance measurement mode and set the limit switch to 2 kOhm, securely install the probes of the device onto the sensor contacts, and they must be clean.
To achieve this, you can wash it with alcohol or gasoline. This may be the cause of the problem. Having installed the probes on the contacts, we observe the readings of the device, which should fit into the range from 550 to 750 Ohms. If this is the case, then the sensor is most likely working. But this can be stated with a probability of 50%, because during breakdowns and short circuits the resistance may change. And if the new one had 750 Ohms, and when checked it turned out that it was 500 Ohms, then this means that it is faulty. And he had an interturn short circuit.
This leads to a decrease in the pulse level that is detected by the controller. Therefore, to be sure of its 100% serviceability, you need to refer to the passport data, which will indicate its exact resistance and inductance. Based on this, you can check the inductance of the sensor winding. To do this, you need to switch your device to inductance measurement mode, if of course there is one. The readings on a working sensor should be up to 400 mH with a resistance of 750 Ohms. If, according to the passport, the sensor has a resistance of 500 Ohms, then accordingly its inductance will be 200 mH. If so, then the sensor is working.
In addition, the condition of the sensor insulation should be checked. To do this you need to have a megohmmeter. Although the multimeter has a mode for measuring high resistance, it is measured with low voltage and high error, while the megohmmeter produces voltage up to 500 V and is a separate device. So, having set the measurement voltage on the device to 500 V and the measurement accuracy to 10% under normal conditions (20-220), we place one end of the probe on the sensor body, and the other on the contact. The resistance should not be less than 20 MOhm.
Replacing chips and pinout of DPKV VAZ 2110
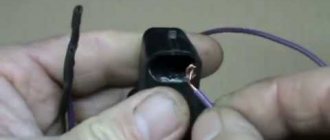
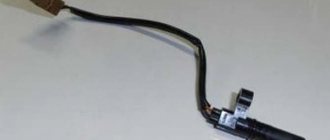
Over time, the wires going to the DPKV chip wear out. Located in the lower part of the engine and not far from the front wheel, as a result, dirt, snow, oil, and aggressive chemical media in the form of salt get on the DPKV and its chip and settle, which leads to slow oxidation of the wires on the chip and subsequently to their breakage. Since the wires from the chip are combined into a single bundle, when replacing it, a repair chip is provided with protruding two wires 15 cm long. Having removed the damaged chip, install a new one with a twist. The twist points are insulated using heat shrink or electrical tape.
From the diagram below it can be seen that their pinout is not complicated and two wires are directly connected to the signal input contacts in the control unit, passing along the entire length of the harness. The polarity of the connection between the signal wires of the sensor and the control unit must be observed. If the polarity is reversed, the synchronization system will not work. To restore the operation of the DPKV, you simply need to swap the wires and check the functionality by starting the engine.
Crankshaft Position Controller Basics
Now we suggest that you familiarize yourself with the basic information regarding the crankshaft sensor. Where is this device located, how to check the device, what types are there? Find the answers below.
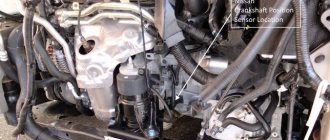
Installation location, purpose and device
The crankshaft sensor or crankshaft sensor is a small device designed to transmit information about the position of the crankshaft. The information is sent to the control module, that is, the block. The regulator is responsible for injection. The correct operation of the engine injectors, which are responsible for supplying fuel, depends on the performance of the DPKV. DPKV also affects the performance of the ignition system as a whole. As for the location, the controller is not difficult to find - it is located in the engine compartment, next to the crankshaft pulley, the sensor is fixed to the oil pump with a bolt.
Principle of operation
It is necessary to take into account that the Fours can use different DPKVs and they differ from each other not only in design features, but also in their operating principle. For example, if we are talking about an inductive type controller, then it is equipped with a steel rod with a magnet that is used to magnetize the sensor. On top of the rod there is a winding of copper wire. In this case, the operating principle is based on delivering an impulse if a metal object is located nearby.
There are also sensors whose operating principle is based on the Hall effect; the Hall controller itself is located inside the structure. If you bring a metal device to the DPKV, the state of the sensor will change. In addition, the “Fours” also use pulse devices, which are designed to generate signals of a certain frequency.
Possible problems and methods for eliminating them
How to check and determine if the regulator is not working? There are many reasons why a DPKV can break, ranging from contamination of the device to failure of the device itself or damage to the wiring.
First, let's look at the main symptoms of a breakdown:
- the car's power unit has become unstable at idle speed - the speed can increase and decrease arbitrarily;
- the power of the car engine may also decrease;
- when the driver presses on the gas, dips may occur in which the car’s power does not increase;
- there are difficulties starting the engine;
- computer diagnostics may show errors 0335 or 0336; with such problems, most likely the cause should be sought in a damaged electrical circuit near the connector.
As for the main breakdowns:
- the device case is damaged, then the only solution is to replace the sensor;
- there is a short circuit of the turns on the winding itself, due to which the control module receives incorrect signals - the device will also need to be replaced;
- natural wear and tear of the sensor - there is no escape from this, the sensor will have to be replaced;
- The teeth on the crankshaft pulley are damaged; in the event of such a malfunction, the pulley itself must be replaced (author - AUTO REPAIR channel).
How to change the DPKV yourself?
The easiest way to check the functionality of the controller is by replacing it with a known working device. If, as a result of replacement, the symptoms of malfunctions become more pronounced, then we can say for sure that the previously installed crankshaft sensor is inoperative.
How to change the device yourself:
- First, turn off the ignition and open the hood of the car.
- Find the location where the controller is mounted, look for it on the oil pump, next to the crankshaft pulley.
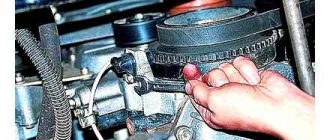
- If the sensor seat is dirty, it should be cleaned before dismantling the device. Make sure that the surface around the device is as clean as possible.
- Then disconnect the connector with wires connected to the sensor, unscrew the screw that secures it and remove the controller from the mounting location. Visually check for possible damage to the device body, as well as the toothed pulley.
- Before installing a new DPKV, clean the seat again. Install the new controller, tighten the screw that secures it. When tightening, be careful not to over tighten.
- Using a feeler gauge, you should also check the gap between the pulley and the controller core. Ideally, this gap should be no more than 1 mm; a slight deviation of 0.4 mm upward is allowed.
- When the DPKV is installed, it is necessary to start the power unit and check its operation. If you notice that the engine started quickly and confidently, then the replacement was performed correctly (the author of the video is the IZO channel)))LENTA).
Oscillogram of DPKV VAZ
An oscilloscope is used to accurately diagnose the operation of the DPKV. By connecting the oscilloscope probes, an oscillogram of the DPKV operation will be displayed on the monitor screen, on which you can clearly distinguish the point where the teeth skipped and measure the signal value in volts based on the maximum amplitude of the 58 teeth located between the skip points.
Signs of failure
Now let's look at the signs of a faulty crankshaft sensor. In fact, there are not very many of them. These are detonation sounds and detonation under load, when driving uphill at low speeds. You can also feel that the engine is not running as smoothly as before - it lacks stability. At idle, you can notice that they drop quite sharply, and then the number of revolutions grows at tremendous speed. Often the car stalls at idle, both while driving and while standing at a traffic light.
It is often possible to observe a situation where the dynamics of the car have significantly decreased. There are problems starting the engine. One of the most tangible and noticeable signs of a faulty crankshaft sensor is the inability to start the engine at all. This often happens on modern cars. The electronic unit already contains information, thanks to which the engine does not start if the signals from the actuator are unreliable. Another characteristic sign of DPKV failure is the absence of a spark, but not constantly, but periodically.
Features of testing on other cars
As for other cars, for example, VAZ-2109 with an injection engine, VAZ-2112 and VAZ-2114, their check is carried out identically to the VAZ-2110 car.
It is noteworthy that for VAZs, when checking the resistance of the crankshaft sensor coil, an additional check can be carried out.
But to do this, the multimeter must be switched to voltmeter mode with a measurement limit of 200 mV.
Then connect the probes to the DPKV terminals and pass them with any metal object, for example, a screwdriver, at a short distance from the core.
If the sensor is working properly, it will react to metal, the multimeter will show voltage surges on the display. The absence of these bursts will indicate a faulty element.
As for a car like the Reno Logan, the difference from the VAZ in this car comes down to slightly different readings of the resistance of the sensor coil when measured with an ohmmeter.
A working Logan DPKV has a normal resistance of 200-270 Ohms.
For Daewoo Lanos, the coil resistance should be in the range of 500-600 Ohms.
But on the ZMZ-406 engine, installed on Volga and Gazelle cars, the normal coil resistance is in the range of 850-900 Ohms.
Replacement
To independently replace the DPKV on a VAZ 2115, you do not need to have great skills in car repair. You just need to prepare the necessary tools.
To replace you will need:
- Pliers;
- 10 mm wrench;
Replacement process
It is most convenient to carry out work from an inspection hole or overpass, but if one is not available, you can remove the right front wheel and unscrew the engine mudguard, after which free access to the sensor will open.
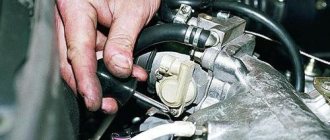
- Remove the connector from the sensor;
- Unscrew the bolt with a 10mm wrench;
- Quite often, the sensor turns sour in its seat, after which it is difficult to get it out of there; to do this, you can use pliers and rotate the sensor to remove it;
- Before installing a new sensor, you need to clean the seat for easier installation;
- We assemble in the reverse order;
Using an Oscilloscope
This method is the most reliable and with its help you can be 100% sure of the current state of the sensor. To do this, you need to turn on the oscilloscope to a limit of 10 ms and an amplitude of 1 V/div. And try to start the engine with the starter. In this case, on a well-charged battery, the engine should be accelerated by the starter to 800 rpm, this will correspond to a frequency of 200 Hz and a corresponding period of 5 ms/div. You should observe impulses, one period of which occupies two cells.