"Tomahawk 9010" is a car alarm that has good technical characteristics and provides an optimal balance between price and quality.
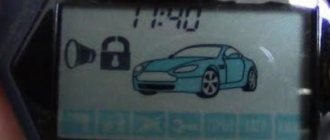
To control the Tomahawk 9010 alarm system, a key fob (remote control, pager) with an LCD screen and five functional buttons is used.
For the convenience of readers, we will name the buttons as follows:
- 1 – trunk;
- 2 – silent security;
- 3 – functions;
- 4 – key;
- 5 – lock.
Programming of the main alarm functions is carried out using the Override button located in the car interior.
Key fob programming
Up to four key fobs can be registered in the Tomahawk 9010 system. When programming new key fobs, the data on the old key fobs will be erased. Therefore, within each programming session, the user will have to register all valid key fobs.
To register a new key fob in the system, you must:
- turn on the ignition, but do not start the engine;
- press and hold the Override button;
- after four siren sounds, release the Override button;
- press and hold buttons No. 1 “Trunk” and No. 2 “Silent security” on the pager until one beep is heard;
- repeat the last action with the remaining key fobs (after registering the first key fob, one beep will sound, after registering the second – two beeps, after the third – three, after the fourth – four).
New key fobs are registered. 6 seconds after registration is completed, the system will exit the programming mode.
ATTENTION! The interval between registration of key fobs should not exceed 6 s. Otherwise, the alarm will exit the programming mode.
Ignition switch wire designations
Look at the diagram shown in the figure.
Terminal block with two starter contacts
The above does not mean that both cords can be connected together and connected using the circuits discussed here. The diagrams indicate one wire (ST1) that makes up the starter power circuit. This option is suitable:
- For all domestic cars without exception;
- For new foreign cars;
- For foreign cars up to 90-91 years of manufacture.
This is the paradox - the “ST2” cord is not provided in the new, as well as in the oldest models.
Diagram for TZ-9030
Here's how to connect the Tomahawk TZ-9030 main unit to the ignition switch to use autostart. Of course, after installation, you need to do programming, which is discussed below. If the use of a lineman is required, connect it to the terminal of the main alarm connector (black and red cord). The power connector, in turn, has the following wiring.
Instructions for equipment TZ-9030
If we talk about the Tomahawk TW-9010 model, the purpose of the IGN3 pin will be different from what is being considered here.
In "Chapter 1" the designations were listed: IGN1, IGN2, ACC, starter wire (ST). The “IGN3” cord has been added here, but it replaces the ACC wire. The “blue” cord coming out of the alarm terminal block must be connected to the ACC contact, otherwise the autostart will not work. At the same time, if you make changes to the settings, the IGN3 pin can be connected to the ST2 pin. True, it is not clear how to “emulate” the ACC wire then.
A “T” connection is used when connecting to all wires except the starter. And the “ST” cord needs to be cut to connect the resulting ends with the black and yellow wires. The cable that goes to the alarm from the lock is a signal cable (thin).
Diagram for TW-9010
A non-standard method of switching starter current is typical for the following alarm model: Tomahawk TW-9010. Voltage is supplied here from the 6-pin power terminal block when autostart is performed. The rest of the time, the starter wire conducts current, even if the car alarm does not work or does not work correctly. A blocking relay is included in the gap in the standard wiring. Whether it can be removed from the scheme is unknown. It is better, therefore, to stick to the recommended option.
Current loop without blocking
Note that the Tomahawk TW-9010 and TZ-9030 alarms can control the immobilizer bypass. The lineman’s “negative” cord is connected to the black-red cable (figure at the beginning of the chapter). The latter is designed to be connected to the “IGN3” pin, but in most cars this option is not used.
The ground potential on the black-red cord appears before the starter starts, which is exactly what is required for the lineman to work. In general, everything looks strange: in alarms with auto-start, they often provide a separate output intended only for connecting a lineman.
Setting the clock, alarm and timer
To set the clock, alarm clock or timer, use button No. 3 (functions).
Setting the clock, alarm and timer
| Modes | Number of presses on button No. 3 (functions) |
| Setting the minutes on the watch | 1 |
| Setting the alarm clock | 2 |
| Setting the minutes on the alarm clock | 3 |
| Turning the alarm on (off) | 4 |
| Setting the clock on the timer | 5 |
| Setting the minutes on the timer | 6 |
| Turning on (off) the timer | 7 |
To set the time, hold down button No. 3 (functions) until the field with an electronic clock flashes on the pager screen.
- To set the current clock value:
- button No. 1 (trunk) increases the time, button No. 2 (quiet security) decreases it;
- To quickly scroll through time, hold buttons No. 1 or No. 2 in the clamped position.
- To set the current minutes:
- briefly press button No. 3 (functions) and the cursor moves to the field with minutes;
- button No. 1 (trunk) adds minutes, button No. 2 (quiet security) decreases them;
- To quickly scroll through the minutes, hold buttons No. 1 or No. 2 in the clamped position.
If, after setting the minutes, you press the F button, the alarm setting mode is activated, but if you do nothing, the key fob will save the current time and exit the setting mode.
The alarm clock is set according to the same principle as the clock. If, after setting the alarm, you press the F button, the timer setting mode will turn on; if you do nothing for a few seconds, the current alarm value will be saved and the key fob will exit the setting mode.
To immediately begin setting the timer from standby mode, press buttons No. 2 (silent security) and No. 3 (functions).
Setting the timer in standby mode
| Number of clicks: |
| To button number 2 |
(silent security)
(functions)
To go directly from the standby mode to setting the alarm clock, bypassing the clock setting mode, press buttons No. 1 (trunk) and No. 3 (functions). Then they proceed according to the standard pattern.
Remote engine start
To remotely start the engine, you need to press button No. 4 (key) - the car will respond with a triple flash of parking lights and three siren signals. One of the messages will appear on the display:
- 5t – an attempt was made to start the engine;
- 5P – attempt to start the engine failed;
- image of a car with clouds of exhaust gases - the engine is running.
The car engine will run for a pre-programmed time (5/10/15/20 minutes) and then turn off. To extend the operating time, you need to simultaneously press buttons No. 4 (key) and No. 5 (lock). Each subsequent press of these buttons increases the engine warm-up time by 5 minutes. The key fob display will show the value of the programmed engine operating time.
Auto engine start
By temperature
When installing the Tomahawk 9010 alarm system, an additional temperature sensor is hung under the hood. When autostarting the engine based on temperature, the system is guided by the readings of this sensor, and if an external sensor is not installed, then by the air temperature in the cabin.
To activate automatic engine start based on temperature, you must:
- simultaneously press buttons No. 4 (key) and No. 1 (trunk) - the parking lights will flash once, the siren will emit one beep;
- the melodic trill of the key fob will sound and two new objects will appear on its display: an icon depicting a fan and a warm-up temperature set by software;
- if the system is based on an external temperature sensor, the engine will start when the temperature drops below the programmed mark;
- If the system is based on the air temperature in the cabin, the engine will automatically start when the air warms up to the set temperature.
To disable this function, press buttons No. 4 (key) and No. 1 (trunk). The car will react with a double flash of parking lights and a double siren signal. The key fob will play a melodic trill again and the fan icon will disappear from its display.
ATTENTION! Automatic engine heating at a given temperature can be performed no more than six times within two hours
By time
To activate timed engine autostart, you must hold down buttons No. 4 (key) and No. 2 (silent security) - the car will honk, the pager will emit a melodic trill and an icon with a clock will appear on its display. From now on, the Tomahawk 9010 will start the vehicle engine every day at the same time when this function was activated.
To disable the daily autostart function by time, you must again press the buttons “4” (key) and “2” (silent security). The parking lights will flash twice and the system will confirm deactivation of the function with two beeps. The clock icon will disappear on the key fob display and a melodic trill will sound.
At regular intervals
The Tomahawk 9010 system allows you to automatically start the engine at regular intervals. To activate this function, you need to activate the daily autostart function, and then within 5 seconds select the corresponding button on the key fob and press it:
- No. 5 (lock) – engine starts every hour;
- No. 4 (key) – start the engine at intervals of 2 hours;
- No. 1 (trunk) – starting the engine at intervals of 4 hours;
- No. 2 (silent security) – starting the engine at intervals of 12 hours.
The system will remember the selected interval. The engine will be started for the first time immediately after the programming session is completed.
Main functionality
When each mode is turned on, a sound signal is heard. This option allows the vehicle owner to verify that the selected function is correct. When the protective unit is activated, the alarm responds with a short-term siren and flashing lights. If the option is connected correctly, the light sensor will start blinking. The system responds to the execution of the reverse procedure by sending identical signals.
The kit switches to immobilizer mode automatically thirty seconds after the ignition is turned off. The corresponding indicator lights up to confirm the selected option. To turn off this mode, you need to press the button with the image of a closed lock once.
The Tomahawk 9010 series, with the help of which autostart is carried out remotely using a button with a key emblem, indicates the start of the mode by parking lights flashing three times, and the necessary indicators are displayed on the remote control monitor. After starting the power unit, the pager will signal with a specific melody sound.
Setting the sensitivity of the shock sensor
Adjustment is required if the shock sensor is not configured correctly and the alarm reacts to thunderstorms, passing cars, or does not even respond to strong impacts on the car.
We configure the sensor as follows:
- tighten its adjusting screws (to increase sensitivity, turn it clockwise; to decrease it, turn it counterclockwise);
- we lock the car and put it in security mode;
- We try to lightly hit the body.
If the sensitivity is too low or too high, open the car and adjust the sensitivity again using the adjusting screws. Thus, we adapt the alarm to our requirements.
ATTENTION! You can find out where the shock sensor is located from the specialist who installed the alarm on your car.
Equipment
Signal delivery set:
- microprocessor module in a plastic case with brand designation;
- main remote control with two-way communication, with which you can configure the main functions of the system;
- a spare communicator, without a screen, characterized by a reduced range of 15 meters, supplied in a waterproof case;
- sensitivity controller, belongs to the two-level class;
- antenna adapter with a sticker for fixing on glass;
- additional temperature sensor;
- LED indicator;
- service key, called Jack or Override;
- powertrain blocking relay;
- limit push-button switch, supplied in quantities of one piece, designed for installation on the hood;
- a set of mounting wires for connecting the processor unit, sensitivity controller, central locking transceiver, as well as a blocking relay;
- service manual describing all the nuances of installation and configuration;
- package.
The package may also include batteries for the key fob standard AAA 15V battery. The alarm system is sold with one limit switch, so the remaining devices will have to be purchased separately.
Alarm kit
Reset to factory settings
A factory reset can be performed using the built-in button. To do this proceed as follows:
- turn on the ignition;
- Press the Override button 10 times in a row;
- turn off the ignition - the alarm sounds 10 trills;
- press the Override button once – the alarm emits one trill;
- press button “5” (lock);
- turn on the ignition - the side lights flash 5 times.
When resetting the alarm to factory settings, all manipulations must be performed promptly and without delay.
Emergency activation and deactivation of the alarm system
If the car does not respond to the key fob, you can use the emergency activation and alarm disabling function.
Emergency alarm activation
To activate an emergency alarm, you must:
- turn on the ignition, but do not start the engine;
- press the Override button eight times;
- turn off the ignition.
The car will react with a single flash of the parking lights and a single sound of the siren. After 20 seconds, the system will automatically turn on the security mode.
If, 20 seconds after the emergency activation of the alarm, any of the security zones are triggered, the car will notify the user of this by flashing the parking lights four times and sounding the siren four times. After this, the user will have 20 seconds to disarm it. If this is not done, the system will activate the alarm mode.
Emergency alarm shutdown
To make an emergency shutdown of the alarm without a key fob, you must:
- turn on the ignition (do not start the engine);
- press the Override button four times;
- turn off the ignition.
The parking lights will flash twice and the siren will sound twice.
REFERENCE. The key fob pager will continue to function even after the user has made an emergency activation or emergency shutdown of the alarm system
Setting the time on the Tomahawk key fob is possible for every car owner who has this security system. Just follow the instructions in the user manual. In what cases is it necessary to adjust the time?
- When the power supply is discharged. This is the most common and easily fixed problem.
- Mechanical wear of the control panel.
- Incorrect key fob programming.
Functions
Functions of 9010 series security systems:
- confirmation of command execution with sound and light indication;
- support for automatic start on vehicles with manual or automatic transmission;
- car security with siren turned off;
- bypassing faulty protection zones while informing the driver;
- remote shutdown of the shock sensor is provided;
- support for anti-robbery and panic modes;
- compatibility with standard locking control units;
- mode for calling the driver from the passenger compartment;
- the owner can look at the remote control display to see the current time;
- recording of the state into memory is provided when the power is turned off.
Advantages and disadvantages
- low cost;
- ease of switching;
- automatic warm-up function;
- presence of a display on the remote control.
Disadvantages of the 9010 series alarm noted in owner reviews:
- easy interception and decoding of signals transmitted by remote controls;
- there are cases of incorrect operation due to design flaws;
- numerous false alarms (cannot be corrected by adjusting the shock sensor).
Universal instructions
There is nothing complicated about setting a watch, but not everyone knows how to do it. The time is set using a key fob with 5 buttons and a liquid crystal display. Below is the procedure for setting up the Tomahawk 7010, 9.5, 9.9, etc. security system.
- Installation is done with four main keys. All actions are shown on the display.
- Keep the F button pressed for a few seconds. The watch face icon on the screen should blink.
- Start regulating. To set the clock forward – the “Trunk” key. Back – “Silent Security”.
- Press F once, the minute setting mode will follow. Translation forward – “Opening the luggage compartment.” Back – “Quiet Security” button.
- The clock is set. Hold down F for a few seconds and you will proceed to setting the alarm. Exiting the menu is simple - don't press anything for eight seconds and it will happen automatically.
Equipment
Delivery set of Tomahawk 434 MHz signaling device for cars:
- A control module equipped with a processor and a relay assembly. It is supplied for sale in a black plastic case, which bears the manufacturer's markings.
- Main pager with feedback function. Its use was made possible thanks to the presence of a display in the key fob. If you look at the communicator screen, you can find out the status of the anti-theft system due to the presence of special indicators on it.
- Spare remote control. The device is not equipped with a liquid crystal display, so feedback is not implemented in it. The range of the pager is no more than 15 m.
- Sensor for detecting impacts and any other physical impacts on the vehicle body. The device belongs to the category of two-level regulators.
- Antenna module equipped with a connector and cable for connection. Supplied with a double-sided sticker for attaching the device to glass.
- Additional temperature controller. Intended for installation on a car engine.
- Service manual with which the consumer can independently install and configure all functions. The user should understand the technical documentation, since the manual includes electrical circuits for connecting alarm components to the microprocessor.
- LED lamp. It is used to determine the alarm status and is supplied with a cable and a connection block.
- Button to enter the alarm service mode.
- Car engine blocking relay.
- Limit switch used for installation on the hood of a car.
- A set of wires and fasteners for connecting all devices and fixing them.
- A separate button designed to activate the Anti-Robbery function.
- User's note.
- Guarantee document.
- Packing box.
The Tomahawk 434mhz alarm system does not include a siren or door triggers; these devices are purchased additionally.
Setting the time on the Tomahawk 9010 key fob
Below is the procedure for TZ and TW alarm modifications.
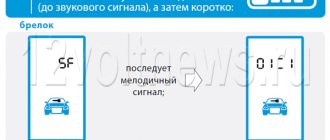
- Hold F and release. You will see a flashing icon on the display indicating you are entering clock setting mode.
- Translation of values is carried out using the trunk opening button, and back - through the crossed out loudspeaker.
- The next press of F switches to the minutes display. The values are changed using the “Trunk” and “Quiet Security” keys.
- The translation has been completed. Do not perform any actions with the key fob and you will automatically leave the regulation mode.
Specifications
Technical parameters of 9010 series equipment:
- current consumption - up to 15 mA;
- voltage in power circuits - 12 V;
- remote control range - up to 200 m;
- switched current (depending on the circuit) - up to 40 A.
Modification TW
The Tomahawk TW-9010 complex is equipped with an external status indicator, which is mounted on the instrument panel. The block is equipped with connectors located on the sides of the housing. A 5-pin plug is used to switch the transceiver device.
Modification TZ
The Tomahawk TZ-9010 alarm system replaced the TW series. The product is characterized by a smaller processor unit (due to the introduction of a different element base), technical parameters do not differ from the previous model. The control diode is integrated into the signal receiver, equipped with a 6-pin connector. The connectors on the block body are located on one side.
Tomahawk 9020 remote control
On the 9020 control key fob with two-way communication, you can set the time. To do this you need:
- Press F until the dial on the device flashes.
- Set the required values using the “Trunk compartment opening” and “Silent security” keys.
- Pressing the “F” button again will allow you to set the minutes correctly. Forward – “Open trunk”, back – “Silent security”.
- Do not make any pressure for eight seconds. You will automatically exit the electric clock regulation.
Tomahawk X5
Setting the time value on the X5 alarm does not require additional knowledge; it is simple and straightforward.
- Press and hold the “Speaker Crossed” key for five seconds until the second beep sounds.
- The dial on the display blinked.
- Use the “Open the car” and “Trunk” buttons to set the clock readings.
- To skip to minutes, press once again “Crossed out radio speaker”.
- Change the values using the same keys.
- Don't touch anything for a few seconds. The electric clock of the X5 pager has been adjusted.
Keychain watch Tomahawk 434
Changing the time on the 434 MHZ Frequency alarm panel is carried out according to the following scheme.
- Press and hold “Crossed out speaker” until the second siren beeps.
- The dial on the screen should blink.
- Using the "Open doors" and "Open trunk lid" buttons, change the clock readings.
- Clicking on “Crossed-out radio speaker” will turn on the minute adjustment mode.
- Set the minutes using the same electric buttons.
- The clock has been adjusted. Don't touch anything for a couple of seconds, and their value will be stored in the pager's memory.
How to install
When installing the complex, it is recommended to follow the conditions set out in the installation instructions. When choosing placement locations, you should ensure that the components are hidden; the parts are mounted away from heat sources and electromagnetic interference. The unit must be installed with the connectors facing down, ensuring that condensation is removed from the contact points. The siren is installed in the engine compartment; active type devices can be used. To place the impact sensor, an area is selected inside the car interior; the sensor must be rigidly attached to the base.