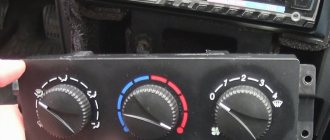
In winter, at 25 degrees below zero, many owners of VAZ 2110 cars and their families notice one important problem in their cars - the interior heater heats very poorly. The reason lies in the ill-conceived design of the stove. The stove itself consists of two separate and completely different systems.
- The first system is an air heating unit. It consists of a heater radiator, air ducts with a regulation unit and a cabin filter.
- The second is the temperature control system.
- In addition, there is also a controller for the heater control unit.
In the interior of the VAZ 2110 you can quite often see that the heater simply does not respond to the temperature regulator. The answer immediately suggests itself - one of the elements of the system has simply failed. We start looking for him.
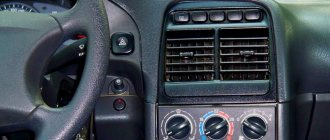
Problem with standard air ducts
Standard air duct
If the stove on a VAZ 2110 blows cold air, but at the same time it itself is heated to a temperature of 90 degrees, then the reason is hidden in the standard air ducts. Most likely, they are either damaged or have fallen off from the stove itself. And to get to them you will have to disassemble and remove the entire panel. If you still cannot restore them, you can simply replace them with corrugated hoses purchased from building materials and install them. And seal all joints tightly and thoroughly with polyurethane foam or modelin.
temperature sensor
You can often encounter the following problem: it is not possible to properly regulate the temperature in the cabin. In most cases, the problem is a failure of the control unit and an incorrectly set damper. This is not a difficult problem at all, and it can be solved quickly. First you need to check the serviceability of the temperature sensor. To do this, move the heater knob to one side, and after a while - to the other. The temperature of the air entering the cabin should change. If this happens, the problem is not in the controller. If the temperature sensor does not work, you can temporarily turn on the stove without it, then the temperature in the cabin will be the same as that set on the electronic unit.
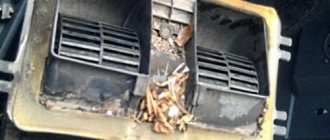
The heater radiator is clogged
Radiator of the VAZ 2110 stove
If the stove on the VAZ 2110 blows cold air, then there is only one reason - the stove radiator is clogged. If the engine is cooled with water, then rust can form in the radiator, and at high temperatures, scale can also form. Small pipes in the radiator can become clogged if you (accidentally) mix antifreeze with antifreeze, this mixture will simply curdle. In addition, some short-sighted car enthusiasts add a special radiator sealant to the coolant, which also clogs the radiators from the inside. It's quite easy to check. You need to warm up the engine to a temperature of 90 degrees, turn on the heater and check the inlet and outlet pipes of the heater by touch. If the temperature on them is different, then the radiator is simply clogged and must be replaced. But the process of replacing it is quite labor-intensive.
Possible faults
In any case, every motorist wants to drive in a warm and heated interior, especially in the winter season. So, before disassembling or replacing the stove on a VAZ 2110, we suggest that you familiarize yourself with the basic information about malfunctions, as well as options for eliminating these breakdowns.
If the heater on a VAZ 2110 does not heat well or it blows cold air, this may be due to several malfunctions:
- the driver no longer has the ability to independently adjust the heater;
- the hot air flow does not blow well or only cold air blows, while clicks are heard in the engine compartment;
- there is a coolant leak in the operation of the system, namely the radiator;
- the temperature sensor has failed, it refuses to work, we are talking about a controller installed on the ceiling;
- There has been a malfunction in the operation of the control unit.
Temperature is not adjustable
If the driver cannot adjust the temperature regime, there may be two reasons for this:
- the control unit has failed or is not functioning correctly;
- The damper itself has failed (the author of the video is Fire Screen – Live).
In this case, the first thing to do if the VAZ 2110 stove does not work is to diagnose the temperature sensor. As we said above, this element is located on the ceiling of the car, next to the ceiling lamp. In order to correctly diagnose this controller with your own hands, you need to scroll it several times from the extreme position of the cold air flow to the extreme hot one. In the same way, you can check the temperature of the air flow based on your feelings.
If, when setting the regulator to the extreme heating position, a hot air flow begins to flow from the dampers, this indicates that the device is fully operational. If, when installed in this position, the air flow barely flows or it begins to heat up only in the extreme “hot” position, this indicates the need to replace the controller.
Damper repair or replacement
In some cases, it happens that the VAZ 2110 stove stops working due to a broken damper. As a rule, the damper simply freezes in such cases. This element stops turning as a result of the fact that the device’s clamps have oxidized because they have not been serviced for a long time. Accordingly, if the problem lies in the damper, it can be solved independently.
On domestic “tens”, you can only get to the damper from the engine compartment. First you need to dismantle the deflectors, after which you need to bend the antennae. After these steps, you can reach the flap by sliding it with your hand. If during disassembly you notice that the heater damper of the VAZ 2110 moves without problems, this indicates that the reason for the system’s inoperability is completely different.
However, in order not to subsequently encounter the problem of a poorly functioning damper, it is necessary to replace it with an aluminum one. As practice shows, the fastening itself often fails on plastic dampers, so using the aluminum option is the most optimal.
Location of the stove damper
As a result of such minor modifications to the system, the heater will be able to better retain hot air. Overall, the heating system will function much better. This is because thanks to this modification, deformations that are relevant for plastic dampers will not appear in the system.
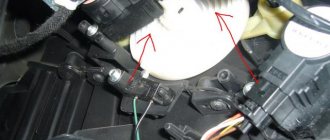
Damper micromotor
Often, owners of "ten" cars are faced with the inoperability of the heating system in their cars as a result of the failure of the micromotor. The device itself is located in the engine compartment, next to the windshield. To get to the damper micromotor, it is necessary to remove the frill, the insulating element. If the lever moves when the driver starts the heater in heating mode, this indicates that it is working properly.
However, a problem with the device’s performance may occur when the gears wear out and, accordingly, begin to slip. In this case, the micromotor is replaced on the VAZ 2110. In order not to change the motor, you can simply manually open the damper itself - nothing bad will happen from this. Only the air flow will always enter the car interior, and whether it will be warm or hot depends on the heater settings in the cabin itself. So it is important to carry out such actions as a temporary measure (video author - In Sandro's garage).
It also happens that the problem lies in the operation of the stove resistor. The thermal fuse in the “tens” heating system is located next to the resistor coil of the unit. If the resistor is heated too high - 117 degrees - the internal panel of the device will melt and rupture. As practice shows, this element can also burn out due to increasing current strength, when the ventilation device cannot move. If the fan does not really start working, this can cause the load on the safety device to increase to 17 amperes, which is quite a lot for a car's on-board network.
In fact, replacing the resistor does not happen so often, since in principle this malfunction is rare; usually it is the thermal fuse that blows. By the way, such devices are installed on many household appliances.
Diagnostics of the fuse itself is carried out as follows:
- You need to short-circuit the resistor with a “bridge” using a piece of wire.
- After short-circuiting, turn on the stove itself. If the heater works normally in all modes, then the problem lies in the fuse.
- Buy a new 15 amp 117 degree fuse and solder it in place of the old one. When soldering, the device must not be overheated, since if the soldering temperature exceeds 117 degrees, this will lead to its failure. Therefore, the soldering procedure is carried out with a heat sink.
We recommend: Removing scratches on a car body without painting
Leaking radiator
Heating system radiator
In practice, it often happens that on domestically produced cars the heating device begins to function poorly due to a leak. We are talking specifically about a leak in the system radiator. As a rule, the driver learns about this as a result of a lack of coolant in the expansion tank located in the engine compartment. In this case, the problem can be solved for some time by adding consumables to the system, but over time the stove will again blow cold air. For what reasons does this happen?
First of all, it is necessary to pay attention to diagnosing the radiator device itself. You need to check the integrity of the radiator. It should be noted that this task is one of the most difficult of those related to the diagnosis of a heating unit. After all, in order to get to the radiator, you first need to remove the stove.
If during diagnostics you notice that the radiator device has cracks on its body through which antifreeze escapes, then it is advisable to replace it. As practice shows, soldering the case usually does not give the desired results. In most cases, it helps for a short time, but the process of dismantling and installing the stove itself is quite tedious for the motorist.
Insulation
Sometimes it happens that the hot air flow does not flow well to the side windows and to the feet, although the heating system itself is working properly. In this case, the side windows may become foggy. Even when replacing the corrugation, this does not help solve the problem. In order to get rid of such a malfunction, you do not need to repair the control unit of the VAZ 2110 stove or look for a leak - you just need to get rid of all the cracks. Seal the center console with sealant or a special “anti-creak”; in some places you can use construction foam.
The thermostat has failed
Thermostat VAZ 2110
The most common reason why the stove on the VAZ 2110 does not heat with hot air is the thermostat. It just starts to stick in the upper or lower position over time. If this happens, then you just need to replace it. But the same situation can happen to a new one. So what should we do then, change it again? There is a proven way to bring a stuck thermostat back to life.
To do this, you will need to park the car on a slight slope. In this case, the front wheels must be 25–35 cm higher than the rear wheels. The engine must be running. You need to open the hood and prepare a small wooden (precisely wooden, to avoid damaging the thermostat) stick, or the handle of a shovel. Now, once you get behind the wheel, you need to change the gas 2-3 times. Immediately go out and tap the thermostat with the butt of a stick. After this, touch all incoming and outgoing pipes near the thermostat. Such manipulations need to be carried out 3 – 5 times, after which the thermostat will work like new again.
Malfunctions of the VAZ 2110 stove and their elimination
VAZ-2110 owners are faced with the problem of a non-working or malfunctioning stove. The malfunction boils down to the fact that the air does not heat up, the heater supplies hot air, or there is uneven heating - cold air goes to the windshield, but well-heated air goes to the foot area.
Why does the stove not heat well?
These symptoms occur due to a malfunction in the stove control system:
- Damage to the ACS controller.
- Malfunction of the micromotor gearbox.
- Damper deformed or jammed.
- Temperature sensor malfunction.
To identify the problem, first determine in which branch of the control system the malfunction occurred. To do this, start the engine, turn on the heater fan at maximum speed, and then turn the temperature control knob from “Min” to “Max” and listen to whether the noise changes from the fan operation. If the “controller-gearbox” branch is working properly, then the dampers move, and by changing the direction of air flow, the noise from the stove operation changes in tone.
But if the sound of operation does not change, the reason lies in the controller, gearbox or dampers.
To check the controller, replace it with a known good one and check whether the operation of the stove has changed. The next thing to check is the gear motor. The difficulty of checking is that it is located under the “jabot” on the engine side, and it is difficult to get to the gearbox. This control branch may not work due to jammed dampers.
To check the “controller-temperature sensor” branch, disconnect the wires from the sensor. Without its readings, the controller controls the damper based on the temperature set by the driver. If the problem with the operation of the stove lay in the temperature sensor, then after it is turned off, the normal functioning of the heating system will be restored, with the only difference that the automatic fan mode will stop working and the ACS will not be able to adjust the temperature of the air flow.
More often, problems arise with the controller and gearmotor. These units can be repaired, but since their price is low, it is easier to replace them with new ones.
Other causes of failure
- In addition to the dampers, the fan often starts to malfunction. Possessing as many as four operating modes, its malfunctions can be very different. The first thing you need to do is look at the fuse (F7). If the fan refuses to work at all, most likely this is the problem.
- There are times when the above-mentioned unit performs poorly or even stops rotating at low speeds. This problem is more complicated, since, most likely, it is associated with the burnout of additional resistance. This is not that difficult to fix, but the problem will be the path to solving such a problem. The broken part can only be reached through the engine compartment.
- In addition, it is in the engine compartment that you often need to look for the reasons why only warm air comes out, while the adjustment is at the “maximum” position.
It's all about adjusting and supplying air inside the car body. The climatic conditions outside the car are also important to consider. But it’s better to leave all the troubles with the engine compartment in the hands of the service station. Repairing heaters, stoves, and air circulation in this machine is very difficult, so independent work must be carried out with a great understanding of responsibility and good experience in machine repairs.
Let's sum it up
The high-quality functioning of the heating system of a vehicle is the main factor that affects the comfort and convenience of the interior. Problems with its operation during the cold winter periods force drivers to carry out urgent repairs and checks of the heating system.
There can be many reasons why the VAZ-2110 stove does not work or does not heat well. The main thing is to understand the technical features of the car’s heating system in order to narrow down the search for a fault as much as possible. Almost all dozens of causes of poor-quality interior heating can be eliminated with your own hands without significant financial investments.
To prevent heater breakdowns at inopportune times, monitor the car’s heating system and carry out regular preventive inspections and diagnostics. Experts recommend diagnosing the vehicle heating system at least twice a year. Only proper operation of the heater and constant high-quality care of it will guarantee its uninterrupted operation at any time of the year.
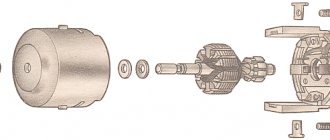
What to do if the heater motor does not work
Sometimes the problem with very low interior temperatures is due to the fact that the heater motor is not performing its functions. You can detect its failure as follows:
- start the car engine;
- Using the heating system control unit, we switch its operating modes;
- If, when switching, the sound of the motor and its rotation speed changes, then everything is in order.
Otherwise, you will need to perform diagnostics of the entire system, which usually indicates the following reasons for motor failure:
- due to intense loads the fuse has failed;
- The heater operating mode switch is broken;
- contacts in the system have oxidized;
- the wires connecting the heating system to the on-board power supply network are damaged;
- The motor itself burned out.
The most difficult task is to eliminate the last fault, since in this case you will need to install a new electric motor.
This procedure must be performed strictly in the following sequence:
- unscrew the decorative trim located directly in the car interior, on the driver’s side;
- disconnect the wire through which voltage is supplied to the electric motor;
- remove the wiper arms that prevent access to the heater motor;
- remove the seal located immediately under the wiper panel;
- dismantle the upper protective casing of the electric motor and disconnect the power wires;
- divide the electric motor into two parts and carefully remove it;
- We mount the working part and carry out the assembly in the reverse order.
Replacing a heater motor is a rather complicated procedure, so if you do not have the relevant experience, it makes sense to contact a car service center. If this is not possible, try to perform all operations with extreme caution so as not to damage parts located in the immediate vicinity of the unit.
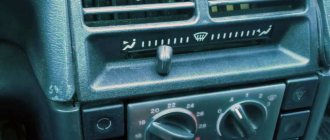
Principle of operation
The operating principle of such a control system is simple - the driver uses the left handle to set the desired temperature (completely cold or in the range from 16 to 28 degrees). Based on the set mode, the controller supplies power to the micromotor gearbox and it sets the dampers to the desired position.
Two-way communication is used between these elements - a position sensor is installed on the gearbox, which “informs” the controller about the opening angle. Thanks to the installed temperature sensor (located on the ceiling), the controller constantly monitors the degree of heating of the air in the cabin, based on which it adjusts the position of the damper to maintain the temperature set by the driver.
Temperature sensor VAZ 2110
Thanks to the use of automatic control system, the driver no longer needs to adjust the operation of the stove in order to maintain a comfortable temperature; he sets the temperature with a handle, and the controller does the rest. On the early VAZ-2110, the heater fan had three operating modes, the difference between which comes down to the rotation speed. Speed adjustment is carried out by installing a rheostat block in the power supply circuit of the electric motor. Then models appeared in which the fan received a 4th operating mode - automatic. When it is turned on, the fan operates under the control of the controller - the ACS regulates the rotation speed of the electric motor to adjust the temperature in the cabin.
The use of electromechanical control on the VAZ-2110 increased the convenience of controlling interior heating, but due to the more complex design, the likelihood of stove failure increased.
Air lock preventing the stove from working properly
In our article we will look at another common problem, due to which the stove begins to forcefully blow cold air into the cabin. It consists in the formation of an air lock in the system. Diagnostics usually indicate the presence of the following causes for this malfunction:
- damage to the cylinder head gasket described above;
- poor-quality connection of pipes to each other. Usually, to eliminate this malfunction, it is enough to tighten the clamps well and check the integrity of the sealing elements;
- Improper coolant replacement, which allows air to enter the system.
How to correct the situation with an air lock and ensure flawless operation of the heating system of a VAZ-2110 car? To answer this question, we provide detailed instructions:
- we install the car on some elevation so that the engine is as high as possible;
- open the expansion tank;
- fill the coolant to the maximum level;
- turn on the ignition, start the engine and accelerate it to 3000 rpm;
- gently but firmly squeeze the lower radiator pipe and carefully monitor the antifreeze level - as soon as it decreases, you should immediately add coolant to “expel” absolutely all the air from the system;
- After the antifreeze stops “failing”, close the expansion tank and enjoy the excellent operation of the heater.
What to do first
In order not to get buried in the abundance of reasons, it is necessary to act from simple to complex. Leave the frightening thoughts of a broken cylinder head gasket and take a trifling attitude, as if the electric damper actuator has failed. Actually, that's where we'll start.
Check the operation of the climate control shutters
Turn the knob or rocker of the climate system and evaluate the temperature of the incoming air. For example, with “blue all the way” the air should be noticeably cold, and with the maximum red settings it should be warmer.
Immobilized valves will not be able to mix flows according to the specified °C value. Therefore, at any position of the regulator, air will blow at the same temperature. The dampers stop as a result of damaged fasteners or a failed servomotor.
Is the antifreeze level in the expansion tank stable?
Lift the hood, find the “extender” and the boundary marks on it. When cold, the antifreeze level should be between the MIN and MAX marks. If the tank is constantly emptying, look for leaks. You can look at where the coolant goes using the Lada Vesta as an example.
Heater radiators of some cars, for example Lada Kalina, are very sensitive to the amount of antifreeze in the expansion tank. At the slightest leak, the engine heats up, and the stove is cold or barely warm. And in general, when liquid flows out, air comes in and thus the system becomes airy.
Inspect the heater radiator for unobstructed circulation
Find two pipes going to the heater heat exchanger near the engine shield and touch them. The radiator assembly is embedded in a small circle in parallel, which means that the hoses should warm up immediately after starting the engine. It is better to carry out work when the engine is warmed up.
How to remove an air lock without draining the coolant
It happens that if there is air in a small circuit, the temperature sensor on the dashboard behaves strangely: the needle sometimes jumps. For example, it was at 60°C and instantly became 90-100°C, then returned back. This is explained by the fact that the air heats up noticeably faster than the liquid and to higher temperatures. As a rule, the needle twitches when the system is seriously aired.
The fact is that a small traffic jam does not always go around the entire small circle. Air accumulates at the highest point of the circuit - the radiator of the car furnace, causing the circulation of coolant in it to slow down. At the same time, there are no sudden temperature changes in the motor jacket. Even without observing extraneous symptoms, assume that the engine is overheating and the cabin heater is blowing cold air due to air accumulation. Try to etch it out, because you don’t need to disassemble anything:
- Raise the front end on a lift or drive up a hill.
- Allow air to escape through the highest point in the system. Why unscrew the cap of the expansion tank if it is a circulation tank (there is no plug on the engine radiator), or the cover of the engine heat exchanger. On front-wheel drive Ladas, the highest point is the throttle heating hose, disconnect it.
- Warm up the engine to operating temperature at idle speed.
- Increase the speed to 2,500-2,700 units.
How to easily remove a dirt plug from a furnace heat exchanger
When one side of the heater radiator is cold and the other is hot + no antifreeze is coming out, feel free to flush the heater radiator installation. There is no need to remove anything except the pipes. The only equipment that will be useful is a submersible pump from a country well, a deep basin, long hoses and one of the means for flushing the car engine cooling system.
Find out where the heat exchanger has the inlet and outlet and start cleaning:
- Disconnect the standard tubes. When dismantling the pipes, 1-1.5 liters will drain. coolant. A 2-3 liter coolant canister is quite enough to replenish reserves. There is no need to drain all the antifreeze from the system.
- Connect the hoses leading to the pump and basin: supply to the radiator outlet, drain to the inlet.
- Fill the container with cleaning agent.
- Turn on the pump for 10-15 seconds.
- Reconnect the hoses: supply - to the inlet of the heat exchanger, drain - to the outlet.
- Turn on the pump for 15-20 minutes.
- The flushing composition will circulate in a circular manner: from the basin and back into it.
- A short supply of fluid in the opposite direction quickly flushes out the dirt plug at the radiator inlet.
- Check whether antifreeze flows from the radiator steam pipes into the tank (relevant for circulation “expanders”).
Heating system design
Design of the heating system "tens"
If the stove cannot turn on, it begins to blow heat poorly or has stopped producing heating altogether, you need to take a very serious approach to solving the problem. After all, operating a vehicle in the winter without a heater is the most inconvenient and uncomfortable option for a motorist. Therefore, before you learn how to remove and disassemble hoses on new and old devices and how to properly adjust the system, let's understand the device.
On domestically produced vehicles, including the VAZ 2110, the heating system has certain differences. First you need to take into account that the heating system operates separately. In particular, it is represented specifically by the heater. The heater is the stove itself.
The stove will be filled inside with a hot air flow, which enters the vehicle interior through special heat distributors - pipes. The pipes themselves are led to the car's interior, where warm air flows directly from the front center console to the driver and passenger (face and legs), as well as to the windows.
Thanks to window blowing, the driver can get rid of the problem of freezing or fogging. The entire system is controlled using a special regulation and control unit, which regulates the air flow and temperature conditions. That is, in essence, this block is an air flow distributor. Unlike other domestically produced car models, the stove on the “ten” has a fundamental difference - it is equipped with an evaporator (the author of the video is Alexander Amochkin Kolomna AAK).
How to use the stove
It is no secret that its service life and reliability of operation largely depend on how an item is handled. This is perfect for a car heater. The more correctly you operate it, the better and longer the stove will be able to work.
There are a few simple rules that, if followed, will extend the life of this unit.
- During cold weather, control the stove in two modes. First, start the car, set the control to “All on glass”, and while driving, switch to directing the heat to your feet.
- Do not block the air supply nozzles.
- Carpeted interior floors will require you to aim the nozzles higher.
- Try to always keep the glass clean.
- Use air conditioning in damp weather.
Weak supply of warm air, stove modernization
One of the main problems of the VAZ-2110 heater is leakage and poor-quality assembly, low quality of air duct elements.
The stove can wildly heat up the air entering it, but the barely perceptible warm breath of the heater can reach the cabin. It's all about leaky air duct connections, and, unfortunately, there are quite a lot of them. Firstly, it is recommended to seal the primary air ducts ; a leak of heated air is often detected between them and the stove itself; it simply warms the engine shield.
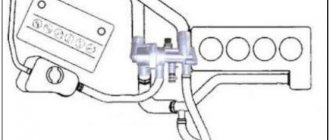
Heater differences
In earlier versions of the VAZ 2110, the stove was a little simpler than at the end of its release. Initially, the direction of air flow was changed mechanically using a lever on the air ducts. In the latest modifications of the “tens” this system was changed, and now the direction of air flow was changed using a gearmotor.
It should be noted that the new model stove turned out to be much more efficient and warmer than its previous modifications.
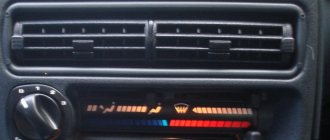
New sample stove
Old style stove
Here you can notice differences in the heater control unit and in the air intake options. In subsequent models, the heater changed; the direction of air flow was controlled through the heater control unit.
Advice from auto mechanics
To tune the VAZ heating system, its circuit diagram is studied. The system can be modified to block the air flow to the rear of the car using foam. The factory thermostat is also being replaced with an analogue one with 6 holes. In this case, the temperature in the cabin will remain longer, and the stove will heat better. Another way to modify the standard 2110 heating system is to install a plug for the deflector.
In order for the stove to serve longer, it is recommended to follow the rules of its operation.
If your car has air conditioning, it should only be turned on in wet weather. In winter, the stove turns on and directs the air onto your feet or onto the glass.
To ensure good operation of the heater, the nozzle is raised above the lining. Before starting the stove in winter, it is recommended to clean the glass from moisture.