It is known that a car cannot drive without a starter. It seems like a simple electric motor, but you can’t do without it. You can start a piston unit with a failed “starting” unit only from a pusher, but only for a trip to a car service specialist.
The reasons for the breakdown of such a critical mechanism are quite obvious. Most diseases can be cured if you repair the starter yourself. We list below the main sources of malfunctions:
- natural wear and tear of electric motor elements;
- water ingress while washing the car engine;
- improper operation of the unit, for example, long periods of operation of the electric motor after starting the engine;
- short circuits.
Do-it-yourself partial repair of the starter usually saves you from all this. That is, it is not at all necessary to buy a new unit entirely. Next, we will look at which specific elements fail, and how to repair the starter with your own hands.
Let us first note that according to the symptoms when turning the ignition key, it is necessary to distinguish between the types of malfunctions of the starting electric motor. If, for example, after turning the key you hear a clicking or crackling noise, then the problem is in the retractor cylinder. The latter can be completely replaced.
How to deal with the VAZ unit
First, let's look at how to repair the starter with your own hands on VAZ cars. First, let's take the very first of the cars in this line.
To repair a VAZ 2101 with your own hands, we will use the tools listed below:
- set of wrenches;
- flathead and Phillips screwdrivers;
- sandpaper;
- heads.
So, let's start work by opening the hood.
- Disconnect the terminals from the battery.
- We dismantle the air filter housing with the filter element.
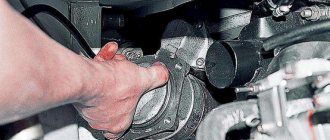
- Unscrew the three nuts securing the electric motor to the motor.
- We disconnect the wires after taking photographs of the connections.
- We remove the defective device.
- Perhaps the so-called “pants” - the exhaust pipe - will interfere with this, then you will have to unscrew the four bolts and “lower the pants”.
- We separate the retractor cylinder from the dismantled element by disconnecting the wire and unscrewing three screws. We inspect it and, if necessary, replace it completely.
- After unscrewing the bolts, remove the motor casing.
- After unscrewing the two bolts, remove the cover.
- Separate the windings from the brush holder plates and remove the insulating tube.
- Separate the cover from the collector side.
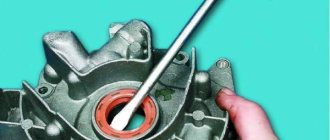
- Use a screwdriver to remove the motor brushes. We measure them and replace them if necessary.
- We disassemble the drive of the defective assembly unit. To do this, undo the cotter pin, then remove the drive lever, disengage the drive from the clutch, and then remove it.
- We inspect the windings of the electric motor.
- If necessary, we press it out, and then replace the bushings of the assembly.
- We clean elements with soot or plaque. We replace failed parts with new spare parts.
- We carry out assembly and installation in the opposite direction.
Note that do-it-yourself starter repair for a VAZ 2106 is carried out according to similar instructions.
Also find out where the fuel filter is located on the Hyundai Solaris and the structure of the fuel pump.
If we discuss the problem that interests us regarding front-wheel drive VAZs, then it is enough to simply consider what differences there are from the given instructions. The tools used here are the same.
However, for example, when repairing a VAZ 2109 starter yourself, you do not need to disconnect the exhaust pipe during removal from the car. Further manipulations are carried out exactly as described above.
Naturally, repairing a similar VAZ 2108 starter with your own hands is done according to a similar scenario. When repairing a VAZ 2110 starter with your own hands, it is easier to immediately remove the solenoid relay while dismantling the unit from the car by unscrewing the corresponding nuts.
However, in case of repairing the starter of a VAZ 2115 with your own hands, the electric motor can be dismantled immediately along with the retractor cylinder.
By the way, it is not necessary to replace this completely assembled cylinder if it breaks. You can also repair the starter retractor relay yourself. To do this, you need to disassemble it, inspect the retractor winding, return spring, and replace failed parts. As for domestic cars, UAZ repairs can be performed according to the given instructions from VAZ.
How are things going with other popular cars?
Now let’s touch on two more truly popular cars. Let's talk about sorting through the starting element on Oka, as well as Nexia.
To repair the starter at Oka with our own hands, we will need:
- set of wrenches;
- screwdrivers.
We start by dismantling the unit; it is located under the thermostat of the cooling system.
- In this car, the starting device is attached to only two points; to remove it, you need to unscrew the bolt on one side and the nut on the other. But first we disconnect the wires, both from the battery, from the retractor cylinder and from the connecting block.
- We unscrew the two nuts, and then remove the traction relay.
- Unscrew and remove the cover casing from the collector side.
- We dismantle the brush springs, locking, and adjusting washers.
- Separate the cover from the body where the collector is.
- We remove the brushes, then measure them; when they are worn out, they need to be replaced.
- Having unfastened the cotter pin, we dismantle the lever axis.
- Remove the cover from the drive side.
- We remove the drive lever, then take out the anchor.
- We inspect the windings of the electric motor.
- We dismantle the drive coupling and inspect its condition. This clutch is also called bendix. In case of any defects in the clutch, it is easy to repair the Bendix of any starter with your own hands. You just need to replace the broken elements.
- We take out the bendix spring and replace it if necessary.
These are some simple manipulations.
It must be said that in such a small car, such as the Tavria, the mounting of our treasured electric motor is also made at two points, and its design is similar. Therefore, Tavria does its own repairs in the same way.
Well, with Oka and Tavria it’s somehow easier, but if the starting unit of another people’s car breaks down, will it be more difficult? Let's see. To repair the starter of a Daewoo Nexia with your own hands, you need to prepare:
- set of wrenches;
- screwdrivers.
- To dismantle the unit from the car - here, like all rather large cars, there are three fastenings - unscrew the nuts and disconnect the wires. You need to know that a “ground” wire is attached to the upper bolt that secures the electric motor to the piston unit.
- We immediately check the drive gear; it should only rotate unidirectionally.
- We disassemble and sort out the assembly in the same way as in previous cases.
- We also disconnect the solenoid relay.
- We remove the cover from the collector side, as well as from the drive side.
- We dismantle and then, if necessary, replace the brushes.
- We take out the anchor and study the windings.
- If necessary, we press it out, and then replace the bushings of the assembly.
- We do the assembly in reverse order.
Apparently, there are few difficulties here.
The same can be said about repairing a starter, for example, an Audi 80 with your own hands. There you need to act, practically repeating the above points.
Price and necessity of the procedure
However, not everyone decides to repair the starter with their own hands. For some, turning to a car service center may seem like a much more convenient option. For such car enthusiasts, we have compiled a table with prices for the described operation.
Replacing the solenoid relay on the VAZ 2110 starter yourself
Starter and retractor relay VAZ 2110
If the car suddenly stops starting, there are no characteristic sounds before starting the engine, or a strange “humming” noise appears, then the starter solenoid relay may be damaged. Naturally, the device can sometimes work normally without showing signs of breakdown, but at the most inopportune moments the car has to be started from the pusher. In this situation, only replacing the retractor on the VAZ 2110 starter will change everything for the better. Symptoms of the malfunction are different, for example, the appearance of clicks at the relay, lack of cranking of the starter, lack of signs of life when turning the ignition key, etc. It is worth noting that replacing the VAZ 2110 retractor starter can be done with your own hands.
Typical breakdowns
Now let’s figure out how to check the starter solenoid relay on a VAZ 2110. It must be carefully inspected after dismantling.
This unit is characterized by certain breakdowns, which we will talk about.
- The fastening is loose or the nuts responsible for fastening the wire end are completely loose. Everything is simple here, as you understand. You just need to tighten the fasteners.
- Oxidation has formed on the windings, connections or wiring. If everything is not too serious, you can simply clean the contacts. In case of serious oxidation, it is better to replace them with new ones.
- The power supply circuit has breaks. Again, you don’t need to come up with anything fancy, just replace the chain.
- The armature exhibits idle operation or slow operation. Just replace the armature and that's it, problem solved.
- Check the short circuit of the turns of the two windings using an ohmmeter.
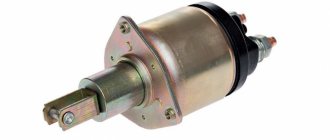
Solenoid relay
The VAZ 2110 starter solenoid relay is designed to remotely turn on the electric starter motor. They ensure the clutch of the bendix (see Replacing the bendix on the VAZ 2110 starter on your own) with the flywheel crown. This element structurally consists of: a returning, contact and magnetic system, including two coils - a holding coil, connected to the control terminal and going to the housing, and a retracting coil, connected by the control element.
This is interesting: Repair scheme for Kedr Auto 10A
VAZ 2110 starter solenoid relay
The pipe where the armature is located is a core, inside of which there is a copper winding (the end and beginning of the winding are attached with terminals, one side is connected to the electric motor and the control contact, the other is connected to the control terminal and goes to the housing).
VAZ 2110 retractor clicks and the starter does not turn
The movement of the armature in the core is carried out due to the electromagnetic field, and when the voltage disappears, the armature in the core goes to its initial state. When powered, a magnetic field appears, causing the armature to retract the return springs. When the car engine starts, the voltage begins to disappear, the spring presses on the armature and it returns to its initial position, the contacts open, the Bendix disengages. If the solenoid relay breaks down and before replacing it, you should first make sure that the problem lies in the starter.
Note. It is necessary to exclude the following malfunctions in the car: the presence of scale, battery discharge, traces of oxidation on the terminals, damage to the wiring, loose contacts. The car may not start for these reasons.
Checking with the starter removed using a multimeter
This test of the solenoid relay allows you to very accurately perform internal diagnostics and determine the condition of the windings and contacts. Dismantling the starter, depending on the make of the car, is carried out in various ways. For VAZ 2110, this procedure is carried out from below from the pit. Before unscrewing the fasteners, remove the wires (it is better to mark the terminals so as not to confuse them during assembly); you may need to remove the crankcase protection.
To begin with, voltage is applied from the battery to the body and terminals of the relay; operation is accompanied by a characteristic click and visible movement of the rod. Further checks are carried out using a multimeter, which is switched to resistance measurement mode and the range of 200 Ohms is selected.
First, check the serviceability of the retractor and retention coils. To do this, one of the probes is connected to ground, the second touches the contacts in succession. The device readings are 2 ohms. Deviation of the device readings from the specified value is a sign of a break or short circuit.
To check the power contacts, remove the core from the relay body and remove the return spring, after which the core is inserted back. The core rod is pressed against the table with a certain force and the resistance between the contacts is replaced. The resistance is approximately 1.5 ohms.
Examination
VAZ 2110 retractor starter
To check the functionality of the starter, you will need a battery and two wires:
- First the starter is removed;
- Using the first wire, the output of the solenoid relay is connected to the positive terminal of the battery;
- The second cable is connected to the negative terminal with the starter ground;
Note: if there is a click, this indicates that the Bendix mechanism is working. It is important that the click is sharp and fast. If the sound seems sluggish and drawn out, then something is wrong inside the mechanism, for example, the pin contacts have burned out.
VAZ 2110 does not turn the starter, the retractor clicks
If, after the inspection, there is a suspicion that the starter requires repair, you should immediately go to purchase a new spare part. If the starter is not removable, then the entire solenoid relay must be replaced. If it is collapsible, then:
- To repair the solenoid relay, unscrew the screws on the relay housing cover.
Note. In some cases, it is necessary to unsolder the ends of the winding; they can be an obstacle to removing the cover.
- After removing the cover, the power contacts are checked; in many cases they cause damage to the device.
Note. If possible, replace old contacts with new ones. If the contact is not badly damaged, the burnt surface is removed using fine-grained sandpaper.
- After this, the structure is assembled in the reverse order.
The retractor relay is installed under the hood and is located on the starter. When buying a new one, you need to take the non-working item with you and ask the store for a similar one - in this case, mistakes are excluded. All manufacturers make their own markings on the solenoid relay. The device is secured with three screws.
VAZ 2110 remove starter retractor
What type of relay can be repaired?
One of two types of relays can be installed in a car: collapsible and non-dismountable. If the car has the second type of relay, then you won’t always be able to fix it yourself.
A non-separable relay can only be repaired if the contact plates are burnt. If one of the windings has deteriorated or a short circuit has occurred in them, then it will no longer be possible to repair it - only replacing the part.
Important! In case of self-repair, when removing the relay, it is recommended to mark the terminals so as not to confuse them when installing the mechanism in place. It is also a good idea to clean and degrease the contacts on the relay and starter.
Replacement
VAZ 2110 starter retractor
To replace the solenoid relay on a VAZ 2110, you will need the appropriate tools. Before starting work, it is imperative to disconnect the battery mass, which is marked with a minus sign, from the battery. To do this you will need a 10mm wrench. After removing the contact, you need to find the starter. It is located at the bottom of the engine compartment, between the engine block and the cooling system. Only after this can you begin to dismantle the device.
VAZ 2110 starter retractor
- Two wires are connected to the solenoid relay; it is necessary to disconnect the red wire that runs from the relay to the male contact.
- Unscrew two nuts on the back of the relay; this is done using a “13” wrench.
- Using a flathead screwdriver, disconnect the cord from the front of the relay retainer.
- After releasing the relay, it must be carefully removed.
Note. When performing this procedure, you need to make sure that the core is inside and the spring located in the relay does not fall out. This is a very complex procedure in the process of replacing the solenoid relay.
To install a new retractor, repeat the steps in reverse order. Due to the fact that we left the old core, the new relay is mounted without it, only with a new spring. So:
- Armed with a flat-head screwdriver, you need to screw the wires in front of the relay.
- Connect to the wires and tighten the nuts using a “13” wrench.
After installing the relay, you need to tightly tighten the nuts that connect the power wire and are attached to the “male”. That's all, the machine is ready to go. To replace this element yourself, you will need only three tools, a video review and a photo instruction. To perform this procedure with your own hands, you will have to spend about 16 minutes of time and save about 500 rubles in your wallet, which you would have to pay for repairs in car workshops, where the price of these services is constantly rising.
Restoration of technical condition
Due to physical wear, external influences or manufacturing defects, the starter solenoid relay may need to be replaced. It is not recommended to delay this, otherwise the list of car components requiring repair will expand significantly. To carry out restoration work, an overpass or inspection hole will be required. The first is located in the GSK or at the service station, and the second is present in many garages.
Before you begin troubleshooting, you must remove the negative terminal. If the car has a mudguard or crankcase protection, then they must also be removed. The further procedure is as follows:
- Unscrew the nut located under the bottom of the starter;
- remove the terminals located on the VAZ 2110 starter solenoid relay;
- unscrew the starter mounting nut;
- disconnect the relay directly from the starter;
- when unscrewing the fastening nuts, it is necessary to hold the spring with utmost care;
- After removal, the core is checked - it must remain in the starter housing 2110.
Once the required part is in hand, it is inspected. A wire with a length of 30 to 40 cm will help with this. A direct connection is created between the “negative” terminal of the battery and the exhaust relay. You must make sure that the negative terminal is connected to the corresponding one on the battery. A similar check is carried out with the “positive” terminal.
When power is applied, the retractor element must react immediately.
The gear moves out with a characteristic click. The car owner’s further actions depend on what he sees.
If the power supply to the VAZ 2112 starter actuates the relay, then the problem must be looked for in other components and assemblies.
Otherwise, the solenoid relay must be replaced immediately. At this stage, novice car owners make a common mistake - they forget about the need to check the VAZ 2112 starter relay before replacing it. The procedure is similar to that described above.
The speed at which the engine turns on depends on the efficiency of the small-sized part. In this regard, it is recommended to regularly carry out preventive inspections of this element of the car.
How does the VAZ-2110 starter relay work?
When the current stops flowing through the coil, the armature is free in the core. The solenoid relay consists of a magnet with two windings, an armature, contacts and a return spring. The magnet consists of two coils: one retracting, the other holding. The first is connected to the control terminal and the electric motor, the second is connected to the control terminal and goes to the housing.
When the control contact is energized, magnetic induction is induced in the coil, creating a magnetic field that causes the armature to compress the return spring. At the same time, it rotates the bendix, which connects the battery to the starter. The retracting winding is energized “+” when the contacts are closed, the current stops flowing through the coil, but the armature remains inside under the influence of the field of the holding coil.
When the engine starts and the power is turned off, the return spring moves the armature to its original place - the contacts are open, the bendix is disengaged.
BN electrical diagram
The structure of the electric fuel pump (hereinafter referred to as EBN) on the domestic VAZ-2110 car is very simple in structure. It is an electric motor powered by 12 volts. This device protects the pump body from the entry of dirt and dust particles, which serves to protect it from possible damage and contamination.
The EBN of a VAZ-2110 car contains the following elements:
- egnition lock;
- circuit breakers;
- relay;
- electrical wiring;
- the engine control unit.
When the ignition key is turned, power is supplied to the BN terminals through the vehicle relay, and the pump pumps gasoline. After filling the inlet line of the fuel line with flammable liquid, the electrical control unit gives a command to turn off the voltage. In this way, the fuel system is prepared to start the car engine. You just need to crank the engine using the starter.
BN relay for VAZ-2110
The function of a relay in any electrical circuit is to close and open a circuit in order to protect the elements of the entire circuit from high inrush current. When starting the engine, the current required for the starter to turn over reaches 80-300 Amperes. If there is no relay, any element of the electrical circuit may fail.
The BN relay of the domestic “ten” has an electromagnetic coil with a core inside a plastic housing. When voltage is applied, the contacts close immediately. The relay for this car is four-pin.
How to test a relay
If the electric fuel pump does not show any signs of life when the ignition is turned on, this does not mean that it has burned out. The cause of the malfunction may also be a relay. The easiest way to check the RB by ear is that when you turn on the ignition, the relay should click. If you don’t hear a click, there is a high probability that the “relay” is faulty.
But not everything is so simple - the problem can be “tricky”, for example, the car does not start the first time. The cause of the malfunction may be hidden in burnt relay contacts. It’s quite simple to check the functionality of the pump itself; proceed as follows:
- remove the protective casing, under which there is a block with relays and fuses;
- we unscrew the fastenings of the block, remove it, it remains attached to the wires;
- pull the RB out of the block, place a jumper between two opposite contacts, like this;
- Thus, we supply power directly to the BN
- If, with such a connection, the electric motor of the pump begins to make noise, it means that the BN itself is working, most likely, the malfunction is hidden in the relay.
If there is no voltage on any of the contacts on the RB block, you should look for a break in the wiring; there may also be poor contact at the place where the wire is attached to the terminal.
How to install the VAZ-2110 starter solenoid relay?
- We remove the terminals from the battery, put the gearbox in neutral, otherwise when the starter is turned on, the car may start moving.
- We purchase a four-contact relay with open contacts, three wires with “mothers” with which we will connect the relay to the retractor starter and plus to ground, of which: two 25 cm each - on one “mother” at both ends, one with a terminal at one end and a ring for an M8 bolt on the other, also 5 cm with a terminal and a ring for M6.
- We connect the relay with the retractor as follows:
- Using one nut to ground, we tighten the wires, with the second we secure the relay, plus it will come from the power stud:
Dismantling
The dismantling process cannot be called difficult; even a beginner can handle it. Just follow the given instructions.
- Disconnect the negative cable from the battery.
- Remove the air filter.
- Disconnect the set of wires that go to the retractor.
- Remove the nut responsible for securing the tip of the power wire. To do this you will need a 13 key.
- Now it is the turn to dismantle the nuts that hold the starter. Here you need a larger key - 15 millimeters. But if the top one unscrews without any problems, then it will not be easy to get to the bottom one. But it will have to be done.
- Remove the starter.
- Remove the nut of the lower terminal of the solenoid relay and disconnect the wiring.
- Unscrew the relay mounting bolts using a size 8 wrench and remove it completely.
Replacing the starter relay
- Clicking noises when turning the ignition key, but without cranking the starter itself
- no reaction at all when trying to start the engine
Of course, there are times when the relay can be repaired, for example, when nickels burn. In this case, you can simply clean them and everything will work again. But in most cases you have to change the retractor completely. Fortunately, the price of this part is not so high, so you won’t have to spend much.
It is worth noting that to perform this repair you will need the following tool:
- Socket head 13
- Ratchet handle
- Phillips blade screwdriver
Of course, it is most convenient to replace the retractor after removing the starter. After this, you must first unscrew the nut securing the wire terminal, as shown in the photo below:
And disconnect it:
Now turn the starter over and unscrew the two bolts securing the solenoid relay:
Now you can remove the relay by moving it to the side:
If the core remains engaged, then you need to disconnect it with a simple movement of your hand:
Now you can replace the solenoid relay, since everything is ready for this. The price of a new part may be about 500 rubles. Installation is carried out in reverse order.
Signs and causes of relay failure
If the relay is broken, the following signs will tell you about it:
- when you try to start the engine with the key, it does not start, or starts only after two or three attempts;
- There is a buzzing sound after the engine starts. This means that the starter rotates at higher speeds, although it should no longer be.
If at least one of these signs is observed, then this is a reason to be wary. The relay may soon break. There are several reasons why this happens:
- one of the windings, or both, were burned or broken at once;
- deformation of the return spring inside the mechanism;
- a short circuit has occurred inside the part on one of the windings;
- The surface area of the contact plates has decreased, or they have completely burned out.
Understanding the reasons why the relay fails, repairs will take less time, because It’s immediately clear where to look for the problem.
VAZ 2110 - replacing the starter retractor relay
The most common reason why the car starter does not work is a malfunction of the solenoid relay. You can drive your car and not suspect anything, but at one fine moment the car will stop starting, you will need to call friends and start it with a push. To be armed and know the features of the starter, today we will tell you how to replace the solenoid relay on a VAZ 2110 with your own hands.
This is interesting: Video on how to assemble a starter on a trimmer
Symptoms of a malfunction can be different, for example, the relay clicks, but the starter itself does not turn, or it happens that when you turn the ignition key there are no signs of life. To quickly troubleshoot a problem, you need to have the following tools available:
- flat screwdriver; - head 8; - ratchet.
Let us remind you that in the previous article we told you how to replace ball joints on a VAZ 2110 with your own hands. Considering the quality of parts today, replacement is required almost every 5-6 months, so I recommend bookmarking the instructions.
Replacing the starter solenoid relay with your own hands
1. You can unscrew and replace the relay without removing the starter from the car, but it is better to do all this with the device removed from the car. When this is done, you need to unscrew the nut securing the terminal to the stud, as is clearly shown in the photo above.
2. Then carefully remove the terminal and move it and the wire a little to the side.
3. Now on the back side of the starter you need to unscrew two bolts using a regular flat-head screwdriver. All this is clearly demonstrated in the picture.
4. Now you can remove the relay without experiencing any difficulties. gently pulling it back. If it does not come off, then you need to lift it slightly so that it disengages from the anchor.
5. If it was removed separately from the spring, then it can be removed later along with the anchor.
How to replace the starter solenoid relay on a VAZ 2107 One of the main causes of starter failure on a VAZ 2107 is the failure of the solenoid relay. The first symptoms of a malfunction are when you hear clicks when you turn the ignition key, but the starter never starts to turn. Today we will look at
Replacing the solenoid relay on a VAZ 2115 The solenoid relay in the VAZ 2115 starter is the most vulnerable point, so when malfunctions occur in the starter, you should immediately pay attention to this detail. Symptoms of a malfunctioning solenoid relay can vary, ranging from:
What does the starter consist of?
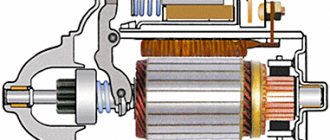
The main elements that make up the VAZ-2110 starter, the price of which is 2300-2500 rubles, were discussed above. But it also contains a number of parts that affect the performance of the device. The stator winding, located on the stationary part of the device, is necessary to generate an electromagnetic field with the help of which movement is created. But it cannot be created without a counteracting field that forms around the rotor winding.
Consequently, the engine rotor also has a winding, which is powered from the on-board network through a brush assembly. This is the most vulnerable unit, since the brushes are made of graphite. Although it is durable, you should not forget that it constantly rubs against the slats, between which there is a small gap. This results in significant wear, and its result is loss of contact between the starter power input and the rotor lamellas. In the back cover there is a bronze bushing, which is used to center the rotor and power it from the battery negative.
How does the VAZ-2110 starter relay work?
When the current stops flowing through the coil, the armature is free in the core. The solenoid relay consists of a magnet with two windings, an armature, contacts and a return spring. The magnet consists of two coils: one retracting, the other holding. The first is connected to the control terminal and the electric motor, the second is connected to the control terminal and goes to the housing.
When the control contact is energized, magnetic induction is induced in the coil, creating a magnetic field that causes the armature to compress the return spring. At the same time, it rotates the bendix, which connects the battery to the starter. The retracting winding is energized “+” when the contacts are closed, the current stops flowing through the coil, but the armature remains inside under the influence of the field of the holding coil.
When the engine starts and the power is turned off, the return spring moves the armature to its original place - the contacts are open, the bendix is disengaged.
How to install the VAZ-2110 starter solenoid relay?
- We remove the terminals from the battery, put the gearbox in neutral, otherwise when the starter is turned on, the car may start moving.
- We purchase a four-contact relay with open contacts, three wires with “mothers” with which we will connect the relay to the retractor starter and plus to ground, of which: two 25 cm each - on one “mother” at both ends, one with a terminal at one end and a ring for an M8 bolt on the other, also 5 cm with a terminal and a ring for M6.
- We connect the relay with the retractor as follows:
- Using one nut to ground, we tighten the wires, with the second we secure the relay, plus it will come from the power stud:
DIY VAZ starter repair
It is important to know!
Every motorist should have a universal device for removing scratches on a car of any color. The effect is visible within 10 minutes, and the action of RENUMAX will pleasantly surprise you with its simplicity and effectiveness. Read more >>>
The service manual contains detailed instructions for replacing the starter, and you will also find a diagram and design of the starter in it). But as a rule, any similar process is not without difficulties, so let’s figure out how to repair a starter using a specific example:
Removing the starter retaining ring
To remove it, I had to pry it off with a flat screwdriver. After replacing the starter Bendix, I had difficulty reassembling the rings in the reverse position, but something turned out to be wrong. It turned out that the restrictive ring has a slot for the retaining ring and should be put on on the opposite side of the bendix.
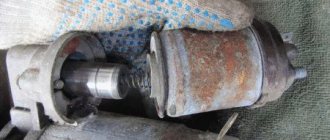
Repair of starter retractor relay
The starter solenoid relay (the little thing to which the wires attach, also called the traction relay). The principle of its operation is as follows: 12v is supplied from the ignition switch to the coils in a metal case. They retract the armature of the retractor relay (a metal sinker with its end hooked to the tail of the bendix). With one end he drives out the bendix, with the other he presses the lever inside the relay, which closes the “+” contact coming from the battery. The plus is transferred to the brushes that make the armature spin. The gears transmit torque to the extended bendix, thus the flywheel rotates.
When removed carefully, you can easily break it by pulling the contacts from the winding. After unscrewing, you need to heat the contacts with a soldering iron and remove the plastic from the metal case. There is no particular point in disassembling it. You can't get into the coils; they seem to be filled with plastic. Therefore, in this case, it is recommended to strip the copper contacts from the lever, and the contacts from the bolts. You can also check with a tester for the presence of contacts.
Checking the starter solenoid relay:
- Usually “+” is applied to the flat contact from the ignition switch, and “-” to the housing.
- Alternatively, it’s different: “+” is a flat contact and minus is on the bolt to the starter (more precisely, on the brushes installed in a larger housing). There should be a click (don't forget to put the anchor inside).
Thus, by checking it is possible to determine the cause of the starter malfunction. For example, poor contact can be corrected by placing tin on the washer holding the contact bolt.
The price of the starter retractor relay is about 350 rubles.
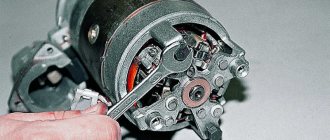
Disassembling the stator with armature
Monitoring the technical condition of the mechanism
The driver must know how to check the starter solenoid relay himself. Attention should be paid to the appearance of a characteristic sound: when the key is turned, a click appears in the ignition switch. Further attempts to start the car end in a series of clicks and jerks. Signs such as these indicate the need for the following check:
- bridge the 2 copper contacts located on the back cover of the relay;
- the movement that appears will indicate a malfunction of the retractor mechanism;
- at the time of testing, it is necessary to exercise maximum caution, because the solenoid relays rotate at high speed;
- An additional method of control will be to connect the positive connector of the retractor mechanism to the “+” of the battery;
- the second wire connects the ground of the starter and the battery;
- If the retracting mechanisms are working properly, then at the moment the circuit closes, a sharp click is heard.
This is interesting: Test drive Suzuki Wagon R
Further actions of the car owner depend on the nature of the detected malfunction. If the device runs too fast or slow, we are talking about mechanical wear of its individual elements. Retractor mechanisms often fail due to a short circuit. Charred contacts are expressed in a series of clicks, complemented by slow operation of the mechanism.
Planned or emergency replacement of the starter relay is associated with monitoring the technical condition of the starter itself. For preventive purposes, the bolts securing its rear wall are removed. If necessary, the device is freed from accumulated traces of contamination. At the next stage, the Bendix fork and brushes 2112 are checked for physical wear. If any are found, replacement is made.
There is no point in postponing this procedure until later. With further operation there is a high risk of damaging the traction relay. After this, all elements are returned to their place. The rear cover of the starter is closed, and the immediate repair of the starter solenoid relay begins.