Perhaps one of the simplest procedures is adjusting the clutch on the VAZ 2110 and 2112. Anyone, even a novice driver, can do it. This may be necessary when working on removing the gearbox, as well as when the clutch drive malfunctions. Typically, this means increased wear on the friction disc. It is advisable to familiarize yourself with the features of the clutch drive on this car model before carrying out work. This way you can make diagnostics and settings much easier for yourself. Even for a beginner, the process takes a minimal amount of time, so there is no point in visiting a car service center for this.
How to adjust clutches on a VAZ-2112 with your own hands: video inside
One of the most basic elements of any transmission, including the VAZ-2112, is a mechanism designed to transmit torque from the crankshaft to the gearbox - the clutch. And after a certain mileage with the clutch drive, certain problems may arise.
The video below describes in detail the process of adjusting the clutch on a VAZ 2110-2112:
Peculiarities
Clutch adjustment on VAZ 2110 and 2112 is done without much effort. This is due to the characteristics of the drive. Here it is cable-based, which helps to avoid additional work on bleeding the clutch and checking various additional indicators. The cable is located in a protective casing and is attached at one end to the pedal, and at the other end to the clutch fork using a swivel joint. If the discs are worn out, the pedal travel increases. Wear of the cable (pulling) leads to a decrease in stroke, or incomplete engagement/disengagement of the clutch.
Clutch diagnostics
In order to understand that there is something wrong with the clutch drive, YOU do not need any special skills!
As a rule, they manifest themselves in the form of extraneous noise, creaking while the car is moving, and also when the clutch pedal is pressed.
If such facts exist, it is necessary first of all to carry out diagnostics and first adjust the clutch pedal. Despite the seemingly complicated course of work from the outside, you can carry it out yourself. How to do this correctly is written below in our article.
Tool
To make adjusting the clutch easier, you need to prepare the following tools:
- Jack.
- Wheel chocks.
- Set of socket wrenches.
- Hammer and punch.
- Ruler.
- New clutch cable.
As a rule, work on adjusting the clutch pedal is accompanied by replacing the cable. Since the old cable will be significantly worn out, making adjustments will only be easier.
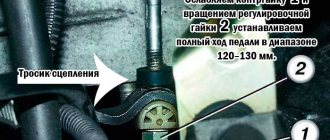
The maximum permissible values for the clutch pedal travel on the VAZ-2112 should be no more than 160 millimeters, at its maximum values. And ideal readings should vary between 120-130 millimeters. This distance (from the mat to the edge of the clutch pedal - approx.) can be easily measured using a regular ruler, without any help with your own hands.
Step-by-step procedure for adjusting the clutch pedal on a VAZ-2112
Before starting work, make sure that the car is on a level surface, wheel chocks are placed under the rear wheels, and the car itself is with the hand brake on.
It is also recommended to disconnect the negative terminal from the battery.
- First of all, we check the travel distance of the clutch drive; to do this, we apply a ruler perpendicular to the floor and the pedal rod. If the readings are 160 millimeters or more, then adjustment for the pedal is a must.
We evaluate the measurement result.
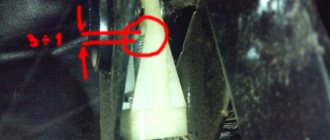
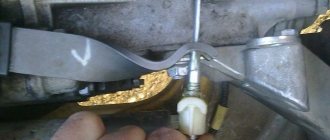
The numbers indicate two nuts.
How could you understand that if you tighten the first nut and unscrew the second, then the pedal stroke will increase, not decrease.
- When adjusting the nuts is carried out, periodically check the pedal travel by pressing them 3-4 times at each approach, and then take the measurements again.
- When you reach the desired distance in the free travel of the clutch pedal, tighten the nuts as close to each other as possible, thereby creating a locknut effect.
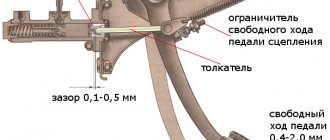
- Next, slide the restrictive sleeve made of rubber into the fork until it stops, after which we check all cable connections and close the hood.
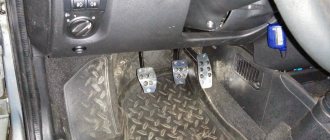
Pedal travel
This is where the whole process begins. The factory manual states that normal travel is about 13 centimeters.
Nut and locknut
But over time, the parameter increases as the driven disc lining wears out. This leads to the fact that the pedal rises slightly. Measuring the indicator is not difficult.
- Open the door leading to the driver's seat in the cabin.
- Squat down so you are close to the pedals.
- Place a regular ruler on the mat under the pedal, positioning it perpendicular to the clutch pedal.
- Measure the distance from the mat to the extreme point of the pedal, that is, the maximum distance.
- If the indicator is 16 centimeters or more, this indicates an urgent need for adjustment.
To complete the work, you will need certain tools, for example, 13mm wrenches (2 pcs.). It is better to drive the car into the inspection hole. This will make it easier to do all the work.
The location of the clutch cable is the bottom of the pedal. Even a beginner can easily find it. How to adjust the pedal depends on how much travel it has. The length of the cable should be 12-13 cm. True, it can be increased to 16 cm. The pedal should “walk” in the range of 12 to 16 cm. If the travel indicators have different values, then adjustment of the VAZ 2110 clutch pedal travel is required .
VAZ 2110 clutch problems and where they come from
The design has a number of disadvantages. The drive cable tends to stretch, and the friction linings wear out. Inevitable processes lead to breakdowns and failures, which provokes the need to adjust the device.
Clutch slipping
Disc slippage often occurs due to wear. Fine tuning of the drive prevents the parts from closing tightly, which causes slipping. A clear sign of this is difficulty shifting gears and a decrease in vehicle dynamics.
Jerks at start
The next obvious sign of a breakdown is jerking during sudden acceleration. Here, the root of the problem may be hidden in wear of the clutch, loose release, or stretching of the cable.
There is increased noise
Typically, driving a car is accompanied by increased noise for a number of reasons.
- Releaser wear. The device may make a lot of noise when changing gears.
- Crunching sound when trying to put the gearbox in position. Here the reason is incomplete opening of the disk with the basket. The mechanism is not disconnected and the load is partially transferred to the gearbox. If you try to drive the lever in this position, you can damage the gears.
Clutch not fully disengaging
A standard problem that makes it difficult to shift gears. The friction disc does not disengage, which causes difficulties during operation. In this case, the gearshift lever may refuse to enter the position.
Eventually
In conclusion, it should be noted that there are some “homemade” ones who specifically move the release bearing away from the basket, explaining their actions by the fact that in this way they will be able to extend its service life. However, they will have to be disappointed - the bearing is unlikely to become more durable, but the petals of the diaphragm spring will gradually be milled by the untwisted bearing race. And, please note, we are not discussing the discomfort from increased pedal travel, which can result in much greater expenses than purchasing clutch elements.
vote
Article rating
Diagnosis of clutch faults
You can check that the clutch is working properly like this.
- Put the car on the handbrake.
- Move the gearshift lever to the neutral position.
- Start the engine.
- Engage the gear and slowly release the clutch.
As a result, the car should stall. If this does not happen, the clutch needs to be adjusted.
Reasoning about alternative regulation
Before adjusting the clutch on a VAZ 2110 in the traditional way, let’s think about how justified it is, and whether there is any point in using an alternative option. According to reviews from many owners of “ten” cars, and not only them, the clutch control pedal is quite high from the floor. The inconvenience that most drivers get used to is actually quite significant.
The driver gets tired during the trip, he wants to change gears less and less, each time lifting a heavy boot. This affects not only the speed of movement, but also the condition of the transmission. Experienced drivers assure: when the clutch pedal is released, it should be positioned so that it can be depressed without lifting the heel from the floor. It’s not without reason that on UAZs and Gazelles, where adjustment is impossible, experienced drivers place a piece of board under the mat.
The classic adjustment order indicates data that ensures the clutch disengages with a large margin. As a result, by fully depressing the pedal, the driver forces the bearing to bend the diaphragm spring much more than is technically necessary. As a result, it loses its characteristic properties, and at critical moments it simply breaks. And it doesn’t matter that you chose a branded clutch kit - everything is subject to the laws of physics.
Method for alternative clutch drive tuning
Experienced car enthusiasts prefer to make adjustments individually for each set of coupling parts. The event does not require an assistant or special equipment:
- Start the engine, depress the clutch and engage reverse gear. On almost all VAZ models it does not have a synchronizer, so the disks are completely disconnected.
- Slowly release the pedal and simultaneously engage and disengage reverse gear.
- The moment the speed is switched on is manifested by vibration on the shift knob. If the setting was made according to the official factory instructions, then the start of activation will correspond to a distance of the pedal from the floor of 75-100 mm.
- Set the cable length so that the “grasping” moment corresponds to 20 mm from the floor to the top edge of the pedal.
After we adjusted the clutch on a VAZ 2110 in this way, the clutch pedal in the initial position is much lower than the brake pedal. This allows you to instantly switch the toe of the boot without raising your foot to the handlebars. Early activation greatly simplifies the process of driving a car; gears are engaged smoothly and without jerking.
Do-it-yourself clutch adjustment on a VAZ 2110
The design of the clutch mechanism of injection or carburetor “dozens” with 16 valves is absolutely identical to the mechanisms installed on 8-valve cars.
At the same time, the operating principle of the unit is based on the use of a mechanical cable, in contrast to classic machines that use hydraulics. The main advantage of the system is the ease of adjustment and repair. To perform the operation, you do not need to drive the car onto stands or an inspection pit - all manipulations are performed at the top of the engine. Precise calibration consists of tightening the drive cable and setting the required pedal position.
Note for drivers
If you keep your foot on the clutch release pedal for a long time, then the clutch will quickly burn out and you will have to change it:
- This truism is often violated by new drivers.
- This does not happen due to forgetfulness, but simply driving a car with the clutch half depressed is more convenient and much easier
- That is why for most car enthusiasts, clutch failures became the reason for their first repair, a new car
- The clutch operation must be checked before each trip to a driving school, and the diagnostics performed often indicate the need for urgent repairs; malfunctions are usually associated with replacing friction discs
How to finally adjust the clutch on a VAZ 2110
You can check that the settings are correct as follows.
- Warm up the engine to operating temperature.
- Engage the rear position of the gearbox. If the transmission “sticks” without difficulty, you can start moving.
- When accelerating the car, the acceleration proceeds smoothly, parallel to the increase in speed of the power plant.
- All gears work the same when reset to the bottom and top without any extraneous noise, squeaks or knocks.
If all conditions are met, the setup is complete.
Device and purpose
The clutch mechanism is the main transmission mechanism; it allows us, without stopping the engine, to move smoothly and change our intensity of movement, changing gears on the fly. All passenger cars use exclusively single-plate friction clutch mechanisms with hydraulic or mechanical drive. A mechanism that is located outside and inside the basket casing, which is bolted to the flywheel, and consists of the following parts:
- Flywheel
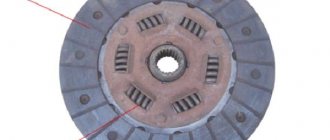
- Driver and slave and discs (friction linings on the driven disc)
- Springs that press the drive plate against the flywheel
- Clutch fork
- Release levers
- Push coupling
- Release bearing
- Clutch pedal and pedal shaft
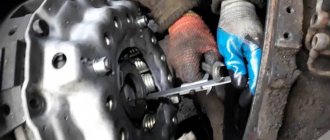
Replacing the clutch cable of a VAZ 2110
The simple procedure goes like this.
- Disconnect the release fork fastening.
- Using a 10mm wrench, unscrew the adjusting nut mounting bracket.
- Using “dancing with a tambourine”, unscrew the screw connecting the cable to the pedal inside the cabin. The second way is to dismantle the frill and wipers to gain access to the inspection hatch. From here the entire line can be easily removed.
- The next step is to remove the entire line through the interior.
- Installing a new cable is performed in the reverse order.
Specialization : Graduated from the State Automobile University, worked for 20 years at GAZ-56, now I drive a Zhiguli.
Source
Adjustment
The clutch cable is located under the corresponding pedal and goes to the fork located on the gearbox. Finding it is not a problem, even for an inexperienced car enthusiast. The need for adjustment is determined by the pedal travel. Ideally, it should be within 12-13 cm, it can be increased to 16 cm. That is, the pedal stroke can vary from 12 to 16 centimeters; for any deviations, adjustments must be made. This is done as follows:
- If the pedal is raised by more than 16 centimeters, it is necessary to make an adjustment;
- To do this, open the hood and find the clutch cable. We are interested in the nuts located on it. It is advisable to treat them with WD-40 and let them stand for 5-10 minutes, this will avoid problems with unscrewing them;
- We are setting up. To do this, unscrew the lock nut with one of the keys, and use the other to make adjustments. By screwing the adjusting nut towards the tip, the pedal stroke increases; by unscrewing it in the opposite direction, the indicator is reduced. At the same time, do not forget to measure the progress in the cabin;
- When you move the pedal 13 centimeters, you should sharply press it 3-5 times. After which, the measurement is repeated. If the move goes wrong, you need to repeat the setup procedure;
- The last step is to move the rubber bushing until it stops.
When taking measurements, you can make an allowance of a couple of millimeters. If its stroke is more than 17 centimeters, then you need to think about repairing the basket, or rather, replacing the clutch disc.