Despite the fact that this model of the Zhiguli car has been out of production for quite some time, the issues of its operation and especially repair have not lost their relevance, since a huge number of “sixes” continue to travel along Russian (and not only) roads.
The simplicity of the design of the VAZ 2106 and the relatively high operational reliability of mechanisms, components and assemblies suggest a fairly long period of its use. These same qualities allow the owner of the “six” to carry out repair, restoration and adjustment work without the use of special, and therefore expensive, equipment and tools. In addition, this process does not require the car enthusiast to have specific knowledge and skills.
All of the above fully applies to the clutch adjustment procedure, which is, in fact, an adjustment performed in accordance with certain rules, as a result of which the specified gap values are introduced between the elements.
Clutch adjustment on a VAZ 2106
How to adjust the clutch pedal travel on a VAZ 2106 is quite a pressing question. To cope with this, knowing the required values of the gaps between the moving parts of the clutch cylinder, it will not be difficult to make a similar adjustment of the VAZ clutch with your own hands, you only need to have the following tools:
- wrenches for “10”, “13” and “17”;
- pliers;
- emphasis;
- ruler.
Signs of an incorrectly adjusted clutch on a VAZ 2106
Often, if the clutch is not adjusted correctly, the following problems may occur:
- When the clutch pedal is depressed, the engine is only partially disconnected from the transmission and the car begins to jerk. This happens due to insufficient separation of the disc from the basket.
- Gears do not shift; this may occur in conjunction with the above problem.
- The pedal is very hard or it falls out completely, and the gears do not change.
- The car accelerates too slowly or does not respond at all to sharp pressure on the gas pedal.
Clutch adjustment process
Clutch adjustment on a VAZ 2106 occurs as follows:
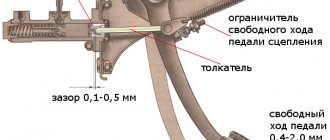
- The gap between the pusher and the piston is set in the range from 0.1 to 0.5 mm. The gap is set using a nut on the clutch pedal travel limiter. To do this, you will need to loosen the locknut by screwing in or out the limiter. After setting the gap to 0.4-2 mm, the limiter must be tightened again with a lock nut. All this work is carried out from inside the car under the steering column.
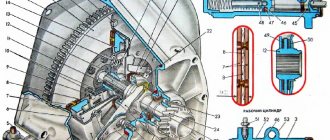
Mechanism structure: 1 – main cylinder body; 2 – bypass (compensation) hole; 3 – fitting gasket; 4 – fitting; 5 – lock spring washer; 6 – piston of the main cylinder; 7 – sealing ring; 8 – pusher piston; 9 – hook; 10 – pedal axis; 11 – bracket for clutch and brake pedals; 12 – clutch pedal servo spring; 13 – clutch pedal release spring; 14 – clutch pedal travel limiter; 15 – clutch pedal; 16 – piston pusher; 17 – protective cap; 18 – retaining ring; 19 – inlet; 20 – sealing ring (ring valve); 21 – piston bypass hole; 22 – working cavity of the cylinder; 23 – spring; 24 – gasket; 25 – cork.
Clutch pedal free play limiter
The process of adjusting the limiter is shown
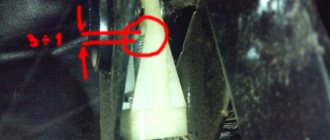
- To ensure smooth operation of the clutch, you need to adjust the free play of the fork pusher. It should be 4-5 mm. To carry out this procedure, you will need to remove the spring and install a ruler along the pusher. After this, mark the minimum and maximum travel of the fork pusher. Calculate the stroke in millimeters. If there are deviations, then adjustment is required. This is done by tightening or loosening the nut on the pusher.
Clutch mechanism, components: 1 – clutch release bearing; 2 – ball joint; 3 – clutch release fork; 4 – pusher; 5 – adjusting nut; 6 – lock nut; 7 – tension spring; 8 – housing plug; 9 – fitting for bleeding; 10 – cylinder body; 11 – sealing ring; 12 – protective cap; 13 – piston; 14 – seal; 15 – plate; 16 – spring; 17 – support washer; 18 – retaining ring.
Adjustment nut and locknut offset
The normal clutch pedal travel is 25-35 mm. It is worth clarifying that the adjustment process itself is not simple and can take quite a lot of time. When performing any action, try to be extremely focused.
Source
Clutch replacement
Please note that it is imperative to install new clutch basket mounting bolts. On old ones, the threads already have minor deformations, therefore, the connection will be very unreliable. The price of all elements will be approximately 2000-2500 rubles.
If you prefer foreign-made units, it will be more expensive. However, it is worth wondering about a simple truth: the service life of imported ones is sometimes shorter than domestic ones, and the price can be twice as high. Why pay extra money? And in general, if the price of a car is 20-40 thousand rubles, why invest a lot of money in it?
But let's return to the replacement procedure. Unscrew all the bolts from the basket, remove it and the clutch driven disc. Install new elements in the same way, but tighten the bolts, do not tighten them. It is advisable to look at the condition of the crown before installation. If it is deplorable, then you should immediately install a new one.
In stores, its price is about 200-250 rubles, which is not very expensive. But you can reduce the cost of repairs by simply removing the crown, heating it and installing it on the reverse side. But you will have to buy a new one if this procedure was previously performed.
Pay attention to the VAZ 2106 clutch fork; if it is damaged, be sure to replace it. A new release bearing is installed in any case. You can apply CV joint grease to it, for example. This can slightly increase its resource.
Almost finished, all that remains is to take the guide sleeve and install it in the hole of the clutch disc. Without removing the shaft, tighten all the basket mounting bolts crosswise. Do not allow distortions, otherwise the clutch will not work correctly and its service life will decrease.
That's all, the clutch replacement was completed successfully, now all that remains is to assemble the car. But here no difficulties will arise, since all the actions are the opposite of those that were described in detail in this article. If you also need to replace the brake fluid in the drive system, then read on.
Clutch mechanism of a VAZ 2106 car
A device with the simplest design that ensures the engagement of the power plant and gearbox. The mechanism is primitive, which makes its repair and maintenance as accessible as possible for the average motorist.
Description of design
Here are the elements:
- clutch pedal;
- master cylinder;
- pressure main;
- working cylinder;
- clutch fork.
Inside the structure there is a special liquid that ensures the transfer of impulse from the pedal to the fork.
How does the clutch drive work?
- The driver presses the pedal.
- The master cylinder piston, connected by a hinge to the pedal lever, forces fluid through the cylinder, creating excess pressure inside the line.
- The oil passes through the pressure line and enters the working cylinder.
- Next, the piston is pushed out and the clutch fork moves.
- The mechanism comes out of the hook and the motor is disconnected from the gearbox.
The principle of operation is the same for all modifications and versions. Some car enthusiasts install a dry clutch. The actual difference is only in the working element - the classic one contains liquid, the dry one contains a cable.
Clutch failure
Among the most common “diagnoses” of auto mechanics are:
- Breakdown of the head or working cylinder seal. Liquid flows out of the system, causing it to become airy.
- The pressure line is clogged or coked. The problem is a consequence of using counterfeit oil or not replacing it in a timely manner.
- Mechanical damage to the fork or working cylinder. The parts are located at the bottom of the car. Typically, users can damage the mechanism when driving over off-road roads or curbs.
- The easiest problem is the spring stretching or falling out of the mounting groove.
Symptoms of malfunctions
Problems arising from improper clutch adjustment.
- The car jerks. This means that the disc does not move far enough from the basket and that when the drive is pressed, the motor is not completely disconnected from the gearbox.
- The gears don't want to turn on. The symptom that arises in the above problem is similar.
- When you press the gas pedal hard, the car does not respond or accelerates too slowly. Jerking may also occur during steady driving.
- The clutch pedal is falling/too hard and the gears will not engage.
Frequency of setting
The VAZ-2106 clutch pedal free play is adjusted if the value exceeds 2 mm. If the pedal has a very long travel and there are dips, then it is necessary to correct the position. Until you adjust the mechanism, the clutch will not function properly.
If there is play in the mechanism, the driven and driving disks will not be able to disconnect from each other. If you notice that the pedal has sank, you will need to reset the free play. Set the gap between the clutch fork and the slave cylinder. The play should not exceed 5 mm. To evaluate the free play of the fork located near the gearbox, you need to move it in different directions and measure the displacement distance.
A working cylinder is installed near the gearbox, on which there should be no brake fluid leaks. If the boot is damaged or the tightness of all connections is broken, the mechanism must be replaced.
When is clutch adjustment necessary?
- Pedal dips - when you press, you feel your foot drop to a certain level.
- Loss of elasticity under pressure.
- The car begins to move at the beginning or end of the pedal stroke.
- Loose lever or complete lack of working play.
- Difficulty shifting gears.
- Slipping of the clutch disc during acceleration and braking of the car.
Other deviations in the normal operation of the gearbox unit and unit are also acceptable.
Clutch adjustment options
If it is necessary to adjust the mechanism, the machine begins to behave inappropriately. The pedal sinks, changing gears becomes more difficult, jerking and jerking appear.
There are factory recommendations that establish strict tolerances for backlash.
What pedal stroke is considered normal?
In the correct position and in fully working order, the movement of the pedal until the mechanism disengages is 2.5-3.5 centimeters. The reference standard is established by the manufacturer and is considered a recommendation value.
Some car enthusiasts reconfigure the system to suit themselves, adjusting it within the range of 45-55 mm.
How to measure your car's pedal travel
Experienced craftsmen recommend measuring the stroke like this.
- A ruler is applied to the pedal at an angle of 90 degrees.
- Next, note the pedal height in centimeters.
- Press the lever until it stops.
- Make a mark on the ruler.
Measure the difference in values; normally, free play is limited to 25-35 mm.
Frequency of setting
There is no strictly established time interval for servicing the mechanism. The manufacturer insists that clutch adjustment is mandatory after performing any repair and service work related directly or indirectly to the device.
- replacing the clutch disc/basket;
- pumping of highways;
- installation of new cylinders.
Measuring the free play of the pusher
You can also adjust the pedal travel by adjusting the working cylinder, which is installed near the gearbox. Before adjusting the VAZ-2106 clutch slave cylinder, you need to make sure that its rod has a large free play. To take measurements you need to take a few simple steps:
- Disconnect the return spring that is installed on the clutch fork. This will allow you to get rid of unnecessary resistance when setting up.
- Position the ruler so that its edge is at the end of the pusher.
- Press the fork all the way down. You just need to do this with your hands, you don’t need to use any additional devices.
- Lock the clutch fork in the depressed position.
- Measure the free play of the fork using a ruler.
Setting up the VAZ 2106 clutch
You can check whether the clutch position on a VAZ 2106 is set correctly in this way.
- Place the car in neutral and warm up the engine to operating temperature. With the engine running, without touching the accelerator lever, turn on the “R” position. The response to the action should be a smooth movement of the lever without extraneous sounds or excessive force.
- During the operation of the car, all gearbox positions work clearly, there are no crashes, squeaks, or crunches.
- During sharp acceleration, the increase in engine speed is proportional to the acceleration. If the clutch disc slips, the engine starts to spin up without a manual transmission.
How to remove the clutch slave cylinder
Before you begin repairing the clutch cylinder, it will have to be removed from the vehicle. Here's what you need for this:
- pliers;
- set of spanners;
- set of socket heads;
- empty container for brake fluid;
- rags.
Sequence of operations
It is most convenient to remove the clutch cylinder in the inspection hole. As an option, an overpass is also suitable. If the driver has neither one nor the other, it will not be possible to remove the cylinder. The work is performed in the following order:
- The cylinder return spring is removed manually.
Video: removing the clutch cylinder on a “classic”
How to properly bleed the clutch on a VAZ-2106
The sequence of the operation is as follows.
- Drive the car into a pit or put it on trestles. Securely secure the car.
- Clean the expansion tank and bleeder fitting from dirt. The latter is located on the working cylinder.
- Open the RB cover.
- Check that the fitting can be unscrewed and put a pre-prepared hose on it. Place the other end of the tube into the waste container.
- The assistant sits behind the wheel and pumps up the pressure 4-5 times by pumping the pedal. At the end you need to pinch and hold it.
- Next, the shut-off fitting is unscrewed and the liquid, along with the air, goes into a container for draining the waste. At the same time, you need to monitor the oil level in the RB and add it if necessary.
- When the bubbles are completely released, the fitting closes.
- To eliminate any remaining air in the line, it is recommended to repeat the operation 2-3 times.
Checking and replacing the hose on the clutch cylinder
The hose on the clutch slave cylinder is an extremely critical part that is exposed to high brake fluid pressure. Therefore, the car owner must monitor its condition especially carefully.
The clutch cylinder hose is a very important part, the condition of which must be carefully monitored
Here are signs that indicate that the hose should be changed urgently:
- cracks and other mechanical damage visible to the naked eye have appeared on the hose;
- the hose looks intact, but there are visible leaks of brake fluid on it (this means that it is still damaged and microcracks have appeared on it, which the driver simply cannot see);
- The threads on the hose ends are partially or completely stripped.
If you notice any of the above, the hose should be replaced immediately. It is better to install standard VAZ clutch hoses, their catalog number is 2101–16–025–90, and the cost is about 80 rubles.
Hose replacement sequence
Before starting work, you should stock up on an empty plastic bottle and two open-end wrenches: 17 and 14 mm.
- The car is driven into the pit and secured with wheel chocks. Open the hood and find the place where the slave cylinder hose is screwed to the clutch hydraulic tube.
- The main hose nut is held firmly with a 17 mm wrench, and the fitting on the hydraulic tube is unscrewed with a second wrench - 14 mm. After unscrewing the fitting, brake fluid will flow out of it. Therefore, there should be a container in the inspection hole to collect it (a small basin would be the best option).
- The second end of the hose is unscrewed from the working cylinder body using the same 17 mm wrench. There is a thin O-ring in the cylinder under the hose nut, which is very often lost when removing the hose . This ring should also be changed (as a rule, new seals come with new clutch hoses).
- A new hose is installed in place of the old one, after which a new portion of brake fluid is added to the hydraulic system.
So, even a novice driver can change the working cylinder on a six. All you need to do for this is to carefully prepare the necessary tools and strictly follow the above recommendations.
We change the clutch with our own hands without removing the transmission
- Place the machine on a viewing hole or a lift and securely secure it to prevent it from rolling away.
- Disconnect the cardan and slave cylinder from the gearbox.
- Remove the protective cover of the mechanism and the traverse.
- Unscrew the box cushion.
- Using your hands or using a lever, push the gearbox housing away from the power unit until it stops. For insurance, you can install a support under the box.
- Next, you will need to unscrew the 6 bolts securing the basket from the flywheel.
- The box basket needs to be moved all the way and the clutch disc pulled out through the resulting gap.
- Similarly, slide the basket back and remove it.
- The last step is to dismantle the release fork and remove the bearing of the same name from the gearbox input shaft.
- Installation of new parts is carried out in reverse order.
Work under the car
This is perhaps the most difficult part of the entire repair, since there are many more steps to be taken here. So make yourself comfortable and proceed to the following operations:
- Unscrew the last (lower) nut securing the starter and remove it. This nut is the nastiest, since it is difficult to get to it using simple wrenches; you will need to use a socket, a ratchet and a cardan. True, it was possible to work with an ordinary open-end wrench installed in the end.
- Unscrew the suspension bearing mount.
- Disconnect the cardan and rear axle flange. Hold the bolt head from turning with a 12mm open end wrench.
- Apply sharp blows to the driveshaft to dislodge it from the rubber coupling on the transmission shaft. Move the cardan to the side.
- Unscrew the mounting of the pillow, install a support under the gearbox.
- Remove the slave cylinder from the clutch fork. Be careful not to lose the bar underneath and the spring.
- Remove the speedometer cable.
- That's all, now all that remains is to unscrew the four bolts that secure the box to the engine block.
Remove the gearbox carefully, try to move it as far as possible from the engine block. The fact is that you can damage the VAZ 2106 clutch drive disc. And this is quite easy to do.
If we take nines and newer VAZs as an example, then the clutch drive discs on them are more reliable and durable. It is advisable to set the gearshift lever to the position corresponding to the third speed.
Pro Tips
Experienced auto mechanics recommend following the advice.
- When pumping, only high-quality fluid should be used.
- Operations related to the clutch must only be carried out cleanly. Dirt entry is unacceptable.
- It is recommended to check the clutch settings every 3-4 months of active use. The maximum permissible deviation from the working position is 10% of the range width.
Specialization : Graduated from the State Automobile University, worked for 20 years at GAZ-56, now I drive a Zhiguli.
Source
How to repair a clutch slave cylinder
Before describing the cylinder repair process, a few words should be said about repair kits. The vast majority of problems in six cylinders are related to leaks. And this happens due to wear of the cylinder sealing cuffs. Cuffs can be purchased individually or as a set.
Experienced car owners prefer the second option. They take the kit, disassemble the cylinder and change all the seals in it, regardless of their degree of wear. This simple measure significantly increases the service life of the wheel cylinder and ensures that there are no brake fluid leaks for a long time. The repair kit for the “six” clutch slave cylinder consists of a protective cap and three sealing collars. Its catalog number is 2101–16–025–16, and it costs about 100 rubles.
For repairs you will need the following tools:
- pliers;
- open-end wrench 8 mm;
- rags;
- flat screwdriver;
- vice.
Repair sequence
It will be extremely difficult to perform all the operations listed below without a normal bench vice . If they are, then you need to do the following:
- The clutch cylinder, removed from the car, is clamped in a vice so that the air valve is on the outside.
- Using an 8 mm open-end wrench, the air valve is unscrewed and inspected for wear and mechanical damage. If the valve shows even minor scratches or abrasions, it should be replaced.
- After unscrewing the valve, the vice is loosened, the cylinder is installed vertically and again clamped with the vice. The protective cap must be on the outside. This cap is carefully pryed from below with a flat screwdriver and pulled off the stem.
- Now you can remove the pusher itself, since nothing else holds it.