Lada Vesta became the new flagship of AvtoVAZ in 2015. External design, interior and equipment began to differ radically from all previous models. For the first time in many years, the new product was able to compete with the most popular foreign cars from Europe and Asia. Moreover, Vesta is not inferior to them in quality, and in some cases can give them a head start.
Why does the clutch pedal click on a Lada Vesta - the degree of danger and the design of the assembly module
Design
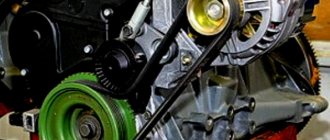
The situation in which the box clicks when you release the clutch on the Lada Vesta or squeeze it in is typical for products from both companies. Experts assure that extraneous clicks are regarded as a defect. But apart from acoustic discomfort, they will not bring serious problems such as, say, bent valves due to untimely replacement of the timing belt on the Lada Vesta engine.
Clutch
The design diagram of the unit links the work of several structural units:
- Basket.
- Driven disk with friction linings.
- Hydraulic drive.
The basket part consists of a pressure plate with a friction insert and a diaphragm spring mounted on its body. The latter is bolted in the amount of six pieces to the engine flywheel. The driven part is located between the pressure plate and the flywheel. When the pedal is released, the discs are engaged and transmit torque from the engine to the gearbox.
Drive part
The structure of the hydraulic drive includes the following elements:
- Main cylinder.
- Pipelines.
- Working cylinder.
- Expansion tank.
It is noteworthy that the design does not provide forks. The working cylinder and the release bearing are connected in one housing and represent a single part with its own article number:
- 21810160118001 – manual transmission VAZ.
- 306201586R – Renault gearbox.
For your information . You can find out the manufacturer of the gearbox by the VIN number.
Mechanism design
Structurally, the clutch on the VAZ 2114 consists of a total of 15 elements. Namely:
- Main shaft bearing having rollers;
- Clutch protection housing;
- Fork support bushing;
- Switch, also known as bearing;
- Press disk;
- Pressure spring;
- Secondary disk;
- Flywheel;
- Scale;
- Gearbox main shaft;
- Second bushing-switch;
- Carter;
- Plug switch;
- Fork toggle switch;
- Flywheel mounting bolt.
The clutch design on the “fourteenth” model cannot be considered very complex. In practice, you need to know four main points from him:
- Clutch with one disc brake;
- Type dry, closed;
- The driven disk has a device that dampens vibrations;
- The pressure spring is diaphragm.
Total
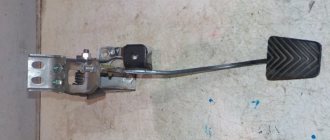
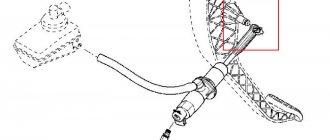
If it clicks when you release or squeeze the clutch of a Lada Vesta in the cabin, the reason may be in the limit switch, pedal support or hydraulic cylinder design. Knocks in the engine compartment are more serious - the dealer is less likely to refuse to find out their cause, since this may indicate a malfunction of important parts - springs, release bearings, working cylinder.
As a temporary solution to a serious knock, drivers use the accelerator. You need to get used to this: when the clutch is released, the driver applies more gas and the knocking disappears. Typically, such actions indicate defects in the release support guide.
With a working engine, an impeccable gearbox, and a new chassis, the car will not go anywhere without a clutch. On the Lada Vesta this is one of the most important components. The task of a mechanical clutch is to connect the internal combustion engine and manual transmission, transmitting torque from the engine to the chassis, and also to separate them when changing gears (if you leave the gearbox input shaft rotating through the internal combustion engine, the gears will inevitably be damaged).
The Lada Vesta clutch on a manual transmission (mechanical) consists of one disc, engagement is made mechanically (dry, permanently closed type), the drive is hydraulic. The latter means that the unit is driven by fluid pressure and is adjusted manually (by foot) by the driver. In addition, the fluid system acts as a pedal booster. After all, simply pressing with your foot is not enough to set in motion the structure, which engages with the shaft while rotating several thousand revolutions. Therefore, there is no need for hydraulics on an AMT. Read the article to the end and you will learn the intricacies of this knot! Find out the problems that often happen and the clutch drive fails: the release bearing or the basket as a whole is broken. It's time to change, or adjust enough, precise adjustment is important for good operation of the unit. Replacement at the dealer at 9 TO.
Clutch replacement on Lada Vesta cars under warranty
You can replace the clutch on a Lada Vesta under warranty. A similar procedure can be carried out when the car breaks down during the first 20,000 kilometers. If it is proven that neither the driver nor third-party manipulations are involved in the malfunction of the unit, the service center will carry out repairs free of charge. After the replacement, the brakes will also be bled. This is a mandatory process for a hydraulic drive, since after the intervention air cavities (plugs) are formed in the system. For a robotic gearbox, another manipulation is carried out - adaptation.
Under warranty: replacement of the clutch mechanism is also included in the list of TO9 works for the Lada Vesta. Even if the unit is working, it will have to be replaced. There is no need to worry about this; the life of the part has come to an end anyway, and it will not last long.
Difficult to diagnose on a cold car
As luck would have it, on the day of the service visit it was cool, and the car, left overnight in the cold, refused to twitch. During demo runs with a warranty engineer in the passenger seat, I was able to generate only moderate vibration during braking.
The engineer agreed that there was a problem and said that the clutch was to blame. He also said that my appeal on the website could help convince AvtoVAZ to make a replacement, but the problems needed to be demonstrated more clearly. Otherwise, the Zhigulists might not have believed it.
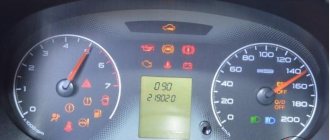
For the demonstration, it was necessary to shoot a video of the car jerking. The first video is a view of the dashboard from the interior during vibrations. The second video is driving with the hood open.
And this is what Rituska and I came up with:
This video had to be sent by mail or brought on a flash drive. The second option seemed more reliable to me. So they did not have the opportunity to refer to the fact that the letter “did not arrive.”
A repeat visit to the dealer was supposed to take place after the clutch arrived. It was supposed to be delivered in about two weeks.
Analogs
The manufacturers themselves recommend 826818 VALEO 2180 for Vesta. Owners note that when using the model, the pedal becomes noticeably softer and the car starts easily. The note applies to the original set; fakes are often found. The spare part costs four thousand eight hundred rubles.
The original part of the Lada Vesta is not suitable for the 21129 engine in terms of power; it is designed for lower speeds, for example, such as 2112. For 106 horsepower and above, TS-00001321 would not be a bad match. Price – five thousand six hundred rubles.
Signs of clutch failure
The occurrence of malfunctions in the Vesta clutch mechanism is most often associated with improper operation (inexperience of the driver, aggressive driving style), an initial defect in the part, or breakdown of other components interacting with it. Of course, you will immediately notice problems with the clutch - the car will begin to behave differently:
- Gears are difficult to shift/do not work at all;
- Pedal too soft/hard;
- The car jerks;
- The device is activated in the upper position of the pedal.
There can be many reasons for this behavior of Vesta, and not all of them are related to the intermediate part between the internal combustion engine and the gearbox. Often the problem comes from the fluid system. There may be a malfunction of the brake master cylinder, clutch slave cylinder, damaged hoses, a simply low DOT4 level or an air lock. Such problems (especially problems with the cylinder of the unit) have exactly the same effect as the failure of the entire unit. The clutch consists of a housing cast together with the drive/pressure plate (basket) and the driven disc. The release bearing of the Lada Vesta acts on the petals of the basket, which, in turn, with the help of damper springs, press the inner disk away from the flywheel - the clutch opens. The bearing moves either under the influence of the hydraulic pedal drive (manually) - manual gearbox, or from the actuator (automatically) - manual gearbox. These parts can fail: more often - the release mechanism, less often - the basket body. Let's take a closer look at the most common “breakdowns”.
The problems get worse and it becomes impossible to drive
I planned to solve all the problems with the box before the May holidays, so that I could go to Riga without hassle. It didn't work out.
The already painful nine-hour wait in traffic jams at the border was aggravated by the fact that every start of the heated car was accompanied by the most disgusting shaking. We were really afraid of getting stuck at the border at night with a broken box.
By nine thousand kilometers, manipulating the gas at start stopped helping. As a result of this, the car was guaranteed to twitch when starting from a standstill. Moreover, the jerking appeared when driving in reverse. And they were so strong that before parking I had to take the girls out of the car so that they would not hear the obscene language with which I was commenting on what was happening.
Starting uphill or with the wheels turned completely out also caused strong vibrations. In general, it was impossible to operate the car.
Clutch does not fully engage (slips)
Usually the Lada driven disc is to blame. Either it is worn out, or deformed, or oil has gotten on its friction linings (the oil seal has leaked, it was installed poorly). Less commonly, the cause is broken petals or wear of the left pedal.
It makes no sense to replace the device in parts, since replacement work is considered one of the most expensive. Car service centers recommend changing the entire set: the pressure plate, the pressure plate assembly with the housing, the release bearing.
The clutch does not disengage (drives)
Often, the Lada mechanism does not fully release due to the hydraulic clutch release. This could be due to poor drive adjustment, leaking fluid system, or cable wedge. Such breakdowns are easily eliminated. It is much more difficult when one of the elements of the main device breaks down.
If the mechanism does not completely disengage, it means that something is holding it: a deformed driven circle, the formation of dirt, rust in the spline joint, flywheel wear, as well as a change in the shape of the release fork, weakening of the pressure plate. In all cases, the disk will need to be replaced.
Jerks when starting off
If you notice that the movement is accompanied by twitching, this is a serious reason to seek help from specialists. The Lada Vesta can shake for various reasons (for example, ignition failures), but if it is the clutch mechanism that gives the effect, we are talking about scrap parts. Obsolescence will never be accompanied by jerks, but destruction, the breaking off of pieces of metal, manifests itself this way. The presence of freely moving debris can cause great damage to other Vesta nodes. It is recommended to carry out repairs immediately.
Fast and Furious is messing up and the second conversation with AvtoVAZ
Two weeks after my previous visit to the service, I did not have any information about the clutch that appeared. In the end, I called Forsazh myself and found out that the clutch had arrived a long time ago and the manager simply forgot to call me. But they can only sign me up a week in advance, because the work is “long and complex for the whole day” (quote). In total, I waited three weeks for something unknown. The clutch for the best-selling car should have been available in a warehouse in the region. Damn the service!
On a wave of indignation, I decided to contact AvtoVAZ again and complain about the operation of the afterburner. I also asked them about the situation with replacement cars during repairs and all that. But this call had no consequences.
Noise when disengaging or engaging the clutch
The Vesta device is considered to be turned off when the pedal is lowered to the floor. It is always on when the driver's lever is in the free position - the internal combustion engine transmits torque to the transmission.
A noise similar to rustling, grinding, a slight hum, or howling appears when the unit is turned off. When turned on, it disappears. With almost one hundred percent probability we can say that the release bearing has worn out. Replacing it does not require removing the entire component. However, its untimely replacement leads to failure of the entire mechanism. A squelching, whistling sound when you press the pedal is associated with wear on the master or slave cylinders. There is pressure, the broken part does not hold it - the liquid breaks through further, making noise. The noise in the box disappears only when the clutch is disengaged.
The second type of sound is constant, disappears only when the gear is disengaged, and is located in the area of the gearbox. The nature of the “tinkling” of Lada Vesta is a weakened connection between the three main nodes.
The worn driven circle loses its volume and begins to dangle inside the housing. Worn dampers are not able to press the circle tightly. The box is not tightly connected to the engine. Replacing the clutch on a manual gearbox
The procedure is very complicated. The main difficulty is not even that the gearbox needs to be completely removed, but that during assembly it needs to be centered in weight with the flywheel. Repairs can be done with your own hands. But if you do not have the proper experience, saving is not worth it, because we are talking about direct contact with the most important “organs” of the Lada. In general, the process looks like this:
- We de-energize Vesta, remove all attachments that block access to the gearbox mounting bolts (air filter, pipes);
- To prevent the loose internal combustion engine of the Lada from falling, we will hold it with a small diamond-shaped, barrel jack;
- We unscrew the power fasteners so as not to drain the oil, dismantle the box assembly with drives;
- We loosen one by one, then unscrew the fastening elements of the engaging mechanism housing (the bolts here are strong, but small in diameter, you need a good 8mm wrench). We remove the part and find the defect;
- We install the new product, adjust the position of the driven circle inside with a special tool;
- We change the release bearing in the box housing;
- Smoothly, without tilting, the input shaft of the gearbox hits the flywheel splines;
- We check the operation of the drive.
Not all operations are described here. For example, in order to remove the gearbox with drives, it is necessary to dismantle the suspension arms and so on.
The connection mechanism between the box and the engine is a “vitally” important element. Like any detail, it loves careful handling and timely service. The mechanism is directly connected to the internal combustion engine and gearbox; prolonged use of a faulty part can damage these two components. Do not neglect any suspicions that a unit is malfunctioning. May the car serve you for a long time.
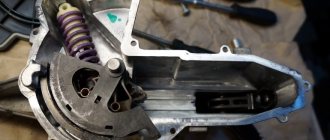
I encountered strange clicking noises on Vesta. When you press the clutch pedal in the cabin, a click is heard in the pedal area.
The bushing is most likely plastic
0 0 Answer rating: 0
Removing gearbox 21807
1. Place the car on a two-post lift, apply the parking brake, turn off the ignition, open the hood and disconnect the earth wire terminal from the battery.
2. Remove the front wheels from the car.
3. Unscrew thirteen bolts 1 of the fastening and remove the mudguard 2 of the engine (replaceable head 10, knob and extension).
Engine splash guard:
- fastening bolt;
- engine splash guard
4. Disconnect the pipes of the intake resonator 1 from the air intake and the air filter housing, unscrew the two fastening bolts and remove the resonator (replaceable head 10, knob).
Intake resonator:
- intake resonator;
- air filter pipe;
- air intake pipe
5. Unscrew the fastening clamp 1 and disconnect the upper hose 3 of the crankcase ventilation from the pipe of the cylinder head cover 7 (pliers).
Air filter with intake pipe hose assembly:
- clamp for securing the upper crankcase ventilation hose;
- intake pipe hose clamp;
- upper crankcase ventilation hose;
- intake pipe hose;
- air filter mounting bolt;
- air filter;
- cylinder head cover
6. Loosen the fastening clamp 2 and disconnect the intake pipe hose 4 from the throttle pipe (a Phillips screwdriver).
7. Unscrew bolt 5 securing the air filter and remove air filter 6 assembled with hose 4 of the intake pipe (replaceable head 10, knob).
8. Press down the buttons 2 of the cable end clamps and disconnect the ends of the shift cable 4 and gear selection cable 5 from the gear shift mechanism 6 levers.
Disconnecting the transmission control drive cables:
- cable sheath fastening clamp;
- button for securing the cable end;
- bracket for fastening gearbox control drive cables;
- gear shift cable;
- gear selection cable;
- gear shift mechanism
9. Move the clamps 1 fastening the cable sheaths in the direction indicated by the arrow, remove the cable sheaths from the fastening bracket 3 and remove the gear selection and shift cables from the work area.
10. Disconnect harness 4 of the ignition system wires from the block of harness 1 of the oxygen sensor wires.
Disconnecting the diagnostic oxygen sensor wiring harness:
- oxygen sensor wiring harness;
- oxygen sensor wiring harness mounting bracket;
- oxygen sensor wiring harness block mounting bracket;
- ignition system wiring harness
11. Disconnect the harness block 1 of the oxygen sensor wires from the mounting bracket 3, remove the oxygen sensor wiring harness from the mounting bracket 2 and remove the harness from the work area.
12. Disconnect the ignition system wiring harness connector from reverse light switch 4.
Disconnecting the bracket for securing the outlet hose from the gearbox:
- mounting bracket bolt;
- outlet hose mounting bracket;
- radiator outlet hose;
- reverse light switch
13. Unscrew bolt 1 of bracket 2 securing the outlet hose (replaceable head 13, knob).
14. Unscrew the two fastening bolts 1, remove the clutch hydraulic drive cylinder 2 without disconnecting the hydraulic drive tube 3, and hang the cylinder on the service hook (replaceable head 13, ratchet wrench, service hook).
Removing the clutch hydraulic cylinder:
- bolt;
- clutch hydraulic drive cylinder;
- clutch hydraulic tube;
- bracket for fastening the hydraulic clutch cylinder;
- Transmission;
- clutch release fork
15. Unscrew three bolts 1, remove bracket 2 for fastening the hydraulic clutch cylinder, remove starter 3 and hang it on a service hook (replaceable Torx E10 head, extension, ratchet wrench, service hook).
Removing the starter:
- bolt;
- bracket for fastening the hydraulic clutch cylinder;
- starter
16. Unscrew the fastening nut 1, remove the ground terminal 2 from the stud and remove the wire from the work area (replaceable head 17, knob).
Disconnecting the ground wire from the gearbox:
17. Unscrew plug 1 and drain the oil from gearbox 3 (ring key 17, installation type 24164 “ALFA” (Italy) for collecting used oil).
Hole plugs for changing the oil in the gearbox:
- oil drain plug;
- oil filler plug;
- Transmission