Fog lights are not required equipment on a car. However, their presence will make travel more comfortable and safe. Installation does not require special skills. Installing and connecting the PTF to the wiring is quite feasible at home. To do this, you will need an installation kit for connecting fog lights, simple plumbing tools and insulation.
Rules for installing fog lights
Like most automotive equipment, fog light devices must be installed and located correctly, in compliance with the specified standards.
The traffic rules say that fog lights can only be installed in a quantity of two.
They should be located:
- No more than forty centimeters from the side surface of the vehicle (along the outside of the headlight);
- At least twenty-five centimeters from the road (along the lower edge of the headlight);
- The light gaps of the fog lights must be below the upper edge of the light-transmitting opening of the low-beam headlights;
- The visibility angle of fog lights, within which they are not cluttered with vehicle components, should be: +15–10 degrees in the vertical direction, +45–10 degrees in the horizontal direction.
Anti-fog units should only be connected together with the dimensions. When there is no space on the car for such headlights, you need to choose it.
What are fog lights for?
The vehicle's standard headlights provide sufficient visibility in clear weather. However, in bad weather it is of little use. The problem is that the rays of the low and high beam lamps are reflected from drops of fog or snowflakes, creating a “white veil” in front of the car.
This is a consequence of two factors:
- narrow optical beam is better reflected from the surface;
- Highly mounted headlights highlight areas with a high concentration of fog droplets.
PTFs are specially designed for operation in severe weather conditions. And this is not about yellow filters, which some drivers consider a panacea in foggy weather. It’s not for nothing that traffic regulations allow the installation of PTF in two colors - white and yellow.
These headlights cope with bad weather thanks to a couple of important properties:
- Width of the light beam . A wide beam is less reflected from water and ice and does not create a “white veil”.
- Mounting height . The concentration of fog near the ground is lower. Therefore, the low location allows illumination under the veil.
The last point is especially important. If you install the PTF at the level of the headlights, they will not cope with their task.
In addition to the front PTFs, which improve visibility from the driver's seat, rear fog lights are used, duplicating the dimensions. They clearly identify the car in poor visibility conditions, but are excessively bright. Therefore, they should not be turned on in clear weather.
DIY installation and connection
Self-installation of fog lights begins with creating a connection algorithm. A carefully designed plan helps eliminate unnecessary wiring and ensures the electrical chain functions smoothly.
It is recommended that installation work be carried out in a garage, but most car owners carry out installation operations outside.
Initial stages of installation
First, the main panel is removed - there are two light bulbs for the stove regulator. They will not affect the operation of the fog lights in any way, but at the same time their wiring will be needed in the future.
- To find a two-pin socket, you need to run your hand along the cord until it ends.
- It is of great importance, since this is where the first contact on the relay will be placed.
- Then the cord is connected to the stove backlight socket, and the rest of it goes to an isolated button for connecting the fog lights.
Connecting contacts
How are these headlights connected through the relay further? To ensure that the system has 12V voltage from the side lights and the eighty-fifth contact, a cord is routed to the relay. Then the eighty-seventh contact under the pedals is pulled to the automatic transmission.
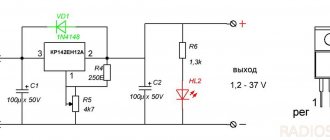
How to properly connect fog lights via a relay?
- The instructions contain pins 30, 85, 86 and 87.
- They, according to the algorithm, are connected.
- A fifteen-amp fuse is installed here.
- In addition, it is recommended that it be located next to the generator.
- Then the eighty-sixth contact. Everything is easy here - it connects to the body.
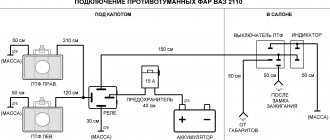
Instructions - how to connect fog lights via a relay and a button using the example of a Chevrolet Niva
As can be seen from the diagram above, to connect the fog lights you will need:
You will also need some tools for the job: screwdrivers, a sharp wire stripper and electrical tape.
We carry out the work of installing and connecting fog lights via a relay and a button in the following sequence (let's look at the example of a Chevrolet Niva):
- Determine the location of the relay. Since this component is small in size, it can be easily hidden behind the dashboard.
- Determine the location of the PTF on/off button ;
- We measure the length of wires required for connection;
- Next, we stretch the copper wire from pin 30 to the battery (+), after installing a 10 Amp fuse in a convenient place;
- We connect the fog lamp button to pin 85 and install it in the selected location. As a rule, the front PTF button is installed in place of the standard buttons, where the plug is located;
- Relay contact 86 is connected to ground in any convenient place;
- We install fog lights. Manufacturers have made sure that those owners who wish to install fog lights do not invent a “bicycle”. The front bumpers of the Chevrolet Niva have special niches for this purpose, which are closed with plugs. In order to remove them, you need to unscrew the screws on the inside of the bumper. We insert the headlights and look at the wire markings.
- We supply the positive wire to them from pin 87, the negative wire from the car body;
- We are testing.
About wiring
Now we need to deal directly with the fog lights. It’s no secret that only 2 cords come out of any headlight (“+” and “-”, respectively). The latter is connected to the body, that is, it is a mass. Then it is lifted onto the relay so that the wiring is not visible, and is connected to the battery.
This procedure is quite simple, so even a novice car enthusiast can handle it.
Video
The wiring diagram for installing fog lights is shown in a video filmed for the “Car Lover” channel.
If your profession involves frequent car trips, or you simply like to travel, then you probably know that without good optics it is quite difficult to guarantee driving safety. At this point, even the shortest trip should not be undertaken without good anti-fog equipment. Such optics are now installed on almost every car as standard.
Installation of PTF in the front panel and adjustment
There are three installation methods:
- Into standard holes;
- On the outer bracket;
- In a closed bumper, not intended for mounting headlights.
Customization is done using a homemade template. It is mounted perpendicularly at a distance of five meters from the car headlights. The adjustment is carried out until the upper edge of the light spot coincides. The compliance boundary is placed 100 mm below the height of the central part of the lamps.
Adjusting the fog lights ensures better visibility for the driver and reduces the likelihood of blinding oncoming drivers.
Advantages of functional lighting equipment
Fog lights allow you to partially relieve the strain on the driver's eyes during a forced trip in difficult weather conditions. With their help, it is possible to achieve better illumination of the road surface. The greatest importance of headlights lies in the precise supply of light, which determines the illumination of the road.
Precisely adjusted devices illuminate up to 10 meters of space in front of the car, which is quite enough for safe driving in difficult weather conditions. Of course, for this you will need to adhere to a certain speed limit. The headlights are adjusted during the installation of the equipment. The quality of road lighting depends entirely on the setting of the angle of incidence of the light flux.
We recommend: Self-installation of the Starline alarm system is the right decision for the car owner
Installation of PTF in a blind panel
The most difficult and energy-consuming method is considered to be the method of installing fog lights in a solid bumper (i.e., not containing production sockets for this):
- The panel is removed from the vehicle in accordance with the repair and use manual.
- The best location for mounting headlights is determined in terms of frame configuration and compliance with standards.
- A hole is drilled for the headlights. The best method is to make gaps around the perimeter and cut out the holes with a saw. The gap is then adjusted to ensure better contact between the frame and the art frame. Small parts and fragments of the bumper are carefully removed with a construction or stationery knife.
- Gaps are drilled for the fog light frame, which is secured with suitable screws.
- The headlight is installed in the frame and a protective gasket is mounted. It is attached to the plastic panel.
- The headlight is adjusted using a special key, which is included in the kit.
Installing PTF on the outer bracket
Method of fixing fog lights to a metal bracket:
- The boundaries of fixing the bracket to the panel are marked in accordance with the standards for installing fog lights. Usually additional headlights are placed on the bracket.
- The bracket is screwed to the bumper with screws or self-tapping screws.
- They are installed on the fog lamp fixation points and the wires are connected.
Installation of PTF in standard holes
To install a headlight in a panel containing standard holes, do the following:
- The front part of the vehicle is raised by placing a wooden beam 150-200 mm high under the tires. For comfortable operation, the machine is placed on a lift.
- The protective shields covering the bottom edge of the panel are removed.
- The fasteners of the standard bumper plugs are unscrewed.
- The fog lamp is inserted into the guides and secured with standard screws.
When using headlights that are not the original version, discrepancies in dimensions and mounting points may occur. In this situation, you need to adjust the components to each other.
Relay for turning on low and high beam headlights - where is it located and how to replace it?
- There should be two fog lights themselves - no more and no less.
- They should be installed at a distance of no more than 40 cm from the edge of the side marker diffuser and no lower than 25 cm from the level of the road surface. Most modern cars have standard places on the bumper for installing PTF.
- If fog lights are not included in this package, plugs are installed in their place, which are easily removed and PTFs are installed in their place.