To remove the element, simply unfasten the rubber retainer
Insert a new one in its place, secure it with a clamp and connect all the pipes in the reverse order, using new clamps.
The new part is inserted into the niche in place of the old one and secured with a clamp
On VAZ 2110 and 2114 cars, disassembly and installation of a new part are carried out in the same way. The only difference is the location of the tank.
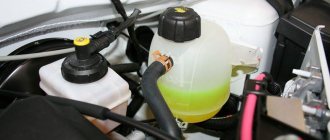
To add antifreeze to a level between the Min and Max marks on the tank wall without creating an air lock in the system, disconnect the tube from the throttle valve heating unit (this is the highest point of the cooling circuit). Pour liquid into the tank until it runs out of the removed tube, then put it on the fitting and secure it with a clamp. Add antifreeze to the required level.
Before pouring antifreeze into the system, you need to remove one of the pipes connected to the throttle valve block
During the replacement process, you should pay attention to the condition of the hoses leading to the container. If their ends have become soggy and increased in diameter, and cracks have formed on the walls, it is better to change such pipes.
Video: replacing the tank on a VAZ 2110
Installation of an expansion tank from Priora
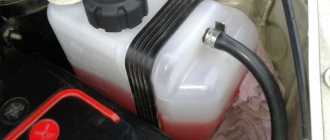
The capacity of the engine cooling system of the VAZ 2170 is distinguished by thicker walls, thanks to which Priora has forever gotten rid of the “childhood disease” of a bursting tank inherent in the VAZ 2110. There is another reason: in the standard tank of the “tens”, a stream of antifreeze from the radiator pipe hits from the inside directly into the lid , which is why the latter leaks. On the “Prior” part, the fittings are at an angle to the neck, so liquid does not get there.
The tank fittings from the VAZ 2170 are directed away from the filler neck
Since the part from the VAZ 2170 is wider than the standard element, its installation is associated with some difficulties: the tank will not simply fit into the narrow space between the glass and the partition. What should be done:
- Remove the windshield wipers by unscrewing the mounting nuts.
Remove the upper body panel.
In order for the wide element from Priora to fit into a narrow opening, you will have to remove the partition trim
Expansion tanks for Priora come in two types - with 2 and 3 fittings (the first are installed on a car with air conditioning). You need a second type of part to connect three hoses.
Installation of pipes and filling of coolant is carried out using the technology described in the previous section. As for modifications of the VAZ 2114-15, where the expansion vessel is located in a wide niche in front of the pillar glass, such a replacement will not cause any difficulties.
Video: tank from Priora on a VAZ 2110
The work of replacing the expansion tank on machines of the “tenth” family should be done independently if you want to save personal time and money. A trip to a car service center will take longer and cost more. At the end of the procedure, do not forget to check the operation of the cooling system by warming up the engine to operating temperature and turning on the electric fan.
First of all
Try replacing the cover with a new one or using a known working one for the duration of the test.
Notice how much the tank swells. If it is not significant and it is clear that it is not due to excess pressure, and you are the owner of a VAZ 2110-12, then you should not worry too much, since this is considered the norm for such cars.
The fact is that new tanks for such cars have a finless design and are made of plastic, which does not hold its shape very well, so over time they begin to swell.
Expansion tanks from Lanos, Priora, Nexia have proven themselves well; they are often installed instead of VAZ ones.
If the tank swells strongly and ruptures, even after replacing it along with the lid, then pay attention to the following points:
- Does the coolant boil?
- What color is the oil in the engine crankcase?
- Are there gases from the combustion chamber in the tank?
- What is the pressure in the cooling system;
- The quality of the tank itself.
How to replace the expansion tank with a new one
If the expansion tank on your VAZ 2112 is out of order, there is only one way out - replacement. Let us briefly describe this simple procedure that you can complete in just 15 minutes of your personal time.
- 1. Partially drain the coolant into a clean container using the drain plug on the radiator in sufficient quantity to easily remove the empty tank.
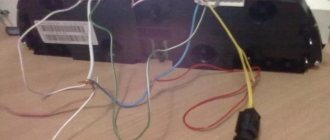
- 2. Loosen the clamps of the steam exhaust and filling hoses and fold the communications of the cooling system of the VAZ 2110 (2112) to the side.
- 3. By disconnecting the fastening clamp, you can remove the VAZ 2110 expansion tank from the hood.
The reverse installation is similar and should not cause you any difficulties. Do not forget to add coolant to the tank according to the marks indicated on the tank. In order to get rid of air, it will be enough to let the engine run for several minutes at high speeds.
Gases in the expansion tank
The presence of gases in the expansion tank indicates that the cylinder head gasket has burned out, all signs of this problem. This is one of the main reasons why it can become bloated.
Burnout of the gasket could occur due to overheating of the engine, unless, of course, the time for its overhaul has arrived, since it is at 150 - 250 thousand km. mileage the service life of this gasket is calculated.
But there is an important point here - the reservoir will not expand if the valve in the roof is working properly, since excess pressure will still be released, but the engine will overheat. But, if the flow of gases is very strong, then the valve will not have time to release the pressure and the tank will eventually swell and even rupture.
In order to detect the presence of gases in the cooling system, you must:
- Visually inspect the coolant in the barrel with the engine running and make sure there are bubbles or not. If there are bubbles, then the gasket is most likely broken.
- A more accurate method is to use a gas analyzer. The device will accurately indicate the presence of gases.
- Use balloons or similar (well, you get the idea). The ball is placed on the neck of the tank and tied tightly with threads. You need to start the engine when it is cold, before the heated coolant begins to expand greatly. If the product inflates quickly, it means that exhaust gases are entering the cooling system, this is only possible through the cylinder head gasket.
- Check engine compression. If the car's mileage is not very high, then the compression should be normal, since the cylinder-piston group has not yet worn out. But if the cylinder head gasket is broken, the compression meter will show readings below normal.
You can also check in the area of which cylinder the gasket is broken. To do this, you need to supply air under pressure into the cylinder through the spark plug hole, while the tank cap must be removed.
If the cylinder head gasket is broken, bubbles will be visible in the tanks and air hissing.
The pressure in the cooling system is checked using a 3 atmosphere pressure gauge. To do this, you need to make a tee and connect the device to it.
Start the car and observe the readings. Readings of more than 1.5 atmospheres should already be alarming; 2 – not every barrel can withstand it.
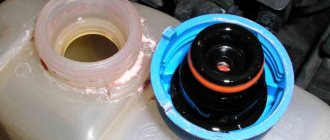
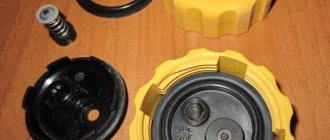
Modernization of the valve cover of VAZ 2110 (2112)
With a high probability, the expansion tank of the VAZ 2112, as well as in the 2110 model, fails precisely because of a malfunction of the valve built into the lid. Some motorists take a radical approach to solving the problem by drilling a hole in the traffic jam. But this is not entirely correct, since it causes “airing” of the cooling system.
You can slightly reduce the maximum pressure and the difference in the degree of vacuum relative to the ambient pressure, for which you will need to disassemble the plug and adjust the operation of the valve. This way you guarantee reliable operation of the tank due to more gentle pressure levels. This method is also suitable if the valve fails and urgent repairs are necessary.
The design of the valve is extremely simple. It works due to the force of two springs. The larger one is responsible for the outlet, and the small one for the inlet. Cut 1 turn on the larger spring, and two turns on the small one. Thus, the bleed valve should now operate at about one-third the nominal pressure (about 100 kPa).
Coolant boiling
If antifreeze (antifreeze) boils, make sure:
- Does the radiator fan work and when does it turn on? The sensor may be faulty;
- Is the thermostat working? The coolant constantly moves in a small circle, thereby not cooling;
- Is the pump working?
- Is the cooling system, including the radiator, clogged?
- Is the system airy?
- Is the valve on the lid working properly? Low pressure in the system can cause premature boiling of the antifreeze.
As for airiness, for example, in VAZ 2110, 2111, 2112, from the experience of their operation, the system practically does not become airborne due to its special design.
In other cars, when replacing the coolant, an air lock may end up in the stove and, over time, make itself felt by overheating the engine and burning out the cylinder head gasket. It is important to monitor the instrument readings.
What is needed for replacement
When carrying out the disassembly process, you must first let the engine cool down, because uncooled liquid will certainly spill or drip onto your hands, and a burn will occur. Specialized equipment and any conditions are not needed; these include an inspection hole. To make the work comfortable and of high quality, choose a bright room with a flat surface, and if the replacement is carried out in winter, it is advisable that it be warm.
Tools required for installation/repair:
| pliers or pliers |
| wrench set |
| foot or hand pump with a nozzle pointed at the end |
| container for antifreeze |
| rags (rag made of special material) |
| crosshead screwdriver |
| unused clamps |
| sandpaper |
We use sandpaper to sand the rough surface of the inlet holes until it becomes smooth, which is necessary for a better fit of the nozzles.
Oil color
If a gray-white emulsion is found in the engine crankcase, it means that coolant has entered the oil, and its level will decrease and the oil level will increase.
This could happen due to a burnt-out cylinder head gasket, but this is not a fact; additional diagnostics need to be carried out here.
As a rule, first the cap is changed, then the reservoir, and only then, if the latter still inflates, the cylinder head gasket, if necessary. But it is important to understand that you need to replace the cover with a known good one, now a lot of defective ones are produced.
Location of expansion tank
A plastic reservoir for excess coolant is installed by the manufacturer in different places depending on the model of the “tenth” family:
in cars of the VAZ 2110-12 series, the reservoir is located on the left side (in the direction of travel) between the pillar glass and the wall of the interior partition;
The expansion tank on VAZ 2110-12 models is installed in a narrow niche on the driver’s side
In cars of the 2114-2115 series, the tank is located in front of the pillar
The expansion tank is attached to the body elements with a clamp in the form of a flat rubber belt with a metal hook that hooks onto a protrusion on the side member. There are 3 hoses connected to the tank:
- A large diameter pipe leading from the thermostat is connected to the bottom.
- The upper tube of small diameter goes through the partition to the radiator of the cabin heater.
- The middle small tube connects the tank to the upper fitting of the main cooling radiator.
The reservoir compensates for the expansion of coolant and steam from three elements of the system - the cabin heater, the radiator and the main line near the thermostat
On some modifications there is a reservoir with two fittings and connecting pipes - the large one comes from the thermostat, and the small one from the main radiator; there is no connection to the stove.
Each hose performs a separate function. The thick pipe serves to expand the coolant and fill the system while pouring antifreeze through the neck of the tank. Two thin tubes are designed to drain the steam-water mixture from the stove and the main radiator into the tank when heated to the maximum permissible antifreeze temperature of 95 ° C.
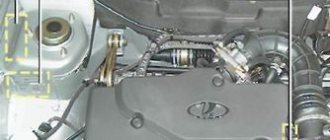
The expansion tank (item 1) is located at the highest point of the cooling system at the same level as the throttle valve
Checking the quality of the tank
To do this, you need to plug the drain hole in the tank, tighten the caps tightly and connect a pressure gauge to the circuit. Air is supplied under pressure by a compressor.
During the test, it is checked what pressure the tank holds and at what stage the valve operates.
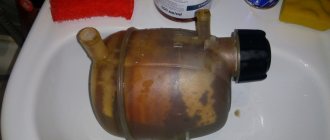
What does he look like?
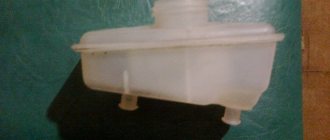
Externally, the expansion tank is a plastic container. Liquid is poured inside this container, which is directly involved in cooling the engine.
The design of the element includes hoses closed in a circuit, a float sensor built into the lid or plug of the tank. Whichever is more convenient for you. It is this sensor that transmits information about the current coolant temperature. When the permissible values increase, the corresponding warning light lights up on the dashboard.
Complete structure
Where is he located?
To replace a damaged container, you first need to determine where it is located.
The location of the expansion tank is the engine compartment on the driver's side, right behind the pillar glass.
Such an arrangement in the VAZ 2110 certainly cannot be called successful, since there are metal elements on all sides of the plastic tank. Because of this, problems arise with the expansion of the plastic, sometimes the tank simply bursts.
Depressurization of the tank occurs especially often in the summer, when there is intense heat outside. The manufacturer, represented by AvtoVAZ, took this problem into account when developing new models. And the owners of the “ten” have to put up with this arrangement of the tank.
Container location
Let's look at each of them
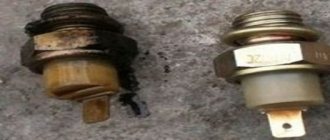
The problem may arise with the valve plug - the cover may simply jam. Since its main purpose is to remove steam, if the lid breaks, excess pressure occurs inside the tank. This situation is quite capable of leading to the tank simply bursting. It is important to remember that if the cover jams while driving, do not turn off the car engine. Stop driving and wait for the cooling fan to start operating.
Another problem may be simple wear of the neck thread, which in most cases leads to either the inability to tighten the lid or a leak in the seal. Of course, you can temporarily use a seal, but it is still more advisable to completely replace the entire expansion tank.
A malfunction of the expansion tank may also be detected, such as a leaky connection between the pipe and the tank. This problem can be solved by using a special sealant.
Well, and finally, the most “conspicuous” problem is the actual damage to the tank itself. It doesn’t matter what caused this problem: manufacturer’s defects, natural wear and tear of the material, or rupture as a result of increased pressure, in any case, only purchasing a new expansion tank can correct the situation. On the Internet you can find advice on gluing or sealing a vessel, but it is hardly advisable to do so, because the price of the part is not so high.