The Lada Largus washer reservoir is one of the components of the glass cleaner system of a domestic station wagon, which plays an important role, but often goes unnoticed in everyday use.
The Lada Largus washer reservoir acts as a battery, which stores a supply of windshield washer fluid for the windshield and rear door glass.
On older cars, the washer reservoir was made in the form of a rubber bag. This significantly reduced the cost of production and simplified the design. Only in more modern cars did they begin to use a plastic tank for washer fluid.
What you need to know when replacing a windshield washer
Maintaining the windshield washer system does not require much effort, but it is better to monitor and service it regularly to prevent blockages, traffic jams or ice from appearing in the winter. Important to remember:
- The system should be pumped periodically to remove air and water from it. This should be done before each new anti-freeze fill.
- There should always be a container with 3-4 liters of windshield washer fluid in the trunk to top it up if the reservoir is empty in the middle of the road.
- There is no need to fill the washer reservoir to the top. If the anti-freeze suddenly freezes, you should have room in the tank to add hot water, alcohol or anti-freeze concentrate to melt the ice.
- Antifreeze concentrate can be diluted if there is no serious frost or thaw outside, but the liquid and water should be mixed not in a tank, but in a separate container. This way you will protect the system from accidental incompatibility of components and will be able to control the concentration of the finished solution.
- If you accidentally poured low-quality anti-freeze into the tank, you should drain it completely. If you poured in a liquid with an inappropriate freezing point, you can simply add concentrate.
Replacement
If the old motor has failed, there is no point in trying to repair it somehow. To buy a new part, you will have to spend very little money. And the replacement procedure on most cars is extremely simple.
I will describe the main stages of work associated with replacing this element of the windshield cleaning system of any car.
Turning off the vehicle's power. A safety measure without which further work makes no sense. Be sure to remove the negative terminal from the car
It's simple but important. Otherwise, you not only risk burning the wiring, but also getting an unpleasant electric shock yourself. Search for a motor
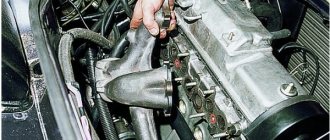
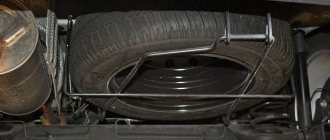
It all starts with identifying where your windshield wiper motor is located. It depends on your car. On some cars, just lift the hood and you will immediately see the washer reservoir. The motor itself is located on the reservoir (partially inside) of the windshield wiper, into which the liquid is poured. Do you see the tank? If yes, then you are in luck. If not, then you will have to look for it by removing elements of the engine compartment. On some car models, the tank is hidden so that the fender protection has to be removed.
- Disconnect the connectors with wires from the motor. Then remove the tank itself.
- The hose and fitting are separated from each other. Don't forget to drain the liquid. Filling a new one will not be difficult. Yes, and for prevention it won’t hurt to do it.
- Using a screwdriver, push the intake seal out of the bushing. This will allow you to completely remove the windshield washer motor.
- Don't forget to install a new bushing when reassembling. This often leads to the washer pump itself breaking down. So the old bushing goes to the landfill.
- Reassemble the assembly in reverse order. Here many craftsmen relax, because they consider the work done. In fact, reassembly causes more problems than disassembly. Advice from someone who made similar mistakes. That is, from me. Do not try to remember the location of parts unless you are confident in your memory capabilities. We got distracted by something, forgot, got confused. This happens to everyone, and there is nothing wrong with it. To ensure proper reassembly sequence, you can record, mark, or label the parts in the order in which they are removed. This will make it easier to put everything back together the way it was before.
The instructions are for informational purposes only, as the procedure may differ depending on the car model. Consult your machine's owner's manual for assistance. This is the best visual aid for self-repair.
There is nothing complicated in this work. Even the car owner who prefers to solve most problems with the help of a car service can easily cope with it. Repairs cost several hundred rubles and take a maximum of a few hours.
Thank you for your attention! Subscribe, leave a comment, share your own experience in repairs and don’t forget to tell your friends about us! They might also find it interesting and useful.
Where to start diagnostics?
If your car's windshield washer does not work, pay attention to the characteristic symptoms. The electric motor hums when turned on, but liquid does not splash from the nozzles onto the windows.
To check, just turn off the engine, turn on the ignition and switch the steering column switch to the windshield washer position. Most likely, the reason is clogged nozzles, a filter element, a flown off, kinked or burst hose.
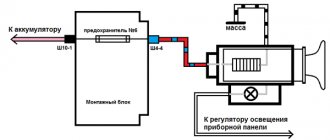
The windshield washer motor is silent when turned on. There is a problem with the pump, wires or steering column switch. If the fuse is good, proceed to diagnosing the power supply circuit.
The windshield or headlight washer pump requires + and – to operate. Depending on the connection diagram, when you move the steering column lever, one of the wires is shorted to ground or acts as a power wire (a + appears on it). Accordingly, the second wire is either constant + after turning on the ignition, or shorted to ground. The search for an open circuit or short circuit should begin with studying the electrical circuit.
How to set the washer spray correctly?
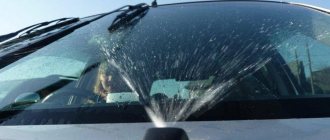
Safety directly depends on the cleanliness of the windshield, because due to insufficient visibility, you can miss a dangerous situation on the road. The most important role in the cleanliness of the windshield is played by the windshield washer and how correctly it is set. Most motorists adjust the direction of flow of water streams by eye, but this is wrong. Today we’ll figure out how to do this according to GOST.
️Where should the sprinklers be directed?
Popularly, windshield washer jets have received the comic name of sprayers. Most modern cars use two-jet nozzles, as they allow you to spray a larger area of the windshield. Not all drivers know how to properly adjust these jets and where exactly on the glass the contact spots of the jets with the windshield should be located.
To configure we will need:
️- electrical tape (blue, other will not work);
️ - a piece of wire with a diameter of 0.8 mm;
️ - flow direction diagram.
️Double nozzles
It is worth noting that many people use needles to adjust the nozzles, but manufacturers do not recommend doing so. As you can see in the image, the jets from the windshield washer must be directed strictly to certain places. Before you begin adjusting the injectors, you must make markings on the windshield. To do this, use a tape measure to find the points where the jets should be directed and mark them with pieces of electrical tape.
After marking, you can proceed to adjusting the nozzles themselves. It is more convenient to do this with an assistant, who, on command, will press the windshield washer lever. Your task is to use a thin wire to direct the streams to the places marked with electrical tape. The wire is inserted into the nozzle hole and moves slightly in the desired direction.
️ Triple nozzles
Some machines have triple injectors that are adjusted in exactly the same way. First we make markings, and then we adjust the injectors. Most cars have precise instructions for setting up injectors in their operating or repair instructions. However, some cars, for example, LADA Vesta, have non-adjustable injectors, and it would be better to replace them with ones that can be adjusted.
Source
Modernizing the trapezius row
It takes a lot of time to refine the trapezoid thrust. However, this will allow you to forget about water on your windshield forever. Proper modification of the trapezoid requires a little welding skill and special tools, and in this case there is no need to replace the windshield wipers.
- We remove the rod from the body; to do this, you need to do the following manipulations.
- Open the hood and remove the special plastic attachment where the base of the windshield wiper blades is hidden.
- Remove the plastic grille and hood seal.
- Be sure to remember the position of the brushes so that you can put them back correctly in their place, otherwise they will not work.
- We remove the leashes, to do this easily and simply, you need to pull them towards yourself, swinging them a little.
- We remove the plastic pads that are under the leashes.
- After this, you will see a pin from which you need to unscrew the nut and remove the washer.
- Be sure to disconnect the motor unit for the windshield wipers.
- On the lever we twist the nut and, accordingly, the washer.
- To easily remove the lever, you need to pull it up using two screwdrivers.
- Remove the rod from the lever joint.
Next, you need to mark the cut location on the removed rod. In order for the brushes to work normally, you should cut off 6-8mm of metal between the fastening of the rod itself and its bend, as mentioned above. After marking, you need to cut off all excess. Then you need to weld the pieces of rod into one and process the seam so that there are no irregularities. After this, the rod should be returned back and everything that was disassembled should be collected.
Reason for replacing windshield wipers
The main reason for replacing Renault Logan windshield wipers is their strange operation, which has long been classified as a generic “disease” of cars of this brand.
The fact is that most modern cars are equipped with a windshield cleaning system in which the windshield wipers work synchronously with the glass washer.
When the Renault Logan windshield wipers are on, they do not activate the washer; as a result, the glass is cleaned dry until the driver manually starts the device. Naturally, this creates certain inconvenience when driving, since the driver is distracted from the road, which can lead to the most disastrous consequences.
In addition, the design of standard wipers has another unpleasant feature - the blade sizes are the same for both the driver and the passenger. They are 55 cm. This length of the brushes does not allow them to completely clean the windshield of the car, since they simply do not capture the small part of it on which water accumulates. Fans of Renault Logan even gave this phenomenon a nickname, calling it pejoratively “snot.”
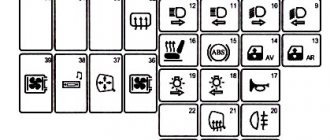
Fuse
The protective elements of the washer system are located on the left side of the dashboard, under the plastic cover, see photo:
Fuses numbered F01(20A) and F27(20A) are responsible for the operation of the windshield wipers and washers of the windshield window and tailgate, respectively. They need to be removed one by one and the condition assessed. Burnt out elements should be replaced with new ones.
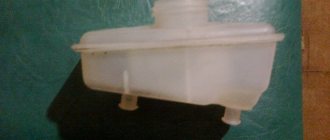
Lada Largus washer reservoir volume
The Lada Largus windshield washer reservoir has a volume of 4.7 liters.
For refueling in the warm season, it is permissible to use ordinary running water, but it is recommended to use either distilled water or a special summer windshield washer fluid.
When the temperature drops to +2 C, it is necessary to replace the summer windshield washer fluid with a special winter “anti-freeze” fluid. Or use a concentrate diluted with water. Otherwise, the summer fluid will freeze and may damage the reservoir, pipes or injectors.
However, the most common breakdown of this unit is the loss of its cover. This happens due to the breaking of the retaining plastic strip. But the cap continues to fulfill its role, but may be lost when the windshield washer fluid is added again.
For those who are faced with such a problem, the only way out of it is to replace the cover with a new one. Fortunately, there are no problems with its purchase and it costs little money.
To order online, you can use the article number:
Windshield washer reservoir cover for Lada Largus article number - 6001548742 It looks like this:
Dismantling
It will be much better if you remove the nozzle, as this will be more convenient for adjustment. This will also be useful if you just want to replace it with a new one. In order to do this, you must first remove all suitable hoses. There is a nut for fastening, you need to unscrew it and then calmly remove the washer.
If it gets hard, it’s better to spray in WD-40 and wait a little, as too much force can break the washer. Putting it back is more difficult and you need to be even more careful here than when removing it.
New injectors will cost you about 300 rubles, and for AvtoVAZ models you only need to pay 60 rubles. The price may be slightly different due to the brand of the car; of course, they will cost more for expensive cars.
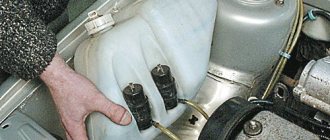
How to remove the washer reservoir on a Lada Largus?
When replacing the washer reservoir on a Lada Largus, many car owners wonder how to remove it. Everything is done relatively simply, but it will require a small amount of time, a standard set of tools and a place to carry out the work.
Note! If it’s frosty outside, it’s better to remove the washer reservoir in a warm place. Otherwise, you can ruin the plastic, as it becomes very fragile in the cold.
1. Remove the rubber hood seal approximately halfway. 2. Remove the clip securing the plastic frill on the right side. 3. Remove the hose from the holder and remove the right side of the lining.
4. Disconnect the wiring block from the washer pump by first squeezing the plastic lock.
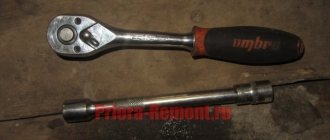
5. Using a 10mm wrench, unscrew the only bolt securing the washer reservoir to the car body.
6. Turn the tank over and remove it from the installation site, having first removed the hose seal from the groove in the body.
We install the tank in the reverse order.
Switch
The steering column switch can also cause washer failure. Over time, its contacts wear out and oxidize. If all previous checks have failed, you should look for a solution to the problem in the power lever. A new part is quite expensive, so it makes sense to revive the original switch.
To do this, you need to disassemble the steering column casing, disconnect the terminal and, unscrewing the retaining fasteners, remove the lever. Next, bend the latches, open the case and assess the condition of the contacts. Worn parts can be slightly bent to restore contact elements, and oxidized parts can be cleaned. Reassemble the switch in reverse order.
In order to encounter washer failure as little as possible in the future, it is recommended to follow simple rules. Before the trip, check the level of washer fluid, do not fill it with ordinary water in the cold season, and avoid getting debris and dust into the tank. After all, caring for any car is the key to its trouble-free operation.
Share this article with your friends:
How to choose the right antifreeze liquid
Antifreeze is a liquid based on water and alcohol, and the higher the content of the latter in the solution, the lower temperature it becomes (at 50% content it can withstand temperatures down to -30C). In severe frosts, therefore, liquid concentrate should be poured into the washer reservoir, and at -5-10C you can dilute the anti-freeze with water.
Today there are many windshield washer fluids on the market from various foreign and domestic manufacturers, with different chemical compositions and conditions of use. How not to make a mistake with your choice, buy an anti-freeze product with the required crystallization limit (freezing temperature) and not stumble upon a counterfeit product?
Read the labels on windshield washer fluid containers! It should indicate:
- crystallization (freezing) temperature – from trusted manufacturers on the packaging it is indicated for the concentrate with a margin of several degrees;
- kinematic viscosity - fluid fluidity and thickening conditions (thickened antifreeze clogs the nozzles);
- surface tension coefficient - the ability of a liquid to wet surfaces and impregnate dirt (the higher the better);
- surfactant content (surfactants) – the less, the better.
A separate and very important characteristic is the type of alcohol used in the solution. Ethyl alcohol is considered the highest quality and most expensive, the most popular is inexpensive and effective isopropyl alcohol, the most dangerous to human health and prohibited in legal production is methyl (methanol).