Comments: no Published: 03/16/2016
Rating:
Tags:VAZ 2110/2111/2112Low beam headlight adjustment
The vast majority of motorists are faced with the need to replace lamps on a VAZ 2110. Factory components sooner or later wear out or do not initially meet the driver’s requirements. This applies in particular to low beam bulbs, which may not suit the needs of motorists for several reasons. Such as:
- too dim road lighting;
- rapid wear, breakdown;
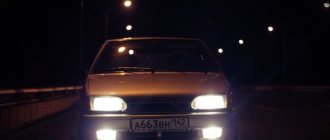
- inappropriate shade of color (for example, headlights with a white and bluish glow are well suited for driving during adverse weather conditions).
Since the driver needs to drive with low beam both at night and during the day, the bulbs in the system become unusable relatively quickly.
Low beam headlights on a VAZ 2110
If the low beam lamps on a car break down, according to the law, it is urgently required to replace it - for driving in the dark without the lamps on, you will face a fine. In addition, it is unsafe for you and other road users.
In order to choose which types of low beam lamps are suitable for installation on a VAZ 2110, you need to understand how the electrical circuit of your “ten” functions. The following components are connected to it:
- light switch, located in your car on the panel at the front of the car;
- headlight mode switch, which you can find on the steering column;
- relay for switching the modes of lamps located between the high and low beam bulbs;
- fuses (4 pieces), which are located on the installation block and ensure the operation of the light electrical circuit;
- signal lighting that notifies the motorist that the high beam is operating.
For the VAZ 2110, as well as models 2111 or 21124, it is important to choose lamps that will illuminate the road and prevent eye fatigue when driving in the dark.
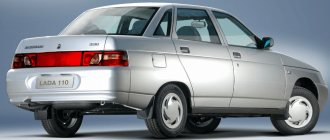
Optics for VAZ 2110
What kind of light bulbs are in the PTF VAZ 2112?
Lamps used in Lada 112 hatchback VAZ-2112 cars
| Light device | Quantity, pcs | Lamp type |
| Front marker light | 2 | W5W |
| Front direction indicators | 2 | PY21W |
| Front fog lights (depending on configuration) | 2 | H3 or H1 |
| Side direction indicators (depending on configuration) | 2 | W5W or WY5W (yellow bulb) |
Removing the parking light and turn signal
So, first of all, open the trunk lid and open the “window” with Velcro in the place shown in the picture below:
As you can see, there is one nut that needs to be unscrewed. After this, you need to unscrew the self-tapping screw from the side with a screwdriver, with which the casing is attached. It is enough to do this in one place, as shown in the photo below:
And we move it back slightly to gain access to the remaining nuts securing the rear lights.
Now you can start unscrewing the two nuts that secure the lamp:
And then from the back side, you can carefully, without making excessive efforts, pull the lantern so that it comes out:
Since at first we did not disconnect the block with wires, we can do this now:
At this point we can consider half the work done. Now let's move on.
Removing the reverse light and brake light
First, with the trunk open, remove the power plug from the board, as is clearly demonstrated below:
Now all that remains is to unscrew the two nuts, which are clearly visible in the picture below:
And also, as was done in the previous description, we take out the flashlight from the back side. The central pad may be slightly in the way, but you don’t have to remove it if you act carefully:
If necessary, we replace it, and installation proceeds in the reverse order. What can we say about the cost: at the moment, a set of rear lights for a VAZ 2110-2112 is about 2000 rubles, but all this can be bought separately in blocks, that is, two right and two left blocks.
Source: https://remont-vaz2110.ru/zamena-zadnix-fonarej/
How to turn on the high beam headlights on a VAZ 2110?
To signal with high beam headlights, pull the left steering column switch towards you without bringing it to a fixed position. The high beam remains on when the lever is held, and when released, the lever returns to its initial position.
Interesting materials:
How to call a dog catcher? How to call a helicopter in Far Cry 5? How to froth coffee at home? How to get your login and password from a Rosselkhozbank ATM? How to get a statement from a Qiwi wallet? How to train an adult cat to use a litter box? How to weigh flour without scales? How to get to Zandalar as an alliance? How to bind the camera in Dota 2? How to block an IP address on a computer?
Types of lighting
To ensure reliable and long-lasting headlight performance, car enthusiasts can choose from LED, xenon, halogen or conventional incandescent low beam bulbs
The following types of lamps are popular among owners of the VAZ 2110, as well as 2111 models:
- Philips Vision. Capable of providing a third more light than halogen models. They are also significantly superior in quality and durability to the factory lighting of many car models. Often these are the lamps that are installed in machine production, which is an indicator of the high quality of the model. In terms of price-quality ratio, they are considered one of the best options for VAZ;
Philips Vision bulbs
- Philips VisionPlus. The model is a modernized Philips Vision type. It illuminates the road surface 60% better than the standard halogen model, which provides greater light output;
Philips Vision Plus light bulb
- Philips X-treme Vision. It is the most powerful lighting component because it increases luminous flux by 100%. It is not installed during the production of the VAZ, so it must be purchased separately;
Philips X-treme Vision bulbs
- Osram Night Breaker Plus. With them the light is 90% brighter. In addition, the glow of the product is 10% whiter than conventional models. This allows you to significantly (up to 35 meters) increase the length of the illuminated road surface. Also, the products last 50% longer than ordinary halogen varieties;
Osram Night Breaker Plus Bulbs
- Philips Diamond Vision 5000 K. Capable of increasing the brightness of light by 20% relative to the standard lighting in the VAZ 2110. The low beam in the headlights when using such products becomes as close as possible to natural light in the daytime. They are more expensive than most of the presented models;
Philips DiamondVision light bulbs
- Osram CoolBlue 5000 K. High color temperature provides bright white (but close to daylight) illumination, which does not tire the driver and is familiar to the eyes.
Osram Cool Blue Bulbs
Typical faults
A burnt-out light bulb, of course, is not the only malfunction of the rear light device. He can refuse for many reasons, the main ones of which we will consider:
- Fuse blown;
- Oxidation of connecting blocks;
- Failure of the lighting device itself;
- Failure of the breaker relay (only for direction indicators and hazard lights);
- Failure of limit switches (brake light, reverse signal);
- The power wire is broken or shorted to the body.
Circuit breakers
The issue with fuses is easily resolved. We open the mounting block, which is located to the left of the steering column and is fixed with a mechanical button.
The VAZ 2112 mounting block is fixed in the panel with a button
We press the button, tilt the block and check the serviceability of the following fuses:
- F1 – side light (left side);
- F11 – side light (right side);
- F16 – power supply of the breaker relay (turns, alarm);
- F17 – brake light;
- F19 – direction and reverse indicators;
- F20 – rear fog light.
Finding the necessary inserts is not difficult - they are all numbered directly on the panel of the mounting block:
Location and designation of relays and fuses of the VAZ 2112 mounting block
Pads and connectors
The next problem is the connecting blocks. Moisture could get into them, they could oxidize or burn. Focusing on the wiring diagrams (section “Connection diagram”), we disconnect all the connectors, not forgetting about those that connect the mounting block. We check the condition of the contacts: they should be clean and shiny, no debris, signs of oxidation or burning. If necessary, clean or replace.
The mounting block pads are located on its rear side. Unscrew the fixing screw, remove and turn over the mounting block.
In order to remove the mounting block on the VAZ 2112, it is enough to unscrew one screw
When dismantling the mounting block, we try not to lose the fixing bracket, which is secured with the same screw.
Flashlight
Failure of the light fixture itself is also a fairly common malfunction. To solve this problem, it is not necessary to remove the flashlight. It is enough to remove the back panel with the lamps (see the section “How to change light bulbs”) and disconnect the power supply from it. Both the tail and corner lights use a flexible circuit board.
Removed panel of the corner lamp of VAZ 2112
We carefully inspect the traces of the printed circuit board for fracture, burning or oxidation. If necessary, we clean (oxidation), “treat” with a soldering iron and scraps of thin mounting wire. If “treatment” is impossible, we simply buy a board and install it to replace the failed one.
You can simply buy the boards for the rear and corner (left) lamps of the VAZ 2112
We inspect the contacts of the socket and lamp, and clean if necessary. If it cannot be repaired, we replace it.
Lamp sockets (left) P21W and P21W+T4W
Relay-breaker for direction indicators and hazard warning lights
The relay is located in the mounting block under number K3 (see photo from the “Fuses” subsection). We pull the relay out of the block, turn on the ignition, the turn switch and with a piece of wire we alternately close contacts 49a-49 and 49a-31 of the block. If the turn lamps come to life, change the relay.
Limit switches
The switch responsible for the reverse lamp is located on the gearbox and closes automatically when reverse gear is engaged. Turn on the ignition, pull off the block from the limit switch and use a piece of wire to close its contact to the body (engine or gearbox). If the signal lights up, change the limit switch.
Checking the reverse limit switch of VAZ 2112
The brake light switch also operates automatically, but when you press the brake pedal, it also lights up the brake light lamps. It is located in the cabin above the brake pedal lever and is equipped with two single-contact blocks.
The brake light limit switch has two blocks
We remove the pads, turn on the ignition and use a piece of wire to connect the contacts of the pads to each other. If the “stops” light up, change the limit switch.
Wiring
When the supply wires are shorted to the body, the corresponding fuse immediately burns out. A new one burns out either immediately after installation (a “reliable” circuit) or regularly while driving (a circuit occurs during vibration and shaking). In any case, the reason is frayed insulation. The most likely places for a malfunction are: the harness passes through body ribs, moving parts, and when passing through holes in the body.
A break occurs much less frequently, because before it completely rubs out, it will begin to short-circuit to the body, giving time to find the problem. The locations of this malfunction are the same as during a short circuit.
We carefully inspect the corresponding power harnesses, find them, and remove them using electrical tape and, if necessary, a soldering iron (not twisting!).
Connection diagram
But before you start troubleshooting the rear light of the VAZ 2112, it would be useful to get acquainted with its connection diagram. The connection diagram for turn signals on a VAZ 2112 is as follows:
Installation diagram of turn signals VAZ 2112
The rear light bulbs are marked here with the number 6, and they are activated when the ignition switch 3 is turned on by switch 7. Relay-breaker K3, located in mounting block 2, is responsible for the “blinking”.
The connection diagram for brake lights, reverse gear and dimensions of the VAZ 2112 looks like this:
Installation diagram of external lighting devices VAZ 2112
Here the number 6 indicates the side lights, 7 the brake light, and 13 the reverse indicators. The dimensions are activated using switch 3, and the ignition does not need to be turned on. The stop light lamp is turned on by limit switch 11, the reverse light by limit switch 10. These signals will light only when the ignition switch 4 is turned on.
The process of replacing a low beam lamp
Moreover, on the Lada Granta the lamp is changed quickly and not difficult, as, for example, on the Renault Megane 2, where you need to turn the wheels, remove the protective cover, and replace it by touch.
No special tools are required to carry out the replacement.
- Turn off the ignition, headlights and parking lights.
- Open the hood of the car.
- Remove the protective plastic cap.
- Remove the chip with wires. To do this, pull it to the side. Additional force may be required.
- Next, remove the rubber plug. It is attached on the sides with three grooves. There are tabs on the plug, you need to pull them. The plug may get caught in the center of the lamp, so do not pull too hard, but try to remove the plug with smooth movements from both the headlight and the lamp body.
- Bend aside the “whiskers” that secure the lamp. There are two of them. One goes down, the other goes up.
- Remove the headlight, gently pull it towards you, and it will come out of its seat.
Install the new lamp in reverse order. After replacement, headlight adjustment is not required.
If, on the contrary, your low or high beams do not turn off, then read the material: the low beams on the Lada Granta do not turn off, why?
Lamp type
The type of lamp used in the Lada Granta H4. This is a lamp for both low and high beam. Its peculiarity is that if the near one breaks down, the distant one can work.
Common optical problems and how to fix them
Problems with automotive optics can be divided into mechanical and electrical problems.
During operation, automotive optics are subject to mechanical stress. It can be damaged by small and large stones, sand, branches of bushes, etc. The easiest way to eliminate damage is to replace the headlight or flashlight. To do this, you need to know how to remove the headlight on a VAZ 2112. But you can restore the optics with your own hands.
The following mechanical problems are possible:
- cracks and scratches on the glass surface;
- damage to fasteners;
- violation of tightness.
Scratches and cracks can be eliminated by grinding and polishing. Destroyed fasteners are replaced with new ones. If the seal is broken, the optics sweat, so it needs to be restored, as visibility deteriorates and the contacts oxidize. For serious mechanical damage in the form of chips, tools are selected depending on the degree of damage.
Before repairing, you should study the material used to make the optics. Depending on this, you can use cold or conventional welding.
When it comes to electrical problems, the most common cause is burnt out light bulbs. In this case, they need to be replaced.
If the reason is not the light bulbs, then the following malfunctions are possible:
- fuse is blown;
- The switching relay does not work;
- contacts are oxidized or burnt;
- switch is faulty;
- The integrity of the wiring is broken; ground is missing.
Replacing blown fuses
If the brake lights of the VAZ 2112 do not light up, the turn signals do not work, or the light has completely disappeared, you need to sequentially check all the elements that are part of the lighting system, including the fuse box and power supplies.
Recommendations for selection
I hope the installation issue has been sorted out. If you decide to install LED lamps in halogen headlights, it is entirely at your own peril and risk.
I advise you to act within the law, otherwise you will get tired of constant conversations with traffic police officers, fines and other proceedings.
If you can install LEDs, all that remains is to answer the question of which ones are better.
I can’t say for sure which company’s products are best to buy. From personal experience, I tried lamps from Philips. I was pleased and still use it. But if you want, look for alternative solutions. Much also depends on what kind of lens and base you need.
LEDs are classified depending on the type of base. They are divided into:
- H1;
- H3;
- H4;
- H7;
- H8;
- H9;
- H11;
- HB2;
- HB3;
- HB4.
I propose to consider the main positions, dividing the choice of LEDs into several categories.
Namely:
- low beam;
- further;
- near/far;
- fog lights;
- dimensions.
We will study each of the points separately.
Low beam
For low beam headlights, the H7 base is mainly used. H11 is used a little less often. The LEDs are located in the upper part, the light stream is reflected downwards from the headlight reflector.
For low beam it is recommended to use LED with:
- power from 12 W;
- light flux from 1000 lm;
- radiator in the design.
When purchasing LEDs for such purposes, you need to consider several important nuances. So that LED installation does not become an unpleasant surprise for you.
We are talking about the following pitfalls:
- Due to the size of the radiator, LEDs sometimes make it difficult to put on the sealing cap for car headlights;
- the design of the headlight does not always correspond to the design of the LED, which makes the light boundaries insufficiently clear;
- The power is 3 times lower compared to halogen, so LEDs cannot always protect the optics from icing in winter (little heat is generated).
Let's move on.
High beam
The H1 base is used here, which imposes more power requirements. The prices for LED high beam headlights vary widely. But here quality is closely related to cost.
There is a lot of controversy and talk regarding LED-based high beams. Moreover, the majority considers this not the most correct decision.
The minimum characteristics should be:
- power from 17-20 W;
- luminous flux from 1500 lm;
- presence of a radiator.
The disadvantages are similar to low beam headlights. As practice shows, it is better to leave high beams based on halogen. There's too much risk of not getting what you wanted.
Near/far
LEDs on the H4 socket are different in that a pair of powerful LEDs are combined in one lamp. The low beam is located at the top, and the diode responsible for the high beam is at the bottom.
When choosing such a design, it is better to give preference to more compact models. The headlights of the car were originally adapted for spiral halogens. Therefore, for diodes, their dimensions should correspond as much as possible to the dimensions of the spirals.
The performance requirements are:
- for long-range illumination, luminous flux from 1500 lm;
- for the neighbor at least 1000 lm;
- total power of at least 17 W with an efficiency of 100 Lumens per Watt;
- the presence of an active or passive cooling radiator.
Please note that manufacturers often indicate the total brightness. It’s also not worth buying too bright ones, since this is more of a marketing ploy than a real benefit.
Fog lights
Most often, motorists change halogens to LEDs in PTFs, using base H11 and H8. They do not perform a primary role, so traffic police officers have a minimum of questions about them.
But due to the wrong approach, many choose 400-700 lm light bulbs. In the end, it turns out that halogens worked much better.
To ensure that the LEDs in PTF do not disappoint you, choose a brightness of at least 900-1000 lm. The less powerful ones become meaningless and useless.
A few years ago, mass production of special diodes with a yellow cap and position adjustment began. This allows you to make them into a full-fledged imitation of a halogen lamp. With such optics, traffic police officers will definitely not be able to find fault.
parking lights
The base used here is W5W T10. Marking T10 T5 is also found. The assortment is huge, which is somewhat confusing for car owners.
Nominally the power should be 5 W, and the brightness should be from 50 lm. There is no point in increasing these parameters excessively. The more powerful the LEDs, the faster they fail. This is due to overheating.
Most motorists prefer devices with 1-2 watts and 50-100 lm.
Whether to install diodes or not is a purely personal decision.
I just want to suggest when it’s not worth doing this, and in what situations there are no real obstacles.
Thank you all for your attention! Subscribe, leave comments, ask questions!
Repair
As already said, it is prohibited to drive a car in the evening or at night if the side lights are not on, so we will look for the cause and then eliminate it.
If you are sure that the paths through which electricity passes are in good condition, the first thing to do is check to see if the lamps have burned out. And if they need a replacement, do it.
- Open the hood;
- We disconnect the battery, or even better, remove it. After all, we are talking about electricity, which is unsafe;
- From the engine compartment, holding the lamp with your hand, disconnect the wires directly going to the light bulb from the block;
- Remove the rubber cover;
- We move the latch to the side, disengaging the spring from the hook;
- We take out the size bulb;
- We replace it with a new one and put everything back together.
When the replacement is made, we check whether the head lamps are on.
Light bulbs in the rear dimensions on a VAZ 2110 are installed as follows:
- We de-energize the car;
- From the trunk (open) side, remove the contact part of the rear light with lamps. To do this, you need to release the latches;
- Remove the headlight bulb and replace it with a new one.
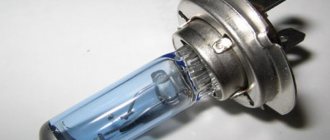
Do not forget that you cannot touch the halogen lamp with your bare hands. Replacement must be done with gloves. The fact is that dark spots will appear where you touch the light bulb. In addition, it has been proven that such a light bulb burns out much faster.
Replacing the turn signal lamp:
1) In this case, everything is very simple, first of all, you will need to understand where this lamp is located, so that it is more clear to you, see the photo below:
Note! As you already understood, in the photo the arrow indicates only the chamber or, as it is also called, the lamp base, but the lamp itself is not visible, so in order for you to be able to see it and easily remove and change it, grab this base part with your hand and then turn it it clockwise by a small degree, and thereby remove it from there!
2) When the base together with the lamp itself is removed, grab the light bulb with your hand (Indicated by the arrow) and then slightly press on it and turn it counterclockwise and remove this lamp.
Note! When you install a new lamp, make sure that it fits into the grooves, one of them is indicated by an arrow in the photo, and when it fits in there all the way, turn it so that it locks, and after fixing, check that it doesn’t fly out of there!
By the way, before changing the lamp, check the fuse that goes to it; perhaps it has simply blown and because of this the lamp does not work!
Additional video: For more information on how to replace all lamps, see the interesting and instructive video below:
Expert opinion
It-Technology, Electrical power and electronics specialist
Ask questions to the “Specialist for modernization of energy generation systems”
LADA VAZ 2110 lamps - type, power | Car breakdowns For xenon equipment independently installed in inappropriate optics, a penalty is provided in the form of deprivation of a driver's license. Ask, I'm in touch!