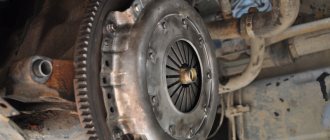
The comfort of the driver and passengers of a passenger car in the cold season directly depends on the quality of the heater, and the VAZ 2107 is no exception. If the heating fails, you can forget about the normal temperature in the cabin; in addition, fogging and frosting of the windows threatens traffic safety. One of the main reasons for the failure of the heating system is the stove radiator, which does not provide normal heat exchange and does not warm up the incoming cold air.
Signs of a malfunction of the VAZ 2107 heater radiator
A malfunction of the VAZ 2107 heater radiator manifests itself in two variants:
- The radiator is leaking.
- The stove doesn't heat.
If you unexpectedly find a puddle of coolant under the feet of the driver or passenger, then there is a high probability that the heater radiator will need to be replaced.
There is no need to rush to change it immediately after detecting antifreeze in the cabin. First you need to make sure that it is the radiator that is leaking, and not the heater pipe or tap. By the way, a leak may not appear in the form of a puddle of antifreeze under your feet. Sometimes the leak is not very large and the hot antifreeze flowing from the heater radiator evaporates under the influence of the air flow from the heater fan. In this case, the windows begin to fog up while the stove is operating. The cause of the leak may be corrosion of the radiator material or damage due to physical impact. To eliminate the leak, the radiator must be removed and then either soldered or replaced with a new one. If, when the engine is warm and the heater tap is open, cold or barely warm air comes from the heater, the reason is a clogged heater core. Most often, the radiator becomes clogged when the car owner tries to fix a leak in the engine cooling system by adding various “miracle additives” to the antifreeze, designed to combat small coolant leaks. Yes, such additives can clog a leak, but they also clog thin radiator tubes. The radiator can also become clogged due to rust or poor-quality coolant. In this case, it is useless to try to pour in other additives designed to clean the cooling system. The radiator must be removed and tried to be washed or replaced.
Introduction
Replacing the radiator of a VAZ-2107 heater requires certain skills, however, experienced motorists who have been using domestic cars for many years note that the process on the “seven” is similar to the identical procedure on the “kopek”. When upgrading your car, it is worth remembering that the difference between the two vehicles lies solely in the location of the air ducts.
To change the radiator of a VAZ-2107 stove you need certain skills
To change the heater radiator on a VAZ-2107 with your own hands, you will have to spend time removing the panel with the radio and glove compartment. The material below provides instructions that will help you replace the heater radiator in the domestic “seven” without any special investments or huge labor costs.
Removing the radiator of the VAZ 2107 stove
- Drain antifreeze from the engine cooling system. It is not at all necessary to drain it all; it is enough for its level to drop below the level of the heater radiator.
- Using a wrench or screwdriver, loosen the two clamps securing the heating system pipes to the radiator.
- Remove the rubber seal located in the body opening.
- Remove the console (radio panel), which is secured with self-tapping screws.
- Disconnect the interior heater valve drive cable.
- Remove the heater fan by unscrewing the 4 mounting brackets.
- Remove the heater valve drive rod.
- Remove the radiator casing.
- Unscrew the fastenings of the pipe that drains antifreeze from the radiator.
- Remove the pipe and the rubber gasket that is located between the flange and the heater radiator.
- Remove the heater valve from the radiator.
Replacing the heater tap
If you have a puddle and an unpleasant smell in your cabin, it means that the interior heating system faucet is leaking and it’s time to replace it. You can do this yourself. Prepare the following tools and accessories for this:
The work of replacing an old tap with a new tap is carried out on a cooled engine.
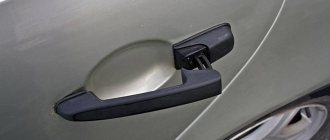
Disconnect the side deflector
We give away the crane mount
To prevent the bottom nut from falling or being lost, secure it with plasticine.
Remove the pipe from the tap
Installing a VAZ 2107 heater radiator
The radiator is installed in the reverse order of removal. To prevent possible leaks, it is better to replace the radiator pipes and the clamps securing them in advance with new ones. This is especially true for pipes, while worm-wheel clamps can simply be lubricated and put in place.
Before adding coolant, you must open the heater valve. It is better to pour antifreeze into the cooling system through the engine radiator, having first unscrewed the cap. After the radiator is filled to the neck, you should start the engine and let it run a little at high speeds. The flow of coolant from the pump should expel any air bubbles that may have formed in the cooling system during filling. After this (if necessary), you still need to add antifreeze to the radiator, filling it, close the radiator cap and fill the expansion tank with antifreeze, focusing on the level mark on it.
After completing the procedure, it is worth idling the car a little to make sure there are no antifreeze leaks. Only after this can the work be considered completed.
Replacement procedure
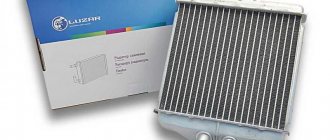
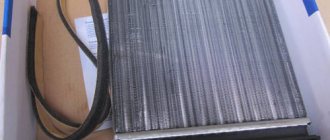
You can buy a new heater radiator for a VAZ 2107 at any auto store; an aluminum one will cost about 1 thousand rubles, and a copper one will cost a little more, but it can be soldered, which, however, is only a temporary measure. The kit should include spare parts necessary for installation.
First you need to disconnect the battery terminal so as not to damage the car's electrical system during operation. Radiator installation begins with draining the coolant. To do this, use a 13mm head to unscrew the drain plug, which is located on the cylinder block; there is no need to drain the cooling system radiator.
After the plug is unscrewed, we insert a hose that drains the antifreeze into a separate container, after which we unscrew the radiator cap. Next, the plug is screwed in again and tightened with a wrench, the heater hoses are disconnected, and the rubber sealing gasket is unscrewed near their connection point, for which you will need a 7 wrench. To remove it, pry it off with a flat screwdriver.
Next, to open access to the heater radiator, we go to the interior, where we remove the plastic protection near the gear shift lever. Then the 2 screws holding this unit are unscrewed. We take out the upper part where the clock is located and unscrew the two nuts on the studs, for which you will need a 10 mm spanner. Remove the shelf, which is attached to 4 self-tapping screws for a shaped screwdriver. The panel element with the clock is pushed into the seat and the console around the gear shift knob is pulled out.
To remove the heater radiator, the clips holding the air ducts are released in the opened space, first this is done from the driver’s side, which will require pliers. On the passenger side, the rear mounting bracket is removed and the air duct is disconnected, after which the front bracket is removed. On the left side, unscrew the cable and remove the plastic fan box, which is located under the center console.
Now you can replace the stove radiator with a new one, since access to it is open. It is pulled out with a simple downward movement; for convenience, you can grab the tap and it is removed into the cabin. After checking the integrity of the pipes, they need to be screwed onto a new stove; if they burst, these parts must also be replaced.
As a rule, new nuts are included with a new stove, since the old ones may not fit. New gaskets must be installed, which are best seated on the sealant; however, the bolts do not need to be tightened too tightly so as not to damage them. After this, the radiator is installed in its seat and secured from the hood side with 7 bolts through a rubber gasket.
Diagnostics and restoration of performance
When removing a part, first of all you should pay attention to the integrity of the tubes. If there are obvious signs of damage, you should purchase a new radiator. Some of the damage can be soldered, but this is not very reliable. Therefore, it is still recommended to install a new heater.
If there are problems with the flow of fluid into the radiator, you should first check the condition of the tap. Due to the nature of its design, it often becomes clogged with various deposits. If liquid does not pass through it, then a new bypass device should be installed. Experienced car owners prefer to install cranes from Volkswagen. They are completely suitable here, and their service life is much longer.
Also, a problem with weak heating can occur as a result of a large number of deposits directly in the radiator. To fix the problem, you need to flush the tubes. To do this, take 300 grams of acid per 5 liters of water. The radiator is washed with the resulting solution. The easiest way to force the cleaning solution through the tubes is to use a compressor. It can be used for quick cleaning. If there is no compressor, you will have to do everything manually. To do this, use a watering can to pour cleaning liquid into one of the nozzles. But keep in mind that such work will take quite a lot of time. If after all the manipulations it was not possible to achieve normal permeability of the tubes, then you will have to buy a new radiator.
Preparing the car
Before starting the radiator replacement procedure, it is necessary to drain the coolant from the system. To do this, you need to warm up the engine (so the liquid drains faster) and install the car in any convenient way so that you can get to the drain plug (on an inspection hole, overpass, etc.). After this, open the caps of the cooling radiator and expansion tank.
Climbing under the car, we find the coolant drain plug on the cylinder block. Do not confuse it with the oil drain plug located on the oil pan! Having substituted a previously prepared container, unscrew the cap with a key set to “17” and wait until all the liquid has drained. This may take from 2 to 5 minutes. After this, the plug can be wrapped.
Now you can begin the procedure for replacing the stove radiator.
Causes of heating system malfunction
Experts identify several reasons why normal circulation of antifreeze is impossible:
- Coolant leak. It can occur as a result of natural wear and tear of parts of the cooling system, damage to the unit by corrosion or a hard object. In this case, it is necessary to replace the radiator or other damaged parts of the system. A malfunction in the stove shows itself as antifreeze leaking into the cabin, under the feet of the front passenger or driver.
- Obstruction of the internal tubes of the heat exchanger. This is evidenced by the impossibility of adjusting the air supply - only a cold or exceptionally warm stream will blow into the cabin. In this case, it is possible to get by by washing and purging the unit.
It is important to convince
It seems that the cause of the leak is in the heat exchanger. In the VAZ-2107, taps often leak or pipes leak. Copper-brass units can be soldered yourself or in a car service, but this is a temporary measure. Experienced craftsmen recommend replacing the unit even if there are blockages, since their appearance is one of the signs of the onset of corrosion.
Stove modernization
Very often, in parallel with the prevention of stove malfunctions and its settings, the driver modernizes the heating system for more efficient operation.
We recommend: How to calculate engine hours in kilometers and what is an engine hour?
Most often, for these purposes, the standard fan and resistor are replaced with products from the figure eight. The new fan is larger in size, due to which a larger amount of warm air is supplied, and the vehicle interior warms up faster. The new fan fits into the standard seat with virtually no modifications. It is only necessary to cut off one of the aerodynamic ridges from the impeller. After such improvements, it will also be necessary to replace the standard fan button with a product from the figure eight.
Sometimes, for better airflow of the driver’s side windows, additional small fans are installed in the deflectors. Such improvements, combined with preventive maintenance, will ensure comfort and warmth in the cabin even in the coldest times.
DIY replacement instructions
Replacing a heat exchanger consists of two stages: removing the old unit and installing a new device.
For the procedure, you should prepare the following tools and materials:
- Phillips screwdriver;
- a set of keys;
- sealant;
- a container for draining the working fluid, you can use a 5-liter water bottle;
- new heat exchanger;
- clean rags.
1. Remove the hoses from the pipes.
2. Disconnect the tap cable.
3. Remove the heat exchanger with tubes.
In addition, you need to stock up on coolant and two rubber gaskets.
Features of dismantling
Before removing the heater radiator on a VAZ 2107, you need to drain the antifreeze from the heating system. To do this, it is better to install the machine on an overpass, inspection groove or other device that will allow you to reach the drain plug. To make the glass flow faster, it is advisable to warm up the engine.
We recommend: How to change the cabin filter on a Chevrolet Niva?
The dismantling procedure consists of the following steps:
- To drain the antifreeze, unscrew the cap on the radiator and expansion tank.
- Having gone under the car, you need to place a container under the cylinder block and, unscrewing the drain plug, drain the liquid from the system. When the coolant has completely drained, you can screw the plug back in.
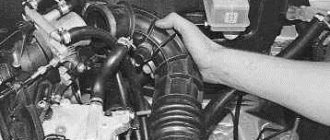
- In the engine compartment, use a screwdriver to loosen the fastenings of the clamps holding the heating system pipes. Then disconnect both hoses and heater tap tubes. Wipe off the spilled liquid with a rag.
- Further work is performed in the salon. You need to remove the radio shelf. To do this, two self-tapping screws are unscrewed.
- After dismantling the shelf, the heater tap will be accessible. Use a wrench to unscrew the cable fastening and move the free end to the side.
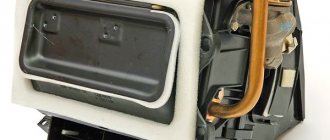
- The heater casing consists of two parts, which are held together by two steel brackets. Unfasten the brackets and remove the lower part of the case.
- Now the radiator can be carefully pulled out along with the heater tap.
- Then unscrew the stove tap and inspect the gasket. If it is unusable, then we replace it with a new one.
- Having unscrewed the two bolts of the inlet pipe, inspect the gasket. You should also check the functionality of the tap and replace it if it is faulty.
Replacement process
To avoid leaks in the near future, you should replace the pipes and gaskets with new products.
Replacing and installing a VAZ 2107 heating radiator is performed in the reverse order:
- After applying sealant to the gasket, you need to connect the inlet pipe to the tap.
- Next, the tap is screwed to the heat exchanger. A new rubber gasket must also be installed between them. After installing the cable, it must be adjusted so that the valve opens and closes completely using the control lever.
- Now we install the new device in its regular place. Having installed the gasket, fasten the unit.
- Then we attach the hoses and tighten the fastening clamps.
- After checking that the drain plug is screwed in, pour antifreeze into the system. When filling, the heater tap must be open so that coolant enters the heat exchanger.
- Next, tighten the caps on the heat exchanger and expansion tank.
After installing the unit, you need to start the engine and let it run until it reaches operating temperature. Without turning off the engine, check all connections for leaks. You also need to check the coolant level. If it does not meet the standard, add it to the required level.
If there are no complaints about the operation of the heating system, we connect the cable to the heater tap and secure the casing with staples. We install the radio shelf in its original place.
What will you need?
You will need quite standard tools for this work. Be sure to prepare screwdrivers (phillips and slotted). You will also need several keys. It is advisable to stock up on rags and containers for collecting coolant. If you are sure that the radiator is damaged, then you should buy it in advance. On sale you can find 2 types of heater radiators for classics. One of them is copper, which is now quite difficult to find. But such radiators have better heat transfer, which has a positive effect on interior comfort. Such heaters fail relatively quickly.
Aluminum radiators are more reliable. But, they cope somewhat worse with heat transfer. If the problem is related to a lack of warm air supply, then most likely there is a problem with the faucet. It often becomes clogged with deposits, and accordingly ceases to cope with its responsibilities. In such a case, it is easiest to replace it.
Let's sum it up
Even a novice driver can handle replacing the stove on a 7 on his own, the main thing is the desire to work for a positive result. Carry out regular preventive diagnostics of your car's heating system at least once a year, before the onset of cold weather. This will provide you with comfort in the car at any time of the year.
Sources
- https://avto-idea.ru/sovety/pechka-vaz-2107-ustroystvo-rabota-osnovnye-neispravnosti/
- https://avtocity365.ru/ustrojstvo-i-ekspluatatsiya-avtomobilya/remont-radiatora-vaz-2107/
- https://7road.ru/drugoe/radiator-pechki-2107-razmery.html
- https://avto-idea.ru/remont/vaz-2107-remont-pechki-svoimi-rukami-zamena-pechki-vaz-2107/
- https://ladaautos.ru/vaz-2107/kak-pravilno-razobrat-pechku-na-vaz-2107.html
- https://bumper.guru/klassicheskie-modeli-vaz/sistema-ohdazhdeniya/pechka-vaz-2107.html
- https://7-vaz.ru/remont/kak-zamenit-radiator-pechki-na-vaz-2107.html
- https://akki-carsh.ru/dvigatel/otopitel-vaz-2107.html
- https://remam.ru/vozdsys/zamena-pechki-vaz-2107.html
Repair and replacement of individual heating system elements
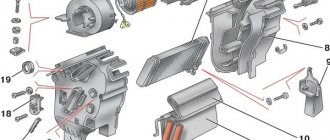
In addition to the radiator, the heating system includes a fan with an electric motor, a tap and a control unit.
Drivers who have been driving Zhiguli cars for many years often say that the VAZ 2107’s stove sometimes does not heat well. The most common cause of malfunctions in a system such as the VAZ 2107 stove is a leak in the radiator, as well as in pipes, taps and connections located directly between them. To this can be added switch failures for electric fan modes, damage to the device wires or oxidation of their components.
Fan motor
The electric motor of the stove is considered one of the weakest points of the VAZ 2107. This is due to the material of the bushings on which the rotor rotates. When these bushings wear out, the fan operation is accompanied by a characteristic whistle. This happens after two to three years of using the car. The electric motor can be brought back into working condition by cleaning and lubricating. However, after a short time the whistle from the stove fan will appear again. In such cases, experts recommend replacing the standard electric motor with a new one - a bearing one. As a result, the whistle will disappear, and the reliability of the unit will increase. The replacement process is associated with certain difficulties, since the electric motor is located in a rather inaccessible place. Nevertheless, after installation, the bearing motor is guaranteed to work for several years.
The factory electric motor of the VAZ 2107 heater fan is usually replaced with a bearing one
Heater valve
The heater valve is replaced when it jams, leaks, or in other cases when repair is impossible. Experts recommend installing a ceramic faucet in this case.
The metal heater valve usually opens in the fall and closes in the spring. During periods of inactivity, it can sour, become covered with scale and simply fail. The result can be extremely unpleasant for the car owner. These disadvantages do not exist with a ceramic faucet. There is practically no scale accumulation on ceramics, and it is not subject to corrosion. As a result, even after a long period of inactivity, the heater valve will be in working order.
The standard faucet of the VAZ 2107 stove is often replaced with a ceramic one
Control block
The heating system is controlled from the interior of the VAZ 2107 by several levers on the instrument panel, connected to the controlled elements by a flexible rod (steel wire). Using these levers you can:
- adjust the degree of opening of the air dampers;
- open and close the heater tap;
- distribute air flows between the windshield and side windows;
- take air from the engine compartment.
Each of the levers of the control unit is responsible for the operation of a specific unit.
In addition, there is also a lower damper (air distribution cover), which is controlled by a special lever located under the instrument panel on the driver’s side.
Thus, any car owner can perform most of the work on repair, maintenance and replacement of elements of the VAZ 2107 heating system independently. In addition, recommendations from experts will help you modify the stove yourself and make it work more efficiently.