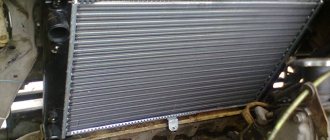
Engine overheating is a terrible phenomenon that promises its owner major repairs and serious cash injections. In order to prevent engine overheating, it is necessary to regularly monitor the coolant level, proper operation of the thermostat, and the condition of the engine cooling radiator. If you find a coolant leak or puddles after a long period of parking, check the engine radiator for coolant leaks. A wet mark or hole in the radiator is a signal for immediate action. If the crack or breakdown is small, you can try to solder the cooling radiator. In addition to cracks and holes in the radiator, leaks can be caused by faulty connections or loose clamps. If the reason is not the clamps, and repairing the radiator is impossible or unprofitable, the radiator will need to be replaced.
How you will make the replacement is up to you, there are two options: entrust the work to service station specialists or carry out the repair yourself. For those who have chosen the second option, my article today on how to replace a VAZ 2115 radiator will be an excellent guide and assistant in performing this work.
Replacing a VAZ 2115 radiator - detailed instructions
Engine overheating is a terrible phenomenon that promises its owner major repairs and serious cash injections.
In order to prevent engine overheating, it is necessary to regularly monitor the coolant level, proper operation of the thermostat, and the condition of the engine cooling radiator. If you find a coolant leak or puddles after a long period of parking, check the engine radiator for coolant leaks. A wet mark or hole in the radiator is a signal for immediate action. If the crack or breakdown is small, you can try to solder the cooling radiator. In addition to cracks and holes in the radiator, leaks can be caused by faulty connections or loose clamps. If the reason is not the clamps, and repairing the radiator is impossible or unprofitable, the radiator will need to be replaced.
How you will make the replacement is up to you, there are two options: entrust the work to service station specialists or carry out the repair yourself. For those who have chosen the second option, my article today on how to replace a VAZ 2115 radiator will be an excellent guide and assistant in performing this work.
Some useful tips
Advice from professionals.
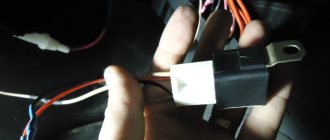
- To drain the coolant, you need to unscrew the plugs on the radiator, on the expansion tank and on the engine cylinder block.
- If the cooling system is not functioning well, the culprit may be a liquid cooling pump whose shaft bearings or seals have failed. It needs to be repaired or replaced with a new product.
- The cause of failure of the cooling system may be improper operation of the thermostat, which must be repaired or replaced.
- It is more convenient to remove the radiator together with the fan. The fan can be removed later if necessary.
You can check the tightness of the removed radiator as follows:
- fill the bathtub with water;
- lower the product into water and apply pressure of approximately 0.2 MPa;
- bubbles will show where leaks have appeared.
Sometimes, to bring the radiator into working condition, it is enough to rinse it with water. It's done like this. The antifreeze or antifreeze is drained and clean distilled water is poured in. The engine starts and runs at 3000 rpm. The temperature should be monitored. They turn off the car and after 7-8 minutes drain the water. If it is not completely clean, the procedure can be repeated. If the fluid has changed color, it needs to be replaced.
The coolant should be changed: antifreeze - after 2 years, antifreeze - after 5 years. The best choice for cooling fluid is antifreeze. The standard cooling system fan is quite noisy. Therefore, it makes sense to replace the original four-blade impeller with a new eight-blade one. When purchasing an impeller, you need to remember that the shaft for its attachment can have a landing thread of 8 mm and 6 mm.
Replacing a VAZ 2115 radiator - detailed instructions
1. First of all, you need to empty the radiator; to do this, drain all the coolant that is in the engine cooling system.
2. It will be easier if you remove the radiator together with the electric fan (on the VAZ-2111, among other things, you will have to remove the air filter housing).
3. Using the socket on “8”, unscrew the two nuts of the pressure plate, and then remove it.
4. Remove the radiator inlet hose from the outlet pipe by slightly loosening the mounting clamp.
5. Remove the radiator outlet hose from the thermostat in the same way.
6. Now tilt the radiator towards the engine and release the clamp of the radiator steam outlet hose, then carefully remove it so as not to damage the plastic radiator fitting.
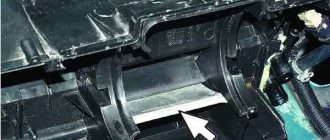
7. Remove the cooling radiator along with the fan; to do this, tilt it slightly towards the engine. If the radiator is to be repaired, the fan most likely will not need to be removed, but if it is a radiator replacement, remove the fan and install it on a new radiator.
8. To remove the electric fan, use a “10” wrench and use it to unscrew the two fastening bolts and one nut.
9. Unscrew the nut on the upper mount of the electric fan to the radiator with a socket set to “10”.
10. Next, using the “8” socket, unscrew the two nuts securing the pressure plate, then remove it.
11. Remove the cooling fan along with the shroud.
Attention! Before replacing the radiator, make sure that there are two rubber cushions at the installation site; it is on them that the radiator must be installed, and the cushions, in turn, must be installed in the holes of the cross member.
Replacing the VAZ 2115 radiator is complete, all that remains is to assemble everything in the reverse order and fill in the coolant.
Reasons for removing a cooling system element
When a car breaks down, some reasons lead to the need to remove the radiator. The main ones:
- various types of mechanical damage;
- individual radiator tubes are clogged with dirt, deposits in the form of scale and rust;
- getting a car into an accident.
Replacing the device in question is not always required. Sometimes it can be repaired, washed, soldered. Modern radiators often have an aluminum core and a plastic tray. Such models are very difficult to repair.
To eliminate the malfunction or replace it, you will need to dismantle the device. You need to take this work very seriously and do it carefully. In order for the process to be carried out efficiently, you need to at least briefly know what parts the radiator assembly consists of. It includes:
- device body;
- expansion tank;
- Electrical engine;
- engine casing;
- impeller (fan);
- rubber cushion;
- drain plug;
- various hoses;
- a pump that is powered by a drive belt.
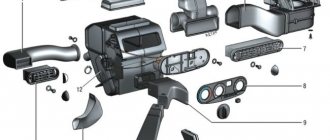
Cooling system: 1 – expansion tank plug; 2 – expansion tank; 3 – radiator supply hose; 4 – hose from the radiator to the expansion tank; 5 – radiator outlet hose; 6 – left radiator tank; 7 – aluminum radiator tubes; 8 – sensor for turning on the electric fan; 9 – right radiator tank; 10 – drain plug; 11 – radiator core; 12 – electric fan casing; 13 – electric fan impeller; 14 – electric motor; 15 – pump gear pulley; 16 – pump impeller; 17 – camshaft drive toothed belt; 18 – heater radiator outlet pipe; 19 – pump supply tube; 20 – hose for supplying fluid to the carburetor starter; 21 – carburetor heating block; 22 – exhaust pipe; 23 – heater supply pipe; 24 – hose for draining fluid from the carburetor heating unit; 25 – thermostat; 26 – hose from expansion tank to thermostat
Choosing a heater radiator for VAZ 2114, 2113, 2115
Which radiator to choose for the stove on a VAZ 2114? This question is gaining relevance in connection with the approaching winter. It's no secret that not all domestically produced cars have a good heater. Let's try to figure out which radiator to choose:
Copper radiator.
Immediately after purchase, the copper radiator has a heat output of 389.6 W/(m. deg).
The properties of copper are such that such a radiator takes a long time to heat up and takes a long time to cool down. The number of fins in a copper radiator is smaller than in an aluminum one, and the cross-section of the channels is smaller. Therefore, they clog faster and the stove blows cool air at idle. Most often, this is what VAZ owners complain about. The advantages of a copper heater radiator include its maintainability. This is where the advantages end. And the disadvantages begin: recently, manufacturers have been saving on raw materials and using impure copper. Some paint radiators to give them a marketable appearance, but this reduces the heat transfer of such a radiator. Lately it has been very difficult to find a high-quality copper radiator.
Inconvenient design solutions
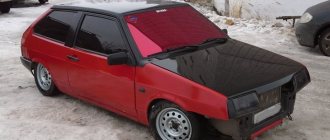
VAZ-2114 and 2115 cars are quite modern and quite popular cars in the budget segment.
But in these cars, as in most new models, there is one not very pleasant feature.
By increasing the comfort of the interior and the design of the front panel, designers significantly complicate the maintenance of the heating system.
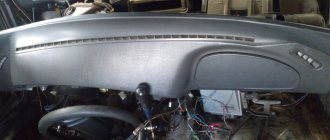
The heater radiator in these cars is hidden deep under the panel and is not so easy to get to.
But the heating radiator is a rather vulnerable element of the cooling system. And if the heating of the interior has deteriorated, in more than half of the cases the problems are related specifically to the heat exchanger.
And all this despite the fact that the element itself is practically not repairable and is often simply replaced.
Radiator VAZ 2114
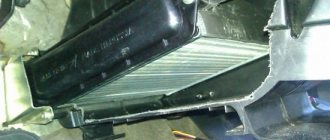
As mentioned just above, the radiator of the heating system is necessary in order to take heat from the circulating coolant and transfer it inside the cabin. If it is not working properly (for example, coolant does not pass through it), then it will be cold in the cabin even if all other units are functioning normally.
In some cases (small leaks, slight blockages), the radiator can be brought back to life by soldering or blowing with compressed air, but very often there is nothing left to do but replace it. It will also have to be replaced with a new one if a coolant leak is detected inside the cabin.
Currently, there are 3 types of “stove” radiators on the market, slightly different in design:
- aluminum non-prefabricated;
- solid aluminum (prefabricated);
- copper.
Radiators VAZ 2114
It is worth noting that the original radiator of the VAZ 2114 stove is DaAZ (produced at the Dmitrovograd Automotive Component Plant), made of aluminum.
At the same time, it is not at all necessary to strive to install the original version on your car. Below we will look at the advantages and disadvantages of all types of radiators.
Main reasons for replacement
There are not many reasons why it may be necessary to replace the radiator of the interior heating system. One of them is the appearance of a leak.
Heat exchangers are made of non-ferrous metals - copper or aluminum.
Gradually, these metals oxidize due to exposure to liquid, which leads to the appearance of cracks through which coolant flows out.
The second reason for replacing the heater radiator is clogging of the tubes with contaminants. The coolant, circulating through the cooling system, washes away corrosion products, small particles, etc.
Moreover, the liquid cannot contain them and these polluting elements settle on surfaces, including the stove radiator.
As a result, the heating system first loses efficiency, and later (if it is heavily contaminated) it simply stops working.
In some cases, radiator blockages can be eliminated by flushing using chemicals.
But if the blockage of the tubes is severe, then the plugs can only be removed from the dirt mechanically. And this can only be done with the radiator removed.
Before you start disassembling, you should first make sure that the problems arose with the radiator.
So, a leak of this element is manifested by the appearance of traces of antifreeze on the floor in the cabin.
But the same result can also be caused by damage to the radiator pipes or loss of tightness at the point of their connection with the heat exchanger.
Methods for replacing a radiator
There are two ways to remove the heater radiator on a VAZ-2113, 2114, 2115. The first involves completely removing the front panel
, which is necessary to access the heat exchanger.
Note that complete dismantling is a relative concept, since the panel itself is not removed from the car, but is only disconnected from the body, which allows it to be moved and thereby allow access to the radiator.
You will also have to move the torpedo itself.
Second method - without removing the panel
. But it is not suitable for everyone, since to provide access it is necessary to make cuts in some places so that it is possible to tilt the lower part of the panel in the area where the heat exchanger is located.
The disadvantage of the first method is that it is labor-intensive, since you will have to unscrew a lot of fasteners and disconnect the wiring, of which there is a lot that goes to the panel.
As for the second method, the panel itself will essentially be damaged, although it is cut in places hidden from view.
Also, after completing the replacement, you will have to think about how to reattach and secure the cut parts.
But since the stove radiator can leak at any time, ease of access to it is very important, so the second method is preferable.
Radiator replacement
is engaged in universal developments. For this reason, the VAZ 2114 radiator is suitable not only for this, but also for earlier and later car models. During the constant operation of this device, dirt may get into it and it may receive various mechanical damage. In some cases, the coolant itself can corrode some areas of the radiator from the inside.
How to remove the old one and install a new device? All work is carried out only on a cold engine, so as not to get burned by hot liquid. The VAZ radiator grille remains in place. Operating procedure:
- park the car on level ground;
- remove the battery;
- drain the coolant by unscrewing the special plug located at the bottom left of the radiator;
- remove the air filter;
- remove the protective screen;
- loosen the clamps and remove the upper and lower pipes, all tubes going to the expansion tank;
- disconnect the power supply wire and remove the fan;
- attach the fan system to the new unit;
- connect the fan power cable;
- lubricate the lower pipe with sealant and secure it in place;
- install the upper pipe;
- tighten the return clamp going to the expansion tank, secure the screen;
- install an air filter;
- fill the new radiator by pouring 5-8 liters of coolant into it through the expansion tank;
- start the engine and let it run for a few minutes.
Selecting a replacement radiator
But before you begin the removal and replacement operation, you should first select a new heat exchanger.
You can buy a factory heater radiator, catalog number 2108-8101060. But analog products made by DAAZ, Luzar, Fenox, Weber, and Termal are also quite suitable.
As for the material, it is recommended to use copper heat exchangers, but they are much more expensive than aluminum ones. Although this is not an acquired taste, many people use aluminum products and are quite satisfied.
In general, the main thing is that the radiator is designed specifically for these cars.
The designers used the same front panel design on the VAZ-2113, 2114 and 2115 models, so the replacement algorithm is the same for them.
Next, we’ll look at how to remove the radiator of the interior heating system using the example of a VAZ-2114, and how this is done in different ways.
Replace without removing the panel
But no matter what method is used, you will first have to drain the coolant from the system. Therefore, you will have to stock up on antifreeze in the required quantity in advance.
First, let's look at the replacement method without removing the panel. As already mentioned, this will require making cuts in some places.
To complete the work you will need:
- Set of screwdrivers of different lengths;
- Hacksaw blade for metal;
- Flat container for draining residual coolant from the radiator;
- Rags.
Having prepared everything and drained the coolant from the cooling system, you can begin work:
- We remove the storage box (glove compartment) from the panel, for which it is necessary to unscrew 6 screws securing it;
- Remove the side trims on the center console;
- Use a metal blade to make the necessary cuts: The first cut is vertical
, we do it on the inner wall of the panel near the center console (behind the metal strip of the glove compartment). Moreover, here you will have to make two cuts.
The second cut is horizontal
, runs in the upper part along the rear wall of the opening under the glove compartment.The third is also vertical
, but not end-to-end. It is done on the right on the rear wall of the lower storage shelf of the panel; - After all the cuts, part of the panel together with the wall can be bent down, which will provide access to the radiator. We bend this part and fix it;
- Unscrew the near bracket for fastening the heating system flap control cable and move the cable to the side;
- Loosen the clamps of the coolant supply pipes to the radiator. In this case, you should place a prepared container under the connection points, since liquid will flow out of the heat exchanger. Remove the pipes;
- We unscrew the three screws securing the radiator, remove it and immediately inspect it.