Air suspension of a car is one of the types of suspension, thanks to which you can adjust the height of the body relative to the road. The famous Citroen concern was the first to actively introduce such a suspension. French engineers were able to appreciate all the benefits that compressed air provides when operating a car.
Pneumatic for VAZ 2114
Nowadays, manufacturers most often equip semi-trailers and trucks with air suspension. But the owners of the VAZ 2114 are trying to use it to slightly change the usual standards and appearance of their “iron horse”. In addition to aesthetic qualities, air suspension has a number of advantages.
Replacing Chevrolet Niva front brake pads
Tools:
- Sliding pliers
- Pliers
- Medium flat screwdriver
- Small hammer
- Wheel chock
- Rolling jack
- Rubber bulb
- Brake fluid container
- Punch
- Wire brush
- Mounting blade
Parts and consumables:
- Front brake pads
- Graphite grease
- Aerosol lubricant type WD-40
- Brake fluid
Note:
The minimum permissible thickness of the friction linings of brake pads is 1.5 mm. Replace the pads in the following cases:
– the thickness of the linings is less than 1.5 mm;
– the surface of the linings is oily;
– the linings are not firmly connected to the base;
– the linings have deep grooves and chips.
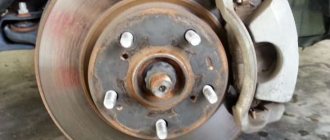
If for some reason you have removed the front wheel, check the condition of the pads through the hole in the brake caliper housing. If the thickness of the friction linings is about 2 mm, replace the pads. If the car pulls to the side when braking or you hear strange noises, remove the brake pads and check their condition.
Attention:
Loosen and tighten wheel nuts only with the vehicle on the ground. Do not use gasoline, diesel fuel or any other mineral solvents to clean brakes. The brake pads on both front wheels must be replaced at the same time. It is not permissible to replace the inner and outer pads between each other, as well as between the left and right wheels. This may result in uneven braking.
1. Brake the vehicle with the parking brake and install wheel chocks under the rear wheels.
2. We hang and remove the front wheel.
3. Clean the brake mechanism from dirt. To facilitate disassembly, apply WD-40 type liquid to the joints of the pins with the caliper and clamping arms.
4. Pump out some of the fluid from the reservoir if, before replacing the pads, the brake fluid level in the reservoir is at or close to about zero.
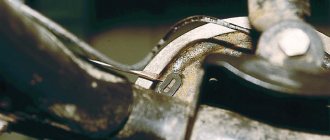
5. Using pliers, remove the cotter pin of the lower clamping arm axis.
6. Using a drift, we touch the axis of the clamping lever.
7. Holding the lever, use pliers to remove the axle.
8. Remove the clamping lever.
9. We remove the two clamping lever springs from the pad guide so as not to lose them.
10. Using a screwdriver, lift the brake caliper.
11. Place the caliper with the cylinder block on the steering knuckle.
12. Remove the brake pads from the guide.
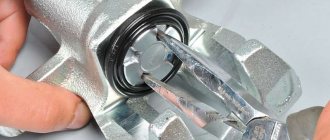
13. Before installing new brake pads, it is necessary to move the pistons as far inside the cylinders as possible. Using sliding pliers (or a pipe wrench), press the pistons into the cylinders.
You can recess the pistons into the cylinders in another way. To do this, insert the outer block into the guide and install the caliper in place. Use a spatula to press the pistons into the cylinders.
14. We carry out further assembly of the unit in the reverse order. To make it easier to install the axis of the clamping lever, use a file or emery to grind the end of the axis like this.
To make a cone.
15. Before installation, lubricate the axis of the clamping lever with graphite grease.
16. Pressing the lever, insert the axle.
17. After installing the brake pads, you must press the brake pedal several times so that the cylinder pistons move the pads to the brake disc.
18. Check the brake fluid level in the reservoir and, if necessary, top up to normal.
Attention:
After replacing worn brake pads with new ones, do not rush to immediately drive onto busy highways. It is possible that at the very first intensive braking you will be unpleasantly surprised by the low efficiency of the brakes, although you have installed branded pads. The brake discs also wear out, and the new pads only touch them at the edges, practically without braking. Choose a quiet street or passage without cars and brake smoothly several times so that the pads get used and begin to fit the entire surface. At the same time, evaluate the effectiveness of the brakes. And try not to brake sharply for at least the first 100 km. When unused pads become very hot, the top layer of their linings burns, and the brakes will not be as effective for a long time.
The article is missing:
- Photo of the instrument
- Photos of parts and consumables
- High-quality photos of repairs
carpedia.club
How to replace the oil seal
If you detect an oil leak from the gearbox, carefully inspect the crankcase.
The leak will reveal itself. Lubricant usually leaks out through the CV joint seals and rocker panels. In the latter case, to replace you will need to perform a number of actions:
- Purchase a new VAZ-2109 gearbox seal. Its price is about 100 rubles.
- Drain the oil completely from the gearbox by unscrewing the plug from the bottom using the key “17”. If necessary, you can replace the lubricant later. It is recommended to pull out the upper dipstick to facilitate oil drainage.
- Disconnect the cardan from the rocker arm.
- Remove the boot, use a 10mm wrench to unscrew the bolt securing it to the gearbox rod.
- Using an awl or a thin screwdriver, remove the old oil seal. Inspect it for damage.
- Install the new oil seal using a pipe or large washer to press in.
After replacement, install the boot. Assess the condition of the cardan: if it has too much play, it will need replacement. After carrying out all the work, be sure to check that the speeds are turned on correctly.
Chevrolet car repair manuals and tips
Guide for removing and installing rear pads on a Chevrolet Niva
Chevrolet Niva is a car from the SUV class. And for an SUV, the condition of most control systems is the key to successfully passing an obstacle. Thus, an important role is played by the braking system and the parking brake, which performs the function of blocking the wheels while stationary. Blocking or braking of the rear wheels of the car is performed by drum brakes. The most important elements of these brakes are the rear pads of the Niva Chevrolet. Actually, this article will tell about them.
Removing the drumWhat are pads
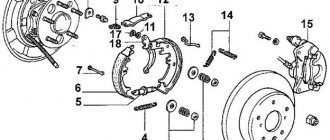
The brake pads are arched in the shape of the letter “C” and are installed in the rear wheel drums, where they do their work. The brake pad consists of the following elements: 1. the main part, made of special steel; 2. friction lining applied to the brake pads from the back of the head; 3. fastening elements, which are various holes.
Rear brake pads
Let's briefly consider the principle of operation of the rear pads. So, the brake pads are located in the rear wheel drums, two in each. They are located with the inner side facing each other, and the outer one, with a friction layer, interacts with the wheel drum. The resulting interacting force, which is accompanied by the release of energy, ultimately leads to the car stopping.
When you press the Niva Chevrolet brake pedal, pressure is created in the brake system, which acts on the pistons in the working cylinder. The so-called extrusion of the pads occurs; the friction part interacts with the moving wheel drum and leads to its braking. As the pads wear out, the friction layer wears off. The inside of the drum is also erased.
When is pad replacement necessary?
Before replacing the rear pads, an inspection must be carried out. A malfunctioning handbrake does not mean that the brake pads are urgently needed. They change in the following cases:
1. If the thickness of the friction layer is less than the permissible value, that is, less than 1.5 mm. 2. There is oil or other liquids on the lining. 3. There are cracks, gouges or chips on the layer. 4. The connection between the gasket and the base is weak.
Removing the brake drum
Only disassembly and detection of one of the above damages indicates the need to replace the pads.
Replacement of brake system elements
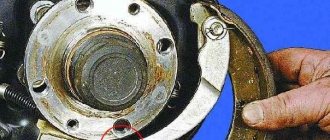
Replacing elements requires the availability of basic tools and careful implementation of repair actions. 1) It is necessary to place the Niva Chevrolet car on a flat surface and set second gear to the gearbox. Bars are placed under the wheels to secure the car in a stationary state. Set the handbrake to its lowest position. 2) Using a jack, lift the rear part and remove the wheel. Next, the drum is removed and a picture of the arrangement of the elements of the rear brake system is observed. Now you can remove the brake pads in two ways, let's look at both:
Disconnecting the spring
First extraction method: 1. One of the ends of the upper spring is pryed up with a screwdriver and removed. 2. The spacer bar installed below the spring is removed. 3. The support post, located in the middle, is held by hand on the back side of the shield and, using pliers, the outer post of the front block is rotated until the slots coincide with the protrusions. 4. The tension spring with both cups is removed and the stand located on the reverse side is removed. 5. The upper part is slightly retracted and the lower spring is removed. 6. Next, retracting the rear part, the drive lever is pulled out and freed from the tension cable. Second extraction method: 1. The support posts are removed from both edges. 2. The rear block is pryed up with a screwdriver and removed, first removing the spacer plate. 3. The upper fastenings are removed from the working cylinder. 4. The lower spring and both elements are removed along with the spacer bar and the spring. 5. The tip of the cable is removed from the lever, and the brake pads, complete with bar and spring, are removed. 6. Now holding one element, the spring and spacer are removed.
Analogs
| Brand name | vendor code | Price, rub.) |
| LYNXauto | BD4602 | 860 |
| Ferodo | FDB195 | 1140 |
| Delphi | LP189 | 870 |
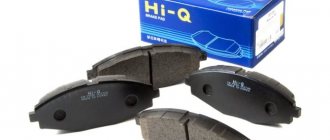
| HI-Q | SP1168 | 460 |
| TRW | GDB265M | 570 |
There is a large selection of similar parts, so choosing the ones you need won’t be difficult.
The main thing is to pay attention to the article number. This will prevent you from purchasing a low quality fake.
Also, fake parts do not have markings, or they are poorly printed on the products themselves.
Also interesting: What to check when buying a Niva
| Brand name | vendor code | Price, rub.) |
| Bosch | 1987475191 | 312 |
| Rosdot | 000006237 | 480 |
| Pilenga | BS-T001 | 560 |
| Fenox | BP50001C3 | 670 |
| "Start" | 361278J,MSK026 | 520 |
The minimum thickness of the brake pad linings should be 1.5 millimeters. To assess the condition of parts without removing them, you can use the inspection window. It is located in the brake shield.
What are pads
The brake pads are arched in the shape of the letter “C” and are installed in the rear wheel drums, where they do their work. The brake pad consists of the following elements:
- main part made of special steel;
- friction lining applied to the brake pads from the back of the head;
- fastening elements, which are various holes.
Rear brake pads
Let's briefly consider the principle of operation of the rear pads. So, the brake pads are located in the rear wheel drums, two in each. They are located with the inner side facing each other, and the outer one, with a friction layer, interacts with the wheel drum. The resulting interacting force, which is accompanied by the release of energy, ultimately leads to the car stopping.
When you press the Niva Chevrolet brake pedal, pressure is created in the brake system, which acts on the pistons of the working cylinders of the front and rear wheels. Next, the so-called extrusion of the pads occurs; the friction part interacts with the moving wheel drum (or disk) and leads to its braking. As the pads wear out, the friction layer wears off. The inside of the drum is also erased.
When is pad replacement necessary?
Before replacing the rear pads, an inspection must be carried out. A malfunctioning handbrake does not mean that the brake pads are urgently needed. They change in the following cases:
- If the thickness of the friction layer is less than the permissible value, that is, less than 1.5 mm.
- There is oil or other liquids on the lining.
- There are cracks, gouges or chips on the layer.
- Poor connection between the gasket and the base.
Only disassembly and detection of one of the above damages indicates the need to replace the pads.
Replacement of brake system elements
Replacing elements requires the availability of basic tools and careful implementation of repair actions. 1) It is necessary to place the Niva Chevrolet car on a flat surface and set second gear to the gearbox. Bars are placed under the wheels to secure the car in a stationary state. Set the handbrake to its lowest position. 2) Using a jack, lift the rear part and remove the wheel. Next, the drum is removed and a picture of the arrangement of the elements of the rear brake system is observed. Now you can remove the brake pads in two ways, let's look at both:
- First extraction path:
- One of the ends of the upper spring is pryed off with a screwdriver and removed.
- The spacer bar installed below the spring is removed.
- The support post, located in the middle, is held by hand on the back side of the shield and, using pliers, the outer post of the front block is rotated until the slots coincide with the protrusions.
- The tension spring with both cups is removed and the stand located on the reverse side is removed.
- The upper part is slightly retracted and the lower spring is removed.
- Next, retracting the rear part, the drive lever is pulled out and freed from the tension cable.
- Second extraction way:
- The support posts are removed from both edges.
- The rear block is pryed up with a screwdriver and removed, after first removing the spacer plate.
- The upper fastenings are removed from the working cylinder.
- The lower spring and both elements are removed along with the spacer bar and the spring.
- The tip of the cable is removed from the lever, and the brake pads assembled with the bar and spring are removed.
- Now holding one element, the spring and spacer are removed.
Next, replacement continues, but before installing new ones, it is necessary to check all parts: springs, spacers, struts. If there is damage or stretching, it is better to replace them. 3) Lubricant is applied to friction points, as well as to the threads of the spacer bar if old spacers are used.
Be careful!
Working with the cardan shaft mount (including the box seal) leads to displacement of the rocker, so difficulties arise with switching some speeds. The reason for them is in the fastening and adjusting screw at “13”, connecting the cardan and the gear shift lever. Therefore, after the new oil seal is installed, you need to check the position of the lever and adjust it if necessary.
After everything is assembled, it is worth checking the oil level and, if necessary, adding it. Then check the work to make sure there are no leaks.
The caliper jams on a Chevrolet Niva
The brake pipe fittings are screwed into the holes on the right side of the cylinder: The elasticity of the ring is selected in such a way that it does not move along the cylinder mirror from the force of the tension springs of the pads, but only from the force of the pistons.
Features of the Niva Chevrolet brakes. The car is equipped with two independent braking systems: working and parking (Fig....
Otherwise, replace the valve. This operation can be performed as follows: The elasticity of the ring is selected in such a way that it does not move along the cylinder mirror from the force of the tension springs of the pads, but only from the force of the pistons.
Maintenance of the mechanism From time to time, any brake system may malfunction. No car is protected from malfunction, especially if it is not always used correctly.
A very common maintenance procedure that you will encounter is bleeding.
With the help of the latter, you can get rid of air bubbles in the brake fluid, which interfere with normal braking, or even lead to system failure.
Check the condition of the pads through the hole in the brake caliper body. If the thickness of the friction linings is about 1.5 mm, replace the pads.
To check the degree of wear of the brake pads of the rear brake mechanism, remove the rubber plug from the hole in the brake shield and 5.
Replace the pads in the following cases: Check the pressure regulator with an assistant from below the car mounted on a lift or inspection ditch.
Have an assistant press the brake pedal. When you press the pedal with a force of 70-80 kgf, the piston should move out of the body, twisting the torsion arm.
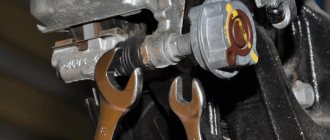
To adjust, lift the rear axle of the car. Loosen locknut 1 of adjusting bolt 2.
When turning the adjusting bolt with wrench 1, achieve light contact of the bolt with piston lever 2. Turn the adjusting bolt one more turn and tighten the locknut. With proper adjustment of the rear brake pressure regulator drive, the rear wheels should lock during hard braking somewhat later than the front wheels.
Place the ruler next to the pedal with its end on the floor, oriented in the middle of the pedal pad. Mark on a ruler or remember the position of the pedal. The vehicle is equipped with a vacuum booster located between the pedal pusher and the brake master cylinder. It is attached with two studs to the pedal bracket. The amplifier is non-separable; if it fails, it is replaced.
If the amplifier is working properly, after starting the engine the pedal should move forward.
Remember that failure to operate or insufficient efficiency of the vacuum booster can also be caused by a leak in the hose that takes the vacuum from the receiver.
The brake master cylinder is attached to the vacuum booster housing with two studs. At the top of the Chevrolet Niva master brake cylinder there is a reservoir from which brake fluid enters the cylinder.
The tank has markings for the maximum and minimum liquid levels, and a warning device with a float is mounted in the lid, which closes the contacts when the liquid level drops. The brake pipe fittings are screwed into the holes on the right side of the cylinder: The front wheel brakes are disc brakes with a three-piston floating caliper.
The pads are located between the cylinder block and the caliper: The caliper can move in the pad guide, being pressed against it by two spring-loaded levers. The pad guide is rigidly attached with two bolts to the steering knuckle.
When unscrewing, the bolts are secured by the edges of the protective casing; they are bent back at the edge of the bolts after tightening. Brake discs are cast iron.
The automatic clearance adjustment device is located in the wheel cylinder and consists of two elastic steel split rings, one for each piston, installed on the pistons with an axial clearance of 1.65 mm.
The elasticity of the ring is selected in such a way that it does not move along the cylinder mirror from the force of the tension springs of the pads, but only from the force of the pistons. As the pads wear, the pistons move the rings along the cylinders during braking, maintaining a constant design gap between the pads and the drum. In this case, it is necessary to replace the cylinder and brake fluid.
The nominal inner diameter of the drum is mm. It is allowed to groove the working surface of the drums when worn.
The largest permissible diameter during wear or after grooving is mm. The pressure regulator serves to reduce the braking force on the rear axle, which prevents the car from skidding when braking.
Key Benefits
At first I was surprised why so many owners of domestic cars that fall into the classic category are looking for an air suspension kit.
But when I began to delve into this issue, I discovered serious arguments in favor of such a change in the suspension design. If I had an old VAZ, maybe I would decide to install pneumatics on it myself.
Historically, the authors of this idea when organizing suspension were the French. And to be even more precise, representatives of the car company Citroen. They were the first to use air suspension on cars. And for good reason, because it provides a number of advantages.
- Comfort. Pneumatics can significantly affect the level of comfort in a car, and in a good way. Such solutions help achieve an optimal balance between rigidity and comfort. Classic shock absorbers are not capable of this;
- Ground clearance. Exhibition cars only compete to go lower and go higher. But let's talk about real operating conditions. Pneumatics allow you to change the current vehicle clearance at your discretion. This way you can relate the clearance to the degree of load of the machine. The more cargo, the higher the car rises. But it is also useful to lower the car when entering the highway. This lowers the center of gravity, allowing the car to stay on the road better;
- Overload resistance. By adjusting the suspension, the driver, if necessary, can load the car as much as possible, but without fear of possible damage to the chassis, or any significant changes in the behavior of the car on the road.
This is just a small part of the benefits. There are many more of them that can be identified. But we won’t focus too much attention on this.
Removing front brake pads from a Niva Chevrolet
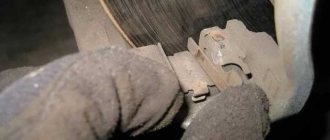
Replacing the front pads in a Chevrolet Niva begins with jacking up the left or right side of the wheel, having previously removed the bolts on this wheel. The car must be set at speed and on the handbrake, and supports must be installed under the wheels. And only after that jack up the car and completely unscrew the nuts. Having removed the wheel, you can begin to unscrew the caliper and remove it from the brake disc. A caliper is a complex unit in which the brake pads are attached and the braking effect itself is produced. The caliper is removed as follows: the clamping brackets are removed after first removing the fixing cotter pin from them. It is not so easy to pull out the clamping brackets; to do this, you need to arm yourself with a hammer and a punch (it is better to use a punch with a rubber end). Knockout should be carried out with progressive movements so as not to lose the springs that secure the brackets.
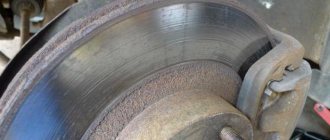
Once the staples are removed, the caliper can be removed. Perhaps, if it was not removed for a long time, it could become stuck. In this case, a can of WD-40 or motor oil may come in handy. By prying it up with a screwdriver, the caliper is carefully removed and hung on the brake hose or placed on a previously placed brick. Now you can begin to remove the pads on the Chevrolet Niva. They are easy to remove; after removing the block, you need to compare its width with the new one. If the old pad is twice (or more) thinner than the new one, then they should definitely be replaced.
The sequence of installing new front pads on Shniva
Before proceeding with installation, you need to know that the pads must be changed in pairs on each side. You cannot install only one new pad and leave the old one on the other; this can lead to poor performance of the brake system.
Before inserting new pads into place, you need to press out the pistons, which are elements of the braking mechanism. In this case, you will need a regular long screwdriver. Having squeezed out the piston, we install the pads in place, in the same form in which the old ones were removed. Installation of the caliper is carried out in the reverse order of disassembly.
It is imperative to lubricate the staples, otherwise it will be more difficult to knock them out next time. Having lubricated the brackets, install the fixation springs and check them for compression strength. To do this, you need to press the bracket where the spring is fixed. If light force is applied to the bracket and it rotates, the springs need to be replaced. It's better to change them now than to wait until they simply become unusable. After everything, we put the wheel in place and similarly replace the pads on the other side of the car. When the pads are replaced on both sides. You need to bleed the brakes to remove air from the brake system so that the hydraulic pistons reach the pads. Replacing brake pads on one side takes approximately an hour; specialists complete this work in 30 minutes.
Removing and replacing rear brake pads Niva Chevrolet
The principle of operation of the rear and front pads is to bring the wheel to a stationary state, or inactive (during slow braking). The only difference is the design of the front and rear brake systems. Rear brakes are used to manually brake a vehicle.
Removing the pads is done in a similar way with the front wheels. The design of the rear pads is arc-shaped and can be replaced in pairs. First, the brake drum is removed, then we measure its internal diameter, which should not be less than 201 mm. The block is removed by removing the tension springs from above and below using a screwdriver. The earring is removed, which serves as a gap adjuster. The cable ends are disconnected and the tension spring is removed. Then we remove the old worn pads and replace them with new ones. Reassembly of the rear pads is carried out similarly to disassembly in reverse order. The brake system of the rear wheels does not require bleeding. You can read more about this in the article. It is only necessary to adjust the cable tension and thereby adjust the handbrake lever. You can find out more about setting the handbrake in the section about the Chevrolet Niva handbrake.
Replacing brake pads on all four wheels of a Chevrolet Niva will not take more than 4 hours. Only now will you be 100% confident in your SUV, and it will never let you down on any road.
Safety first
During operation of the structure we have assembled, it is necessary to pay special attention to its technical condition. To do this, first of all, it is necessary to observe the places where the parts are connected (fittings, valves, adapters). Air leaks may develop in these areas over time. If the air comes out with great force, you will hear it. Another check can be done using a soap solution.
Constantly monitor the readings of the pressure gauges and the rate of decrease in pressure in the air bags. Once a month it is advisable to check the compressor for operability.
Pneumatic pressure measurement
Immediately after completing the suspension installation work, it is necessary to make a test drive, during which you listen to the movement of the car and make sure that there are no extraneous noises and vibrations.
Do not forget about the air supply hoses: regularly inspect them for integrity.
The pressure level in the cylinders deserves special attention. For the front part, normal pressure should be within 7-8 atm, and for the rear part - no more than 6 atm. Changing the pressure level, either up or down, is extremely undesirable.
Replacing front pads
It is logical that for replacement it is better to select original parts or those that have received official approval from the manufacturer. For the further process, you should hang the wheel and secure the car properly. Replacement procedure: Remove the wheel.
- Remove the cotter pin of the lower axle clamping element.
- Partially knock out the axle and then remove it with pliers while holding the lever.
- Remove the lever.
- Remove both springs so they don't get lost in the process.
- Remove the brake caliper using a screwdriver.
- Remove the pads from the guide.
Before installing new parts, press the pistons into the cylinders as much as possible. This is done with an installation spatula, pliers or an adjustable wrench. Afterwards the assembly is assembled in the reverse order. To simply install the clamping lever axis, it is recommended to slightly sharpen it into the shape of a nail and lubricate it with graphite lubricant.