In large machines, bearings often remain forever and are disposed of along with the unit. It happens that bearings are destroyed over time due to old age, corrosion, stress and other troubles in life. They are not easy to get or remove. They are usually located in hard-to-reach, blind holes, pressed in or secured in some other way. In this article we will look at 4 ways to remove or remove a bearing from a part.
Why do you need to change bearings?
- Maximum or average bearing wear;
- Finding an element under prolonged pressure during aggressive driving;
- Impaired balancing of the chassis system, so an urgent decision is made on how to remove the bearing and replace it with a new one;
- The appearance of atypical sounds, creaks when the car is moving, impacts of the cardan on the lower body of the vehicle;
- Detection of wheel play will also force the driver to think about how to remove the bearing from the shaft, carefully install new parts in their seats and return safe maneuverability to the car;
Recommendations
Replacing wheel bearings may vary from vehicle to vehicle. Modern cars may be equipped with various easily damaged electronic devices that must be removed when replacing a bearing. Therefore, if you are not a highly qualified car mechanic, it is better to entrust this work to car service specialists.
It is also worth doing a wheel alignment after replacing the wheel bearing. An adjusted wheel alignment will improve the car's road holding on turns and straights, eliminate vibration, and also reduce tire wear and fuel consumption. Vibration may also occur due to a crookedly inserted bearing. To eliminate it, you need to knock out the bearing again and check the tightness of the wheel nuts.
Method one, how to dismantle the bearing
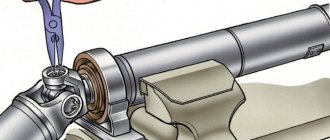
There are a large number of special devices that, even at the factory, received a single purpose - to quickly dismantle the bearing, without requiring power investments and financial costs from the auto mechanic or the car owner. Using special tools to remove the bearing from the shaft is an excellent and easiest solution to carry out repairs. You can save yourself from unforeseen situations. And to do this you just need to follow the instructions. Typically, a standard puller is a threaded shaft that is screwed onto special auxiliary holders. They act as fasteners. Using such a simple puller, the bearing is fixed and removed. Everything ingenious is simple!
Bearing puller
Stages of working with the puller
- We take a puller and bring it to the worn bearing.
- We clamp the bearing with a puller.
- We begin with moderate rotational movements to “pull” the bearing from its seat. Remember that movements should be progressive, without much pressure, so as not to damage the elements of a coherent system.
Thus, the question of how to remove the wheel bearing in car services is resolved. The use of special tools and auxiliary equipment makes the work easier, reduces the cost and speeds up the repair process.
Self-disassembly
Having completed the preparation, you can begin disassembling the SMA. Whatever brand your car is, the repair principle remains the same.
Top and front panel
In some washing machines, it is not necessary to remove the front panel to remove the tank. But we will describe the most difficult disassembly:
- Using a Phillips or hex screwdriver, remove the two bolts on the back of the top cover. Push it forward and remove it from the body.
- Move to the front. You need to pull out the dispenser tray, which is used to pour in the powder. Press the latch in the center and at the same time pull the tray towards you.
- Remove the screws securing the control panel.
- Using a flathead screwdriver, pry open the plastic latches.
- Without unfastening the wiring from the control unit, place the panel on top of the housing. If you decide to put it aside, first take a photo of the location of the connectors and then disconnect it.
- Open the hatch door. Bend the edge of the sealing rubber - behind it there is a clamp. Pry it with a screwdriver and pull it out of place.
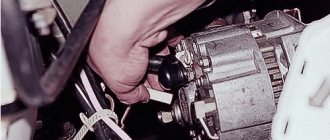
Method two, how to dismantle a bearing using heat
Apply the effective laws of physics associated with heating metal. After all, it is 100% known that metal expands at high temperatures, so there is a possibility that the bearing will jump out of its seat on its own, and there will be no need to use physical force, which is sometimes destructive to the entire system.
Tool for mounting and dismounting bearings
Important to remember! If you use this method for the first time, you may not calculate the temperature conditions or your hand will tremble, and as a result, scale may appear along the edge of the nest. And now it will block the path of the bearing. It is recommended to knock off the scale first, only then continue using the second method.
How to properly prepare for work
First you need to drain the remaining water from the washing machine, as you will need to completely disassemble it. Proceed sequentially:
- De-energize the SM by removing the plug from the socket.
- After disconnecting all communications and shutting off the water supply, drain the remaining water from the intake hose.
- Do the same with the drain filter. It is located under the front panel, behind a small hatch or plinth panel. Open the panel by releasing the latches with a screwdriver, unscrew the filter, and drain the water.
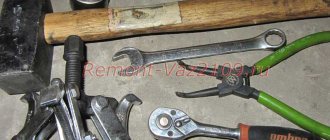
Move the machine away from the wall as far as possible. Now prepare a tool to remove the washing machine bearings. You will need:
- a set of slotted and Phillips screwdrivers, possibly hexagonal;
- a set of wrenches and socket wrenches;
- pliers;
- puller;
- hammer and chisel;
- bolt;
- sealant;
- hacksaw for metal.
Before purchasing a puller, make sure the bearing needs replacement. Then purchase a universal puller suitable for dismantling elements of any size.
Buy a new part. This can be a wheel bearing or any other that is suitable for your model. You can find out the exact numbers and markings after you remove the bearing from the washing machine.
The third way to remove the bearing
If it is not possible to use the first method when deciding how to remove the bearing with a puller, then use the third method. It will require skill and the use of force and auxiliary tools. What is the procedure for action?
- Study the features of the procedure, how to remove a bearing, evaluate your capabilities and level of skills.
- Select the necessary tools: a sledgehammer with a soft tip, wooden stands, a vice.
- Fix the removable shaft in a vice and use a hammer and wooden blocks to knock the shaft out in the opposite direction. Be careful not to damage the entire structure of the part with an awkward blow, because it can be used in the future.
Thus, the third method is used if the bearing is completely worn out and does not come out of its seat, so force must be applied. There are times when it is difficult to solve the problem of how to remove the rear bearings from the shaft, so you simply have to cut them out. This radical method is resorted to by experienced craftsmen who have received a completely worn-out chassis system for repair, and there is no other way to get a bearing to replace it. Beginners are not recommended to use the third method, because they simply will not cope and can damage other elements of the chassis system. In this case, a simple bearing replacement will cost a pretty penny.
Tools and spare parts
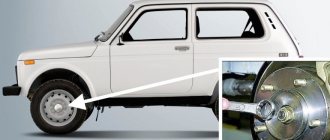
The fact is that the VAZ 2110 wheel bearing is a small part, and in order to work with it, you need sufficient lighting and some convenience. Therefore, a car prepared for repair should be driven into an inspection hole and sufficient light access should be created to the repair unit.
Before going down into the pit, you need to prepare all the tools and materials. It should also be noted that replacing the front wheel bearings is much more difficult than doing the same work on the rear components.
Therefore, you need to start work from the front node.
Front wheel hub diagram
A list of required tools should be provided:
- A special puller to remove the bearing;
- The so-called mandrel, that is, a pipe cut of the required size. This device is used to knock out hubs;
- Head 30, equipped with a high-quality wrench;
- Socket wrenches 19 and 17 sizes.
In addition, you need to purchase new suitable bearings that will be needed for replacement. For a VAZ 2110 car, you should choose Russian-made bearing parts rather than giving preference to Chinese analogues. The difference in price for these products is small, so there is no need to experiment.
Which way is better
There is no definite answer, because every repair is a special case. It all depends on the age of the car, the wisdom of the vehicle owner, and his responsibility for the technical condition of the car. If a person bought a car to ride and then sell the “tortured steel horse”, then the auto mechanic will have to work on such a car for quite a long time, almost all components of the system will be worn out. In this case, the second or third option is suitable. Ideal car repairs are carried out in a short time and do not require additional financial investments. The first method - the most professional and effective - is used by a car mechanic and will very quickly return the car to operation.
Hub unit design
It is important to understand the design of the hub itself in order to safely replace the bearings. Popularly, the hub assembly is often called the steering knuckle, because mechanical energy is transmitted through it to the wheels. The bearing plays an important role in the operation of the unit, since if it breaks, it will cease to function normally.
The device of the car hub unit
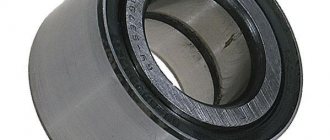
Note! There are several types of wheel bearings (ball, tapered and others). But the replacement occurs according to the same algorithm for all types of parts.
Wheel bearing structure
The bearing consists of several parts: the outer and inner ring, the cage, and the rolling element. To reduce the coefficient of friction, grease is used. During operation of the part, rotation is transmitted through the rolling body. The inner and outer bearings have no connection with each other, since the outer one is connected to the steering knuckle, and the outer one is connected to the car hub. The transmission of torque to the wheels occurs thanks to splines located inside the hub assembly.
Be sure to use hub lube
Replacing the front wheel bearing
Replacing the front wheel bearing of a Suzuki Chevrolet Cruze 4WD.
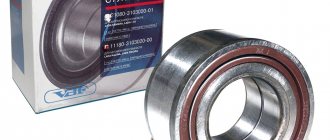
If, while driving on smooth asphalt, you hear a rumble from the front suspension, and this rumble intensifies when cornering, and the frequency of the rumble depends on the speed, then the wheel bearing is probably humming and it’s time to change it. If you drive for a long time with a roar on a collapsed bearing, you can destroy the rubber or wear off the brake disc. With all this, you can shake the suspended wheel with your hands and see the free movement of the wheel in the vertical plane. The unique number of the front wheel bearing is 43440-54G02, but inside the box there is a Koyo DAC4072W-10CS74, which is significantly cheaper than the Suzuki original! It is better to perform this function in a special service. Especially if you have never done anything like this before without the help of others. But if you have an irresistible desire to do everything yourself, then below is an annotation on how to replace the bearing yourself. I have done this function 3 times already.
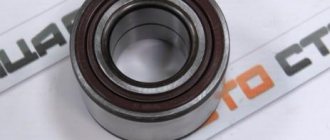
Photo of the new bearing taken out of the box labeled 43440-54G02.
In addition to the unusual bearing, you can also order cheaper (or affordable) analogues, for example Febest DAC40720036.
Or Koyo DAC4072W-10CS74, which is the original, just packed in a different box:
This is how it looks in the diagram:
Before work, you will need the following tools: a jack, or better yet, a pair of jacks or stands for the car, a powerful 30 mm wrench for unscrewing the hub nut, a bolt bolt, 17 and 14 mm wrenches, a hammer or sledgehammer. I recommend pressing out the old bearing and pressing in the new one using a press. You can negotiate a lower price at the nearest shop that repairs suspension. A huge portion of the fee is charged for disassembly and assembly. If you bring them a steering knuckle with a hub that has already been removed, they will charge little money for the work on the press. Thus, we will exclude the most difficult process from the list of our works. At 100, the inner race of the bearing is usually cut off from the hub with a grinder (I don’t have one in my garage
220V, so I removed the clip with a puller) and you don’t have to suffer yourself with this unusual procedure. Moreover, due to inexperience, you can destroy the hub with a grinder disc.
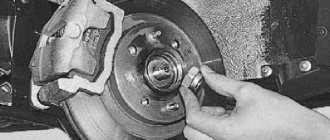
To remove the steering knuckle and hub , you must first remove the hub nut 30 (part No. 09159-18008 in the diagram). This can be done without removing the wheel, just by removing the plastic plug on the casting, or you can remove the wheel and ask your partner to press as hard as possible on the brake pedal, and in the meantime, rip off the CV joint nut on the hub. In the 2nd option, the car may fall off the jack. Once the nut is stripped and just turned by hand, you can remove the wheel.
Then we unscrew the 2 17 bolts securing the brake caliper to the steering knuckle and tie the caliper to the spring so as not to break the brake hose.
If the brake disc cannot be removed by hand, you will have to tear it off by screwing two bolts into threaded holes specially created for this purpose.
After removing the brake disc, you need to unscrew the nut and knock out (knock a couple of times on the protrusion on the steering knuckle into which the ball control rod pin is inserted) the rod control tip.
Later, you need to unscrew the ABS wire with a 10mm wrench and pull out the ABS sensor from its seat in the steering knuckle. This must be done very carefully. The sensor housing is plastic. Unscrew the bolt securing the sensor to the steering knuckle. And we begin to pick out the sensor with a flat screwdriver, twisting the sensor with pliers in different directions.
Next, you need to unscrew the 2 17 bolts (part No. 09103-12051 in the diagram) securing the strut to the steering knuckle, pull out the bracket securing the brake hose, unscrew the 14 bolt (part No. 09100-10184 in the diagram) securing the ball pin and steering knuckle with the hub in our hands.
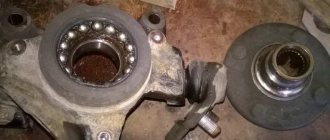
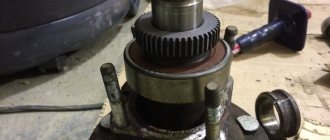
Now you can start pressing out the old bearing. First, we knock out the hub with the inner race from the old bearing from the steering knuckle.
Later, you need to pull out the retaining ring that secures the bearing in the steering knuckle. There is no spare ring included in the unusual bearing kit!
Next we proceed to pressing out the outer race of the bearing from the steering knuckle . On the inside of the steering knuckle there is a collar that secures the bearing. The only way to knock out the remaining bearings is outwards.
The bearing fell apart. I show you how to get a clip without a puller in a matter of minutes
Today, I will tell you how to remove the bearing race from its housing. The method is very simple and does not take much time.
For example, I took a bearing from a chainsaw crankcase. Over time, it often crumbles, but getting it out is not an easy task. Usually, all kinds of pullers do not help in any way to get the clip. But how do you get a broken part?
Disassembling the bearing
We need to find a bearing of the same size. To make it more convenient, it can be secured in a vice. Now you need to disassemble the old part. Don't know how to do this? Now we'll tell you.
We expose the bearing by removing the boot from it. Using a drill, make a hole in the bearing cage. The drill should go right through. Another option is to use a punch or impact screwdriver.
We pry the separator with a screwdriver and pull it out. You can help with pliers.
We collect the balls in a pile (it should turn out something like a crescent). Next, use any tool to push out the sleeve inside the bearing.
Everything is done, but what to do next?
Assembling the bearing
Lubricant must be applied to the fixed holder. Solid oil or lithol are excellent. The lubricant acts as glue. Glue the balls onto the holder and insert the inner ring.
Use a thin screwdriver to push the balls apart over the entire plane.
Now all that remains is to knock out the bearing using a hammer and a regular tube. That's all, see how simple it is?
Do you have any questions or something to add about the article? Write in the comments, perhaps this will greatly help readers in the future. Also subscribe to our channel in ZEN .
Signs of a faulty front wheel bearing on a VAZ 2109
- The sound is similar to a crunch when moving in a straight line. It will be heard both on the street and in the cabin.
- Vibration on the steering wheel. This symptom appears when the bearing is severely worn. As well as the inner race of the outer bearing. To remove from the hub, use a puller. There is a very high probability of a wheel wedge, which can lead to an accident.
- The car pulls to the side. The bearing seems to be shaking the wheel
- If play appears when rocking the wheel by hand. Clicks will also be heard.
Replacing the front wheel bearing of VAZ 2109 2110 with these symptoms is inevitable.
Reasons for replacement
The bearing fixes the position of the shaft, ensuring its uniform rotation. These small parts take on the entire load.
If you are wondering how to remove a bearing from a washing machine, then you suspect that it has become unusable. The reason for this could be a damaged oil seal, which, having lost its tightness, began to leak water. The lubricant was washed out, which led to corrosion and wear of the bearing.
Most users download SMA based on the “as much as it will fit” principle. This is wrong, because over time, overload leads to wear of parts, including bearings. You can notice this by the characteristic grinding sound. It can be heard when spinning or when turning the drum by hand.
Another sign of a bearing problem is leaking. If you find that water is accumulating under the bottom of your washer, it’s time to check.
Untimely replacement can lead to damage to the tank by the drum, wear of the cross and shaft. And this already threatens a major overhaul, which will require installing a new tank and drum.
Video on replacing the front wheel bearing
3. Apply the handbrake, engage 1st gear and chock the wheels.
4. Use a socket or a 30mm spanner to loosen the bearing nut. It is tightened very tightly, so the head or key must be strong so as not to bend or break. Use a long lever to loosen the nut (piece of pipe).
5. Loosen the wheel bolts.
6. Raise the front wheels, in this case the anti-roll bar will not interfere with the repair. It is also possible to lift only the wheel on which the repair will be carried out. In this case, use a pry bar to press out the suspension elements. Place a safety support under the car next to the jacks (a stump or something similar). -We put a new clip in the drum and knock it off the hub. You can remove the bearing race. During repairs, sometimes considerable effort will be applied, and if the jack falls off, the support will hold the car.
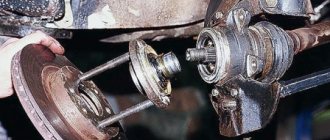
7. Remove the wheel, brake pad guide with caliper and brake disc.
8. Tie the brake pad guide together with the caliper so that they do not hang on the brake hose and damage it.9. Finally unscrew the bearing nut and remove the washer.
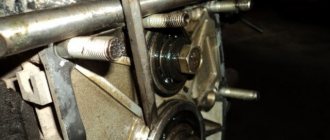
10. Insert bolts approximately 135mm long and with M12 x1.25mm thread into two diametrically opposite holes in the brake disc. Suitable fastening bolts are the heads that are on the “classics” (2106, 2107, etc.)11. Return these bolts to the hub holes (opposite each other) to the full thickness of the hub12. Driving the brake disc sharply along the bolts, as if on guides, hit the bolt heads with it and thereby remove the hub.
13. Unscrew the bolts securing the ball joint to the steering knuckle (Replacing the ball joint) and remove the CV joint (grenade) from the bearing hole.14. Using pliers, remove the retaining ring.15. Using a puller, press the bearing into the cup, which is located outside the steering knuckle, while the bolt presses on the inner ring of the bearing through the washer from inside the knuckle. Puller with bearing
16. If there is no puller, then you can remove the bearing race from the hub (see paragraph 17) (although this is also not so easy, and without a puller, but of a different type, it is even more difficult) and inserting it into the hole where the bearing is located, use the narrow part to hit something metal.
How to choose a circlip puller?
When purchasing a tool, pay attention to the following details:
- Length of sponges. The longer it is, the easier it is to grab the fasteners that are located in the deep groove. Also, the longer the jaws, the less effort you need to put into compression.
- Length of handles. Also, based on the law of leverage, you can understand that the longer the handles, the easier it is to open the ring.
- Tip shape. Can be straight or curved. Straight ones are easier to work with, but curved ones make it much easier to grab the ring in the recess.
- Diameter of tips. Should be as close as possible to the diameter of the hole in the ears. Thin ones may simply break, thick ones will not fit into the hole.
- Reverse bending of tips. Useful for external circlips - they grip firmly and don't slip out.
Can't do without welding
It is important to note that it is not always possible to use a bearing puller, even if you have one at hand. The general design of the mechanism does not allow access with a puller.
It is recommended to proceed as follows:
- an eye is welded onto the outer ring of the bearing;
- it is important to put a steel chain link on the eye in advance;
- Be sure to protect nearby structural elements of the mechanism from hot drops of metal during welding.
All that is required now is to attach the opposite end of the chain to something very solid (weighing at least 50 kg) and pull off the bearing with progressive, sharp movements in the axial plane.
The video clearly demonstrates the above method for dismantling any radial bearings:
Have you noticed that the washing machine hums and vibrates a lot during operation? Perhaps the reason lies in worn drum bearings.
The bearings are designed to last from 5 to 10 years. Parts do not always reach this deadline and break earlier. In the article you will learn why this happens and how to remove the bearing from the washing machine housing for replacement.