Signs that your car's heating system radiator requires replacement:
- high consumption of coolant (antifreeze or antifreeze) in the vehicle cooling system (antifreeze or antifreeze);
- The heating of the car interior does not work;
- traces of a coolant leak on the asphalt under the heater radiator or leaks in the hoses supplying fluid to the heater;
- the smell of antifreeze in the cabin;
- greasy deposits on car windows, their fogging.
In these cases, first of all, check the tightness of the system hose clamps. Perhaps they are the cause of the leaks.
And now about how to replace the VAZ-2112 heater radiator with 16 valves of different types
How to replace the radiator of a VAZ-2112 heater with 16 valves of different types
Signs that your car's heating system radiator requires replacement:
- high consumption of coolant (antifreeze or antifreeze) in the vehicle cooling system (antifreeze or antifreeze);
- The heating of the car interior does not work;
- traces of a coolant leak on the asphalt under the heater radiator or leaks in the hoses supplying fluid to the heater;
- the smell of antifreeze in the cabin;
- greasy deposits on car windows, their fogging.
In these cases, first of all, check the tightness of the system hose clamps.
Perhaps they are the cause of the leaks. And now about how to replace the VAZ-2112 heater radiator with 16 valves of different types
Important subtleties
- When installing a plastic flap, sometimes you have to grind and adjust the flap into place so that it moves freely. It is also allowed to do a little extra work near the aluminum damper.
- After installing the damper, you should set it by hand to the cold air supply position. In this position, the heater radiator will be covered with a damper.
- Move the temperature sensor to the MIN position and turn on the ignition. The sensor will begin to rotate and take the correct position. This will make it easier for you to insert it into place, since the damper and gearbox will be in the MIN position.
- Buy a double for the washer hose, as this will simplify the installation and removal of the wind cover in the future.
As you can see, there is nothing difficult in removing the heater core if you know what to do.
Video:
Video:
New cooling system
The sequence of your actions in this case is as follows:
- First of all, for safety reasons, disconnect the negative terminal of the battery. We drain the cooled antifreeze or antifreeze, first opening the expander cap. To drain the liquid you will need a container with a volume of 4-5 liters.
- Now, after unscrewing the two nuts, remove the wipers from the car.
- Then we dismantle the released protective plastic cover under the windshield, which is secured with 2 nuts and 4 self-tapping screws.
- To access the stove, remove the frill of the car by unscrewing 5 self-tapping screws, 1 screw and 2 nuts located at the bottom, in the middle of the frill, in the area of the steering rack.
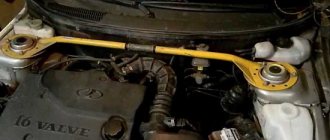
- In order to remove the stove, remove the yellow cross brace, if any, as well as the curved bellows of the air filter.
- We pull the chokes off the radiator pipes.
- Then disconnect all electrical wires from the stove terminals.
- At the steering rack, unscrew 2 nuts that secure the heater, 1 nut securing the heater to the body.
- We unscrew the 3 screws connecting the two halves of the stove.
- We take it out by swinging the right side of the stove, first moving it to the right.
- The radiator in the removed half of the stove is secured with 3 screws. We take it out and replace it with a new one, not forgetting to put on the foam seal. We check the operation of the fan and, if necessary, repair it or replace it with a new one.
- Before installing the assembly, it is advisable to rinse the coolant supply hoses with running water.
- Assembly is carried out in reverse order.
Old style cooling system
Such heaters were installed on early 21120 models. You can determine the modification of the system by its appearance, after first removing the frill of the car.
To replace the radiator you need:
- Carry out steps 1, 4-7 for removing the new type cooling system.
- We dismantle the expansion tank of the cooling system.
- We remove the vacuum booster by unscrewing the 2 nuts (17 mm) and carefully (without damaging the brake system pipes) move the brake master cylinder to the side. Remove the vacuum booster pipe.
- Inside the car, unscrew the 4 nuts from the brake pedal studs and, together with the pedal, remove the car's amplifier.
- Thus, we gained access to the heater core, which is secured with three screws. We replace it and reassemble the entire system in the reverse order.
What to install?
Brand Pekar
Heating radiators used for the VAZ 2110 are usually divided into two types:
- Old style;
- New sample.
Until the fall of 2003, old radiators were installed on the “tenth” model, and then cars with new units began to be offered. There is practically no difference between them, but the repair differs in approach and complexity.
In addition to the standard aluminum radiator, a copper analogue is perfect for the VAZ 2110. This unit has fewer fins, but is characterized by more efficient heat transfer. This will make the stove work much better. The only drawback of a copper radiator is its cost. Ideal for installation on a VAZ 2110, a double-row copper radiator marked 2110-8101060 will cost you up to 2,000 rubles.
If you don’t want to spend that kind of money, but want to get an effective device with high quality indicators, then choose the DAAZ model. This radiator is made of aluminum, works well, and the price does not exceed 1000 rubles.
How to replace the radiator of a VAZ-2112 heater with 16 valves of different types
Signs that your car's heating system radiator requires replacement:
- high consumption of coolant (antifreeze or antifreeze) in the vehicle cooling system (antifreeze or antifreeze);
- The heating of the car interior does not work;
- traces of a coolant leak on the asphalt under the heater radiator or leaks in the hoses supplying fluid to the heater;
- the smell of antifreeze in the cabin;
- greasy deposits on car windows, their fogging.
In these cases, first of all, check the tightness of the system hose clamps. Perhaps they are the cause of the leaks.
And now about how to replace the VAZ-2112 heater radiator with 16 valves of different types
Leak search
Finding out the reason for this state of affairs is not always easy. To do this, the driver will have to carefully examine the situation under the hood. Usually you can only notice a wet pan. In this case, it is worth checking the coolant level in the system. Most likely, there has clearly been a decline.
The cause and location of the leak is not easy to recognize. It is useful to “drive” the car at idle for some time so that the thermostat opens. And only when the optimal pressure is reached will the source of the leaks reveal itself. Most likely, one of the connections of the pipes is leaking, often it can be the pipes for supplying antifreeze to the heater radiator; if this is the case, we proceed to replacement.
New cooling system
The sequence of your actions in this case is as follows:
- First of all, for safety reasons, disconnect the negative terminal of the battery. We drain the cooled antifreeze or antifreeze, first opening the expander cap. To drain the liquid you will need a container with a volume of 4-5 liters.
- Now, after unscrewing the two nuts, remove the wipers from the car.
- Then we dismantle the released protective plastic cover under the windshield, which is secured with 2 nuts and 4 self-tapping screws.
- To access the stove, remove the frill of the car by unscrewing 5 self-tapping screws, 1 screw and 2 nuts located at the bottom, in the middle of the frill, in the area of the steering rack.
- In order to remove the stove, remove the yellow cross brace, if any, as well as the curved bellows of the air filter.
- We pull the chokes off the radiator pipes.
- Then disconnect all electrical wires from the stove terminals.
- At the steering rack, unscrew 2 nuts that secure the heater, 1 nut securing the heater to the body.
- We unscrew the 3 screws connecting the two halves of the stove.
- We take it out by swinging the right side of the stove, first moving it to the right.
- The radiator in the removed half of the stove is secured with 3 screws. We take it out and replace it with a new one, not forgetting to put on the foam seal. We check the operation of the fan and, if necessary, repair it or replace it with a new one.
- Before installing the assembly, it is advisable to rinse the coolant supply hoses with running water.
- Assembly is carried out in reverse order.
Old style cooling system
Such heaters were installed on early 21120 models. You can determine the modification of the system by its appearance, after first removing the frill of the car.
To replace the radiator you need:
- Carry out steps 1, 4-7 for removing the new type cooling system.
- We dismantle the expansion tank of the cooling system.
- We remove the vacuum booster by unscrewing the 2 nuts (17 mm) and carefully (without damaging the brake system pipes) move the brake master cylinder to the side. Remove the vacuum booster pipe.
- Inside the car, unscrew the 4 nuts from the brake pedal studs and, together with the pedal, remove the car's amplifier.
- Thus, we gained access to the heater core, which is secured with three screws. We replace it and reassemble the entire system in the reverse order.
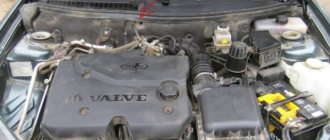
When is it necessary to replace the heater radiator in a VAZ 2112
General view of the heater radiator of a VAZ 2112 car
To maintain the desired temperature, a stove or heater is provided in the car interior. The built-in automatic control system controls the required air heating with temperature deviations of no more than two degrees Celsius. The air is heated by a radiator. After air passes through the deflectors of the device, it is distributed in the car depending on the position of the handle that controls its flow. When antifreeze leaks, most often you need to change the heater radiator on a VAZ 2112. This article discusses how to do this work with your own hands.
What do you need for work?
First of all, you will need a new heater radiator. The choice is presented in a fairly wide range, so decide for yourself here.
As for tools and materials, be sure to check the condition of the system pipes. It is possible that they are also damaged, so they will have to be replaced.
Buy a set of clamps. In general, you will need three of them, but it is better to take a reserve just in case. Moreover, this “just in case” happens to every second person who changes a stove radiator with their own hands.
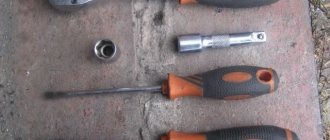
Tools include a short Phillips screwdriver and tweezers . The latter will help you install the latches.
Heating system for VAZ 2112
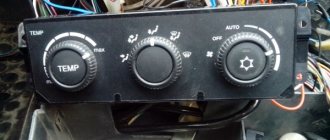
It is impossible to create coziness and comfort inside a car during the cold season without a working heating system, and an indispensable device in it is a stove. In the interior of the VAZ 2112 car there is supply and exhaust ventilation. Air enters it through special holes located in the windshield trims. Air is supplied forcefully, by a heater fan, or spontaneously. There are gaps between the door panels through which air escapes from the passenger compartment. For the same purposes, there are also holes in the ends of the doors. The valves built into them allow air to pass out and prevent its penetration inside. This improves thermal insulation in the cabin. To heat the air, the VAZ 2112 uses a radiator on the stove, which sets the desired air temperature before entering the cabin. Features of the VAZ 2112 car:
- The heater radiator of the VAZ 2112 car is located in a plastic casing, located horizontally under the dashboard.
- The design consists of two rows of aluminum tubes onto which two plastic tanks are pressed. There are two fittings on the left tank: coolant is drained through one and coolant is supplied to the other.
- To regulate the amount of incoming air, dampers are built into the heating system. Its main part passes by the radiator. When the dampers are positioned in extreme positions, there is no air flow into the cabin.
- There is no valve in the system that would shut off the flow of coolant. Therefore, when the engine is running, the heater radiator is constantly heated, which ensures rapid heating of the interior, and reducing the joints in the system improves its tightness.
How to replace the heater radiator of an old model VAZ 2112 car
An antifreeze leak in a VAZ 2112 car is the reason why the heater radiator needs to be replaced. It is not possible to determine why antifreeze is leaking without disassembling the engine shield, so it is better to immediately install a new model heater radiator on the VAZ 2112. For cars manufactured before 2003, the interior heaters are of the old type; after September of the same year, new devices are installed in the cars. Replacing the heater radiator of the new VAZ 2112 model is carried out with some differences from the old designs. Before installing a new unit, you need to remove the old-style heater radiator on the VAZ 2112. For this:
- Antifreeze drains. It can be drained from the engine block into a container or through an expansion tank installed under the hood. The cap of the expansion tank is unscrewed, which relieves pressure in the system. Then the drain plug is removed, first you need to unscrew and move the ignition module to the side.
When draining antifreeze through the expansion tank, remove the hose from the stove, then the rubber pipe with an L-shaped profile.
Tip: If the drained antifreeze is clean, you can then pour it back.
- The rubber hood seal located near the frill or the windshield is removed.
- The frill fixing screw located under the brake master cylinder is unscrewed.
- Unscrew the four screws of the upper fastening on the right side of the frill.
- The clamps holding the wires and hoses on the frill are disconnected.
- The negative wire and positive terminal of the fan are disconnected from the body.
- On the left, 2 screws are unscrewed in the frill, the part is moved slightly forward.
Tip: There is no need to remove the frill completely.
- After unscrewing five screws and removing two nuts, the plastic trim for the windshield is removed.
- The antifreeze level sensor terminal, if present, is disconnected and the hose for steam removal is removed from the expansion tank.
- The hose used to wash the windshield is disconnected from the mount.
- Four screws are unscrewed, as shown in the photo.
How to remove the heater of a VAZ-21124 car
Drain the coolant.
We remove the windshield trim (see Removing the trim and wing of the wind window VAZ-21114, -21124), the right part of the soundproofing upholstery and the throttle assembly (see How to remove the throttle assembly and its drive of a VAZ-2111 car).
We loosen the fastening of the inlet pipeline: we unscrew the cap nuts of the upper fastening completely, and we do not unscrew the two bolts and three nuts of the lower fastening completely.
We loosen the tightening of the self-tapping screw securing the guide tube of the oil level indicator and lift the tube so that its fastening bracket disengages from the self-tapping screw.
Remove the ignition coil of the first cylinder.
1. Disconnect (can be cut) the clamp securing the heater motor power supply wire block and the additional resistor wires.
2. Disconnect the heater motor power supply wire block.
3. Disconnect the wire block from the additional resistor connector.
4. Use a Phillips screwdriver to loosen the clamp.
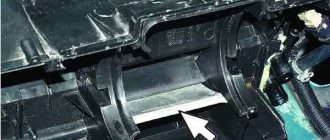
5. and disconnect the supply hose from the upper pipe of the heater radiator
6. Use the same tool to loosen the clamp
7. Disconnect the outlet hose from the lower pipe (it has a smaller diameter than the inlet).
We do not disconnect the steam exhaust hose from the heater radiator, since the clamp for its fastening is difficult to access.
It is easier to disconnect this hose from the expansion tank pipe and remove the heater housing along with the hose.
8. Remove the steam exhaust hose from the clamp on the windshield wiper rod.
9. Disconnect the power supply block from the micromotor-gearbox of the damper drive.
10. Disconnect the wiring block from the damper position sensor.
11. Using a “10” socket with an extension, unscrew the nut of the upper fastening of the heater housing to the body on the right side of the engine compartment.
12. Using a socket or an “8” wrench, unscrew the self-tapping screw of the upper fastening of the heater housing, located next to the fastening of the windshield wiper drive rod.
13. Unscrew the nut of the upper fastening of the heat shield of the steering rack cover.
14. Using a high “10” socket with an extension, unscrew the two nuts of the lower fastening of the heater housing (shown by arrows)
15. Remove the heater housing from the engine compartment of the car
Heater parts according to the catalog
When dismantling the heater electric motor assembled with the impeller, remove the cover of the air purification filter entering the interior ventilation and heating system.
You can also dismantle the heater motor in a car, but to do this you will have to perform all the operations necessary to remove the heater housing assembly.
You can only not remove the body from the engine compartment, but only pull it out to a sufficient distance.
16. Disconnect the motor ventilation tube.
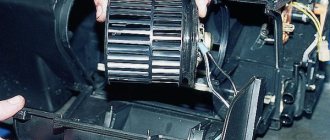
17. Using a Phillips screwdriver, unscrew the three self-tapping screws securing the electric motor flange to the housing.
18. We take out the screws and the plastic bushings located under them.
20. ...and remove the electric motor and impeller assembly