Replacement
Replacing the VAZ-2109 thermostat is very simple. To do this you need:
- Allow the engine to cool completely.
- Drain the antifreeze through the drain window at the bottom of the radiator.
- Using a screwdriver, loosen all 4 clamps holding the pipes.
- Remove the thermostat.
- Install the new part by securing all 4 clamps and adding coolant to the radiator.
READ Management change at Marelli Signal Boost in electrification, ADAS businesses
After adding fluid, you must start the engine without closing the cap of the expansion tank. This will allow all the air to leave the cooling system.
There are many types of thermostats on the market. The most suitable for the VAZ-2109 is the thermostat from 2110 with an 8-valve engine. It is slightly smaller than the original “nine”, it can be disassembled and only the valve mechanism can be replaced. This unit will not require any modifications or corrections. The thermostat from the VAZ-2110 is more reliable and practical. After installing it, the car interior heats up faster, and general engine warm-up is carried out in a shorter period of time.
How to check the speedometer shaft?
Usually, to check the functionality of the shaft, it is enough to drive a couple of tens of meters. Start the engine and drive 20–30 meters and observe the behavior of the end of the shaft. If the tip is motionless, you need to lift the hood cover, unscrew the nut that secures the shaft. If only the shell of the part gives in, then this will indicate only one thing - a shaft break has occurred. In this case, you will have to remove the remaining tip from the drive. For this job you will need pliers.
Another development of events is also possible if both the shaft and the shell fail, and this will indicate that there are simply no edges at the tip of the shaft. Regardless of the reason for the shaft failure, it will have to be replaced.
Often the need to change the drive arises due to wear of paired gears. In order to solve this problem, you do not have to remove the gearbox. To solve the problem, it is enough to have an inspection hole or overpass.
The first step is to unscrew the bolt that secures the drive housing to the gearbox. After this, the housing is removed, then the gears. The latter must be replaced. In order to choose the gears that are suitable for your car, just compare the new ones with the old ones, the number of teeth should be the same.
If there is oil on the housing, it would be a good idea to check the O-ring and replace it if necessary. The drive elements are washed using clean kerosene.
The order of assembling the unit is reverse.
Removing the speedometer
Round device like on a VAZ2106
To dismantle a speedometer of this type, it is necessary to remove the front panel of the instrument panel. First, unscrew the two bolts securing the plastic linings on the steering column, then alternately remove the lower and then the upper parts of the linings. During this procedure, remove the o-ring from the ignition switch; it is important not to forget to install it back during assembly On the front panel (its lower part) there are two recesses, at the same level as the steering column. They have holes through which we gain access to the brackets that secure the panel. We pry up the panel by inserting two flat (slotted) screwdrivers into them. In the case when these holes are covered with film or factory-made polymer, you just need to pry them out with a screwdriver, an awl or a knife. the panel will easily come out of its seat, providing free access to the speedometer and the place where the VAZ 2109 speedometer cable is attached. An old example of a VAZ 2101 speedometer
Old sample speedometer from VAZ2101
- To unscrew this type of speedometer, you will first have to remove the air vent located on the side of the cabin heater, or the windshield air vent
- They are attached with simple latches, which you just need to slightly pry (squeeze) with a screwdriver, or simply turn
- Through the opened hole we get free access to the clamps securing the instrument panel
- Release any lock (one is enough), then push the instrument panel into the cabin
- If the shield has not been removed for a long time and the retainer has become sour, then we recommend using WD-40 or its equivalent.
After dismantling the front panel, we can easily remove the speedometer:
- To identify the cause of the problem - the speedometer mechanism or the drive cable is broken, you just need to twist the speedometer cable on the VAZ 2109 and monitor the operation of the instrument needle (here you need to be careful not to break the limiter)
- If the arrow rotates evenly and its rotation corresponds to the applied force, this means that the problem lies in the cable
- If the arrow “slips” or does not respond to cable turns, you need to replace the speedometer itself
- When replacing it, you should carefully examine the markings (color) on the back cover
- Different VAZ models use several types (types) of gearboxes with different gear ratios
- When we install a device that is designed for a different gearbox, the error in its readings can be up to 10 kilometers per hour for every 50 kilometers per hour
- That is, you are driving within the permitted limit of 60-80, but in fact you are already exceeding the speed limit and breaking the rules, a fine is the most harmless price in this case
- Compatible for different speedometer models and color coded
Procedure
Now let's figure out how to remove the drive when the speedometer on a VAZ 2109 does not work:
- To do this, release the cross member that secures the gearbox to the body, give back the nut that secures the drive
- Pry off the drive housing with a flat screwdriver (as in the photo below)
- By pressing the gearbox to the side (for example, with a piece of pipe) from the drive, we pull the drive out of it
- Then we check its serviceability
- To do this, twist the gear and see whether the groove for the speedometer cable begins to turn or not
- If the groove does not turn, then replace the speedometer drive
- When going to the store for a new drive, it’s better to take the old one with you as a sample just in case (you can confuse the number of teeth on its gear)
- And if you install a “foreign” (not the one you need) drive, then in no more than 100 meters it will break the box cover, because a mismatched gear pitch will simply turn the entire drive outward and result in serious damage to the gearbox
- To be able to use this gearbox in the future, it will be necessary to replace its rear cover and completely change the oil
- If the old one suddenly pours out, there will still be fragments and crumbs of the housing left in it, which can subsequently fall on a gear tooth or clog the oil channel
Now that you know how to determine what the reason is if the speedometer needle suddenly starts jumping and fix it with your own hands.
Drive repair
We only considered replacing the drive, if the speedometer does not work in the VAZ 21093, sometimes this is easier and cheaper to do:
- The speedometer drive is removed, as a rule, to replace its housing, or the sealing ring from under which lubricant flows, or the drive gear itself
- It can be removed without dismantling the gearbox assembly; for this purpose it is better to drive the car onto an overpass, inspection hole or lift
The repair procedure will look like this:
Using a socket wrench, unscrew the bolt that secures the drive housing, pry it off with a screwdriver, then remove it
Unscrew the drive nut, remove it, then pry off the housing with a flat screwdriver and remove the drive
Now we can remove the driven gear. This gear is made of plastic, so it is important to carefully inspect it and if you find signs of wear, replace it immediately
We inspect the condition of the rubber seal (shown by the arrow), then remove and inspect the plastic gear
In addition, it is important to pay attention to the condition of the mounting socket, where the tip of the flexible rod (cable) of the speedometer enters. The socket should not have licked corners or be broken, otherwise such defects will be the reason for replacing the gear. It is also worth paying attention to the condition of the box body in that place , where our drive is installed. If traces of lubricant leaks are visible, then it will be necessary to replace the rubber ring of the drive seal, which is located on its body. To remove it, you will need to remove the driven gear, then push the sealing ring out of the groove. All parts are then washed in clean kerosene
Of course, no one has canceled the service station services, if you are too lazy to tinker, although tinkering is probably not an applicable expression here (it only takes 10-20 minutes), and the price of their services suits you, then decide for yourself.
Replacing the cable
Almost everywhere, car owners are faced with the problem of speedometer failure, which is often caused by a faulty cable. To replace the cable, it is not at all necessary to go to a car service center, because you can easily cope with this task yourself, our instructions will help with this. So:
Go down the car (on a pit or overpass), then you need to unscrew the cable from the drive of your speedometer, located on the side of the engine compartment, move the rubber cover up, and unscrew the nut on the cable. After that, disconnect the cable. To disconnect the cable from the speedometer, you must first remove the instrument panel from dashboard In this case, if your car has a low dashboard, then unscrew two bolts and carefully remove the visor, squeezing the spring-loaded clamps with your fingers. Then you can remove the instrument cluster. If the car has a high dashboard, then first you will need to remove the trim, then unscrew the unit instruments Then you should unscrew the cable nut from the speedometer from the back side, and pull out the old cable through the engine compartment, remember how it went through. Because the next step you will have is laying (pulling) the new cable. Inserting the plug into the compartment bulkhead will be much easier , if you pre-lubricate it with oil, for example Litol
Replacing the cable and speedometer if necessary
Replacing the speedometer with your own hands is very simple, you just need to disconnect the electrical connectors from the old device and switch them to the new device. For this:
- Use pliers to unscrew the cable nut and screw it to the new speedometer
- Then we install the device in place and then assemble the panel
- To replace the speedometer cable on a VAZ 2109, you must first unscrew it from the gearbox
- The connection is located under the bottom of the car, near the gearbox
Unscrew the cable from the gearbox along the bottom of the car near the box
- Using pliers (pliers), unscrew the clamping nut and disconnect the cable
- After this, unscrew the speedometer cable in the same way
- A cable nut is screwed to the device on the back side; you need to unscrew it
A cable nut screwed to the device, which we need to unscrew
- The nut has a special eye, to which you need to tie a strong soft wire or strong thread
- Then we pull the cable towards ourselves from under the bottom on the gearbox side so that the end (of the wire) or thread remains in the cabin
- Untie the thread or wire (depending on what you tied) from the old cable
- We tie it to a new cable, then pull it into the cabin, then connect
- If there is no such eye (this sometimes happens on non-original speedometer drive cables), then we use a nut as a thread stopper
- Before installing a new cable, it is advisable to lubricate it from the inside with a thick lubricant such as “Litol” or “CV joint”, more than half the length that starts from the gearbox
- This way the cable will work longer and will not rub against the sheath at the bends.
- Why is it necessary to replace the entire speedometer if it is quite possible to identify and eliminate the breakdown of its mechanism?
- This is easier because speedometer repairs are not provided and spare parts are not produced; they are sold assembled
- In addition, if one part breaks, then the next one may break in the near future.
- And long and painstaking work to identify and fix the problem will take a lot of time, it’s faster and easier for you to find, buy and install a new device in order to forget about the malfunction for a long time
It will be useful Fuse block VAZ 2109 carburetor
The simplicity and ease of diagnosis and replacement are simply amazing; any driver can handle it without any difficulties. A video is not required here, but no one is stopping you from watching it.
The device and principle of operation of the speedometer
The speedometer drive is a set of mechanisms designed to transmit information about the speed of the car to the speedometer dial. On the VAZ 2109, this drive is made in the form of two gears (driven and driven), which are mounted on the secondary shaft of the gearbox, as well as a flexible shaft.
When the secondary shaft rotates (the car begins to move), the drive gears receive torque and transmit it to the flexible shaft, which, in turn, being connected to the speedometer needle, causes it to show the necessary information on the dial.
Depending on the vehicle modification, the flexible shaft may have different lengths. This is due to the fact that the first “nines” had a low-mounted torpedo, which means the shaft was shorter. Only the latest car releases that underwent modernization received a torpedo with a higher location, which forced designers to produce a longer flexible shaft.
Where is the VAZ-2109 speed sensor located and faulty?
Why do we need a speed sensor on the VAZ-2109? Let's figure it out. This device is responsible for the correct display of data on our speedometer and tachometer. He does this by transmitting electronic impulses to the electrical control unit. But due to long-term operation and significant load on the speed sensor itself of the VAZ-2109 car (more than 6 thousand pulses are transmitted to the control unit per 1 km), an error occurs during data transfer. Then car owners have questions: how to check the speed sensor? How to change it correctly?
Why did the speedometer on the VAZ 21099 stop working?
VAZ 21099 is a very popular car in Russia. The reliability of this car, as everyone knows, leaves much to be desired, so car owners quite often encounter malfunctions of their VAZ 21099. All the problems of this car have long been studied and described. It often happens that malfunctions occur in the car’s speedometer.
Due to problems with speed detection, you may receive tickets for exceeding speed limits, or you may experience problems with shifting gears if you are a novice driver or are accustomed to determining when to change gears using the speedometer. In this article, we will study the causes of the problem and find out how to repair the speedometer.
How to repair the speedometer drive
Now we will talk in more detail about dismantling and repairing the drive. It often needs to be repaired if the O-ring begins to leak oil. To repair this unit, follow the instructions:
- Using a socket wrench, unscrew the bolt holding the speedometer drive housing.
- Then pry it up with a screwdriver and remove the drive.
- Inspect the driven gear; it is made of plastic and may show signs of wear. In this case, it is best to replace the part.
- Check the rubber seal. If signs of wear are visible on it, replace it.
- Then evaluate the quality of the seat for the cable end. It should also not be worn or damaged.
- Look at the drive mounting location on the gearbox; if there are oil leaks there, the O-rings must be replaced. They are located on the body.
- If you decide to replace these rings, you will need to first remove the driven gear and then push out the seal.
- Soak these parts in kerosene. If they are not worn out, replace them. Also wipe the remaining parts with kerosene and put them in place.
The total time for repair and dismantling of this VAZ-2109 unit will take about 30 minutes.
VAZ 21099 - removing the speedometer drive mechanism
Removal and subsequent replacement of the speedometer drive mechanism on a VAZ 21099 car can be performed without dismantling the gearbox. To carry out repair work, prepare a set of keys and a new drive, then perform the following sequence of actions:
- First of all, clean the drive surface from dirt, then disconnect the flexible speedometer cable from it.
- Using a socket head, unscrew the nut securing the drive housing to the gearbox, then pry it off with a flat screwdriver and carefully remove it.
- Disconnect the driven gear and shaft from the drive.
- Next, use a suitable rod to push the rubber O-ring out of the body.
Now that disassembly has been completed, wipe all parts with a rag soaked in kerosene or gasoline, and then conduct a visual inspection of all elements for mechanical damage. Pay special attention to the gear with the shaft, since it is made of plastic, the shaft itself is most often subject to damage, so that its edges are not licked off. Replace all rubber seals if they have lost elasticity or become dry.
At this point, the repair work to remove the speedometer drive mechanism on the VAZ 21099 car has been completed. After repairs are completed, perform installation in reverse order.
0 0 votes
Article rating
Purpose of the speedometer and possible causes of problems
Before you figure out why the speedometer needle jumps on a VAZ 2109, you should understand what is where and what it is intended for. Speedometers are designed to convert the rotational speed coming from the drive shaft to the speedometer sensor into an indication of the speed of the vehicle and, in addition, the number of revolutions that the speedometer sensor drive shaft makes are converted into readings of the trip meter (kilometers) traveled by the car. But when the speedometer needle jumps or even spins as it wants, or may even freeze in one position, it means that there are problems with the speedometer mechanisms and there may be several reasons for this. This:
- A breakdown inside the speedometer itself (see VAZ 2109: how to properly repair the speedometer)
- Broken or damaged speedometer cable
- The speedometer gearbox (aka drive) is broken
Diagnosing the malfunction
It is important to first understand why the VAZ 2109 speedometer does not work:
- To find the reason, we climb under the car from an inspection hole, overpass or lift
- If you don’t have any, you can get by this way - just slightly lift the car, put a reliable safety net (thick wide wooden blocks - you can’t use bricks), then unscrew the nut securing the speedometer cable
- We call an assistant and with his help we check the serviceability of the speedometer and its cable
- While you are turning the speedometer cable from below with your hand (having disconnected it from the drive) in one direction and then the other, an assistant in the cabin monitors the arrow - if at the same time the speedometer arrow jumps, then the cable and speedometer are working, and you should check the drive
- However, there are cases, even though the arrow jumps, there may still be a problem in the cable, it has fluffed up inside the braid and sometimes touches it
We fix speedometer breakdowns on a VAZ 2109: we repair the drive ourselves and change the cable
The mechanism that measures the speed on the VAZ 2109 is simple: on the gearbox shaft there is a gear that rotates a cable, which is connected to the speed indicator located on the dashboard. The arrow on the scale shows the speed at which the car is moving and the kilometers traveled are shown.
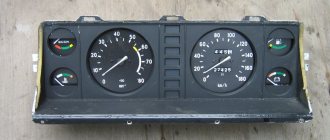
Instrument cluster VAZ 2109
If the speedometer on a VAZ 2109 does not work, then you need to find out what the reason is:
- The VAZ 2109 speedometer drive does not work;
- the cable broke;
- The device is faulty.
Checking the mechanism for functionality
Signs of malfunction:
- The numbers on the dial are uneven or do not move;
- when the speed changes, the meter displays incorrect readings;
- the arrow on the scale stays in place when the car moves.
To determine the exact cause of a non-functioning meter, it is better to install the car on a lifting device or inspection groove. You can carry out diagnostics with the help of an assistant.
To check, you need to unscrew the nut holding the speedometer cable. Then one person turns the cable while under the car, and a second person in the cabin watches the scale.
If the arrow twitches when the cable rotates, then it and the meter are working properly.
Speedometer Troubleshooting Instructions
Having figured out what exactly is not working, you need to remove the faulty part and replace it or repair it.
Drive repair and replacement
The cause of drive failure is gear wear. It is convenient to carry out repair work on an inspection groove or a lift.
Replacing the VAZ 2109 speedometer drive is carried out according to the following scheme:
- To unscrew the bolt securing the gearbox and drive housing, you can use a socket wrench.
- After unscrewing the bolt and prying the housing with a screwdriver, remove it.
- Then the old gears are dismantled and new ones are installed.
Device drive with gear
When changing gears, you should count the teeth. There should be the same number of them as on old products, otherwise incorrect information will be displayed on the dashboard. When removing, the housing should be inspected.
If oil leaks are detected, the seal rings must be replaced. Before reinstalling, it is recommended to wash all parts with kerosene.
Assembly is carried out in reverse order (video author - Vladimir Solokhin).
AVTOTRUE.RU
- Home
- Auto garage
- Replacing the Drive Gear of the Speedometer Drive VAZ 2109
Installing a speedometer on a VAZ 2109 car
The purpose of the speedometer is to inform the driver about distance and speed. It also defines the composition of its units - a counter showing the mileage of the car, called the odometer, and the speed - the speedometer itself. A broken speedometer is a very unpleasant breakdown. Traffic cops can be penalized for speeding and difficulty changing gears correctly, especially around corners. Repair of the VAZ 2109 speedometer is carried out independently.
Symptoms of speedometer defects:
- The numbers don't exactly hit the shelf, but eventually they stop working.
- The speedometer begins to display the wrong vehicle speed.
- Sensors burn out.
To repair the VAZ 2109 speedometer, you need to remove the front panel:
- Unscrew the beard. To do this, tighten two screws on one of the panels.
- The top panel releases three clips and turns off the side lights, hazard lights and low beams.
- The radio is removed, the cigarette lighter is turned off.
- Unscrew the two screws securing the panel and the speedometer cable. Three gaskets removed and panel removed.
- The screws holding the speedometer unit are loose.
If you have exceeded the speedometer, you must do the following:
- Slide the pointer over the stop.
- Tape a piece of construction tape to the bottom of the scale.
- The marker is placed at the top of the arrow.
- Using a ruler, the distance on the device is measured from zero to 10 km per hour. Its value is 0.7 mm.
- The required distance on the adhesive tape from the previously placed mark is measured and the mark is placed again.
- The speedometer needle is removed and installed so that its lower position drops to the second mark.
How to recognize a faulty speedometer?
- The speed is displayed incorrectly;
- The numbers stop crooked;
- The sensor has burned out.
The main condition for success is the correct dismantling of the front panel. Let's consider the sequence of work. A pair of screws are unscrewed, which serve to fix the bottom panel, and the “beard” is removed. The top panel is released from the clamps, and the emergency lights are turned off. This applies to side lights, low beam, and cigarette lighter. Next comes dismantling the pads and removing the panel itself. There is now free access to the screws securing the speedometer.
Thank you for your attention, I hope the article was useful for you, see you again at VAZ Repair.
How to remove the instrument panel
It's okay if the testing mode does not produce results. On some cars it is not there at all, and therefore there are other ways to repair the speed sensor. Here's one of them: drive the car into the garage, set it to the parking brake. After opening the hood of the car, disconnect the battery from the wire with the minus sign. This will allow you to avoid short-circuiting the on-board network. Now you need to pull out the instrument panel. Remove the trim, and then carefully unscrew the steering wheel. After this, you need to remove the switches that are located under the steering control. Having done the above, you need to unscrew all the self-tapping bolts that hold the instrument panel in place.
Having completed all the above steps, you can remove the dashboard on which the instrument panel is mounted. To do this, you need to grab it by the edges and then pull it slightly in your direction. Now disconnect all the wires attached to the dashboard. But before you disconnect them, label each wire. This is necessary in order to avoid mistakes when putting the entire structure back together. After disconnecting the wires, pull out the dashboard.
The instrument panel is attached to the dashboard with several bolts. Unscrew them to disconnect it. Now you need to remove the glass, which is held in place with glue-sealant. The place that connects the glass and plastic needs to be heated with a hair dryer. After completing these steps, you can easily detach the glass.
How to repair the speedometer drive
Now we will talk in more detail about dismantling and repairing the drive. It often needs to be repaired if the O-ring begins to leak oil. To repair this unit, follow the instructions:
- Using a socket wrench, unscrew the bolt holding the speedometer drive housing.
- Then pry it up with a screwdriver and remove the drive.
- Inspect the driven gear; it is made of plastic and may show signs of wear. In this case, it is best to replace the part.
- Check the rubber seal. If signs of wear are visible on it, replace it.
- Then evaluate the quality of the seat for the cable end. It should also not be worn or damaged.
- Look at the drive mounting location on the gearbox; if there are oil leaks there, the O-rings must be replaced. They are located on the body.
- If you decide to replace these rings, you will need to first remove the driven gear and then push out the seal.
- Soak these parts in kerosene. If they are not worn out, replace them. Also wipe the remaining parts with kerosene and put them in place.
The total time for repair and dismantling of this VAZ-2109 unit will take about 30 minutes.
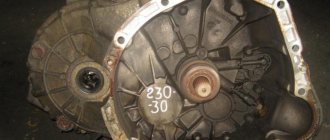
repair of gearbox differential on VAZ 2108, VAZ 2109, VAZ 21099 cars
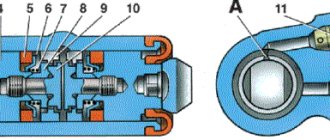
1. Remove the differential (Fig. 5.12) from the gearbox (see “Disassembling the gearbox and troubleshooting its parts”).
2. Turning 90° around the pinion axis, remove the side gears from the differential housing.
3. Remove the retaining ring from the pinion shaft.
4. Remove the pinion axle and two pinions from the differential housing.
5. Remove the bolts securing the driven gear to the differential housing.
6. Press the driven gear off the differential housing. 7. Inspect the working surfaces of the satellites, the axes of the satellites, side gears and the spherical surfaces of the differential housing in contact with them. Remove small irregularities with fine-grained sandpaper. Replace parts with significant defects.
8. Check the condition of the transmission driven gear. If there are chips, chipping or significant tooth wear, replace the driven gear. On VAZ 2108, VAZ 2109, VAZ 21099 cars, final drive gears with different gear ratios are installed. The number of teeth of drive gear 1 and the number of teeth of driven gear 2 are stamped on the driven gear.
WARNING The final drive gears are selected in pairs at the factory based on noise and contact patch. Therefore, when replacing the driven gear, also replace the drive gear: the driven and drive gears are sold as a pair. To check, count the number of teeth on the drive gear.
9. Inspect the bearing seats on the differential housing. If these areas are significantly worn out, replace the differential housing. If there is pitting (sinks) on the raceways and rolling elements, traces of indentation of the rolling elements on the raceways, or damage to the cages, the bearings must be replaced.
10. To replace the differential bearings, use a puller to press the bearings off the differential. In this case, the bearings are destroyed. Then…
11.... press out the outer rings from the gearbox and clutch housings with a special puller. If there is no puller, press out the axle seals first. Please note that in this case the seals are damaged and the seals must be replaced (for more details, see “Replacing gearbox seals”). Press out the bearing rings from the outside of the crankcases with a punch.
12. Please note: there may be an adjusting ring under the ring installed in the gearbox housing, which must be re-selected before pressing in new rings (see “Selecting the differential bearing adjusting ring”).
Signs of breakdown
The car itself can tell you that the DS is out of order. To do this, you just need to pay attention to the characteristic signs of such a breakdown:
- The speedometer does not work at all or provides incorrect information about the current speed;
- Idling behavior is unstable;
- Gasoline consumption is increasing;
- The motor does not produce full power.
The practice of VAZ 2109 owners shows that the most obvious sign of a breakdown of the engine is the engine stopping at idle while coasting, or the engine stopping when the clutch is pressed to change speed.
If the engine breaks down, the “Check Engine” light on the dashboard should light up. If the car is equipped with an on-board computer, then the error code corresponding to the malfunction is 24.
https://youtube.com/watch?v=qiDmZLUuTMI
Causes of failure
There are several main reasons why a DS may stop working:
- There is a break in the electrical circuit. Therefore, first of all, we advise you to check the condition of the wiring and contacts. They could become dirty or oxidized. It's not difficult to clean them. Additionally, we recommend treating contacts with Litol.
- Break near the connector. Here the wiring often bends and chafing occurs. Don't forget to check the condition of the insulation of the wires that are located near the exhaust manifold. Often they melt under the influence of temperature, which leads to short circuits.
- The speedometer cable is worn out. Over time, as the vehicle is used, the cable becomes covered with burrs, cracks, and breaks. As a result, the speed sensor stops working properly.
https://youtube.com/watch?v=jsP9uC7EE-Q
Verification methods
The first thing you need to do is make sure that a voltage of 12 V is supplied to the DS contacts. Since the operation of the DS is based on the Hall effect, the test is performed by torsion. The voltage varies within 0.5-10V.
Today, there are three main ways to check the performance of a speed sensor. The first two involve the use of a multimeter. Which one to choose, decide for yourself. We will talk in detail about all three methods of checking DS.
| Verification method | Your actions |
| Method one |
|
| Method two |
|
| Method three |
|
If checking the DS shows that everything is fine with it, be sure to check the functionality of the sensor drive. It is necessary to hang up the front wheel and find the DS drive by touch. Now start rotating the wheel with your foot and check with your hand whether there is rotation in the drive and how stable it is. The help of a partner will not hurt you here.
Functions
It is incorrect to assume that the DS serves solely to transmit information regarding the current speed of the vehicle. In fact, this device has several tasks.
- Transferring information to the dashboard, namely the speedometer, about the speed of the car.
- Supports optimal functioning of the idle air control.
- Transferring data to the electronic control unit in order to maintain optimal speed depending on the travel mode.
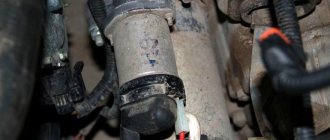
The DS is connected to the speedometer and controller using a mounting block located in the engine compartment. And inside the car, directly on the heater fan relay, there is a sensor fuse.
https://youtube.com/watch?v=7drLW_Qlgj4
Errors and symptoms
If the device starts to work incorrectly or breaks down, you should pay attention to the on-board computer screen. Diagnostics of errors will determine that the DS has stopped functioning properly and measures should be taken to eliminate the breakdown
| Error code | What does it mean |
| P0500 | This error indicates that the computer does not receive a signal from the speed sensor. |
| P0503 | This error code informs about the receipt of an unstable signal from the DS, which is intermittent. |
If these error codes appear on the dashboard, you should definitely inspect the electrical circuit for oxidation or damage to the integrity of the contacts. Often it is because of this that the DS stops transmitting information.
But there are other signs by which you can determine that the DS is out of order:
- On the dashboard, the speedometer shows incorrect speed data or the needle does not move at all;
- With a slight acceleration, the speed floats, the engine switches off on its own;
- Fuel consumption increases;
- Engine power is noticeably reduced.
These signs may be signals of problems with other systems. But if you find one of the characteristic signs of a DS failure, plus one of two error codes appears on the on-board computer, then the problem lies precisely in the speed sensor.
Functionality check
Do not rush to replace the device until you are sure that the faulty sensor is the culprit of the problem.
The check is performed in several ways. Decide for yourself which one you prefer.
Checking the operation of the DS
Before doing this, be sure to check the condition of the wiring and contacts. If they are oxidized or rusted, or there are breaks in the circuit, then the DS itself may well be operational. You just need to return the wiring and contacts to a functional state. If the check shows that everything is intact and there are no problems with the contacts, then diagnose the speed sensor.
- If you don’t want to remove the DS, then place the car on a level surface, secure it with blocks and lift the left front wheel with a jack. Connect the voltmeter to the contacts of the sensor and begin to rotate the wheel with your hands. At the same time, look at the voltmeter data. If the voltage increases with frequency in proportion to the increase in wheel speed, the DS operates normally.
- Another method also does not require removing the measuring device. But for this you will need a test lamp. Use a jack to lift the left front wheel and connect the test lamp to the DC contacts. After this, manually rotate the wheel. If the lamp lights up, the sensor is working well.
- The third method involves dismantling the sensor and then checking the input and output voltage. The device for measuring the indicators will be a voltmeter.
- The fourth method is actively used by those who prefer to repair their car with their own hands. Here you have to check the sensor drive. To do this, lift the wheel using a jack and remove the sensor. Feel for the DS drive, and then begin to rotate the wheel. You can feel with your fingers that the drive rotates. If there are no jams, everything rotates evenly, then the drive is in good condition.
If a malfunction of the DS is detected, the only correct solution is to remove it and replace it with a new sensor.
Having determined that your DS has already served its purpose, you can begin the replacement procedure.
Work technology
Replacing the speedometer cable on a VAZ 21099 with a high and low instrument panel includes the following steps:
- the electrical system is de-energized, for which the battery is removed;
- then the instrument panel is dismantled;
- after ensuring access to the fastening elements, you need to unscrew the fastening nut and remove the slots from the device body;
- for ease of installation, the new cable is attached to the shell of the old one;
- the fastening nut of the drive installed on the gearbox is dismantled;
- the tip is removed from the spline connection;
- the old cable is pulled out of the engine compartment;
- after checking the correct position of the new cable, tighten the union nuts;
- the instrument panel is mounted in the reverse order;
- the battery is connected;
- The functionality of the device is checked.
It is important to consider some aspects when performing such work, for example:
- the cable should be lubricated using greases (Litol, CV joint, CIATIM);
- lubricant must also be applied to the spline joints;
- union nuts are mounted and dismantled using adjustable pliers;
- To prevent damage to the threads, screwing the nuts is done very smoothly, controlling the applied force.
Also, the cause of incorrect speed readings may be a failure of the gear drive. Its drive gear gradually wears down and loses connection with the gearbox. Therefore, before installing the speedometer cable, you should check the condition of this unit. When replacing this unit, you must ensure that the drive is applicable to this vehicle model.
Speedometer repair and cable replacement VAZ 2101,2106,2108,2109,21099
A breakdown of the speedometer does not lead to any damage to the car components, but still requires repair, since by incorrectly assessing the speed, the driver risks flagrantly breaking the rules and even getting into an accident. In essence, all speedometer malfunctions can be associated with its mechanism, or with a break in the speedometer drive cable.
Removing the speedometer on VAZ 2101,2106,2108,2109,21099.
If you have a round-shaped speedometer like on a VAZ 2106 car. In order to remove the speedometer, you need to remove the front panel of the instrument panel. The first step is to unscrew the two bolts that secure the plastic lining of the steering column, and then remove the lower and upper parts one by one. This removes the ignition switch O-ring, which will need to be installed during assembly. At the bottom of the front panel there are two recesses, approximately at the level of the steering column, in which there are holes for access to the mounting brackets. We insert flat screwdrivers into them and pry off the panel. If the holes are covered with factory-made polymer or film, you just need to clean them using the same screwdriver, knife or awl. The instrument panel extends from the seat and there is direct access to the speedometer.
If you have an old-style speedometer, like on a VAZ 2101 car. To remove the speedometer on a VAZ, you first need to remove the airflow grille, which is located on the side of the stove, or the glass airflow grille. They are attached to simple clamps that can either be pressed out with a screwdriver or turned. Through the open hole we gain access to the latches that hold the instrument panel. We release one of the latches, and then push the instrument panel towards the cabin. If the shield has not been removed for a long time and the retainer has become sour, it is recommended to use WD-40 fluid or its equivalent.
Determining the cause of the breakdown.
Once the front panel is removed, you can easily remove the speedometer. In order to determine what the problem is - in the speedometer mechanism or the drive cable, you just need to twist the cable and look at the operation of the speedometer needle. If it rotates evenly, according to the applied force, then the problem is in the cable. If the arrow “skips” or does not respond to the rotation of the cable, then the speedometer needs to be changed.
When replacing the speedometer, you need to pay attention to the color markings on the back cover. Different models of VAZ cars used several types of gearboxes with different gear ratios
If you install a speedometer that was designed for a different gearbox, it will give an error in the readings, which can be up to 10 km/h for every 50 km/h. Compatibility of a particular speedometer model is indicated by color coding.
Replacing the speedometer and cable.
Replacing the speedometer is as easy as pie, just disconnect the electrical connectors and transfer them to the new speedometer. Using pliers, you need to unscrew the cable clamping nut and transfer it to the new speedometer. After this, you can install the speedometer in place and assemble the panel. To replace the cable, you first need to disconnect it from the gearbox. The connection is located under the bottom, near the box. Using pliers, unscrew the clamping nut, and then disconnect the cable. Then unscrew the cable from the speedometer side in the same way. In the area of the nut there is an eye to which you need to tie a soft wire or strong thread. Then we pull the cable towards us from the gearbox side, so that the end of the thread remains in the cabin. Having untied the thread or wire from the old one, you need to tie it onto a new cable, then pull it into the cabin and connect it. If there is no eye (this happens on non-original speedometer drive cables), you can use a nut as a thread stopper.
Before installation, it is advisable to lubricate the new cable with Litol or CV joint grease, a little more than half its length, starting from the gearbox side. This way it will last longer and will not rub against the shell at the folds.
Why is it worth changing the entire speedometer, if you can find and eliminate the cause of the breakdown of its mechanism, it is only because spare parts for speedometers are not produced, they are sold assembled. In addition, if one part breaks, then the next one will break in the near future. And the painstaking work of finding and fixing the breakdown takes a lot of time, so it’s easier to buy and install a new speedometer and forget about the faults.
Video of speedometer repair VAZ 2108, 2109, 21099
The reason for the breakdown of the VAZ 2109 speedometer drive
Since the flexible shaft is the most basic part of the speedometer drive, a common cause of speedometer failure is its breakage. The shaft breaks due to normal wear and tear and must be replaced.
To check the operation of the shaft, the instrument panel is removed, the shell with the shaft is placed on the edge of the inner part of the torpedo, the engine is started and the vehicle is driven at a speed of 20 kilometers per hour. If the shaft does not rotate, then it is broken. If it rotates properly, then the problem lies in the speedometer mechanism itself.
Also, a drive malfunction may be due to wear of the gears, which are attached near the secondary shaft of the gearbox.
If the panel worked before
The check is essentially the same, but you can exclude an error in connecting the wires from the list of possible faults when switching to a new chip.
If you have a VDO device, on our website you can see how to do its self-diagnosis. If not, purchase a “lace” or have it diagnosed at a car service center. Sources of errors can also show which way to dig.
There is a feeling that in your case the problem lies in the speedometer mechanism itself or the tracks on the panel. Disassemble the panel yourself - call the roads, check the mechanism (continuity, check the integrity of the gears in the speedometer drive or other problems - the unit is quite complex, there are many sources of malfunctions) - or take it to a good electrician.
Also on amateur radio forums you can find diagrams of simulators of the speedometer sensor. Assembling this circuit will be useful for checking the operation of the speedometer. Without it, the dashboard will have to be constantly placed on the car and removed back.
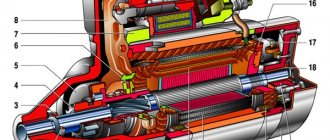
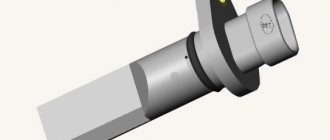
The mechanical method of measuring the speed of a car is long gone. Today, this function is taken over by a speed sensor, whose operation is based on the Hall effect.
The sensor transmits pulses (electromagnetic) to the controller, and based on them, the controller calculates at what speed the car is moving at a given moment.
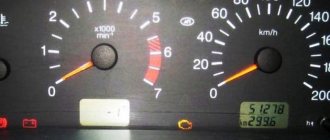
Appearance of the device