Lift the rear of the car and remove the wheel. Take measures to prevent fluid from leaking from the tank.
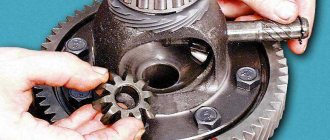
Rice. 7–14. Rear wheel brake drum: 1 — bolts securing the drum to the axle shaft; 2 - threaded holes for installing bolts 1 when removing the drum
Remove the brake drum by unscrewing the mounting bolts 1 (Fig. 7–14). Insert these bolts into technological holes 2 and tighten until the drum separates.
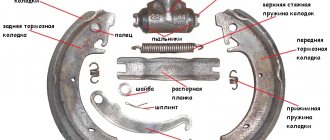
Rice. 7–15. Rear wheel brake mechanism: 1 - wheel cylinder; 2 — upper tension spring of the pads; 3 — pad lining; 4 — brake shield; 5 — inner plate; 6 — rear cable sheath; 7 — lower tension spring of the pads; 8 — front brake pad; 9 — pad support plate; 10 - rivets; 11 — oil deflector; 12 — pad guide plate; 13 — rear parking brake cable; 14 — rear cable spring; 15 — rear cable end; 16 — rear brake pad; 17 — block support post; 18 — lever for manual drive of the pads; 19 — rubber cushions; 20 — pad spacer; 21 — finger of the lever of the manual drive of the pads
Disconnect cable tip 15 from lever 18 (Fig. 7–15) of the manual drive of the shoes, remove the cotter pin, press pin 21 and remove the lever. Use pliers to disconnect the upper 2 and lower 7 tension springs. Having turned the cups of the support struts 17, remove them together with the struts, springs and lower cups; remove pads 8 and 16 and spacer bar 20. Disconnect the brake fluid supply tube from the wheel cylinder and plug the inlet holes of the cylinder and tube. Remove the wheel cylinder. When replacing the brake shield, remove the axle shaft as indicated in the “Rear Axle” chapter and disconnect the parking brake cable by unscrewing the two bolts securing it to the brake shield.
Assembly and installation
Install and secure the wheel cylinder to the brake shield, attach the brake fluid supply pipe to it and tighten the fitting nut completely. Attach lever 18 (see Fig. 7–15) for manual drive of the shoes to the block and install brake pads with spacer bar 20, then install racks 17 with springs and lower cups, place the upper cups and fix them on the racks by turning in one direction or the other . Make sure that the ends of the pads are correctly positioned in the stop sockets on the wheel cylinder pistons and on the brake shield. Install the shoe tension springs. Attach the tip 15 of the rear cable to the lever 18. Install the brake drum, having previously lubricated the seating belt of the axle shaft with graphite grease or LSTs-15 grease and tighten the drum mounting bolts until full. If the wheel cylinder was removed during disassembly, remove air from the rear brake drive circuit.
Disassembly and assembly of wheel cylinders VAZ 2107
Rice. 7–16. Wheel cylinder: 1 — pad stop; 2 — protective cap; 3 - cylinder body; 4 - piston; 5 - seal; 6 — support cup; 7 - spring; 8 - crackers; 9 — thrust ring; 10 - thrust screw; 11 - fitting; A - slot on the thrust ring
Remove the protective caps 2 (Fig. 7–16), then press the pistons 4 assembled with the parts of the device for automatically adjusting the gap between the brake pads and the drum out of the cylinder body.
Rice. 7–17. Wheel cylinder parts: 1 - piston assembly; 2 — cylinder body; 3 - thrust screw; 4 - thrust ring; 5 - crackers; 6 - spring; 7 — support cup; 8 - seal; 9 - piston; 10 - protective cap
Install the piston assembly with the automatic device on a special device so that the protrusions of the device cover the head of the thrust screw 3 (Fig. 7–17). Using a special screwdriver, turning piston 9, unscrew the stop screw 3 from the piston. Remove seal 8 with support cup 7 and crackers 5 from the screw. Separate the thrust ring 4 and the thrust screw 3. Assemble the automatic device for adjusting the gap between the shoes and the drum and the wheel cylinder itself in the reverse order, taking into account the following: - torque the piston thrust screws 3.9–6.9 N m (0.4–0.7 kgf m); Slot A (see Fig. 7–16) on the rings should be directed vertically upward; deviation from the vertical is allowed no more than 30°. This arrangement of the slot ensures more complete removal of air from the wheel brake drive when bleeding the brake; — to pre-compress the thrust rings, press the pistons into the cylinder body using a special device shaped like a cylinder with a conical internal hole; — the force of pressing the piston into the cylinder must be at least 343 N (35 kgf); if the force is less than 343 N (35 kgf), replace the thrust ring; — when pressing the piston into the cylinder, it is necessary to maintain dimensions of 4.5–4.8 mm and 67 mm (maximum) (see Fig. 7–16) for a free fit of the brake drum; — before installing parts into the cylinder body, lubricate them generously with brake fluid. After assembly, check the movement of each piston in the cylinder body. They should move easily within 1.25–1.65 mm. Replace the protective caps 2 last.
Wheel cylinders. Check the cleanliness of the working surfaces of the cylinder, pistons and thrust rings. The surfaces must be completely smooth, without roughness, to prevent fluid leakage and premature wear of seals and pistons. Eliminate defects on the cylinder surface by lapping or grinding. However, increasing the internal diameter of the cylinder is not allowed. Check the condition of the thrust screw 3 (see Fig. 7–17), spring 6, support cup 7 and cotters 5. If necessary, replace damaged parts with new ones. Replace the seals 8 with new ones. Check the condition of the protective caps 10 and replace them if necessary. Pads. Carefully check the pads for damage or deformation. Check the elasticity of the tension springs, both upper and lower; if necessary, replace them with new ones. The springs must not have residual deformations when stretched with a force of 343 N (35 kgf) for the lower springs and 411 N (42 kgf) for the upper ones. Check the cleanliness of the linings, if dirt or traces of grease are found, thoroughly clean the linings with a wire brush and rinse with white spirit, in addition, check for any leakage of grease or oil inside the drum; eliminate the faults. Replace the pads with new ones if the thickness of the linings is less than 1.5–2 mm. Brake drums. Inspect the brake drums. If there are deep grooves or excessive ovality on the working surface, rebore the drums on the machine. Then use a lathe to sand the drums with fine-grained abrasive stones. This increases the durability of the linings and improves uniformity and braking performance. The largest permissible increase in the nominal diameter of the drum (250 mm) after boring and grinding is 1 mm. The limits of this tolerance must be strictly observed, otherwise the strength of the drum as well as the braking efficiency will be compromised. Next page""""""
- 1.2.3.4.5.6.7.8.9.10.11.12.13.14.15.16.17.18.19.20.21. 22.23.24.25.26.27.28.29.30.31.32.33.34.35.36.37.38.39.40. 41.42.43.44.45.46.47.48.49.
Signs that replacement is needed
The brake drum must be replaced when signs of deformation or cracking of the part appear. Another reason for replacement is wear on the drum walls. To check this, you need to get to the working surface of the part and check the internal diameter. The latter increases as the drum wears out. The maximum permissible internal diameter is 251 mm. If the measurements give a higher value, the drum needs to be replaced immediately. To do this, you need to know how to remove the brake drum of a VAZ 2107. Significant wear on the working surface of the drum also makes it difficult to remove it from the hub. This is due to the appearance of a lip along the edge of the inner surface of the drum there. The brake pads grind down the working surface, and in the place where they do not contact the drum, the metal remains intact. Over time, the difference in diameters becomes so large that when the drum is removed, the side clings to the brake pads.
Useful tips
Finally, we will give some tips regarding replacing drums:
- Nowadays this part is often offered, made of aluminum
. In fact, there is no practical sense in such a replacement; - When you have the drum removed, do not press the brake pedal. This will damage the slave cylinder.
As you can see, there are no special rules or difficulties here. Knowing how to remove the brake drum on a VAZ 2107, you can easily complete this job, saving on a trip to a car service center. When performing any repairs, always check the operation of the brakes after completion; this must be done.
Removing the brake drum VAZ 2107
Before removing the drum, you must hang the car or the rear wheel on which you want to remove the drum, and be sure to lower the handbrake lever. If the work is not done on a lift, it is necessary to put shoes under the wheels so that the car does not roll or fall off the jack. Otherwise, you can not only damage the jack, brake mechanism or car body parts, but also cause serious injury.
When the car is raised and secured, the further sequence of operations is as follows:
- Remove the wheel from the car.
- Using a spanner or regular wrench, unscrew the guide pins, which act as fastening the drum to the wheel hub.
- Remove the drum evenly, without distortions, pulling it off the hub and pads.
Note: if the drum cannot be removed, you can use an improvised puller made of two M8 bolts. To do this, you need to insert them into the holes on the drum and screw them in smoothly. Resting against the hub, they will push the drum out of its seat. This should be done carefully, as there is a possibility that the lip on the inner surface of the drum will damage the brake pads.
Payment via WebMoney
After selecting payment via WebMoney, the payment system will launch, in which you need to select a payment method, bank card or WebMoney wallet.
If you already have a WebMoney wallet, you need to log in and make a payment.
If you do not have a WebMoney wallet and want to pay using another method, you must select one of the methods offered by WebMoney and make the payment
After specifying the payment details and confirmation of payment, payment for the goods occurs.
Official website of the WebMoney payment system https://www.webmoney.ru/
Brake drum installation
Before installing a new brake drum, it is necessary to sand the seating surface on the flange from rust and dirt. Then lubricate it, as well as the new drum at the point of contact with the flange, with graphite high-temperature grease. This will make it easier to disassemble the unit later.
Next, you should check the brake fluid level in the reservoirs, and if it reaches the maximum level, pump out some using a syringe. The fact is that when the brake pads are brought together, the pistons of the brake cylinders are recessed and the brake fluid can be squeezed out through the top of the reservoir.
The blocks are brought together using pry bars used as levers. To do this, their ends rest against the side of the shield, and the mounts themselves are brought together, squeezing the pads until they stop.
- Features of removing the brake drum on a VAZ 2107 and replacing it
Note: if, after the pads are brought together, they prevent the new drum from moving into place, you must release the handbrake cable. To do this, you need to unscrew the adjusting nut located under the bottom of the car.
When the brake drum is in place, it should be centered so that the holes in its housing coincide with the mounting holes on the flange. If done correctly, the guide pins should screw into the hub and not push against it.
After installing the drum, you should get into the car and press and release the brake pedal several times to make the brake mechanism work. After this, it is imperative to check the level of brake fluid in the reservoirs and add it if necessary. You will also have to adjust the tension of the handbrake cable, even if it did not have to be released when installing the drum. The inner diameter of the working surface of the new drum is smaller than that of the old one, therefore, if the handbrake is not adjusted, the pads may rub against the drum while driving, which, at best, will cause their premature failure. In the worst case, friction can cause the brake mechanism to become very hot and the brake fluid to boil, causing the brake system to fail.
Welcome! Brake drum - it consists of metal, although at first glance (If you do not pick it up) you might think that it is entirely made of plastic or any kind of plastic, over time this drum (namely its working surface) wears out, due to with this, the car begins to brake a little worse (This is very difficult to notice, because when braking, the entire weight of the car is transferred forward and thus all the loads are handled by the front brake system, and not the rear).
Note! In order to replace a drum on a car, take with you: A set of wrenches, sandpaper, a bit, as well as a screwdriver and two mounting spatulas, or if you don’t have them, then you can use two pry bars instead!
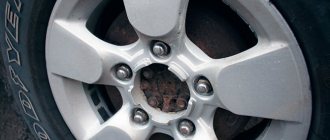
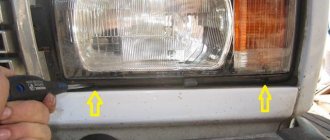
Where is the brake drum located? On our (Domestic) cars, almost all drum brakes are used in the rear of the car, and brake discs are usually installed in the front, but even despite this, there are some cars (for example, Lada Kalina NFR) on which brakes are installed both at the rear and at the front pads, but these are only a few brands; on all domestically produced cars, brake drums take their place at the back; for example, look at the photo in which one of the drums is indicated by an arrow:
When should you replace your brake drum? It must be replaced if it has become deformed and thus various kinds of through cracks or dents have appeared on its surface, in this case the drum must be replaced, but in addition to deformation, as mentioned earlier, it (Like any other part) has a working surface , in order for you to be able to see this surface, you will have to remove the drum from the car and after that you will see it (the working surface is a ring located inside the drum, it is also indicated by a red arrow), and so this surface wears out over time and therefore the internal the diameter of the drum itself (The internal diameter is shown with a blue stripe), so if this diameter after measurement is equal to 251 mm or even higher than this mark, then you will need to replace this drum as soon as possible.
- Replacing the rear brake cylinder
Note! In the photo above, you may not understand a little how the inner diameter of the drum is measured, all this is due to the unfortunate angle taken where the hand covers the rest of the drum, but in words, let's say the inner diameter is measured from one edge of the working surface ring to the other!
Payment via Yandex Cashier
After selecting payment via Yandex, the Yandex Cashier payment system will launch, in which you need to select a convenient payment method (bank card, QIWI, Yandex Money account, etc.)
After specifying the payment details and confirmation of payment, payment for the goods occurs.
If you have a bank card in a currency other than the ruble, the money will be debited from the card at the rate of the Central Bank of the Russian Federation at the time of purchase.
This payment method is optimal for residents of Russia, Kazakhstan and Belarus.
Official website of the Yandex Kassa payment system https://kassa.yandex.ru
How to replace the brake drum on a VAZ 2101-VAZ 2107?
Note! Replacing the drum is carried out with the car hanging and the handbrake released, so keep this in mind when you start replacing!
Removal: 1) At the very beginning of the operation, you will have to remove the wheel you need from the car and then leave the car hanging in the air. (For information on how to remove a wheel, see the article entitled: “Replacing wheels on a car”)
2) Then pick up a wrench or a spanner (it doesn’t matter which is more convenient) and use it to unscrew both guide pins that secure the drum to the hub, and after the pins are unscrewed, pull the drum and thereby remove it from the car .
Note! If the drum will not be removed, then take two M8 bolts and screw them into the holes in which they will fit, but screw both bolts evenly, that is, tighten both bolts first and tighten each one a little and thus you will see how the drum starts get off the car!
3) After the drum is removed, use sandpaper to clean the mounting surface of the axle shaft flange as shown in the figure below from dirt and rust.
Note! When there is no dirt on the surface of the axle shaft flange (the surface is also indicated by a red arrow in the photo below for clarity), then using graphite grease or LSC-1 grease, lubricate this very surface of the flange, and in addition to it, also lubricate the entire place where the drum itself is installed on the axle shaft flange (This location is also indicated by a blue arrow)!
Installation: 1. The new drum is installed in its place in the reverse order of removal, but during installation you will have to perform some operation, namely, sit in the car and pull the handle to open the hood and then go to the engine compartment, there you will find the tank in in which the brake fluid is located (Indicated by an arrow), after finding it, look at it from the side and thereby you will find out how much brake fluid is in it, if it reaches the MAX mark, then in this case take a medical syringe or a rubber bulb and use it pump out a little fluid from the reservoir so that it does not spill out of it when you bring the brake pads together.
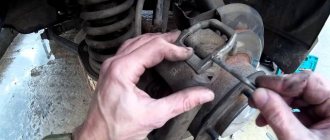
2. Now about bringing the brake pads together, firstly, take two mounting blades in your hands and with their help carry out the entire operation of bringing the pads together, to do this, rest against the flange of the brake shield with both blades (One of the two places where you need to rest against brake shield is indicated in the photo with a blue arrow) and using the blades as a lever, use them to bring both brake pads towards each other, as shown by the red arrows, until they stop.
- VAZ 2114: replacing rear brake pads with your own hands - instructions with photos and videos
Note! If, after the above instructions, your drum still won’t be installed in its place (That is, it is not given brake pads), then crawl under the bottom of the car and look for the handbrake cable there (Before climbing under the car, check whether your handbrake is lowered or no, if it is lowered, then do this work, and if it is raised, then lower it and try again to install the brake drum in its place) and then loosen the adjusting nut that tightens this cable until it stops, more details on how to do this , read the article: “Adjusting the handbrake cable” you will need to study points 1-2 to understand how to loosen the adjusting nut!
3. Then install the new drum in its place and center it with a bolt or bit so that it fits the mounting holes, this is all done so that when screwing in both guide pins that secure the drum, they twist and do not rest against the hub.
Note! When the entire installation is completed, get into the car and press the brake pedal several times so that the brake mechanisms of the rear wheels begin to work for you!
Manuals→VAZ→2107 (Zhiguli)
Payment via Portmone
After selecting payment via Portmone, the payment system will launch where you need to select a payment method, credit card or Portmone account.
The price in the Portmone payment system is converted into dollars at the exchange rate of the Central Bank of the country in which you are located.
If you have a bank card in a currency other than the dollar, the money will be debited from the card at the rate of your country's central bank at the time of purchase.
After specifying the payment details and confirmation of payment, payment for the goods occurs.
Official website of the Portmone payment system https://www.portmone.com
Signs of brake drum fatigue 2108
During normal operation, the rear brake drum does not require any additional inspection or maintenance. If the brakes function normally, then there should be no complaints about the drum. It should only come into view when replacing brake pads or when there is a malfunction in the handbrake drive. If the handbrake stroke has increased, but tightening it no longer gives any results, then you need to check the condition of the brake pads and, most likely, replace them. If there is a question about replacing the pads, then it is better to install either branded VAZ ones or Ferodo ones. There will be a guarantee that they will last the entire declared service life. To replace the pads we will need to remove the rear brake drum.
When should you shoot?
The job of removing a brake drum is actually quite common. This is due to a number of technical features of the domestic car. You will have to dismantle the drum in the following cases:
- Drum wear
. During operation, it gradually wears off, which leads to the need to replace it; - Installation of new brake pads;
- The need to remove the rear axle shaft.
The drum will also need to be removed if it is necessary to repair or replace any elements of the rear brake. Sometimes in this case the drum is changed. Here you need to act based on the condition of the parts on your car.
Product added to bookmarks!
- Description
- Reviews
APPLICABILITY: VAZ 2108, 2109, 21099, VAZ 2110, 2111, 2112, VAZ 2113, 2114, 2115, VAZ 1117, 1118, 1119 (Lada-Kalina), VAZ 2170, 2171, 2172 (Lada-Priora ), VAZ 2190, 2191 (Lada-Granta), VAZ 2192, 2194 (Lada-Kalina 2).
Compared to standard ones, cast iron drums have greater rigidity, due to which they are less susceptible to deformation, less susceptible to overheating as a result of frequent braking, silumin (the alloy from which standard drums are made) is more fragile, susceptible to temperature deformation and not only (egg-shaped), while cast iron retains its shape (there will be no wobbling). Silumin sticks to the hub, sometimes even graphite doesn’t help. Cast iron is much easier to remove when replacing pads.
The largest manufacturer of automotive security systems in the world!
Downloading a book
After successfully completing the payment (by any method) and returning to the KrutilVertel store from the payment system website, you will be redirected to the successful payment page:
On this page you must indicate your e-mail, to which access to download the book will be sent.
If you are already registered on our website, simply follow the link to your personal account.
The book you purchased will be in your personal account, from where you can always download it.
Please note that after making the payment you need to return from the payment system website to the KrutilVertel website.
If for some reason you did not return to the site and closed the payment system tab with a message that the payment was completed, please let us know: we will send you an email indicating access to download the book.
Brake drum - cast iron or aluminum
Each of these reels has its own pros and cons. Cast iron is durable and wear-resistant. On the one hand, this is very good, since a bead from wear very rarely forms on its inner surface, which prevents the rear brake from being disassembled. Cast iron is strong enough and it is almost impossible to split or damage the work surface. But it has one significant drawback - weight. An aluminum drum weighs about 2.4 kg, while a cast iron drum can weigh twice as much. How problematic this is is a philosophical rather than a practical question. This is of some importance if the car is equipped with lightweight alloy wheels and unsprung masses are kept to a minimum. Then the cast iron will spoil the picture with the extra 5 kg on the rear axle.
Cast iron brake drum - durable but very heavy
An aluminum drum is much lighter, but also wears out faster. Especially when driving aggressively. If you have to change it to a new one, then it is better when choosing to give preference to proven brands, such as “Zavod Metallist” or branded VAZ ones with the index 2108-3502070. A low-quality drum can develop a microcrack, which can lead to the destruction of the disc during movement, and this does not smell good. The price of a new aluminum drum is about 250 rubles, and a cast iron one costs twice as much. Therefore, to replace it, it is worth buying exactly the part that matches your driving style and operating conditions.
Required spare parts
2101-3502090-55, 21010350209055, 2101-3502090, VR311, BS-T 1001 N, 13.0460-2966.2, 602966, 2101-3501089, 2101-3501800-82, 2101 0350180082, 2101-3501089. These are Russian and European products, the price varies from 500 to 1100 rubles, but you will put really high-quality parts on the car that will last a long time.
Important! You need to change the rear pads if the lining has worn down to a thickness of 1.5 millimeters. This is a critical size; with smaller values, serious problems with car braking begin.
Diagnosis of brake drum problems
If during the preliminary inspection such places on the working surface of the brake drums are identified that are dotted with small cracks, small and shallow grooves and grooves, then there is only one way out to preserve the pads, prevent their rapid abrasion and for the safety of movement in a car, removal of the products and their treatment is required grinding machine.
If such artificial “shells” have sufficient depth that cannot be removed by grinding, then the brake drums need to be replaced with new products. When preparing for repair work to replace these rear suspension components, it is necessary to purchase brake drums in advance so that you can replace them later without delay.
When purchasing VAZ 2110 brake drums, the price of which varies, both according to the materials used and the brands of the manufacturer of spare parts and mechanisms, vehicle owners will have to make the right choice.
Payment via PayPal
Once you select PayPal payment, the PayPal payment system will be launched where you will need to select your payment method, credit card or PayPal account.
If you already have a PayPal account, you will need to log in and make a payment.
If you don't have a PayPal account and want to pay by credit card through PayPal, you need to click the "Create Account" button shown by the arrow in the picture.
PayPal will ask you to select your country and enter your credit card information.
After specifying the information required to make a payment, you must click on the “Pay Now” button.
Official website of the PayPal payment system https://www.paypal.com
Difficulties during assembly
Let's return to dismantling the brake mechanism. It may happen that as a result of wear, a shoulder forms on the inner surface of the brake drum, which will prevent dismantling. The drum will still have to be removed, and after that it is necessary to measure its internal diameter. Acceptable dimensions for VAZ 2108 are 200-201.5 mm. If the diameter is larger, the drum must be replaced. If the size is within the acceptable range, then in order to remove the collar, it is enough to arm yourself with a file, install the drum on the front hub with the working surface facing outward, start the engine and engage first gear.
The drum will rotate, and using a file and sandpaper it is easy to level the bead with the work surface. After this, you need to achieve a smooth surface without marks or burrs, but after grinding it is worth measuring the inner diameter of the drum again. If the diameter is larger than normal, then there is a possibility of loss of strength, so it is better not to take risks.
In general terms, this is all you need to know about the VAZ 2108 drum brakes in order for them to provide reliable braking.
Let's summarize
It is important that before installing new parts, the cylinder pistons must be brought together as much as possible.
If the drum still refuses to “sit” in its normal place, you can remove the collar. This is done like this: the drum is fixed on the axle shaft with the reverse side, the motor and speed are turned on. The bead is sawed off with a file. Despite the simple design of the rear pads, their installation is more difficult. But having performed this operation once, you will perform all subsequent repairs with ease.
Rear wheel brakes
- Parking brake cable end.
- Drive lever.
- Rear brake pad.
- Drive lever axial pin.
- Brake slave cylinder.
- Upper tension spring.
- Spacer bar.
- Front brake pad.
- Front pad pressure spring.
- Lower tension spring.
- Dirt guard.
Replacing the brake drum
- less than an hour
- 1 person
- 2 points
- —-
- tool
For this operation you will need the following tools and materials: jack, support stand, wheel wrench, wire brush, penetrating fluid, 7 mm wrench, two pry bars.
Note The brake drum must be replaced when the internal diameter reaches or exceeds 201.5 mm.
It is recommended to replace the brake drums on both sides of the vehicle at the same time.
Diameter no more than 201.5 mm