Peugeot Partner is a compact van, designed on the basis of a passenger car, produced since 1996. The first generation was supplied to the market in 1997, 1998, 1999, 2000, 2001, 2002, 2003, 2004, 2005, 2006 and 2007. During this time it received 2 restylings. After a complete update, the 2nd generation was produced in 2008, 2009, 2010, 2011, 2012, 2013, 2014, 2015, 2016, 2022, 2022 and to the present time in various modifications ( tepee, with an extended and standard base, etc. ) . We offer information on the diagrams of all fuse and relay blocks of the Peugeot Partner Tipi with a detailed description of the elements for all generations, we will show the fuse responsible for the cigarette lighter and the instruction manual.
In this model there are 2 main places with the location of
fuse blocks :
- on the left under the dashboard (under the cover)
- in the engine compartment (near the battery under the protective cover).
Removal and replacement instructions
The replacement process is the same in both the first and second blocks, but in order not to confuse anything, we will describe the replacement in each of them separately.
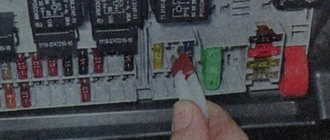
Under the dashboard
Finding the unit located in the cabin is not difficult. It is conveniently located and immediately visible. There is no need to remove any nodes or systems to access it.
Preparation
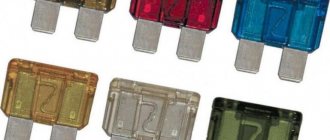
To replace the safety elements, simply remove the cover. In addition, to avoid accidentally damaging the elements and getting an electric shock, special plastic tweezers are provided. Perform work on removing and installing elements only with it. It's convenient and safe.
In the store, buy a set of fuses for a Peugeot Partner car. In general, many people recommend taking it in the car.
Steps
- To access the unit, located on the left side of the driver under the dashboard, you need to perform a fairly simple operation.
- We find the clamps located on the cover.
- We turn them a quarter turn.
- Remove the cover.
- In the table we find the number of the fuse responsible for the faulty equipment.
- Next, according to the diagram, we find where in the compartment the element responsible for the non-working consumer is located.
- We remove it with tweezers.
- We install a new one, similar to the nominal value.
- Turn the ignition key.
- We check whether the consumer has started working.
- If it works, close the lid.
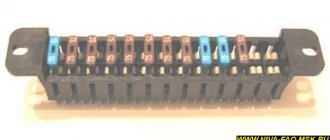
Table of elements
Layout diagram
In the engine compartment
It is not difficult to find the unit installed in the engine compartment; it is located next to the battery and is covered with a plastic cover, which can be gray or black.
Preparation
Before starting work, turn off the car. Make sure you have spare tweezers and protectors on hand.
Replacement fuse tweezers
Steps
- Raise the hood.
- We are fixing this.
- We find where the block is.
- Release the latches and remove the cover.
- We look at the table. We determine the number of the fuse that protects the inactive consumer.
- Find a place on the diagram.
- Stop it with tweezers and remove it.
- We put the same one in place of the extracted one.
- We check if the consumer is working.
- If everything is ok, close the lid. If not, then most likely there is a hardware problem and this is where you will need to fix it. Wiring may also be damaged.
Table of elements
Layout diagram
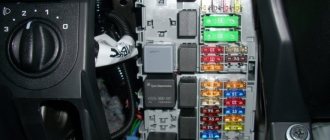
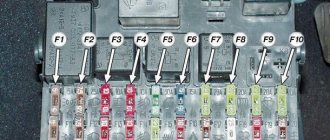
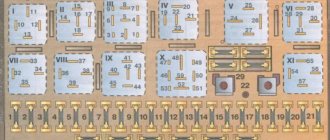
Fuses and relays in the interior of Peugeot Partner 2
The fuses inside the vehicle are located on the lower left side of the control panel.
Peugeot Partner 2 fuse box diagram
Description
- 15A - Rear window wiper
- —
- 5A - Airbag
- 10A - Air conditioning, diagnostic connector, rear view mirror, headlight control
- 30A — Window lifters
- 30A - Locks
- 5A - Rear courtesy lamp, front courtesy lamp, sunroof
- 20A - Car radio, CD changer, display, tire pressure monitoring unit, security alarm and siren
- 30A - Cigarette lighter fuse Peugeot Partner 2 , 12 V sockets front and rear
- 15A - Upper part of the steering column
- 15A - Low current circuit of the ignition switch
- 15A - Rain and light sensor, airbag
- 5A - Instrument panel
- 15A - Parktronic, air conditioning control panel, hands-free system
- 30A - Power supply for locking system
- —
- 40A - Heated rear window and mirrors
Relay description
- R1 - Front power window relay
- R2 - Rear window wiper relay
- R3 - Accessory relay + ACC
- R4 - Door lock relay
- R5 - Rear door super lock relay
- R6 - Front door super lock relay
- R7 - Computer wake up relay
- R8 - Heated rear window relay
Scheme of the second block Peugeot Partner 2
Description
- —
- 20A - Heated seats
- —
- 15A - Relay for folding rear view mirrors
- 15A - Socket relay for connecting the refrigerator compartment
Diagram of an additional unit in the body of Peugeot Partner 2
In some vehicle configurations, an additional unit is installed behind the restrictive partition on the right.
Description for 1st generation
Fuse box under the hood
Lock position
Real photo of the unit
General scheme
Descriptive table
| № | Protection circuit | |
| one | 10 A | Reversing light, preheating unit, clutch release contact |
| 2 | 15 A | Fuel pump |
| 3 | 10 A | Electronic control unit (ECU) of the ABS system |
| 4 | 10 A | The engine control unit |
| 5 | 10 A | Replacement |
| 6 | 15 A | Front fog lights |
| 7 | 20 A | Headlight washers |
| 8 | 20 A | Engine ECU, fan relay |
| 9 | 15 A | Left low beam lamp |
| 10 | 15 A | Right low beam lamp |
| 11 | 10 A | Left high beam lamp |
| 12 | 10 A | Right high beam lamp |
| thirteen | 15 A | Sound signal |
| 14 | 10 A | Window cleaner |
| 15 | 30 A | Engine sensors |
| sixteen | 30 A | Air pump |
| 17 | 30 A | Wipers |
| 18 | 40 A | Electric fan for air conditioning system |
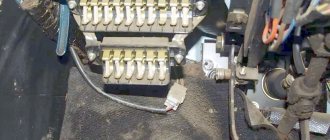
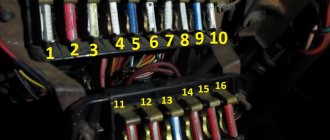
Partner passenger compartment fuse box
Scheme
Decryption table
| № | Protection circuit |
| F1 | Windshield washer 15A (with hinged doors), 12V socket (Modutop) |
| F4 | Dashboard car radio 20A, display, COM2000 |
| F5 | 15A Alarm Siren |
| F6 | Diagnostic connector 10A Citroen Berlingo |
| F7 | 15A Anti-theft |
| F9 | Heated seats 30A, electric fan Modtop |
| F10 | 40A Heated rear window, heated exterior mirrors |
| F11 | 15A Clean rear window |
| F12 | 30A electric sunroof, electric windows Citroen Berlingo |
| F14 | 10A VAN COM2000 network |
| F15 | VAN 15A network instrument panel, radio, display |
| F16 | Electric locks 30A |
| F20 | 10A Right rear brake light |
| F21 | 15A Rear left brake light |
| F22 | Citroen Berlingo 20A cigarette lighter fuse, 12V socket, electric door mirrors, interior lighting, directional light for reading maps and documents |
Fuses No. 1 and 22 are responsible for the cigarette lighter.
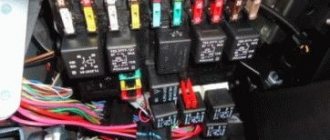
Fuses and relays under the hood of Peugeot Partner 2
In the engine compartment, the mounting block is located on the left side of the engine compartment. The block is closed with a protective cover.
Fuse box diagram under the hood of Peugeot Partner 2
Description
- F1 20A Engine control computer - power supply to the electrical control unit for the two-speed fan group
- F2 15A sound alarm
- F3 10A front and rear windshield washers
- F4 20A Headlight washers
- F5 15A + battery Fuel heating system DV6 - fuel pump TU5JP4
- F6 10A + after contact computer and dual ABS/ESP relay - steering angle sensor - gyrometer stability control acceleration meter - power steering pump mechanism
- F7 10A contact brake sensor - clutch pedal limit switch
- F8 25A starter winding
- F9 10A after contact protection blocking module 3 relays - headlight range control motor
- F10 30A ignition coil control TU5JP4 - injector control TU5JP4 - power supply to the solenoid valve of the DV6 injection pump
- F11 40A enable blower fan relay
- F12 30A control of low and high speed front wiper
- F13 40A after contact power supply SM (intelligent service module)
- F14 30A exhaust gas temperature recovery pump control
- F15 10A right high beam headlight
- F16 10A left high beam headlight
- F17 15A left low beam headlight
- F18 15A right low beam headlight
- F19 15A Reservoir cleaning solenoid valve TU5JP4 - oxygen sensors at the inlet and outlet TU5JP4 - solenoid valve for the turbocharging air heating system 1-2 DV6
- F20 10A sensor for the presence of liquid in the fuel DV6 - solenoid valve for regulating the pressure in the turbocharger DV6 - solenoid valve for regulating the temperature at the outlet F21 5A air flow meter DV6 - power supply for the electric control unit for the two-speed group of the electric fan maxi fuse module (PSF1)
Relay
- R1 main relay of the engine management computer
- R2 engine control computer power circuit relay
- R3 air supply relay
- R4 windshield wiper relay
- R5 front wiper low speed relay - front wiper high speed relay
- R6 distributor relay + after contact
- R7 air conditioning fan relay
- R8 starter relay
- R9 front windshield washer relay
- R10 rear windshield washer relay
- R11 headlight washer relay
- R12 horn relay
An additional fuse block is installed on the battery cover.
Fuse box diagram on the battery cover
Description
- Charge status module - 5A
- Diagnostic connector - 15A
- Brake pedal switch resistance - 15A
- —
- Power steering electric pump group power supply - 80A
- Pre-post-heat control module - 70A
- Protection blocking module 3 relays - 100A
- —
- —
- Simple motor protection relay - 30A
It won’t start, there is no power to the fuel pump, the fuse is intact - Berlingo, 1996 - 2012
Hello, there was something equally inexplicable, then everything is fine on you, everything is spinning, everything that should be on is on and the wrong thing is not on, but it won’t start. The reason is still not clear, but I will describe what happened. I bought a Citroen Berlingo 2004, drove it for a month and suddenly it wouldn’t start, I read, looked, searched, and lo and behold, I turned the key and it started working. At the same time, apart from rocking the wiring under the panel and hood, I did nothing. The previous owner warned that an alarm system with a search system was installed on the car, they removed it before selling it, I mean, I started sinning because it was “removed” somewhere of poor quality... A month later it happened again, but the wiring, fuses, etc. were swaying .p., it didn’t help. (Well, the fuel pump doesn’t hum and that’s it!!) I found a plug under the tank, I called and checked, but I couldn’t figure it out, and there’s no circuit (there are 4 wires) and I’m a weak electrician myself, but I have to do it ! (I don’t trust specialists and their honesty very well, especially in my city) I cut out the hatch, got to the plug on the tank, took out the fuel pump, then I saw what the reason was, checked the fuel pump with a charger - It works! I collected everything - it hummed and started. Such repairs did not add joy to me, but nothing can be done... And so, the most important thing: I went to Astrakhan for fishing, loaded to the brim with boats, engines, and and and ON YOU. A kilometer before the place, I turned it off to take a photo at the sign, and didn’t start it again. There is no garage nearby, there is steppe all around, and the heat is 35 in the shade, we are alone with the woman, and not a drop of water to drink, we drank everything.. - Again we crawled under the car, unloaded all the rubbish from the trunk, because the gas pump is there! I took the carrier (it connects to my cigarette lighter), tore off the flashlight itself (from the carrier), stripped the wires (fortunately I already knew which ones) from the very plug (closely) connected to the fuel pump and connected it all with the wires from the torn off carrier. I stuck it in the cigarette lighter. The fuel pump hummed, turned the key and it started! Maybe someone will say this is impossible with the French, but there I really wanted to die - WITHOUT DRINKING, I never knew such thirst, it was already scary! In the end, with such a system, I went to the nearest store, then set up camp on the shore, covered about 40 kilometers, but I have to turn it off at some point... I turned off the ignition, took the plug out of the cigarette lighter and went to sleep. The next day, without any bells and whistles, tricks, or transfers, it just started up calmly as if nothing had happened. Returning home after 2 weeks, I opened everything again and replaced the wires going from the plug from under the floor to the fuel pump plug. To date (8 months have passed) this problem has not appeared. I’m still unsure and don’t understand what the matter was. (there is no logic in injectors, just riddles!!) I have a Berlingo cargo van. Best wishes.