The Hyundai Accent, a subcompact car, has been sold from 1995 to the present through 4 generations and delivered worldwide. Also known as Hyundai Verna . In our material you will find a description of fuses and relays Hyundai Accent , with block diagrams, their locations and photographs, which were produced in 1999, 2000, 2001, 2002, 2003, 2004, 2005, 2006, 2007, 2008, 2009, 2010, 2011 , 2012 and 2013 ( Hyundai Accent Tagaz ). We will show the fuse responsible for the cigarette lighter and the location of additional electronic control units.
The actual assignment of elements in blocks may differ from those presented. Refer to your diagrams on the back of the protective cover.
Hyundai Accent fuse box: what each element is responsible for
This brand of car has numbered markings of safety elements, which are located in a clear sequence - the functional purpose of the fuse in each block is easily identified from the following list:
No. Passing power, A Functional purpose
| 1 | 10 | The element is responsible for the turning system, as well as duplicating turns and electrically adjustable side-view mirrors if these functions are included in the vehicle configuration |
| 2 | 10 | A technical fuse that regulates the operation of the anti-lock braking system sensors and instrument panel indicators. As a rule, if this part comes out, the car will not be able to start - this is done for safety reasons. |
| 3 | 10 | The element is responsible for the operation of the instrument cluster circuit |
| 4 | 15 | 15-amp fuses are designed to prevent short circuits on the sensors and squibs of all airbags present in the vehicle interior |
| 5 | 10 | A technical element responsible for the operability of the engine electronic control unit systems, as well as the automatic transmission control unit if it is included in the configuration |
| 6 | 10 | The fuse is responsible for the operation of the door position sensors and the central locking remote control system |
| 7 | 10 | This element in the system is responsible only for the operation of the alarm and braking signals |
| 8 | 10 | Protecting the headlight relay coils, power windows, climate control or air conditioning compressor, as well as fog lights and tail lights against short circuits |
| 9 | 20 | The element protects headlight or windshield wipers, as well as wipers and heated windshields from voltage surges |
| 10 | 10 | Reserve socket, which is used when connecting new equipment in a car or to reduce the current load on other fuses |
| 11 | 20 | An element responsible for protecting the cigarette lighter in a car from burnout or short circuit. As a rule, failure occurs several times per season due to the cigarette lighter being overloaded with various gadgets |
| 12 | 10 | Air conditioning circuit fuse. Used if block element No. 8 is already overloaded with other equipment |
| 13 | 10 | Used for separate protection of multimedia equipment - audio systems, all-round cameras or multimedia console |
| 14 | 10 | Auxiliary fuse for the heated seat option. If this function is not included in the configuration, the car is a backup |
| 15 | 10-20 | Reserve socket, which is used when connecting new equipment in a car or to reduce the current load on other fuses |
Important to remember! If any of the car’s functions does not work, before disassembling the vehicle’s equipment, it is important to check the integrity of all fuses in the blocks - as a rule, these elements regularly fail when saving on a high-quality battery or as a result of “handicraft” tuning and connecting a lot of additional gadgets.
Heating system design, typical malfunctions
The glass heater in the car is quite simple. Typically, threads are applied to the glass surface, which can heat up when current passes. Other components that ensure startup, proper operation and power supply of the circuit are a button, wiring, relay, fuse, battery.
Frequent problems:
- The heating is ineffective and streaks of fog appear. The defect indicates damage to the threads. To identify the problem, you need to inspect the stripes; the place of damage is easy to detect - it will be foggy.
- Heating and sweating occur very slowly, which means poor contact and possible problems with voltage. It is necessary to check the indicators at the input and storage.
- If the heating does not work at all, but the light on the button lights up, the fuse may have failed or the problem lies in the power connectors.
- If the system does not work and the control light does not light up, you need to pay attention to the heating relay. The button, voltage and ground are checked.
- With a working system, defrosting does not occur. This happens when winter comes and the ambient temperature drops significantly, the glass freezes up. The heater power is not enough to thaw the ice. It is recommended to clean the glass by hand so that the threads can work normally.
Complete failure of the heating system is rare. The integrity of the threads is often compromised. If problems occur with the device, you can carry out repairs yourself.
Where are the Hyundai Accent fuses located?
Replacing damaged elements in the safety block will not be difficult - the whole procedure is simple and follows an intuitive script. The greatest difficulties for drivers arise when searching for a damaged element - 2 or 3 units can be installed on different generations of Hyundai Accent.
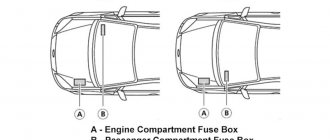
Depending on the model, there may be 1 or 2 blocks in the car interior; a separate block will be located in the engine compartment:
- The first interior unit is located near the driver's seat on the left side - to ensure easy access you will have to remove the decorative trim in the car's dashboard;
- The second fuse box will be located behind the additional glove compartment in the cabin. In some versions of the Hyundai Accent there will be only a few relays located there, in others there will be a relay and several fuse cells;
- Under the hood the block is located on the left side of the engine. All fuses under the hood are located in a sealed box, which is secured with plastic latches - when dismantling it is important not to damage the fastenings, otherwise moisture will quickly enter the system, which will lead to corrosion of the block itself and oxidation of the chips.
To make it easier to find a faulty element, you need to remember that in the engine compartment there will be fuses responsible for the main wiring, engine and electrical equipment of the car, and in the passenger compartment there will be protective elements for additional equipment and equipment options.
Why do the heating, heater and wipers fail at the same time?
Separately, situations stand out when the stove, wipers, and heated rear window do not work. Sometimes, along with these systems, the washer also stops working.
A one-time failure of these devices causes a lot of problems; problems can occur periodically, but they affect the safety of the car. The peculiarity of this breakdown is that the operation of all components is tied to one fuse.
Ways to eliminate the defect:
- To quickly solve the problem, just replace the fuse;
- When examining a faulty unit, it is easy to notice burnt tracks, which can also be soldered.
Depending on the car model, the problem may lie in the ignition relay, which is typical for domestic cars. Sometimes the contacts come loose, but more often the relay needs to be replaced to restore functionality.
What to do if the threads break, how to determine the defect
If the rear window heating stops working, you need to inspect the device to understand the cause of the problem. Most often, the main problem is a violation of the integrity of the threads - the contact necessary for the passage of current and heating disappears.
Determining the location of the damage:
- When the glass fogs up, you need to turn on the heating, which will make it easy to identify non-working elements. It is noteworthy that the performance of the remaining components is not affected, since a parallel design is used.
- Having cleaned the surface, we proceed to inspection. If there is a significant gap, the defect is easy to detect.
- In case of invisible damage, use a magnifying glass or multimeter.
Diagnostics using a multimeter begins by connecting the clamp to the housing. Then, using the second tip, you can begin the process of searching for the damaged area.
When the heater is functioning, there should be a voltage of 12 V on the side bus. Otherwise, the relay is faulty or the contact is bad.
To find a break, you need to determine the resistance by checking the threads in the central part. There should be indicators of no more than 2–3 ohms. If a resistance of 6 ohms is detected, then there is a defect. Having identified the thread, you need to carefully check it, measuring every 1-2 cm.
When identifying the location of the break, the results before and after it will be very different.
Subtleties of heating system repair
Broken threads are the most common problem. Car owners often wonder why the rear window heating stopped working. The problem lies in the threads - they are quite fragile and easily damaged during active friction. To remove dirt, it is better to use a soft cloth and special products. If you have to work with a scraper, you need to do it carefully.
How to troubleshoot:
- Using a complex that includes a syringe and conductive paste, it is easy to restore the integrity of the area. It is enough to apply a thin line of the composition to the damaged area. Drying occurs within a few minutes, sometimes you need to wait a day - it all depends on the product. You need to turn on and check the functionality of the system after complete drying.
- Choosing a conductive adhesive is a more affordable solution. The glue must be applied in two layers. And between them it is advisable to lay copper wire with a diameter of 0.3 mm.
- Applying a mass of paint and non-ferrous metal shavings. The procedure is performed with the heating on. While covering the damaged area, a hissing may occur, which soon goes away. Drying time – 30 minutes. It is advisable to begin operation within an hour.
Attention:
In each case, you need to make a stencil, since the laid line must completely correspond to the width of the thread. Before applying the compounds, the surface must be degreased.
Another restoration method is soldering. This is the most reliable method, and if the damage is small, soldering is carried out quickly, without wire.
Carrying out work for more serious defects:
- wire with a cross section of 0.17 mm 2 is used;
- its length should be slightly larger than the damaged area;
- the edges need to be tinned;
- degrease the working surface;
- coat the thread with zinc chloride flux;
- Having completed the preparation, we begin to work, pressing and soldering the wire into the edges of the threads;
- 12 W power is used;
- When finished, you need to check the soldering area and clean the surface from flux residues;
- the treated area is covered with a heat-resistant adhesive composition.
It takes several hours to complete such work, after which the vehicle can be used safely.
Can the air conditioning system work for heating?
A properly functioning air conditioning system keeps your car comfortable during hot weather. However, even in winter the air conditioning must be turned on. During operation of the device, the moving elements are lubricated. By running the air conditioner during the cold season, you can quickly defog the windows.
When thinking about how an air conditioner works for heating, it is worth noting that in winter, when the air outside is cold, the system cannot start. But when you press the button for heating the mirrors or windshield, the system is activated and will act as a heater.
How it works:
- In the summer, when freon evaporates in the condenser, the outlet temperature is 10–12 degrees.
- When started in winter, the indicators remain unchanged, and this is enough for sweating and thawing.
If the car is equipped with a climate control system, all processes occur automatically, and there is no need to turn on the heated mirrors and windshield.
Fuses and relays HUNDAI ACCENT
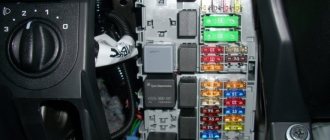
Relay and fuse mounting block in the engine compartment
1 - fuse 100 A generator circuit; 2 - 50 A complex fuse (electric circuits for door lock, alarm, brake signals, heated rear window, sound signal, interior lamp, ECU); 3 - 30 A fuse for the head and side light lamp circuit; 4 - 20 A fuse for the engine control unit circuit; 5 - 30 A fuse for the engine starting circuit and ignition coils. 6 - 20 Amp fuse for the radiator fan circuit of the engine cooling system, 7 - electrical wiring connector, 8 - heater fan relay. 9 - horn relay, 10 - 10 A fuse for the Hyundai Accent interior lamp circuit. 11 - 10 A fuse for the head unit circuit of the sound reproduction system. 12 — relay 2 of the air conditioning condenser heat exchanger fan, 13 — air conditioning compressor clutch relay, 14 — fog lamp relay socket; 15 — reserve fuse socket; 16 - 15 A fuse for idle speed control and camshaft position sensor. 17 - 10 A fuse of the engine control unit circuit. 18 — radiator fan relay for the engine cooling system; 19 - 10 A fuse for the air conditioner switching circuit; 20 — relay 1 of the condenser heat exchanger fan of the air conditioning system; 21 - 10 A fuse of the engine control unit circuit, 22 - 10 A fuse of the air conditioning compressor clutch circuit, 23 - 10 A fuse of the horn circuit; 24 - 15 A fuse for the fog lamp circuit. 25 - 10 A fuse for the right headlight lamp circuit. 26 - 10 A fuse for the left headlight lamp circuit; 27 - 10 A fuse for the side light lamp circuit on the right side of the car; 28 - 10 A fuse for the side light lamp circuit on the left side of the car; 29 — side light lamp relay; 30 — generator pre-excitation resistor; 31 — Hyundai Accent starter relay, 32 — 20 A fuse for the condenser heat exchanger fan circuit, 33 — 30 A fuse for the electric window circuit. 34 - 30 A fuse of the ABS control unit circuit; 35 — relay socket for always-on low beam; 36 — fuel pump relay; 37 - 30 A fuse of the ABS control unit circuit; 38.39 - diode socket; 40 - 30 Amp fuse for the heater fan circuit.
Fuse box in the engine compartment
The mounting block is located on the left side, between the air filter housing, battery and body. To repair your car yourself, you need to be able to read electrical diagrams. Fuses are used to protect circuits from short circuits. List of fuses located in the engine compartment:
- F1 – generator circuit protection (rated 100 A). When this fuse fails, the battery begins to discharge faster. If there is no charge at the battery terminals, it is necessary to check the belt tension, the contacts on the generator, the condition of the brush assembly and the voltage regulator.
- F2 – protection of the door lock circuit. The fuse rating is 50 Amps. It also protects the power supply circuits for the alarm system, horn, heating element on the rear window, microcontroller engine control unit, interior lighting, and various electric drives (including mirrors). Therefore, if the brake light, sensors on the Hyundai Accent do not work, the car does not start, the first thing you check is this fuse. If the alarm system fails, you need to check fuses No. 1 and No. 7 located in the cabin block. If they are working properly, then you need to diagnose relay No. 10. The last thing to diagnose is the button and wiring.
- F3 (30 Amperes) – designed to protect the power supply circuits of the head light and side lights. In the event of a lighting failure, it is necessary to check fuses No. 27 and 28, as well as relay No. 4, which are located in the passenger compartment.
- F4 - this fuse supplies power to the motor control unit. Rated current 20 A. If the engine cannot be started, you need to check this fuse. Only after F5, F6, F16, F17, F18, F21 and in the cabin F5 and electromagnetic relay 3.
- Through F5 (30 Amperes) power is supplied to the ignition coils.
- Through F6 (20 A) and F18, power is supplied to the radiator fan electric motor.
- F10 (10A) – power supply for interior lighting circuits.
- F11 (10A) – protection of the car radio power circuit.
- F16 protects the power supply circuits of the DPRV (phase sensor) and IAC (idle air regulator). Rated current 15A.
- F17 – power is supplied to the ECU through it. View information on F
- F19 (rated 10A) – power supply to the air conditioner control circuits.
- F21, F22, F23 (all rated 10A) - protection of ECU circuits, air conditioning compressor clutch, sound signal, respectively.
- F24 – fog lights.
- F25 and F26 (10A) – head lighting on the left and right sides, respectively.
- F27 and F28 (10A) – side lighting lamps on the right and left sides, respectively.
- F32 – protection of the air conditioner condenser heat exchanger fan circuit.
- F33 – power supply circuit for electric windows.
- F34 and F37 – ABS control unit (if equipped).
- Heating fan – F
Heated rear window Hyundai Accent: typical breakdowns
If one or more conductive strips suddenly collapse, they can be repaired using special adhesives. One of them is conductive glue Kontaktol. Apply it to the damaged area, after two days it will completely harden and work normally. If the wires fall off the metal plate at the soldering site, then it is best to solder them.
It is quite possible that this cannot be done with simple soldering irons; you will have to use a station. If you can’t solder, mix Kontaktol and superglue and use this mixture to connect the wire and the metal plate of the heater. The composition is reliable and will last more than one season.
One of the weak points of the system is the on relay.
Heating diagram for the rear window of Hyundai Accent
Since it switches a large current, a spark may form and the contacts will burn. If the stove does not work in any of the modes, try applying 12 V voltage directly from the battery to its motor. To get to the engine, you need to remove the cover under the main glove box. If the motor does not work, it will need to be repaired or replaced with a new one.
If you have the funds, it is better not to skimp and buy a new one. If the motor is running, check the wiring and serviceability of the stove mode switch along with its contacts. If the interior light does not light up, also check fuse 2, the heated rear window of the Hyundai Accent lamp and contacts in the ceiling lamp, and wiring does not turn on.
If the light does not come on only when the doors are opened, check the limit switches on the body that respond to the opening and closing of the doors. If the radio does not turn on, check this fuse, then take it out and check the contacts in the connectors on the back, as well as the fuse, which is located directly on the wire, usually red. Wiring may also be a cause.
Check where the power is supplied to the radio, from the ignition switch or directly from the battery.
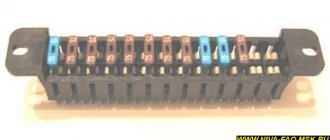
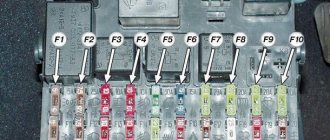
Fuse box in the passenger compartment
The above information about fuses is quite enough to get rid of major breakdowns in electrical equipment. We must remember that the weakest link always fails. If you first install a 30A fuse, and then install it at 10A, in the event of a short circuit, the one with the lower operating current will fail. The second one will remain safe and sound. A block is placed under the hood that protects power circuits - several units at once. Fuses in the cabin
But in the cabin, fuses are installed to protect individual lamps and even devices. Table with characteristics and purpose of fuses:
| Fuse number | Rated operating current, A | What circuits does it protect? |
| F1 | 10 | Turn signals |
| F2 | 10 | ABS system and lamps on the car dashboard |
| F3 | 10 | Power supply for instruments on the dashboard |
| F4 | 15 | Airbags |
| F5 | 10 | ECU, reverse warning lamps, automatic transmission control (if equipped) |
| F6 | 10 | Central locking, door lock drives |
| F7 | 10 | Emergency crew |
| F8 | 10 | Stop signal |
| F9 | 20 | Heating element on the rear window |
| F10 | 10 | Electric windows, headlight washers, radiator and heat exchanger fans, headlight relay coils, fog lights |
| F11 | 20 | Windshield washer and wiper |
| F12 | 10 | Seat heating element |
| F13 | 10 | ABS |
| F14 | – | Reserve |
| F15 | 15 | Cigarette lighter |
| F16 | 10 | Electric mirror drive |
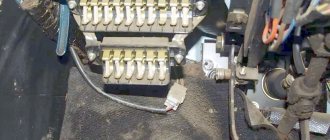
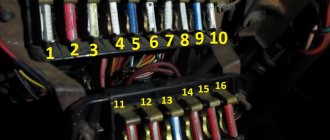
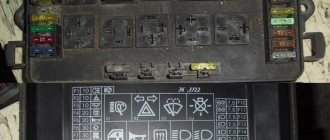
Relay box in the cabin
Relay in the Hyundai Accent interior
The block with electromagnetic relays is located in the cabin, right behind the small glove box. Description and purpose (according to the picture):
- Activation of the EBD (brake force distribution) system.
- Turn on the rear fog lights.
- Main relay COURT.
- Head lighting.
- Windshield wiper and washer.
- ABS activation.
- Electric windows.
- Heated rear window.
- Klaxon.
- Turn signals and hazard lights.
For the Accent model, the electrical diagrams can be found in the manual. The article provides only diagrams of the location of fuses and electromagnetic relays located in the mounting blocks of the engine compartment and passenger compartment.
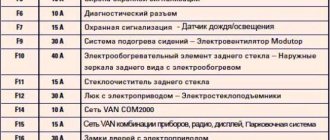
Decoding
Scheme with decoding.
F1 ( red 10 A) - Turn indicators F2 ( red 10 A) - ABS system, control and warning lamps in the instrument cluster F3 ( red 10 A) - Instrument cluster F4 ( blue 15 A) - Airbag F5 ( red 10 A) - engine control unit, automatic transmission (if equipped), reverse lamps F6 ( red 10 A) - Door lock drive F7 ( red 10 A) - Hazard alarm F8 ( red 10 A) - Brake light lamps F9 ( yellow 20 A ) — Rear window heating F10 ( red 10 A) — Relay coil for headlights, power windows, headlight washer, air conditioning heat exchanger fan, radiator fan F11 ( yellow 20 A) — Windshield cleaner and washer F12 ( red 10 A) — Heated rear seat F13 ( red 10 A) — ABS F14 ( blue 15 A) — Cigarette lighter and audio system F15 ( red 10 A) — Electric exterior mirrors F16 ( red 10 A) — Air conditioning system
The Koreans drew this diagram.
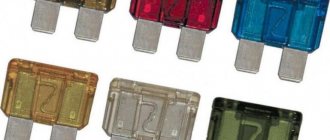
How to extract?
To remove fuses, there is a special tool in the block - tweezers. They need to pinch the edge of the fuse and pull it out. There are duplicate tweezers in the block under the hood.
Tweezers.
How to replace fuses in a Hyundai Accent: step-by-step instructions
The procedure for replacing fuses in the block is simple - to remove a damaged element, you only need tweezers or a special puller; no other equipment is required. To replace fuses on a Hyundai Accent you need:
- Be sure to disconnect the battery, both terminals;
- Next, we find the burnt out element and carefully remove it;
- If necessary, you can use a rough brush to clean the contacts in the block from oxidation;
- Then we press the new part onto the connector in the block until we hear a characteristic click.
At the end of the procedure, connect the battery and start the car to test the system. If the fuse of the recommended power blows out immediately, then you may need to take the car to a service station to diagnose electrical equipment and wiring.
Washer does not work
The driver experiences great discomfort when driving in slushy weather when the windshield washer suddenly stops working. The first thing that comes to mind is whether there is any washer fluid in the reservoir at all.
If it is still present, it is worth checking the integrity of the fuse in the block located inside the car.
Fuse
To do this, it is not necessary to look for a fuse; it is enough to turn on the glass wiper blades, since they are protected by the same fuse as the washer. If the brushes work but no fluid flows, then the fuse is not the cause.
Pump
Next, the cause should be sought first of all in the pump located in the washer reservoir.
In some cases, it is enough to clean the contacts of the pump connector and the washer will work.
Broken wiring
It is worth checking the electrical wiring harnesses, especially where the wires touch the car body. The photo shows a worn and oxidized conductor (blue with an orange stripe) feeding the washer pump.
Be sure to check with a test lamp whether voltage is supplied to the pump . If it is present and the lamp lights up, it means that the pump has exhausted its service life and must be replaced.
If there is no voltage at the pump connector, a break in the wiring is possible, which happens extremely rarely, or oxidation of the contacts in the washer switch. A car electrician will help you find and fix the problem; trying to find the cause on your own without the proper experience and knowledge is quite difficult .
Source