The brake system of a car must always be in good technical condition, and this primarily concerns the brake pads. On the VAZ “Seven” they rarely have to be changed and the main reason for this is wear of the friction lining. The emergence of problems with the brake mechanisms is indicated by corresponding signs that indicate the need for inspection and repair or replacement of the brake elements.
- What are they used for?
- What are there
Front
- Rear
- Brake pad problems
Extraneous sounds
- Skid
Video: why the car pulls to the side when braking
- Dismantling
Video: replacing front brake pads on classic Zhiguli cars
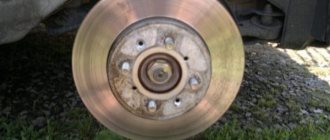
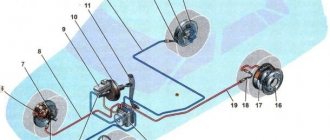
↑ Front brake design of VAZ 2107
1 — fitting for bleeding the front brake drive; 2 — connecting tube of working cylinders; 3 — brake pad wear indicator wire; 4 — wheel cylinder piston; 5 — wheel cylinder clamp; 6 — brake pad lining; 7 - sealing ring; 8 — dust cap; 9 — pins for securing the pads; 10 — bolt securing the caliper to the bracket; 11 — steering knuckle; 12 — caliper mounting bracket; 13 — caliper; 14 — protective casing; 15 — cotter pin; 16 — pad pressure spring; 17 — brake pads; 18 — wheel cylinder; 19 — brake disc.
- Having disconnected the wires of the 3 front pad wear indicators from the plug connections of the wires, remove the cotter pins 15, and then the pins 9 with the springs, remove the springs 16 and the brake pads 17. Mark the pads so that during reassembly you can install them in their original places.
- Having straightened the locking plates, unscrew the two bolts 10 that secure the caliper to the bracket, and remove the caliper.
NOTE! It is possible to remove the front brake (without brake disc) complete with brake pads. In this case, it is enough to disconnect the plug connections of the brake pad wear indicator wires, disconnect the caliper hose and unscrew the caliper mounting bolts 10.
↑ Installation of front brakes
Installation of the front brake caliper is carried out in the reverse order of removal.
After installation, restore the brake fluid level in the reservoir and bleed the system to remove air.
Brake pad problems
The parts of the braking system in question have to be changed not only when they wear out, but also when malfunctions occur that are associated with the use of low-quality consumables or too active driving. The following characteristic signs indicate problems with the pads:
- creaking, grinding and other extraneous sounds when braking;
- car skidding when pressing the brake pedal;
- to operate the pedal you have to exert more or less force than usual;
- beating of the pedal when braking;
- after releasing the pedal, it does not return to its original position;
- the presence of black dust on the rims.
Extraneous sounds
Modern brake pads are equipped with special indicators that indicate wear of these car parts. The indicator is a metal strip that is attached below the friction lining. When most of the material is worn out, but the pad is still able to decelerate, a characteristic grinding or whistling sound appears when the brake pedal is applied. If the pads are not equipped with such indicators, the presence of extraneous sounds indicates obvious wear of the elements in the brake mechanism and the need to replace them.
Pad wear can manifest itself in different ways, and one of the signs is extraneous sounds when braking.
Skid
If the car skids to one side when braking, then the likely cause is wear on one of the pads. The car can skid until it turns around, even on a dry surface. In addition to the pads, skidding can occur due to scuffing or deformation of the brake discs.
Video: why the car pulls to the side when braking
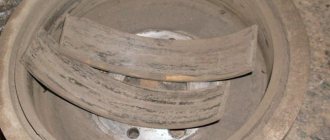
Some time ago I was faced with a situation where the car began to pull to the side when braking. It didn't take long to find the reason for this behavior. After a quick inspection of the car's underside, it was discovered that one of the rear brake wheel cylinders was leaking. This caused brake fluid to get on the working surface of the pad and drum, as a result of which the mechanism was unable to perform its function. The problem was resolved by replacing the cylinder and bleeding the brakes. If you encounter a similar situation, I recommend replacing the entire cylinder rather than installing a repair kit, since the quality of rubber products today leaves much to be desired.
Increase or decrease pedal effort
If the pedal has to be pressed unusually hard or lightly, the problem may be caused by worn or dirty pads. If everything is in order with them, then you should check the integrity of the entire brake system for fluid leaks.
Vibration
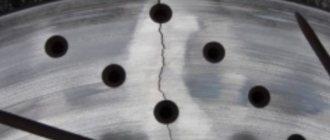
If there is vibration when you press the brake pedal, then a possible reason is that dirt has gotten between the brake disc and the pads, or a crack or chips have appeared on the latter. As a result, parts are subject to premature wear. However, you should be aware that a similar phenomenon is also possible due to problems with the hub or hydraulic cylinders of the brake system.
The pedal goes down
Sometimes it happens that the brake pedal does not move back after being pressed. This indicates that the pads are “stuck” to the disc. This phenomenon can be observed at sub-zero temperatures when moisture gets on the pads. In addition, air may enter the braking system, which requires inspection and subsequent repair or bleeding of the brakes.
Plaque on discs
Plaque on wheel rims is black dust, which indicates wear on the pads. If the dust contains metal particles, then not only the pads are erased, but also the brake disc itself. If such a situation arises, you should not delay inspecting the brake mechanism, as well as replacing failed parts.
The appearance of black deposits on wheels can be caused by active driving or natural wear of the pads.
One day I noticed that the front wheel rims were covered with black dust, and it was not road dust. It is no longer known what brake pads were installed at that time, but after replacing them with factory ones from AvtoVAZ, the situation remained unchanged. Therefore, I came to the conclusion that the appearance of black dust is a normal phenomenon, indicating natural wear of the pads.
↑ Front brake caliper parts
1 - piston; 2 — dust cap; 3 - sealing ring; 4 — caliper with cylinders; 5 — connecting tube of wheel cylinders; 6 — air release fitting; 7 — pad pressure springs; 8 — brake pad mounting pins; 9 — cotter pins; 10 — springs; 11 — lining wear indicator wire; 12 — brake pads.
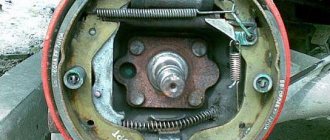
Replacing the rear brake pads of a VAZ 2107
To change the rear brake pads of a VAZ 2107, you must perform the following operations:
- Jack up the car and remove the rear wheel.
- Unscrew the pins securing the brake drum.
- Remove the brake drum.
- Clean the surface of the axle shaft flange with emery to make subsequent installation of the drum easier.
- Check the condition of the brake drum and replace it if necessary.
- Inspect the rear pads on the VAZ 2107. If the linings on them are thinner than 1.5 mm or have cracks, damage or chips, the pads will have to be replaced.
- Clean the brake mechanism from dirt using a clean rag or wire brush.
- Using a screwdriver or pliers, remove the upper spring that tightens the pads.
- Rotate the rear shoe mounting cups 90 degrees and remove them from the mounting rods.
- Remove the small springs located under the pad mounting cups.
- Remove the pad mounting rods (this is not necessary, but the operation will make removing the pads easier).
- Sequentially remove the rear, then the front brake pad.
- Remove the lower spring holding the pads together.
- Remove the brake spacer.
- Unpin the pin on the rear block using pliers.
- Remove the lever that operates the parking brake and the pin from the rear brake pad.
- Install the pin and lever onto the new pad.
- Pin the finger.
- Reinstall the removed pad mounting rods.
- Check the tightness of the brake flap mounting nuts (the tightening torque recommended by the manufacturer is 4.2-5.2 kgf*m).
- Remove the collar that appeared on the brake drum as a result of wear.
- Install the rear brake pads and assemble the brake mechanism in the reverse order of disassembly.
- Install the brake drum and secure it with pins.
- Press the brake pedal several times until the pads move apart and snap into place.
- Check the brake fluid level and top up if necessary.
- Install the wheel and lower the car from the jack.
Replacement of the rear pads of the VAZ 2107 is completed.
After replacing the pads, the parking brake must be adjusted. Only after this the rear brakes of the VAZ 2107 can be considered suitable for use.
Now you know how to change the brake pads on a VAZ 2107 and can do the work yourself, without resorting to the services of a service station.
↑ Disassembly and assembly of the front brake
- Disconnect tube 5 and remove dust caps 2 from the cylinders.
- Then, pumping a stream of compressed air through the brake fluid inlet, push the pistons 1 out of the cylinders on the caliper 4 and remove the O-rings 3 from the cylinders.
Assemble the front brake in the reverse order of disassembly. Lubricate the sealing rings, pistons and cylinder mirror with brake fluid during assembly.
After installation, restore the brake fluid level and bleed the hydraulic drive system.
Replacing the front pads of a VAZ 2107
To replace the pads you must perform the following steps:
- Jack up the car and remove the wheel.
- Treat the pad guide pins with WD-40.
- Remove the cotter pins from the fingers using pliers.
- Using a hammer and a bit (or a thin screwdriver), knock out the pins and remove the springs that press the pads.
- Separate the pads using a strong screwdriver or pry bar.
- Remove the old front pads of the VAZ 2107.
- Check the thickness and condition of the brake disc. If it is deformed or less than 9mm thick, replace it.
- Press in the brake cylinder pistons completely. This can be done by inserting the old pads into place and spreading them all the way using a pry bar.
- Insert new front brake pads on the VAZ 2107.
- Insert the pins of the front pads and secure them with cotter pins.
- Install the pad springs.
- Press the brake pedal several times so that the pistons come out of the brake cylinders and compress the pads.
- Install the wheel and lower the jack.
After replacing the VAZ 2107 pads on one wheel, you need to replace them on the second.
At the end of the operation, you should check the brake fluid level and add it if necessary.
When and how to change pads on a VAZ 2107
It is better to think about replacing brake pads not when the linings have already worn down to 1.5 mm, and the brake disc has developed to a minimum thickness of 9 mm, but to decide on the choice in advance.
On average, pads last 15-30 thousand. km. depending on driving style. The service life of the brake discs is enough for 2-3 sets of pads.
In order to independently replace the pads with new ones, this should be done for both front wheels at once, that is, as a set. To replace you will need:
- jack;
- wheel wrench for removing wheels;
- pliers;
- screwdriver.
After lifting the body with a jack, you need to secure the rear wheels and the body well with supports to safely remove the front wheel. Next, remove the wheel and check the condition of the brake system, measure the thickness of the disc in different places, and the thickness of the linings.
In order to remove the old pads, you must first pull out the cotter pins that secure the pins in the hub. Next, carefully knock the pins out of the hub with a small screwdriver; you can use WD-40 if they are stuck to the caliper lugs. After these manipulations, remove the springs that secure the pads, move the pistons apart and remove the old pads. More details about replacing the front and rear brake pads on a VAZ 2107 can be found in the video or in the article with step-by-step illustrations on our website!
How to choose pads?
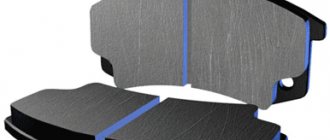
The appearance and markings of the pad can say a lot about them. In particular, the marking contains an indication of the friction coefficient, indicated by two letters (averaged during heating - the first letter, averaged after cooling - the second). Unfortunately, it can not always be found:
| Marking | Meaning |
| C | <0.15 |
| D | 0.15-0.25 |
| E | 0.25-0.35 |
| F | 0.35-0.45 |
| G | 0.45-0.55 |
| H | 0.55-0.8 |
Attention! If the second letter does not match the first (for example, GE), it is best to refrain from purchasing.
Excessively large inclusions of reinforcing particles should also be of concern: this is a crude technology (as a rule, in the manufacture of cheap pads, chips are produced on a lathe, minimally crushing them).
Friction coefficient marking