Light bulb in the interior of a VAZ 2110 and its replacement
If previously elegant interior lighting could only be found in expensive high-quality cars, today interesting lighting solutions can be seen in every second car in the city. In addition, replacing a light bulb in the interior of a VAZ 2110 is very important today and many drivers know how to do it themselves. Replacing a VAZ 2110 interior light bulb or upgrading it is a fascinating and interesting process.
Modernization
With a little modification, you can significantly improve the Kirzhach headlights with your own hands and make their glow brighter.
First, the headlight must be removed, then disassembled in the following sequence:
- To remove glass from Kirzhach, use a hairdryer - you need to heat the sealant, then use a sharp knife to separate the glass;
- Remove the reflective pad;
- The modernization will only affect the low beam units, so unscrew them;
- And then you have a choice: with Kirzhach you can either move the lens towards the reflector by 10 millimeters, or grind off the modular ring, making it shorter. This will help improve the luminous flux of the Kirzhach headlights, raise it and make it wider.
What types of reflectors are there?
Different car models have excellent reflectors.
The choice of one type or another depends on a number of factors:
The last point includes ordinary lighting devices, as well as halogen devices.
On modern cars you can find 4 types of reflectors.
In addition to the structural features of the reflective lens, reflectors differ in the material they are made of.
They can be made from:
Unlike thermoplastic, thermoset plastic has greater resistance to prolonged exposure to elevated temperatures. Low weight, as well as sufficient strength, are a clear advantage of this material over glass and metal.
Other malfunctions affecting the illumination of the rear lights
The reversing lights may not light due to a faulty switch. To troubleshoot, you need to do the following:
- disconnect the connector;
- unscrew the switch with a 21 key;
- remove the switch and replace it with a new one.
A malfunction of the car's lights may be caused by problems with the hydraulic corrector. With its help, you can change the angle at which the headlights are tilted (this is due to the different load levels of the car). The hydraulic corrector consists of a master cylinder, which is mounted on the dashboard, actuator cylinders of the headlights and connection tubes. It cannot be disassembled and cannot be repaired. The assembly part should be replaced. Removal and installation of the main cylinder of the headlight hydraulic corrector occurs in stages:
- remove the handle and cylinder lining by prying it off with a screwdriver;
- unscrew the nut with a 22" head;
- remove the hydraulic corrector.
The trunk light may also need replacing. In this case you need:
- Disconnect the cable and terminal of the negative battery;
- disconnect the rear light from the block with wires by opening the trunk lid;
- press the fastener parts and remove the holder with lamps from the flashlight body;
- unfasten the lamp by unscrewing two nuts;
- loosen the three nuts that secure the decorative trim of the luggage lid and unscrew the nut closest to the lamp;
- lift the cover and remove the lamp;
- The new lamp is installed in the opposite order to that described above.
Many cars of the VAZ family, including the VAZ 2110, have a problem that affects safety and also causes a lot of trouble for drivers. The rear light board is a thin strip with conductive tracks. You have to change this tape quite often, and with it the burnt out light bulbs. You can use the option of inserting iron cartridges from the VAZ 2101. So, to do this, you need to:
- remove and disassemble the rear lights, removing the board and the tape from them;
- buy single cartridges for stops and dimensions;
- purchase copper wire with a cross-section of 2.5 mm, connectors, M3 bolts;
- mark the places for the cartridges and drill them, finishing the holes with a file;
- to modify the cartridges for clearance and brake lights, turn the tip terminals 180 degrees;
- completely cut out the cartridges from the turn signals;
- secure the cartridges to the plastic with bolts and nuts;
- connect all the cartridges, laying the pluses on the turn signal, stops and dimensions;
- extend the connector block and install everything on the car.
Luggage compartment
Since the luggage compartment can be considered part of the car interior, it is necessary to clarify that there is also a flashlight here. It can be used to illuminate the contents of the trunk. In some situations, his work is irreplaceable. To access this mechanism, you must perform the following actions:
- The exterior lighting in the car is completely turned off.
- To release the lantern from its location, you must use a tool. For this purpose, you can use a simple screwdriver. She needs to remove the flashlight from the interior trim.
Note: To dismantle the lampshade, it is necessary to disconnect it from the two power wires. In order to eliminate the possibility of a short circuit when using this lighting device, it is necessary to insulate its connections with special adhesive tape or other sealant.
- The lamp is removed by pressing on the connecting elements. It occurs by analogy with the previous description of removing lamps from the socket.
- To turn on a new lamp, it is necessary to install it. It is pressed into the cartridge mount until it stops.
- To install the flashlight in its original place, you need to insert one end of the lampshade into the connector of the casing, and apply slight pressure on the other. A slight click will indicate that the light is fully connected to the connector in the luggage compartment.
Adjustment algorithm
We sequentially perform the following:
- Cover the right headlight with cardboard or other material that does not transmit light;
- Turn the hydraulic corrector to the first position (I);
- Open the hood, find the screws used for adjustment, and turn them. At the same time, if the left headlight is adjusted, then it will be correct if its light at the top reaches the line N, and at the bottom – P;
- Having adjusted one, the adjustment of the other begins, closing the previous one.
Remember, if the headlights shine too low, they need to be raised, otherwise you may not notice the pedestrian in time, especially if there is slush on the street and he is wearing black clothes. If the light is set high, that is, you deign to raise them high, oncoming drivers will not thank you because you will blind them. Therefore, do-it-yourself adjustment on the VAZ must be done very carefully.
How to remove the headlights yourself and adjust them if the device has defects?
In some cases, the VAZ 2110 headlights cannot be adjusted. This is due to damage to the hydraulic corrector or defects on the reflectors or glass. In this case, you can try to disassemble the unit and replace unusable parts.
How to disassemble the headlight?
Sequence of disassembling the VAZ 2110 headlight:
- Remove the part from the car, remove all lamps from the housing.
- Heat the glass evenly with a hair dryer, melting the sealant layer. Separate the lens from the headlight housing using a flat object. When disassembling a Bosch headlight, you need to unfasten the glass mounting brackets.
- Unscrew the three reflector mounting points.
- Remove the corrector spring through the hole for installing the actuator.
- Remove the reflector from the housing by turning the angle adjusters.
- Wash the headlight components, replace faulty parts and reassemble the assembly. The sealant used is a silicone compound used for installing car windows.
Features of removing and adjusting the headlight
Headlight removal procedure:
- Disconnect the battery terminal.
- Remove the upper decorative radiator grille, which is mounted on two bolts.
- Remove the power supply plugs for the headlight.
- Remove the actuators of the correctors. The part is secured with a latch and a rotary lock.
- Unscrew the three bolts securing the headlight and recess it a little deeper.
- Slide the decorative strip (“eyelash”) and remove it from its seat on the bumper. To facilitate dismantling, loosen the upper bumper mount located between the headlights.
- Unscrew the fourth mounting point of the headlight and remove it from the socket.
- Install a new part (the procedure is performed in reverse order).
A removed VAZ 2110 headlight can be cleaned of dirt and repaired; the design does not provide for any adjustments.
Installation of EUR
Required Tools
Let's say you purchased an EUR kit - it could be from a VAZ 2110 or from another model, for example, from a Priora. Prepare the following tools:
- Drill together with a metal drill.
- Set of screwdrivers, grinder.
- Long ruler.
All is ready? Let's move on to installation.
Step-by-step instruction
- You need to remove the standard terminal from the block and place it in the block on the harness.
We find the standard drive, which is attached to the block. A free terminal must be installed in its place. Now the wire can be placed between the fasteners. We take out the standard terminal and place the terminal from the EUR kit there - Now we take a screwdriver in our hands and carefully remove the steering column housing, and then dismantle the lock and switches.
We need to remove the steering rack; to do this, unscrew the bolt that holds it. Unscrew the fastening screw and remove the part - Take the new and old shaft. Compare their lengths, since we will have to adjust the shaft together with the plate in the future. Don't forget to write down your results.
- We need to adjust the shaft, this should be done on a special machine. It is better to perform this step with the masters, and then return to independent work again.
- As for the plate, here you need to use a drill.
Make sure that the EUR plate matches the hydraulic booster plate. If necessary, trim the corners and place a spacer between the plate and the tens body. Drill additional holes in the plate - Now you can try to install the electric amplifier along with the rack and plate.
If the standard bolt does not fit, then take a smaller mount. The next step is to install the center part of the switch. Installing the central part into the panel - Now we stretch two wires from the interior of the VAZ 2110 to the battery, this can be done through the left wing.
Next, you will need to dismantle the washer reservoir; behind it you will see a copper wire. We move to the safety block and find the wiring there that goes under the hood. The wire must be placed there, as a result it will come out in the left wing. Attach the wires to it, and then pull it all the way into the space under the hood. Pull out the copper wire from the hood space - We dismantle the upper part of the instrument panel (speedometers) and find the red block.
We take the wires coming from the power steering and move them to the space under the dashboard. We need to find the orange wire - disconnect it and put it on the block that came with the EUR. Having found the end with the terminal, place it in place of the standard wire. Connect the orange wire to the EUR terminal - We repeat the procedure with the gray wire. We return to the wires that we pulled out through the wires: we connect the pink plus to the plus, and the black to the minus.
- Done, all that remains is to put the steering wheel and casing back in place.
Adjustment
After assembly, you will need to straighten the steering wheel if it is installed crooked. Separately install the sensor that came with the EUR. If the column casing is cracked, it is better to immediately replace it with a good one. There may be gaps between the front panel and the casing - they must be removed.
Making backlight
Let's start making! The cheapest Chinese RGB tape was taken as a basis, with a controller and remote control that switches color modes.
I wanted to make lighting in the front and back of the cabin, for this we need 4 pieces of tape, cut 20 cm each.
I didn’t just want to glue the tape, since it’s not waterproof, so I decided to make a protective case. I took a plastic wiring box and sawed it into equal 4 parts, 22 cm each.
Next, I fixed the tape inside the box, since it didn’t stick well to me, I decided to put it on super glue, or double-sided tape, 1 cm from the edge.
Then on the second part of the box I made markings for the LEDs.
I decided to unsolder the original wires and solder in the others that I had.
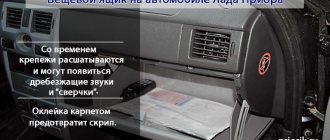
| The lighting of the VAZ 2170 differs from its predecessor the VAZ 2110; for example, in the Priora’s interior there is no central lamp. As a result, rear passengers often lack light. There are at least two ways to correct a design error. |
Expert opinion
It-Technology, Electrical power and electronics specialist
Ask questions to the “Specialist for modernization of energy generation systems”
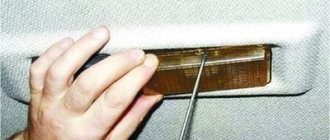
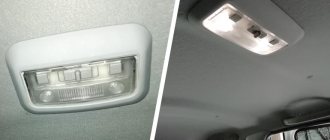
OSVAR interior lamp for VAZ 2108, 2110, 2111, 2112, 2113, 2114, 2115 - Timeturbo Store Then insert a screwdriver into the groove on the side in the upper part of the lamp and press lightly, the cover should fall, hold it with your hand. Ask, I'm in touch!
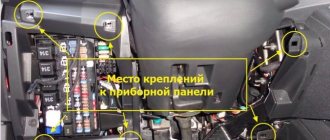
Panel device
A lot of car interior lighting is located in the dashboard. The process of replacing it is one of the most difficult. To carry out work on the dashboard, you must:
- To carry out work with electrical wiring, you should be safe and disconnect the negative terminal from the battery.
- The steering column covers are decorative. They need to be separated from the dashboard.
- The car steering wheel is removed. The horn plate remains unchanged.
- The switches that are located under the steering wheel must be separated from the vehicle.
- When disconnecting them, you will need to disconnect the wires and their connection element.
- The headlight range control has a regulator (a specific position switch). It needs to be dismantled.
- The next step is to unscrew the nut, which is located under this regulator.
- The mounting block is opened.
- This opens access to the location of the fuses (they can blow out, and therefore it is necessary to check their serviceability) and the relay block. It may be enough to replace them. Here you need to unscrew the screw securing the bracket. It is located on the left side.
- The wiring block is disconnected from the ignition system. It is also necessary to unscrew the screw that secures the bracket.
- The tips, two in number, are disconnected from the brake signal switch.
- The console trim has two screws. You need to remove them from the car.
- The console bracket is released.
- The screw securing the instrument panel and air duct must be unscrewed.
- The panel wire mount is disconnected from the rest of the power supply system.
- The immobilizer sensor must be disconnected, namely its wires.
- Similar actions occur on the right side of the panel.
- The nut securing the bracket is removed.
- The wires coming from the cigarette lighter are disconnected.
- The same operation must be done with the fog lamp wires.
- The glove box has a bolt at the top. It must be removed from the connector.
- Both screws of the lower fastening of the instrument panel are unscrewed.
- The seal is removed from the front left pillar.
- Plastic holders are dismantled.
- The same technology is applied to the right pillar.
- The ventilation grilles are removed.
- There are two bolts underneath that need to be unscrewed and removed.
- The dashboard extends slightly, about 10 centimeters, into the interior.
- Once the instrument panel remains in the cabin, you need to disconnect the remaining wires near the left door pillar and next to the steering column.
After completing these steps, you can safely begin replacing sensors, backlights and other components of the dashboard. The assembly process occurs in the opposite order of disassembly. The corresponding video and photo will help you do everything right with your own hands. Of course, if you do everything as the instructions require. Parts, light bulbs, fuses, etc. can be purchased at a special store. The price for them is not too high. You may have to spend time selecting parts. Their diversity can lead to a lot of different situations. Sometimes, parts simply do not fit a particular mechanism. The best option would be to use an old part as an example.
Connecting the interior lighting of the VAZ 2170
First, you need to decide how best to connect additional lighting:
Connection +12V (select the appropriate option):
- plus from the dimensions (+12V appears after turning on the interior lighting). You can take it from the radio block, connector A6.
- constant plus (+12V) from the red wire of the ignition switch or ceiling light.
Ground connection (select the appropriate option):
When connecting, do not forget that the polarity of LEDs is important; do not confuse the minus with the plus, otherwise nothing will light up. We stretch the wires under the carpet or under the ceiling upholstery, whichever is more convenient for you, the main thing is that they do not get in the way. If you connected to the navigation light, then we route the wiring along the left or right pillar.
By the way, do you want to make the Priora’s interior more diverse? Use an RGB controller for the LED strip; it will allow you to change the color of the interior lighting:
To illuminate not only the passengers' feet, it is recommended to install an additional lighting lamp on the ceiling.
Improved high beam
There is also a way to modify the high beams, allowing you to use the standard high beams and DRLs, depending on the time of day. Thanks to the DRL function, you can make your car visible during the day, reduce the current consumption of headlights and increase the life of incandescent lamps. Refinement involves installing a 12V halogen lamp. In this case, the light is directed into the eyes of oncoming drivers, and not into the asphalt, as with low-beam headlights. However, the light does not dazzle and makes the car stand out on the road. The DRL function can be done using high beams, which will shine at only 33 percent of the power and act as daytime running lights. Thus, the normal functioning of the high beam headlights is complemented by an additional mode of sequential activation of 2 high beam lamps. When the DRL button is turned off, the high beam operates in simple mode. The process of implementing such a function is performed in the following order:
- First, a wire is pulled from the interior to the right headlight.
- The wire is connected to the relay terminal (87), then the cover of the high beam headlight module is opened.
- The ground wire is pulled out and cut in the middle.
- The end of the wire coming from the headlight is insulated, and a wire is soldered to the second end going to the high beam lamp, which is laid through the headlight vent.
Note. It is better to pull the wire from the outside of the headlight, using tweezers, through the low beam hole. It is necessary to ensure that the new wire inside the headlight does not touch the headlight sockets. This wire acts as a new ground for the high beam lamp.
- The wire is then connected to the relay pin (30) and the 5 pin relay pin (85) is connected to the green wire in the headlight connector.
- The relay terminals (86 and 87) are connected to ground.
Note. It is better to run a separate wire to the side member stud, where the masses of headlights, fog lights and conductors also converge.
- The connections are then insulated with electrical tape and heat shrink tubing.
- The wire in the passenger compartment fuse box is connected to the fog lamp connector, that is, a button, fuse and relay from the fog lamp circuit are used.
Note. You can make a separate switch in any convenient place.
Power is taken from +12 V after the ignition switch (red-blue wire). Then the daylight will be turned off with the ignition turned off. It is mandatory to install a 5A fuse. OK it's all over Now. With my own hands I managed to not only replace the high beam lamp, but also significantly improve the light performance of the headlights. The instructions given in this article tell you how to act in a situation where there are problems with the high beam headlights, just perfect. And it is noteworthy that by learning how to change headlight lamps yourself and modernize them, you can save a lot of money, because the price of lamps is not expensive, and you do not need to pay repairmen for services.
Sources
- https://master-informa.ru/remont-nissan/poleznye-sovety/20287-zamena-lamp-blizhnego-sveta-vaz-2110-svoimi-rukami-masteravaza
- https://masteravaza.ru/vneshnee-osveshhenie-avtomobilya/fary-elektroprovodka-i-elektrooborudovanie/zamena-lamp-dalnego-sveta-vaz-2110-468
Replacing light bulbs
When the console is freed, you can disassemble the backlight of the Lada Kalina stove without unnecessary interference. Essentially, disassembly comes down to removing burnt out light bulbs. This is done with a slight twisting movement counterclockwise.
The light bulbs are sold assembled, but purchasing them can be problematic. Therefore, it is often necessary to resolder burned-out elements, for which it is recommended to stock up on LEDs. The lamp replacement process looks like this:
- by pressing with a thin screwdriver on the base of the housing lock, the sides of the light bulb are squeezed out one by one;
- at the base of the old lamp, the legs leading to the terminals are cut off;
- diodes purchased in advance are soldered to the terminals;
- the resulting structure is embedded into the lamp body.
Once the bulbs are back in place, you can reinstall the console
Here you need to pay attention to the fact that the top part of the panel is inserted first. You need to make sure that the air intake regulator slider fits into the space allotted to it - otherwise the console will not stand up. Care with the wires is important - after connecting them to the controls and buttons, they should not curl up under the panel; they must be returned to the tunnel
Care with the wires is important - after connecting them to the controls and buttons, they should not curl up under the panel; they must be returned to the tunnel.
When installing the center console, force will be required to secure the metal latches.
Please note here that light pressure is enough to secure it, otherwise the console will burst. If problems occur, check what exactly is preventing the plastic cover from returning into place. Excessive force will lead to cracks and chips.
Excessive force will lead to cracks and chips.
Compliance with the rules and recommendations described in the article will help solve problems in a situation where the backlight of the Kalina stove does not light up. The procedure is simple, but the integrity of the most noticeable element of the interior - the central lining of the instrument panel - depends on the dexterity and calmness of the master.
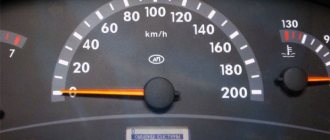
Headlight adjustment
To correctly adjust the headlights of a VAZ-2110 car, the instructions recommend contacting a service station equipped with a special stand or mobile device for adjusting the direction and quality of the light flux. The device shows not only the direction of light, but also the quality of light distribution of the reflector and glass diffuser, which allows us to judge the suitability of the headlight for further use. Experiments have shown that within 4-5 years of operation, all elements of the headlight become unusable and are unable to create the correct direction and the required level of illumination and must be replaced.
Exterior lighting, brake and reverse lights, interior and trunk lighting
The front side light lamps are located in the headlights (see the “Headlights” section), the rear lamps are located in the external rear lights (on the car’s fenders). The brake and reverse lamps are located in the inner rear lights on the trunk lid. (Removing the brake light switch, see “Removing the vacuum booster and brake pedal assembly”). The license plate lights are located on the bumper.
The parking light is on when the exterior light switch is pressed. The side light and brake light lamps are powered through relay K1 for monitoring the health of the lamps in the mounting block. If any of the lamps burns out or the contact in the socket or supply circuit is broken, the corresponding indicator lights up in the control unit. If there is no lamp control relay, there must be jumpers instead, otherwise the lamps will not light.
The license plate lamps turn on simultaneously with the exterior lighting, but are connected bypassing the control relay, so their serviceability is not diagnosed.
The glove box illumination lamp is turned on when the ignition is turned on by a switch under the box lid.
Correct illumination
Before you independently remove the plastic lamp to illuminate the car interior, you need to know that automakers can install lighting devices in different areas. The most popular areas used for highlighting are the following areas:
- a central point on the ceiling or points on the side B-pillars - the light spreads throughout the cabin and is the main internal source for passengers or the driver;
- foot area – present in cars for the front passenger and driver;
- glove compartment – lighting helps to quickly detect small things or documents;
- a mirror under the sun visor - useful for makeup or for checking the facial examination;
- door jam or button area - lighting helps to quickly close/open the door;
- luggage compartment - illumination here helps you find the necessary things or tools that should be located here;
- side door lights - located in the doors, light up after opening and remain on until the doors are tightly closed.
How to disassemble and improve headlights on a VAZ-2110: tuning
Tuning the headlights on your VAZ-2110 with your own hands will not be difficult if you approach this procedure wisely. In this case, the result will please the owner, and his previously unattractive car will look much more modern. The main thing in this matter is to strictly follow the instructions in order to avoid mistakes.
This brand, as a rule, has optics of such types as “Kirzhach” and “Bosch”. The procedure for dismantling old headlights consists of the following steps:
- First you need to disconnect the blocks with wires and remove the upper part from the radiator grille. To do this, take a key of 10.
- After this, you need to remove the boxes with the wires connected to the direction indicators. Immediately after this, the headlight hydraulic corrector is pulled out using a special latch.
- Next, you need to unscrew the headlight mounting bolts and remove the edge from the place where it engages with the wing.
- After completing this work, the headlight of the car is carefully pulled out.
We looked at the procedure for removing a Bosch headlight. Now let’s find out how to remove the Kirzhach optics. This work consists of the following stages:
A flat screwdriver is inserted into the corner of the headlight, as well as a utility knife, which is used to cut off the sealant. If you can’t cut with this tool, you can use a hair dryer; then we proceed to remove the reflector
This is done like this: unscrew 3 bolts around the perimeter and unfasten 4 latches; then the headlights are carefully removed.
The situation is different with the modernization of optics
It is very important to understand what is suitable in a particular case and what is not. Let's try to understand this issue
Device
The entire instrument cluster is mounted on the panel with two bolts and consists partly of mechanical and partly of electronic components. The electronic component of a regular panel is a speedometer and tachometer, but some cars from the VAZ 2110 model range already have an electronic panel.
Also, there must be indicators: coolant temperature, availability, fuel level, as well as warning lights, of which there are 12 installed on the VAZ 2110.
All device connections are stored in a printed circuit board, which is mounted on the back of the case.
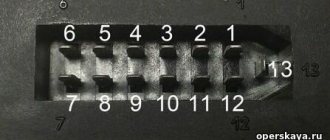
This material will help you figure out the pinout of the instrument panel of the VAZ 2110:
Dashboard of VAZ 2110 disassembled
Expert opinion
It-Technology, Electrical power and electronics specialist
Ask questions to the “Specialist for modernization of energy generation systems”
Comprehensive modification of the interior lighting of the VAZ 2110 You can remove the ceiling lamp with the lamp installed, so perform the following operation if it is necessary to replace the faulty lamp. Ask, I'm in touch!
Injection "ten"
In addition to the wiring that is provided for the VAZ 2110 - carburetor, "ten" - injector, it is also equipped with a number of fuses that protect almost all of it from the possibility of short circuiting.
Structurally, fuses are not provided only for the electrical supply via a relay wire from the battery, in the car starting and ignition circuit, as well as for the wire going to the generator.
Electrical circuit of an injection car
In addition, the injector (as opposed to the carburetor) is a more complex system, and in order to repair it yourself, you need to understand it well. The controller in this wiring system “reads” the operation of all systems, thereby determining and setting many indicators - calculation of the fuel mixture, etc.
Glued glass
Now glued glass is everywhere, but among the Tolyatti cars, the VAZ-2110 was a pioneer in this technology. Of course, such glass is more difficult to replace yourself, but it has more advantages. Such glass is easier to install even in the factory, and improves the rigidity of the body. True, the development of technology did not occur without nuances. At first, cases of untimely and seemingly causeless death of glass were quite common. On later copies and subsequent models there were no such problems.
Step-by-step connection of the starter on a VAZ 2110: video instructions
The first step is to study how the starter works, because this is where any car begins its work. In addition, if you know how the starter works, you can start the engine and find out the reason for the poor start.
To repair a car starter yourself, you just need to know a few things.
Most drivers believe that the starter is a retractor relay. This relay changes the position in which the freewheel is located, which advances the gear to start the engine. When the engine starts, the relay is released from the current and the clutch returns to its previous position, thus moving the gear back. Due to this, the operating time of the gear is preserved, and the machine starter does not deteriorate.
On all cars, the design of the starters is the same, the differences are only minor, which may be in the design, but not in the principle of operation. If you understand how the starter works in one car, you can easily figure it out in another.
Any starter has 40-60 main parts, these include:
- bendix;
- pull-in relay;
- DC motor electric.
Climate control
Yes, yes, that happened too. There was a temperature sensor in a black box on the ceiling near the interior lamp. Based on its readings, the heater maintained the temperature set by the controller. True, there was no air conditioning then, so it all worked only in the cold season.
But the main problem was not the lack of air conditioning, but the constant vagaries of the sensor, which neither the owners nor even the plant could cope with. Therefore, later the automatic system was abandoned, and, accordingly, specific temperature values disappeared from the regulator. Climate control returned (already with air conditioning) only on the Priora.