It is difficult to scare a person who owns a Chevrolet Niva with anything. He is not afraid of vibrations, ominous sounds from the distributor, or the darkness. Although, the darkness is sometimes annoying, especially in those moments when the lamps on the instrument panel do not light up. There is nothing special about the lamps themselves, W1.2W is exactly 1.2 W. These lamps are installed to illuminate the instrument panel, to illuminate the buttons on the panel, and as control lamps.
They are often replaced with LEDs, but this is a separate topic.
First, let's find out how to change the light bulbs on the instrument panel of a Niva Chevrolet.
Signs of a faulty dashboard
Faulty indicators on the dashboard can be noticed through simple observation . For example, this applies to an arrow indicating the speed of movement or the amount of fill in the gas tank. In this case, they will either remain stationary or change chaotically, regardless of external circumstances and speed of movement.
As a rule, such system failures do not affect the functioning of the vehicle itself . But at the same time they knock down the driver by providing him with incorrect information about the vehicle. For example, you can easily pick up fines for speeding without even knowing about such a violation.
Other signs include flashing of various lights on the panel and problems starting the engine . It is much more difficult to detect malfunctions in the operating system in such a situation, since the symptoms may be associated with breakdowns in other components. To find out that the malfunction is associated specifically with the panel, you need to conduct a thorough diagnosis that will help determine the cause of the problem.
A completely different situation arises if all the devices on the panel fail . In this case, the malfunction is beyond doubt and it is necessary to begin troubleshooting the problem. In most cases, the solution requires disassembling the panel and replacing failed elements. You can do this work yourself, without the help of a specialist.
Possible faults
If you understand the designations of the light bulbs in the Niva Chevrolet instrument panel, let's look at the next point - possible malfunctions of the device:
- The instrument cluster does not work, but the engine starts normally. Most likely, the problem is caused by either a failure of the shield itself or a lack of power.
- The lights on the instrument cluster do not light up. If all the indicators stop working at once, this may indicate a break or fraying of the wire responsible for the lighting. If only some of the lamps do not work, then most likely they are simply burnt out.
- Devices not working - speedometer or tachometer. Most likely this is an electrical type problem; you need to disassemble the panel and look for the fault.
- Sensors do not work - fuel level, antifreeze temperature. As practice shows, this usually indicates poor contact in the electrical circuit. Usually this problem is solved by disconnecting and cleaning the plug contacts (the author of the video is the Ig K channel).
DIY diagnostics
In accordance with the service manual for the car, the control panel has its own diagnostic system, which allows you to check the device without removing it.
The sequence of actions for diagnosis is as follows:
- The ignition must be turned off and the daily mileage reset button must be pressed. Next, the ignition is turned on and the key is released. The arrows on the tidy devices must pass through the entire scale several times - this is a tidy test.
- Then hold down the reset button for five seconds - this will clear the processor memory.
- Now press the odometer reset button; the version of the software used should appear on the display. When you press the button again, numbers should appear on the display. The number 0 indicates that there are no malfunctions in the operation of the device, 1 - the microprocessor has failed, 2 - the fuel controller circuit has broken, 4 or 8 - increased or decreased voltage in the on-board network. If there are several breakdowns, the sum of codes will appear on the screen. For example, 14 is errors 2, 4 and 8, fault 10 is errors 8 and 2, etc.
A few words about warning lamps
Why are indicator lights needed on the instrument panel? With their help, Chevrolet Niva gives the driver signals that a failure has occurred in one of the systems. It looks like this:
- a lamp in the form of an oil can indicates that there is insufficient pressure in the engine lubrication system (may be due to damage to the crankcase, a malfunction of the oil pump or the sensor itself);
- the light with the image of the battery turns on when the battery stops receiving charging from the battery (the voltage regulator may fail or there may be an open circuit in the generator circuit);
- a lamp in the form of a circle with an exclamation mark inside lights up when the level of brake fluid in the expansion tank drops below normal (it is better not to continue driving until you find out the cause of the fluid leak);
- a light bulb in the form of a schematic engine - “CHECK” may indicate the failure of any sensor, malfunctions in the operation of systems and mechanisms (accurate diagnosis is carried out after reading and decoding the error code);
- a signal indicator in the form of a thermometer located on top of the scale of the coolant temperature meter lights up if it heats up above normal (failure of the radiator fan, temperature sensor, thermostat).
Replacing the backlight of the stove Lada 2123 (VAZ 2123)
You can try removing the dashboard. To do this, pull it towards you, but the panel fastening latch will get in the way. You need to press it slightly with your finger. Pull the shield towards you, moving it away from the instrument panel. We press the clamp of the shield fastening with your finger. Theoretically, the tidy is free, but it is held in place by wiring harnesses.
Carefully disconnect the contact blocks and remove the instrument panel assembly. Remove the instrument panel panel. When you flip the ashtray lid, you have simultaneous access to the ashtray and the cigarette lighter.
To use the cigarette lighter, press the socket button until it locks into place. After about 20 seconds, the cartridge clicks back to its original position, ready for use.
Design Features To clean the ashtray, press the cigarette extinguishing plate and remove the ashtray from its slot. When the exterior lighting is turned on, the inside of the ashtray and the cigarette lighter are illuminated with special lights.
Use a slotted screwdriver to pry up and remove two plugs. The first is located to the right of the hazard warning button, and the second is on the far right of the panel trim.
We turn out the screws located under the plugs. We pull out the right side of the dashboard trim and remove the connectors from the control buttons. Remember, take photos of which connectors go to which buttons!
We disengage the left side of the trim, remove the block from the buttons for turning on the headlights and dimensions. We remove and remove the lining.
Unscrew the two screws securing the dashboard. And, to be honest, reviews about it do not evoke positive emotions. First of all, this concerns the impossibility of repair.
Regardless of whether repair or replacement is needed, the shield will have to be removed. This is done using a Phillips screwdriver and a flathead screwdriver. Algorithm First of all, remove the negative terminal from the battery so as not to inadvertently short-circuit the electrical wiring.
What is a torpedo
All cars have a dashboard (board), which is located in front of the passenger compartment. In a Niva Chevrolet car, it is a plastic covering on which almost all vehicle control elements are located. Although the panel is not a necessary part for driving a car, without it driving turns into complete dissatisfaction. Under the socket there are parts that can fail from time to time. And sometimes, to get to them, it is necessary, as they say, to disassemble half the car. Let's take a closer look at the stages of removing a torpedo from a Niva Chevrolet car.
Steps for removing the instrument panel
The reason for removing the panel may be not only the breakdown of parts located under the panel, but also the following points:
- Car interior modernization;
- Insulation and noise reduction of the interior;
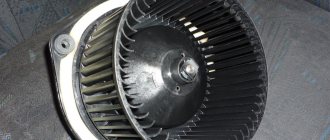
- Cleaning the car heater;
- Replacement with a new, improved one.
Removing the Niva Chevrolet dashboard is carried out in stages. You need to arm yourself with a simple set of tools and get started.
- Stage 1. The car is disconnected from the battery. This is necessary, because there is a huge amount of wiring on the instrument panel, which can accidentally be shorted during removal. To do this, simply disconnect the negative terminal from the battery.
- Stage 2. First of all, the part of the casing located under the steering wheel is removed. The five fastening screws are unscrewed with a screwdriver, and this casing, consisting of two parts, is removed.
- Stage 3. The steering wheel and the switches located on the side are removed. The steering wheel is removed by unscrewing the nut located inside the steering wheel. Remove the steering column shaft. How to remove the steering wheel and its parts can be found in the relevant sections.
- Stage 4. The car radio and its installation location are removed from the passenger compartment. Let's start removing the floor covering. To remove the A-pillar trim, you need to unscrew four screws. The ignition switch is also removed.
- Stage 5. We proceed to disconnecting the wires. The blocks with wires located at the bottom near the gas and brake pedals are disconnected and marked with a marker. The wires supplying the car's anti-theft system are disconnected. The power supply of the instrument board consists of three blocks, which are also detachable.
- Stage 6. The ground wire of the car is unscrewed from the stud. Under the hood, you need to remove the filter, which is designed to filter the air entering the cabin.
- Stage 7. Most of the liquid is drained from the expander, and the clamps suitable for the heater radiator are disconnected.
- Stage 8. Work is carried out with a wrench inside the car. The bolts securing the panel to the stand and the stand to the bracket are unscrewed. The cross member strut is removed. A cross member of the instrument panel is attached to the steering shaft bracket, which can be removed by unscrewing four bolts.
- Stage 9. All visible and invisible bolts securing the instrument panel are unscrewed. These fasteners are located on top near the glass and on the side. The front air duct, which is designed to supply cold and warm air into the cabin, is removed.
- Step 10. You can remove the dashboard. It is best to do this together, so that one person observes the removal processes from inside the panel. Otherwise, any power wire or part may be damaged or broken.
Removing the dashboard of Niva Chevrolet
Dashboard Niva Chevrolet.
There is no way without removing the instrument panel and, by the way, replacing lamps is the only repair that the instrument panel is subject to.
If inaccuracies and malfunctions are found in the operation of at least one device, the shield along with the board is replaced. Regardless of whether repair or replacement is needed, the shield will have to be removed. This is done using a Phillips screwdriver and a flathead screwdriver.
Algorithm
The process goes like this:
- First of all, remove the negative terminal from the battery so as not to inadvertently short-circuit the electrical wiring.
Remove the negative terminal.
Using a Phillips screwdriver, unscrew the two screws of the upper fastening of the instrument panel.
Remove the plug next to the control lamp block.
We take out the plug to the right of the hazard warning switch and unscrew the screw.
Use a screwdriver to pry off the control lamp block.
Disconnect the wiring harness block from the block.
Pull the shield towards you, moving it away from the instrument panel.
We press the clamp of the shield fastening with your finger.
Remove the instrument panel panel.
Disconnect the wiring harness blocks from the shield.
Using a Phillips screwdriver, unscrew the two self-tapping screws securing the instrument cluster on the right side.
Remove the screws securing the instrument cluster on the left.
We put forward a combination.
We disconnect the wiring harness blocks from it.
We remove the instrument cluster.
The panel was pushed aside.
Replacing lamps on the instrument panel
Instrument cluster lamps: 1—backlight lamps; 2 - control lamps.
Rear view of the board.
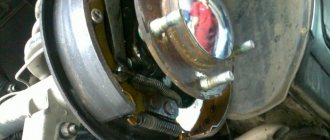
When we have the dashboard in our hands, we turn it face down and find the plastic sockets for the backlight and warning lamps.
To remove them, simply turn the cartridge body counterclockwise. We take out the socket, take out the old lamp from it, and install the new one in its place. We insert the cartridge into the board and turn it clockwise to secure it.
Tuning options
For those who want to bring something new to the interior of the cabin, there are special offers in the form of electronic panels such as Gamma GF 825, GF 826, GF 610 SL, FLASH-I, etc. They look great and are installed without problems.
If you decide to carry out such tuning of the instrument panel, the Chevrolet Niva will immediately be transformed for the better. You just have to pay from 9 to 20 thousand rubles for this. But for this money you will additionally receive:
- multifunctional trip computer;
- digital and analogue vehicle speed indicators;
- LED warning lamps with two-level alarm;
- on-board network voltage indication;
- "Autolight" system;
- integrated diagnostic tester for electronic engine management system;
- ability to select and adjust the backlight (color, brightness).
Well, if you don’t have the opportunity to spend that kind of money, you can modernize the panel using special tuning kits. They include overlays for instruments and indicators (of different colors) and lighting elements. Such sets cost 500-800 rubles.
Source
Replacing Light Bulbs in the Dashboard of a Chevrolet Niva
Chevrolet Niva “Shinovka” > Magazine> replacement
light bulbs
instrument
diode panels
After a couple of years, almost all the lights burned out the instrument
panels, and so I could not stand it and finally replaced what still needs to be done for our client lamps with diodes)
the panel
at first had no problems, everything is very simple.
Price list: 300 ₽ Mileage: 102,000 km
Chevrolet Niva 2006, petrol engine 1.7 l., 80 l. n., all-wheel drive, manual transmission. tuning
Comments 26
they burn out in a month
How many 3V diodes?
And, a photo of the finished result. Where?)
we also need to do what we saved for our client, it remains burnt in the dark to the touch, our client just has to turn it on.
Are the light fixtures on the slab the same as those in the trim? Are they the same for our client?
How did you get the LEDs out of the oven?
He pulled out the scroll, took out the socket, and the light bulbs under it.
But how did you take the turn? I just pull, but they don't give up. And that's why I'm afraid of breaking
replacement dashboard on Chevrolet dashboard cornfield
Replacing light bulbs on the Chevrolet Lacetti dashboard.
Hi all. I wanted to show this video, most save some money)))
How did you get the LEDs out of the oven?
figured it out, just sat)
I installed the stove on an LED strip. But something bright, you need to reduce the number of diodes. And beauty too! Time for 15 minutes heat gun!
Tell me how to remove the hob, 4.5 screws on the panel and where are the extra 4?
1 plug under the button to the right of the emergency lighting, 4 plugs to the right of the indicator lamps, but usually to replace it in the stove panel
You don't have to remove, just the cool sticks for our client should be carefully pulled out and the socket will be removed, and there you can also remove the light bulbs.
No, I didn't do it right, there is no such person, I just wanted to remove the plate where the turn was and it didn't work, I thought you were wrong about that!
Is the LED stuck to the lamp charging point? Convinced of the correct polarity while on vacation?
I didn't realize it was a flask
charging how it differs from the rest. Our client still has the lamp that I pulled out in the same way.
As far as I remember, the excitation is supplied to the generator through a charging lamp. Is there a fee now?
And sell, everything works well.
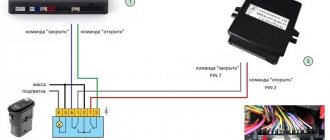
When the ignition is turned on, the generator excitation voltage is supplied to terminal “D” of the regulator (terminal “D” of the generator) through a warning lamp located in the instrument cluster 3. After starting the engine approximately. The excitation coil is powered by three additional diodes installed on the rectifiers. generator block. The operation of the generator is controlled by a control lamp in the instrument cluster. When on
Replacing a Hyundai Accent light bulb.
During ignition, the lamp should light up and, after starting the engine, turn off if the generator is correct. veins If the lamp burns brightly with other radiation when fully heated, it indicates a malfunction.
Malfunctions
The PCB is an electronic unit and therefore may fail in the event of a short circuit or open circuit in the power supply. If you encounter one of the problems, then the first thing you should pay attention to is what signs appeared:
- The engine starts and runs, but the panel shows no signs of life. In this situation, there may be no contact on the device connectors. This can be corrected in the following way: you need to disconnect the pads and clean the contacts; this problem can arise when there is an increased level of moisture, for example in winter.
- The tachometer and speedometer stopped working. This may also appear if there is a break in the power supply or if there are problems with the operation of the temperature and fuel level sensor.
- The light bulbs have stopped burning, but all the elements are working as expected, in this case there may be problems in the power wires or in the lamps themselves
How to choose a lamp
There are a large number of offers on the market from manufacturers that have certain advantages
Therefore, first of all, you should pay attention to the features
First of all, it must have the following qualities:
- comfortable and bright light
- long service life
- favorable price
You also need to look at the manufacturer. Lamps from well-known brands may be more expensive, but they will use high-quality materials.
Do not install lamps with increased functionality, for example, the most durable ones - this is usually achieved by reducing the brightness, which can be unsafe in the dark.
It is better to install standard taillights on the Niva, since other types do not fit into the grooves. The taillights are mostly the same.
Shnivy tidy does not work: reasons
Usually this is damage to the module's power circuit, moisture/condensation on the board, or mechanical damage caused by improper repair.
The problem is simple when studied in detail, and can be easily eliminated without the help of specialists.
The shield does not light up
If it just goes out (the backlight has failed), check the corresponding fuse inside the mounting block. Next you need to follow the wires towards the tidy. Here the condition of the contact groups and the presence of oxidation on the terminals are checked. If there are such problems, the problems should be eliminated.
If only some of the light bulbs stop lighting, dismantle the device and check the lighting elements directly for damage.
Shnivy's shield is blinking
A typical problem in cars that are driven on rough terrain or broken roads. A symptom of trouble is that the device periodically goes out while driving or blinks quickly.
Check the wiring and connecting terminals for possible damage or loose contacts.
Instrument needles Strings stuck
In such a situation, check the systems.
- Fuse and power circuits of the interior lighting line. The design of the network is such that the power is crossed, which causes problems.
- Mass disappears on the connected elements of the on-board circuits.
Possible faults
If you understand the designations of the light bulbs in the Niva Chevrolet instrument panel, let's look at the next point - possible malfunctions of the device:
- The instrument cluster does not work, but the engine starts normally. Most likely, the problem is caused by either a failure of the shield itself or a lack of power.
- The lights on the instrument cluster do not light up. If all the indicators stop working at once, this may indicate a break or fraying of the wire responsible for the lighting. If only some of the lamps do not work, then most likely they are simply burnt out.
- Devices not working - speedometer or tachometer. Most likely this is an electrical type problem; you need to disassemble the panel and look for the fault.
- Sensors do not work - fuel level, antifreeze temperature. As practice shows, this usually indicates poor contact in the electrical circuit. Usually this problem is solved by disconnecting and cleaning the plug contacts (the author of the video is the Ig K channel).
General appearance and varieties
At the moment, there are several options for the instrument panel on the Niva Chevrolet and Niva Treval.
| Picture number | Years of manufacture | Applicability | Catalog number |
| 1 | 2006-2007 | Chevrolet Niva | 21230-3801010-00 |
| 2 | 2006-2009 | Chevrolet Niva | 21150-3801010-00 |
| 3 | 2009-2018 | Chevrolet Niva | 21230-3801010-10 |
| 4 | 2018-2019 | Chevrolet Niva | 21230-3801010-15 |
| 5 | 2019-2020 | Chevrolet Niva | 21230-3801010-17 |
| 6 | 2020… | Lada Niva Travel | 21230-3801010-17 |
Despite the external differences, these shields differ only in appearance, lighting, software and functions of the built-in BC. Otherwise, the icons and designations of these panels are absolutely the same.
Instrument panel elements
All components of the Chevrolet Niva instrument panel can be divided into two groups:
- Devices;
- Signaling lamps.
The instrument panel is supplemented with two liquid crystal displays that display parameters such as total mileage, daily mileage, time and ambient temperature.
Devices
Pointer-type devices that convert electrical impulses coming from the corresponding sensors.
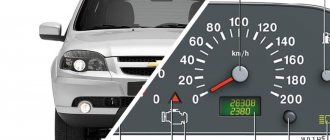
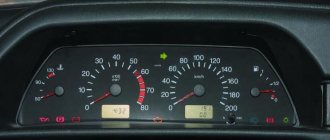
- The speedometer is located in the central part of the panel. It receives a signal from the speed sensor, which is located in the transfer case. The device division price is 10 km/h. The speed limit is 200 km/h.
- The tachometer is used to measure the crankshaft speed. On the Chevrolet Niva panel, the tachometer, like the speedometer, is located in the center. On its scale the zone corresponding to values above 5500 rpm is marked in red. It is not advisable to operate the engine in such modes.
- On the right side of the panel there is a fuel level measuring device. The scale has divisions corresponding to the value 0, ½ and 1. These values indicate the amount of fuel in parts equal to the tank capacity.
- On the left side of the panel there is a device indicating the coolant temperature. The instrument scale is graduated so that the minimum value corresponds to 50 degrees. There is a “red zone” in which engine operation is prohibited.
Design Features
What can the instrument panel tell us? The Chevrolet Niva is designed in such a way that its panel unites all the control devices of the car. It includes:
- speedometer;
- odometer (counter of kilometers traveled);
- tachometer (crankshaft revolution counter);
- coolant and ambient temperature indicators;
- fuel level indicator;
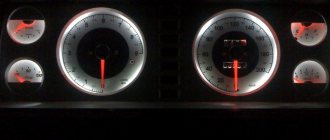
- 12 control (signal) lamps.
In order for the driver to monitor instrument readings at night, the panel is illuminated when the side lights are turned on. How bright is the instrument panel backlight? "Chevrolet Niva" has the function of adjusting the level of illumination of the dashboard. It is provided by six special light bulbs.