At the initial stage of remaking your own car, much attention should be paid to tuning the VAZ 2110 panel. Many owners of the “ten” adhere to the position that their car should not lag behind modern fashion trends in the world of four-wheeled high-speed “iron horses”.
Of course, everyone wants their car, despite some wear and tear and the already quite rich history of the VAZ 2110 brand, to look beautiful, “feel” powerful and provide high comfort inside the cabin for all passengers. While traveling in a vehicle, many passengers pay attention to the instruments.
Of course, they will always be more interested in original devices with exclusive design solutions that literally amaze and delight. Tuning the VAZ 2110 instrument panel should begin with searching for panels. To install such a part, you will have to use your own skills and dexterity if you don’t want to give your hard-earned money to various car dealerships.
Moreover, this work does not require the use of special tools. It will be enough to use pliers and a Phillips screwdriver.
How to create a new design for the VAZ 2110 dashboard
The entire process of updating your dashboard yourself will not take much time. All that needs to be done is dismantling the outdated “part” and installing a modernized model. You can find out how to remove the VAZ panel here and in the car repair and operation manual. But the main steps should be recalled:
- First you need to disconnect the battery terminals. The steering wheel should be lowered to the lowest position.
- It is necessary to unscrew the screws that secure the panel trim.
- Next, we disconnect the connector on the left, in this situation we are talking about a machine switch for external refreshment. Then, using pliers, you should straighten the mountings of the instrument cluster.
- Next, remove it. Some models are attached using M5 screws. Finally, you need to disconnect the connectors.
After this, you can install the new panel in the reverse order. Such tuning of a VAZ 2110 with your own hands will always cause admiration among passengers and a sense of pride.
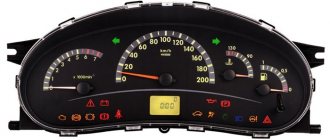
Bottom part
Let's look at the indicators at the bottom of the control panel. If they don’t light up, it means the machine is working normally, and when any of them lights up, this indicates a malfunction in certain components. Most often, this is a signal that repairs are needed, and the sooner the better. From left to right:
The additional front panel of the new-style BSK control has indicators:
- An oil can is shown. If the light works, check the oil level;
- An icon lights up, which, with some imagination, can be “identified” as working wipers. This indicates that there is not enough windshield washer fluid in the tank;
- Conventional image of a thermometer over a container with liquid - high temperature of antifreeze;
- A crossed out light, which the arrow points to, is a sign that the brake light or parking lights are not working;
- If the light with the image of a wheel with brake pads lights up, it is quite possible that the pads are worn out and require replacement;
- The sign of a man with a seat belt indicates that the seat belt should be fastened.
Expert opinion
It-Technology, Electrical power and electronics specialist
Ask questions to the “Specialist for modernization of energy generation systems”
Designation of buttons on a VAZ 2112 europanel The speedometer cable is not used on all cars of the tenth family, but only on carburetor cars, when installing the combination, be sure to reconnect it, or if the central part of it is completely damaged, it has edges, if they are torn off , then in this case, replace the cable with a new one. Ask, I'm in touch!
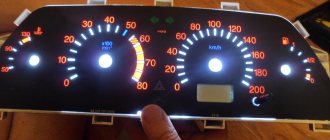
Vibrant variety of colors
Today, the fashion for changing the dashboard lighting is gaining fantastic momentum. Almost everywhere cars have neon lighting or internal LED illumination. However, all these innovations are not a cheap pleasure, which not everyone can afford. The situation is different when replacing the factory backlight with a multi-colored one.
You can, no doubt, use ready-made tuning options, but this will also cost a lot. It is best to do it yourself. In this situation, the main thing is to have the necessary materials and patience. First you have to disassemble the “tidy”. The protective glass must be removed. Next we remove the arrows. To do this, you need to use a screwdriver and hard cardboard.
It should be placed under the arrow, and then pry it off with a screwdriver. Then you need to carefully and slowly lift it to the top. Next, remove the backing. A utility knife will be useful for this. It must be inserted between the panel and the substrate and a layer of sealant must be cut in a circle. Then remove the backing. Let's disassemble the panel and get started.
1. Remove the filter layer using a utility knife. A filter is a colored layer of paint. It is applied from the back of the substrate and gives color illumination to the speedometer numbers and other sensors. To completely get rid of the filter, you can use acetone or another liquid that contains alcohol.
2. Next, change the backlight color. First, you can change the odometer backlight. To do this, you will need to dismantle the odometer screen, and then remove the blue film and remove the backlight bulb. It should be replaced with a multi-color universal LED. He can change colors. We connect the LED to the socket of a standard light bulb. Reinstall the odometer screen.
3. Now you can start completely replacing the backlight. We attach the LEDs to the “tidy” frame. Such LEDs can be purchased complete with a color switch. We install them in place and attach them to the standard dashboard backlight contacts.
4. Let's move on. Now we need to make sure that the arrows have the ability to change the backlight. To do this, remove the layer of red paint from the arrows. For this operation, you can use a stationery knife and acetone. Once the arrow is clean, it can be painted using white nail polish. The main thing is that the arrow is white, since this color conveys the color scheme of the LEDs.
5. Before the final stage, you need to attach the LED color switch to the panel. Such a switch can be installed, for example, in the lower right corner of the dashboard. After this, you can install everything in place. First, the substrate is installed. For greater reliability, you can use a sealant. After this, we put the arrows in place. We insert the protective glass. After that we admire the result.
How to beautifully illuminate the buttons of a VAZ 2110 panel
When tuning the panel of the presented car, among other things, you can also beautifully illuminate the “tidy” buttons. Let's take, for example, the rear fog light button. First you have to dismantle and disassemble it. To do this, you need to pull its moving part and body in different directions.
Once the button is pulled out, the light bulb can be accessed. If you wish, you can take it out. If you can’t pull out the light bulb, then we move on. Using a screwdriver or knife, pry up the latches on both sides. A switch mechanism will appear in front of us. Here we need a black staple. By prying it off, we will calmly scatter the entire mechanism.
Now we can easily remove the lamp; tweezers are suitable for this. Now you can use your imagination. You can purchase an LED lamp in any color. It should be borne in mind that the positive one is contact No. 6, and the negative one is No. 7. You can find out the polarity by looking at the back of the case. A block with wires is inserted here. Next, we check how the backlight works. If everything is fine, move on to the next part.
Getting rid of the green filter. It can be drilled, but this must be done carefully so that the drill does not go right through the entire structure. As a result, we remove the light filter from the structure and check its functionality.
It should be noted that almost all buttons, if desired, can be modified in this way. The only exception is the position of the negative and positive contacts; they need to be looked at in the electrical diagram. If there is no diagram, you can easily find a photo of it on the Internet. The negative contact is usually designated by a black wire, the positive contact by any color.
Most often he is white. You can remember, but it is better to sketch or photograph the contact connections; then there will be no confusion during the assembly process. The assembly process must be done in reverse order.
Auto-assistance
Taking into account the existing Traffic Rules, the driver is obliged to turn on the headlights on his VAZ-2112 passenger car before moving off. This means that the backlight on the instrument panel will also turn on, although it is completely unnecessary during daylight hours, because the instruments can be viewed normally without it. Constantly burning instrument panel backlight lamps shortens their operating life and leads to more frequent malfunctions in this electrical circuit.
The simplest reason why the headlights do not light up is when children's playful hands, sitting in the driver's seat, touch the car controls. If they turn the rheostat knob that regulates the amount of light flux to the left all the way, then there will be practically no illumination of the instrument panel. Therefore, before you start troubleshooting, try turning this knob to the right. If the backlight works, then the problem will be easily solved. But if not, then only then will you have to look for the cause of this malfunction.
In this case, you will have to: either check whether the 5-amp fuse F1, which is located in the mounting block, is intact, or turn on the dimensions of your car, get out of it and see whether the parking lamps on the left side or the trunk lighting lamps are on, since all they receive power through this fuse. The right dimensions receive power through fuse F11.
If the left-hand side lamps are on and the instrument panel illumination does not work, it means that fuse F1 has not blown, so the next step is to check the contacts on the rheostat, with which I adjust the brightness of the instrument panel illumination lamps. There are cases when the plug comes off along with the contacts or it fails. You can check this assumption by removing the rheostat and closing its contacts directly. If the backlight lights come on, that means this is the reason.
A possible malfunction leading to loss of instrument panel illumination may be the instrument panel circuit board. This happens due to the burnout of the track on it, along which power is supplied to the backlight lamps. Considering that the instrument panel is not repairable, it will have to be replaced with a new one. And the filaments of the lamps themselves also burn out, although for this to happen on all the backlight lamps of the instrument panel at once, this is unlikely to happen.
Installing tweeters in the dashboard of a VAZ 2110
You can beautifully complement the panel by installing a tweeter (high-frequency speaker). One of the most problematic stages is drilling holes. The windshield makes it difficult to drill at right angles. But it’s impossible to do without a drill, because there is a metal strip under the plastic shell. In this situation, you should make something like a template or stencil out of paper.
Using a knife, you can remove the soft area of the panel (plastic on the outside, something like foam rubber on the inside). Then we take a drill and drill around the pre-marked area. It is better to use compact drills. Once the hole is drilled, the rough edges should be corrected. To do this, you can use special attachments for drills.
You need to drill at a distance from instruments and sensors. Please note that wires or brackets may be found under the metal strip. The mounted tweeter element must fit tightly into the hole. If there is a certain freedom, then it is necessary to seal this area with sealant. The wires from the tweeter can be hooked along the edges of the air ducts.
This tweeter is an important component if a speaker system is being built in the car. Without such a detail, the sound and sound volume will not be complete.
Repair of "tidy" VAZ 2110
The domestic car 2110 cannot boast of a high-quality panel. In severe frost or summer heat, plastic often begins to crack. In addition, sometimes its corner also comes off. The “tidy” of this machine consists of three parts: a central, upper lining and a lower plastic lining. The corner most often comes off through: unscrewing the screws that attract the top cover, or through the fact that its soft part has moved away from the metal part of the top cover.
In the first option, you need to remove the panel, because otherwise you won’t be able to tighten the top trim. If only the soft part has come off, then there may be several solutions. You can glue it, but it will not stick tightly to the plastic air deflector. Another option is to mask the gap that appears when the corner of the panel peels off.
You can, of course, cover the gap with wire. It is placed inside using a screwdriver. Instead of a wire, you can use a headlight seal. In this case, you can return the corner to its place. Polyurethane foam is used to glue the corner. The casing, thanks to the foam, will stick to the metal body, but first it needs to be cleaned and degreased.
Then we apply foam inside, using a wet rag to remove excess foam. Use paper clips to press the corners. There is no need to remove the foam immediately. You should wait until it dries. After the foam has dried, you need to paint over it with a marker. It may seem like the foam is bursting, but in fact, the corners of the panel will not come out.
Now you can move on to repairing the crack in the panel. To do this, use either a plastic repair agent or tighten the lining with material. As for the first option, it is the simplest, because during repairs you do not need to remove the cover. You can remove the crack using a special epoxy resin.
Cosmofen and cold welding are also suitable for use. To prevent the crack from standing out, you should repaint the dashboard. In the second method, when reupholstering this automobile part, leather or vinyl leather is used. First, the crack must be filled with putty. If the problem is in the corner of the panel that has come unstuck, then repairing it will not be difficult.
If the “tidy” is cracked, then it is very difficult to completely hide the crack and, at the same time, not remove it. If the matter concerns repairs, then it is better to immediately replace it with a European overlay. Here you can see in detail how to solder plastic.
Possible reasons
What to do in a situation where the instrument panel backlight on a VAZ-2110 car has disappeared?
First of all, you should look for the reason why this malfunction occurred. Sometimes it can be identified immediately, but in some cases this process takes some time. In fact, there may be several reasons, so you will need to check everything methodically. The most banal and simplest option is that someone turned the rheostat knob, which is responsible for the amount of light flux, all the way to the left.
This, by the way, is often the sin of children who are placed in the front seat. “Young drivers” love to turn all sorts of knobs, press buttons and switch levers. Perhaps the adults overlooked it, and the child “corrected” the dashboard lighting. The problem, as you understand, is solved by simply returning the rheostat knob to its previous position. Therefore, before you start looking for possible reasons for the sudden disappearance of the backlight, check this particular point.
I would like to remind you of one simple rule. In a situation where there may be several possible causes of failure, when searching you need to follow the path of least resistance. In other words, test the simplest assumptions first. You may be lucky and find the problem with minimal time and effort.
If the reason is not in the position of the rheostat handle, you need to proceed to further search for the causes of the breakdown. Possible sources of problems here could be:
- fuse;
- instrument panel circuit board;
- contacts;
- wiring;
- failure of light bulbs due to short circuit.
So, let's look at some of the above reasons in more detail. After the rheostat handle, you should check the integrity of the 5-amp fuse F1. You can also usually turn on the side lights and see if they work on the left side. Everything is explained here simply. The lamps that illuminate the instrument panel, the left side lights, as well as the trunk lighting operate through this fuse. The dimensions located on the right side of the car receive power through F11, that is, they are not of interest to us in this particular case.
You may see the following situation. The left side parking lights, or trunk light, work, but the instrument panel light does not. This means that the problem is not in fuse F1. Therefore, you need to continue searching for the possible cause of the malfunction. In particular, it is necessary to check the contacts of the rheostat that illuminates the dashboard lighting. It is not uncommon for plugs to fall off. Accordingly, the lighting of the shield disappears due to lack of contact.
However, the rheostat itself can also fail. It is quite easy to check this assumption. To do this, you must first remove the rheostat, and then directly connect its contacts. If after this manipulation the instrument panel lights come to life, it means that the problem has been found, and you just need to replace the failed part. If not, then you need to continue searching further.
The most serious problem due to which the instrument panel lighting disappears is damage to the printed circuit board of the dashboard itself. In particular, there are often situations when the track on it that supplies power to the lamps burns out. One point worth noting here. The instrument panel in such a situation cannot be repaired, which means there is only one way out - replacement with a new one.
There are cases when, due to a short circuit, all the lamps illuminating the instrument panel burn out. However, this happens quite rarely. Much more often, one lamp may fail. As you can see, there are several reasons why the instrument panel lighting may disappear. Accordingly, the search will take some time. However, in the vast majority of cases, eliminating the malfunction that has arisen will not be so difficult, and many people can easily do this with their own hands.
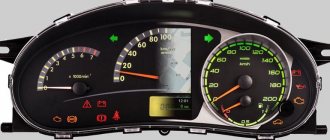
Stylish and modern overlay
Many VAZ 2110 owners quickly get tired of the boring standard panel (in the video), but they don’t want to buy an alternative one, which is equipped with a computer and costs a lot of money. What to do in such a situation? There is an excellent option that will allow you to carry out economical tuning yourself. One of the easiest ways is to buy an overlay.
You can find them without any problems in online stores (the photos presented there give a general idea of such details). To install it, you need to remove the “tidy” and carefully pull out the arrows. When installing the arrows in place, you should make sure that nothing interferes with their movement. Otherwise, you will have to disassemble everything again.
If you add illumination of the scale and arrows to this tuning option, you can almost instantly transform your own car beyond recognition.
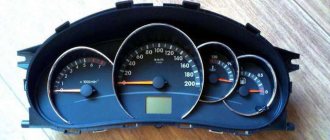
Device
The entire instrument cluster is mounted on the panel with two bolts and consists partly of mechanical and partly of electronic components. The electronic component of a regular panel is a speedometer and tachometer, but some cars from the VAZ 2110 model range already have an electronic panel.
Also, there must be indicators: coolant temperature, availability, fuel level, as well as warning lights, of which there are 12 installed on the VAZ 2110.
All device connections are stored in a printed circuit board, which is mounted on the back of the case.
Dashboard of VAZ 2110 disassembled
How to carry out high-quality soundproofing of a VAZ 2110 panel yourself
It's no secret that the VAZ 2110's panel often creaks. Eliminating squeaks is also called sound insulation. This process begins with disassembling the “tidy” into three parts, which are fastened together with bolts. Modelin can be used as an “anti-creak”, and bitoplast will act as a noise absorber.
In places where the panel parts come into contact, a model should be used. All bolt holes must be closed with model material to eliminate loss of heater air flow. The back of the dashboard needs to be covered with bitoplast.
The rest of it can be glued inside. This article provides more details on how to glue sound insulation. Often the black fuse box and glove compartment cause squeaks. At the bottom of the latter you need to lay bitoplast, and the sides should be covered with modelin. The sides of the black box that are in contact with the panel should be glued with modelin. It should be noted that the bitoplast is crushed during planting and there should be no problems with installing the “tidy”.
Nothing can please owners more than silence and the complete absence of various annoying squeaks in the car. The comfort in the cabin that occurs after soundproofing the panel causes only pleasant sensations.
Find more information here and here