Good afternoon dear friends. Today I want to offer instructions on how to change the light bulbs in the headlight unit of a domestic car, the seventh model Zhiguli. Yes, there are few such people left who have a “Seven” in the garage, but many buy it as a first car, a training car, so to speak. And she, as you know, requires attention and care. Therefore, this article will be useful primarily to novice car mechanics who want to learn how to handle and maintain a car themselves, and gain first experience in repairing in a garage.
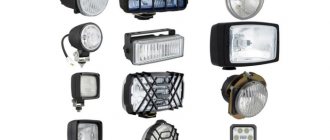
Replacing lamps is useful not only when they burn out, but also when you want to improve the light in your headlights - install LED or halogen bulbs, or carry out a small “tuning” of the head optics with a lighting device. Today we will touch on a narrowly focused topic, namely how to change the light bulbs in a headlight. Let's remember what is there.
Dashboard lights VAZ 2107
Dashboard light bulbs 2107
ECE light bulb designation: T3W
Technical characteristics of the instrument panel light bulb:
- Power - 3 W;
The installation location of the VAZ 2107 dashboard light bulbs is shown by arrows in the figure below:
The instrument panel has four 3W backlight bulbs.
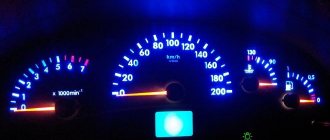
Control lights for the VAZ 2107 dashboard
Designation of light bulbs according to ECE: W1.2W
Technical characteristics of the dashboard warning lights:
- Power - 1.2 W;
Place of installation of warning lights on the VAZ 2107 dashboard:
The instrument panel has six 1.2 W indicator lamps.
CARBURETOR VAZ 2107
Turn signal
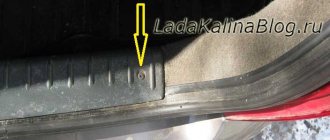
The housing of the side turn signals is fixed in the car fenders with plastic clips. They work on the principle of inserting and clicking. There are two options for replacing the lamp in repeaters: through the wing arch or by removing the plastic housing. In the latter case, there is a chance that this body will no longer be securely fixed in the wing due to breakage of the plastic clips.
Let's consider the second option
We pry up the repeater housing with a plastic flat object, you can use a screwdriver, but use a rag or other lining so as not to damage the paintwork of the wing. The body is surrounded by a rubber “skirt”, so you can lightly press on it with a hard tool and pry it, it should pop out of the metal of the car body.
We remove the rubberized cartridge from the turn signal housing. It uses, depending on the modification, T4W or W1.2W lamps. The last type is removed from the cartridge by turning 90 degrees so that the contacts come out of the latches, the second type is removed from the socket by hand, since it does not have a base.
The first option is through the arch
We do the same thing, just don’t pull the repeater housing out of the wing. It remains in place, which ensures the integrity of its latches. In this case, there are also nuances:
To get to it, you need to remove the fender liner. In some cases, when no one has climbed there for many years, unscrewing the screws will be problematic.
If there is no protection, then there is so much dirt that it will be even more difficult to get there.
We climb under the wing, find the cartridge and pull it out along with the lamp. And we do everything as in the second case. Assembly is carried out in reverse order.
Important! When you “push” the cartridge into the repeater body, you need to hold it from the outside, rest your finger against it so as not to squeeze it out. If this happens, the plastic clips may break and you will have to buy a new one.
Panel light bulbs VAZ 2107
Indicator light
Indicator lamp designation according to ECE: W1.2W
Technical characteristics of the warning light:
- Power - 1.2 W;
Cigarette lighter socket light bulb
ECE designation of the cigarette lighter socket lamp: T3W
Technical characteristics of the VAZ 2107 cigarette lighter socket illumination lamp:
- Power - 3 W;
Clock light bulb
Designation of the clock light bulb according to ECE: W1.2W
Technical characteristics of the VAZ 2107 watch backlight lamp:
- Power - 1.2 W;
Illumination of the glove box (glove compartment)
- Open the lid and use a screwdriver to unscrew the screws, shown in the photo
- We take out the inner casing of the glove compartment and gain access to the backlight
- We take out the socket with the light bulb from the limit switch housing
- We press on it and turn it 90 degrees so that the “antennae” come out of the fastenings, take it out and change it.
Assembly occurs in reverse order.
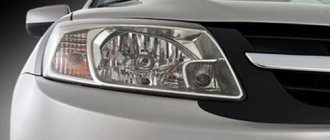
Headlight bulbs VAZ 2107
High and low beam headlight bulb
Designation of high and low beam headlight bulbs according to EEC: H4
Technical characteristics of the high and low beam headlight bulbs:
- Power - 60/55 W;
Installation location of the high and low beam headlight bulbs of the VAZ 2107:
Side light bulb VAZ 2107
Designation of the side light bulb in the headlight according to ECE: T4W
Technical characteristics of the side light bulb:
- Power - 4 W;
Installation location of the side light bulb in the VAZ 2107 headlight:
Turn signal bulb in headlight unit
Designation of the direction indicator bulb in the headlight according to EEC: P21W
Technical characteristics of the turn signal bulb in the headlight:
- Power - 21 W;
Installation location of the turn signal bulb in the headlight unit of the VAZ 2107:
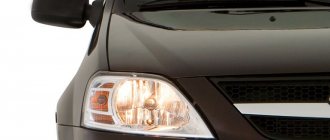
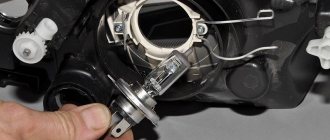
How to replace low and high beam bulbs
The advantage of the head optics of the seventh model Zhiguli over its counterparts is that it has H4 lamps installed, which are responsible for two types of road lighting. In other models, for example VAZ 2106, separate lamps are used for each light, which, if they need to be replaced, causes unnecessary material and physical costs.
Remove the waterproof protection of the headlight unit . It is made in the form of a plastic casing installed at the rear. It is removed by turning 180 degrees counterclockwise. It is attached with “tongues” that are inserted into the headlight housing and rotated in its grooves.
Disconnect the wiring block . It consists of three sockets: ground, low beam, high beam.
We snap off the wire retainer . It is made of elastic wire and securely holds the lamp in the reflector socket.
Remove the lamp from the socket. If it burns out, we replace it; if it was removed purely to replace it with an LED one, then it is recommended not to touch the bulb with the filaments with your hands. Otherwise it will become cloudy. Why? - Don't know!
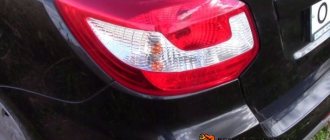
Rear tail light bulbs of VAZ 2107
Rear light pinout
Pinout of the rear light VAZ 2107:
- Bottom row center - reverse;
- Bottom row extreme - turns;
- The top row inside is the brake;
- The top row is the outermost - fog lamp;
- Top row, second from the edge - dimensions.
Tail light fog lamp
Designation of the fog light bulb in the rear light according to EEC: P21W
Specifications of Tail Light Fog Bulb:
- Power - 21 W;
Installation location of the rear fog lamp of the VAZ 2107:
Side light lamp
Designation of the size bulb in the rear light according to EEC: T4W
Technical characteristics of the tail light bulb:
- Power - 4 W;
Installation location of the tail light bulb of the VAZ 2107:
Turn signal lamp
Designation of the turn signal lamp in the rear light according to EEC: T4W
Technical characteristics of the tail light turn signal bulb:
- Power - 21 W;
Installation location of the VAZ 2107 taillight turn signal bulb:
Rear reversing light bulbs VAZ 2107
Designation of the reversing light bulb in the rear lamp according to EEC: P21W
Technical characteristics of the rear light bulb:
- Power - 21 W;
Installation location of the reversing light bulb for the taillight of the VAZ 2107:
Brake light
Designation of the brake signal light in the rear light according to EEC: P21W
Taillight Brake Light Bulb Specifications:
- Power - 21 W;
Installation location of the rear brake light bulb z 2107:
Interior lighting
- Use a screwdriver to pry up the lampshade on one side and remove it. It is detached entirely, complete with button and lamp.
- Loosen the clamps holding the bulb base and pull it out. We replace it and collect everything.
The main thing is not to use too much force when installing the lampshade in place. All fasteners are plastic, you can damage them and end up having to buy a new part.
Instrument panel lighting
- We disassemble and remove the instrument panel to get to the board with the lighting and alarm lamps. You can change them without completely removing it, but you need to act carefully so as not to break the wiring
- Turn the light bulb socket that needs to be changed a quarter turn and remove it.
- The lamp is pulled out in the same way as the socket - by turning it 90 degrees.
Video instructions for replacing instrument panel light bulbs on a “classic”:
In some modifications of the VAZ 2107, baseless lamps can be used. Therefore, it is better to check which ones you have installed, buy them, and only then disassemble the dashboard. Such a light bulb is simply pulled out of the socket without rotation.
You can buy it on the market together with cartridges for installation in a panel. In this case, it is enough to remove it from the “tidy” board and install a new light bulb assembly with a socket - simple and reliable, but they are more expensive.
Typical faults
If the brake lights do not light up, then it may be the car's brake light lamp itself. The simultaneous failure of lamps from both lampshades is rare, but such a breakdown does occur.
- The brake lights on the VAZ 2107 may fail due to poor connection of the vehicle's electrical connectors.
- The fuse has failed.
- The brake frog has failed.
- Brake light problems.
A lamp can burn out for a number of reasons. This includes a long service life, manufacturing defects, and dirt or water that gets on the base.
Brake lamps, how to check their functionality
If the fuses are okay, you need to move on. You should open the luggage compartment and remove the taillights to check the integrity of the brake lamps.
It is advisable to check them by inserting spare lamps, since very often upon visual inspection the lamp may appear to be working. If replacement bulbs are not available, remove suitable bulbs from other locations, such as turn signals, parking lights, etc. After replacement, press the brake pedal and check for the presence of light. It is necessary to carry out replacement and other operations in both headlights, because in some vehicles, when one brake light fails, the second one also stops working.
If the light appears, then the cause of the breakdown was indeed the brake lamps, but if the fault could not be eliminated, we proceed to the next stage - checking the contacts.
What lamps should I put on the VAZ 2105?
Modifications 2104, 21041, 21043, 2105, 21051, 21053, 21054
| Light device | Quantity, pcs | Lamp type |
| Front marker light | 2 | T4W |
| Front direction indicators | 2 | P21W |
| Front fog lights | — | — |
| Side direction indicators | 2 | T4W |
THIS IS INTERESTING: What kind of oil to pour into Ford Transit 2 2 diesel?
Troubleshooting procedure
Lamps fail most often. It's best to start with them. If they are working properly, remove the plugs from the frog and connect them together. The plugs should have +12.
If there is no voltage, check the fuse. If the fuse is intact, check connector Ш12. By applying 12V to pin 3 of the Ш12 connector, voltage should appear. Check the voltage at the fuse contacts. If there is voltage on the fuse on both sides, we try to apply +12 directly to the frog plug. If the lights come on, change the fuse box.
The fuse box can only be repaired in specialized workshops. In this case, the board track could have burned out.
When there is voltage at the frog plugs, but the lights do not light up, we check 12V directly at the contacts of the lights board. If there is voltage, but the lamp does not light, check the connector contact. When there is voltage at the board contact, but the lamp does not light up, remove the lamp and check for the presence of 12V directly on the current of the conductive surface of the base. If there is voltage and the contact is clean, check the housing part of the base. If necessary, replace the flashlight board.
It is extremely rare for the brake light wire to break. The wiring harness comes out from under the instrument panel and runs along the floor of the car under the carpet. Both brake lights are connected in parallel. We check the integrity of the wire from the frog to the lights. If necessary, replace a separate stop wire.