Chevrolet Niva cooling system
The Chevrolet Niva cooling system is a closed liquid type with forced circulation. The cooling system includes an engine cooling jacket, a radiator with two electric fans, an expansion tank, a thermostat, a water pump and a heater core.
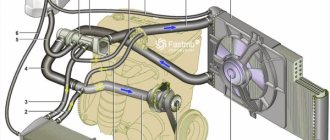
Fig. 17. Cooling system VAZ 2123 Niva (without air conditioning)
1 - expansion tank; 2 — cylinder head pipe; 3 — heater radiator supply hose; 4 — heater radiator outlet hose; 5 — heater radiator; 6 - coolant temperature indicator sensor of the instrument cluster (screwed into the threaded hole of the cylinder head - not visible in the figure); 7 — supply hose of the throttle assembly heating unit; 8 — outlet hose of the throttle assembly heating unit; 9 — left electric fan; 10 — outlet pipe of the system jacket; 11 — control system coolant temperature sensor; 12 — radiator; 13 — right electric fan; 14 — upper guide radiator casing; 15 — radiator supply hose; 16 — lower guide radiator casing; 17 — radiator outlet hose; 18 — steam-air hose; 19 — thermostat; 20 — bypass hose; 21 — coolant pump; 22 - inlet hose
The Chevy Niva cooling system is filled with liquid through the neck of the expansion tank. The tightness of the system is ensured by the inlet and outlet valves in the expansion tank plug.
The exhaust valve maintains increased (compared to atmospheric) pressure in the system when the engine is hot. Due to this, the boiling point of the liquid increases and steam losses are reduced.
The intake valve opens when the pressure in the cooling system decreases relative to atmospheric pressure (on a cooling engine). The thermal operating conditions of the engine are maintained by a thermostat and electric radiator fans.
Water pump (pump)
The Chevrolet Niva water pump is a vane, centrifugal type, driven by a poly V-belt from the auxiliary drive pulley. The water pump housing is aluminum. The roller rotates in a double-row bearing with a lifetime supply of lubricant.
A pulley hub is pressed onto the front end of the roller, and a plastic impeller is pressed onto the rear end. For the correct position of the pump pulley grooves, the distance from the mating plane of the cover to the outer end of the hub should be 84.4 ± 0.1 mm.
Axial and radial play in the water pump bearing is not allowed. If the bearing or self-pressing seal of the pump fails, the cover assembly with the roller and impeller should be replaced.
Removing the water pump Chevy Niva
— Drain the coolant from the engine. Remove the accessory drive belt.
— Loosen the three bolts securing the water pump pulley.
— We hold the pulley from turning with a slotted screwdriver, alternately inserting it between the head of each fastening bolt and the shoulder of the pulley hub.
— After unscrewing the fastening bolts, remove the pulley. Unscrew the four nuts securing the water pump cover.
— Remove the pump cover complete with impeller and bearing. The joint between the cover and the body is sealed with a gasket.
— We install the water pump cover in the reverse order.
— To remove the water pump assembly, use a screwdriver to loosen the clamp securing the supply hose to the housing and remove the hose from the housing branch pipe.
— We unscrew the two bolts of the lower fastening of the water pump housing to the cylinder block and one bolt of the upper fastening.
— Remove the pump assembly.
— The joint between the water pump housing and the cylinder block is sealed with a gasket.
— We install the pump in the reverse order.
Chevrolet Niva thermostat
The redistribution of fluid flows in the cooling system of the VAZ-2123 is controlled by a thermostat with a solid heat-sensitive element.
The thermostat is located above the coolant pump, on the right side of the engine.
On a cold engine, the main thermostat valve closes the pipe leading to the radiator, and the liquid, bypassing the radiator, circulates only in a small circle - through the bypass pipe of the thermostat, liquid from the outlet pipe of the cooling jacket enters the pump.
At a temperature of 78–82° C, the valve begins to move, opening the main thermostat pipe; in this case, part of the liquid begins to circulate in a large circle through the radiator.
At temperatures around 90°C, the main valve opens fully and the bypass valve closes, allowing most of the fluid to circulate through the engine radiator.
Regardless of the state of the thermostat (the position of its valves), liquid always circulates through the heater radiator and the throttle assembly heating unit.
Replacing the Chevy Niva thermostat
— Remove the engine screen. Before removing the thermostat, drain the coolant from the system.
— Using a screwdriver, loosen the clamp securing the radiator outlet hose and remove the hose from the thermostat pipe.
— Loosen the clamp securing the outlet hose of the throttle body heating unit and remove the hose from the thermostat pipe.
— Loosen the clamp securing the bypass hose and remove it from the thermostat pipe.
— Loosen the clamp securing the heater radiator outlet hose to the thermostat pipe and remove the hose.
— Loosen the clamp securing the coolant supply hose to the pump and remove the thermostat.
— To check the thermostat, lower it into a vessel with water, heat the vessel and use a thermometer to control the temperature at which the main valve begins to open.
— The thermostat must be replaced if the temperature at which the main valve begins to open is not within the range (80 ± 2° C) or the stroke of the main valve upon further heating is less than 6.0 mm.
— Install the thermostat in reverse order. Fill in coolant.
— With the engine running, check the tightness of the connections between the hoses and the thermostat pipes.
Radiator Chevrolet Niva
The VAZ-2123 radiator consists of two vertical plastic tanks (the right one with a partition) and two horizontal rows of round aluminum tubes with pressed-on cooling plates. To increase cooling efficiency, the plates are stamped with a notch.
The tubes are connected to the tanks through a rubber gasket. The liquid enters the radiator through the upper pipe and is discharged through the lower. There is a coolant drain plug at the bottom of the left reservoir.
On models without air conditioning, the upper and lower guide housings are located in front of the cooling system radiator, and on models with air conditioning, the air conditioning condenser is located.
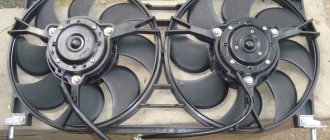
Fig. 18. Electric fans
1 - casing; 2 - impeller; 3 - electric motor; 4 — electric motor connector; 5 — block of wires of an additional resistor; 6 - additional resistor; 7 - shield
The electric fans are located behind the radiator in a casing. As the coolant temperature rises, at the command of the controller, first the right electric fan with a low rotation speed is turned on through an additional resistor, and then both electric fans are turned on at a high frequency.
Removing the Chevy Niva radiator
Drain the coolant from the radiator. Remove the front bumper. We show radiator removal operations on a car with air conditioning. Remove the air conditioner condenser. On a car without air conditioning, remove the radiator guide casings.
We remove the sound signal. Having unscrewed the mounting elements of the power steering radiator, we tie the radiator to the hood hinge without disconnecting the fluid supply and drainage hoses from the radiator.
Disconnect the engine control system wiring harness block from the additional resistor wiring block. We move the additional resistor wire block from the plastic holder attached to the radiator frame spacer.
Disconnect the engine management system wiring harness connector from the left fan motor connector. Similarly, disconnect the engine management system wiring harness block from the right fan motor connector.
Unscrew the three bolts securing the horn bracket and remove the bracket. Unscrew the bolt securing the bracket of the right upper radiator support and remove the bracket with the support. Similarly, remove the bracket with the upper left radiator support.
Using pliers, squeezing the ends of the clamp securing the radiator outlet hose to the thermostat pipe, slide the clamp along the hose and remove the hose from the thermostat pipe.
Having tilted the upper part of the radiator forward, we use pliers to compress the ends of the clamp securing the steam-air hose to the radiator fitting and move the hose from the fitting.
When removing the hose from the radiator fitting, be careful not to break the fitting. Use a screwdriver to loosen the clamp securing the supply hose to the upper radiator pipe. Remove the supply hose from the radiator pipe.
We tilt the radiator assembly with fans forward and lift it, removing the rubber cushions of the lower supports from the holes in the lower cross member of the radiator frame. Remove the radiator assembly with fans.
We unscrew two bolts of the side fastenings of the fan casing to the radiator on each side and two nuts (one on top and bottom) of the central fastening of the casing. Remove the fan shroud from the radiator. We install the radiator in the reverse order.
If, when dismantling the radiator, the lower support cushion remains on its pin, then before installation it must be removed from the pin and installed in the hole on the lower cross member of the radiator frame.
Removing electric radiator fans for a Chevrolet Niva
— Disconnect the casing with electric fans from the radiator of the cooling system.
— To remove the fan motor, unscrew the three nuts securing it to the casing.
— Remove the electric motor with the impeller. Similarly, we remove the other electric motor with the impeller.
— Using two slotted screwdrivers, remove the locking bracket from the electric motor shaft and remove the impeller.
— Similarly, we dismantle the impeller of the other fan.
— We assemble and install electric fans in the reverse order.
— When installing the impeller, it is necessary that the locking pin inserted into the hole in the motor shaft fits into the grooves of the impeller hub.
— To remove the additional resistor, use a Phillips screwdriver to unscrew the two screws securing it to the casing and remove the resistor with the wiring harness.
— Install the additional resistor in the reverse order.
To monitor the coolant temperature, a sensor is screwed into the left rear part of the cylinder head, connected to the temperature indicator in the instrument cluster.
Replacing the coolant temperature gauge sensor
— Remove the engine screen.
— Drain the coolant from the engine.
— Slide the protective cap off the sensor and disconnect the wire tip from the sensor output.
— We unscrew the temperature sensor from the hole in the cylinder head.
— The thread in the connection is conical and does not require additional sealing.
— Install the sensor in reverse order.
— Tighten the sensor with a torque of 15–20 Nm (1.5–2 kg/cm).
A coolant temperature sensor is installed in the outlet pipe of the cooling jacket, which provides information to the controller.
Thermostat is stuck
An element that can jam, thereby preventing coolant from circulating in a large circle even when its temperature reaches a critical maximum.
The problem is solved by replacing the part with a higher quality and reliable analogue.
And so I’ll briefly go over the main variants of a cooling system malfunction and their diagnosis. At the beginning, briefly on the general principles of operation of the cooling system in the ShNG
in general, it is as simple as three kopecks. When the engine is started, the piston engine heats up the cylinder block, which must be cooled so that there is no piston wedge. Cooling is liquid; liquid circulation is provided by a water pump (2), which is driven by a belt from the engine pulley. those. in the general case, the engine was started, the pulley spun and the pump began to turn through the belt, which drives the coolant in a circle.
This leads to the first conclusion - engine overheating is primarily dangerous due to possible piston wedge, then your car will not go anywhere. second - torn pipes of the cooling system (the plug is not a fact that it will have time to relieve pressure when the antifreeze is actively boiling), but this is a lesser problem, because they can be replaced.
THEREFORE - special attention to the presence of an engine belt and tension rollers - if they are not there, you will only be able to drive with long breaks of 1-2 hours, when the dragger cools down and you will move no more than a kilometer or three (in relatively flat terrain without a load). I tried turning the fans on full blast and driving almost without coolant - to no avail, after 3-5 km the temperature became critical.
further, during the initial warm-up of the engine, the coolant circulation system moves in a so-called small circle - i.e. bypassing the cooling radiator and conditionally actually not really cooling. The thermostat (15) regulates movement in a small or large circle - when a certain temperature is reached (indicated on the thermostat), it opens and redirects the coolant movement through the cooling radiator (11). Accordingly, now the cooling area is larger in a unit specially designed for this and when driving along the highway it is cooled by the oncoming oncoming air flow. in all stages before this, in general, no electronics are involved in the operation of the cooling system (with the exception of display meters and calculation of controller operating parameters based on engine temperature, but this does not critically affect the movement of the car).
hence the second conclusion follows - if your thermostat is “broken” and does not open wide (conditionally, it may not open fully, but only partially) - then under certain environmental conditions (if outside temperatures are not 30 and above) and landscape ( if this is not a hard intersection), you will be able to move a certain distance by car, but the main condition is that there must be a sufficiently strong oncoming air flow. When stopping, turn off the engine so as not to heat up the coolant and the cylinder block even more. when driving along an intersection or in high temperature conditions without cooling in a large circle there will be no benefit. You can check the relative correctness of the thermostat operation in this way - start a cold car and warm it up to the opening temperature of your thermostat - 80-90 degrees.
Moreover, BEFORE this temperature, the upper radiator pipe (grasp it with a gloved hand) should be relatively cold, and when this temperature is reached, it should begin to warm up noticeably. this means that the thermostat has opened and coolant is now circulating through the radiator. a worse option is if the thermostat does not open completely and the coolant circulation through the radiator does not occur in full - then early, but not destructive, boiling of the car is possible. more about this below.
further, after opening the thermostat to a large circle, the coolant begins to circulate through the cooling radiator and, when driving along the highway, is cooled by the oncoming oncoming flow. when driving in traffic jams, the city or at an intersection under load, there is no oncoming flow and the coolant is not cooled sufficiently, so the coolant temperature rises. so that the coolant temperature does not rise to the limits when it starts to boil, a coolant temperature sensor (DTOZh) is built into the cooling system, which is located near the thermostat (5), it transmits the coolant temperature readings to the controller, which, based on them, calculates the engine operating modes (does not critically affect ability to move) and - most importantly - controls temperature thresholds when it is necessary to turn on the electric fans (6) for cooling the radiator of the cooling system. those. when a certain temperature is reached (it is either set in the controller firmware or installed in the on-board computer (OB)), the controller gives a command to the relay unit to turn on the fans, which, when turned on, cool the radiator and, accordingly, the coolant and its temperature drops. in exactly the same way, when the lower limit of the coolant temperature is reached, the controller gives a command to turn off the cooling fans.
Also interesting: Replacing Niva front brake discs
This leads to the third conclusion - if the DTOZ or electric cooling fans are faulty (this also includes the fan relays), you will not have normal driving under load or driving slowly - there will be nothing to cool the coolant with. You can water the BC and radiator with water from a bottle - but the method is unproductive. those. In any case, you will have to wait for the engine to cool down, but at least somehow you can drive. In the event of a malfunction of the DTOZH or cooling fans, movement when turning on the interior heater (stove) at full power will partially help - nevertheless, the coolant will be cooled by some kind of radiator, but at the expense of heating the interior))
further, as “chips” that “help” the cooling system, the following methods are used to regulate temperature conditions: - using not water, but special coolants - antifreeze and antifreeze. The lowest boiling point is for water, then for antifreeze, then for antifreeze. G12 antifreeze has the highest boiling point, which means you can drive it as far as possible. further, if you have antifreeze solution running out of the cooling system due to torn pipes, and you need to drive anyway, the main thing is that there is water nearby. You can quite easily pour water into the cooling system and, one way or another, drive quite successfully. the main thing is that the water is clean so that it does not clog the cooling system. After use, even relatively impure water can be flushed with the cooling system.—Operation of the cooling system under pressure. The expansion barrel, designed to relieve excess pressure in the system, has a plug in which the valves operate at a certain pressure. higher pressure means higher boiling point of coolant. the option is not necessary in case the plug or expansion tank fails in the field - non-injection fields work quite well without plugs with valves. - the thresholds for turning on the fans in the SHNG are different - at the first threshold one fan is turned on and at half power (through resistance) , if it fails, then at the second temperature threshold both are turned on at once and in full force.
main operating parameters of the cooling system in the ShNG: - boiling temperature of the coolant - 110-112 g - pressure in the system - 1.2 atm - thermostat opening temperature - 80-94 g - temperature of switching on the 1st fan mode - 98.25; - its temperature switching off - 93.75; - switching temperature of mode 2 - 100.5; - switching off temperature - 95.25; - threshold temperature of a warm engine - 105; - threshold temperature of a cold engine - 35.3;
Now on faults and their diagnosis. First of all, I will say this - I STRONGLY RECOMMEND IMMEDIATELY AFTER BUYING A CAR, INSTALLING YOURSELF AN ON-BOARD COMPUTER! This belief has only strengthened over the years of owning the car. I can give 100,500 examples where the BC allows you to monitor the operating parameters of engine systems and quickly diagnose problems. Moreover, in some cases, it will save you from the more costly consequences of malfunctions! further, if you install a BC (and they currently cost from 1000 rubles), then I immediately recommend installing a BC with a tropic function - arbitrary setting of the temperature for turning on the fans for cooling. this will allow you to be much more able to respond to critical situations.
Diagnosis of sudden and obvious problems with the cooling system:
1. You eat, you eat, you don’t bother anyone. and then (... something happens, but you didn’t pay attention to it...) you notice that the temperature on the instrument panel begins to rise quite quickly and stops there. in the case of BC, when the critical temperature is reached, he will start yelling obscenities. stop, open the hood and look in the engine compartment for the presence of an engine belt or the presence of tension rollers. both, if destroyed, will completely stop the cooling of your engine. therefore, they should always be with you in spare parts. I would also include the torn lower pipe from the radiator here)
2. Next - the pump. It's a pretty reliable thing in terms of relative driving capabilities. most often it begins to leak (diagnosed by the presence of drips under the car or on the protection) - i.e. coolant begins to ooze from under the pump shaft. most often this does not happen in a stream, but simply gets wet and drips, so you can drive, but monitor the coolant level after a certain time. very rarely bearings fall apart, then it will be impossible to drive if the shaft jams, but most often the impending death of the bearing on the pump is signaled by an increased howl from it. I very rarely saw in pictures the destruction of the pump impeller itself or its rotation on the pump shaft. That's it, we've arrived, we need to change the pump.
3. radiators. The interior heater radiator, if it starts to flow like a river in the fields, can be completely excluded from the cooling system by looping the pipes in the engine compartment (this trick was carried out by the St. Petersburg guys at Kola, think about what you need for this). You can try to treat the main cooling radiator in the fields with either cold welding/poxypol or radiator sealant - depending on what kind of hole and where. in general, if there is no leak, you can drive, but monitor the coolant level.
And also interesting: Buy auto parts cabin filter Niva Chevrolet for foreign cars in the online store AUTOPITER
4.cooling fans. The most common reason for failure of cooling fans is loss of contact on the fan connection chips in the engine compartment. moisture, dirt, oxidation do their job and contact disappears. It can be treated by distorting the chips by spraying WD-40. It wouldn’t hurt to check for the appearance of 12V on them when temperature thresholds are reached - this way you will make sure that you do not have the second most common cause of failure of cooling fans - first of all, what fails - the fan relay in the relay block under the glove compartment - inrush current 25A and often they begin to stick due to burning. That's where the fuses are located. further, on a long and difficult route it would be a good idea to take the fan motor directly with you. As a malfunction, they may have increased play on the motor shaft, destruction of the bearing (if not on the bushings) and sticking of the brushes. There are dismountable engines, and there are non-dismountable ones. If you take a spare engine with you on a difficult route, it will not be superfluous; there are examples when the movement turned into flour due to a failed fan motor.
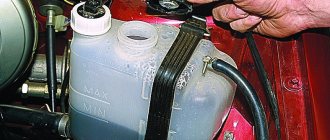
5. expansion barrel. The problem with them is in the SHNG - they often burst even when the cooling system is working, they are diagnosed by the presence of drips under the tank and inspection of the barrel itself. It happens that a crack becomes noticeable only when the tank expands. It’s very inconvenient to carry in Zip, the spare part is quite large. If a barrel bursts, you can try sealing it with Poxypol, unscrew the lid to reduce the pressure on the cooling system and set the minimum temperature for turning on the fans on the BC.
6.cooling system pipes. If a pipe bursts, you don’t have to carry with you a whole bunch of different pipes in length and configuration, but use repair inserts and connectors made from pipes along the diameter of the pipes with clamps. the torn area is cut off, a repair insert is inserted in its place and tightened with clamps. I haven’t heard of a tee failing, but some people replace it with a homemade steel one)
Diagnosis of subtle, difficult to identify problems with the cooling system:
symptoms - your car begins to heat up “somehow” and most often at higher temperature conditions the coolant begins to escape from under the expansion tank cap. torn elements of the cooling system and leaks are a consequence of excess pressure in the system, and this is a consequence of the fact that the coolant is on the verge of boiling. I note that the vast majority of SHNG owners simply set the temperature at which the fans turn on earlier according to the BC (thereby reducing the likelihood of the coolant bringing to a boil) and give up on finding the reasons (it’s worse when they change the cap with more pressure than necessary and at first everything seems to be getting better (since the boiling threshold of the coolant increases significantly as a result of increased pressure), but after a while their pipes and radiators begin to rupture).
but there is no BC in the drain, and at standard temperature thresholds for turning on the fans, the problem will be at full scale. as follows from my experience, using a scientific (and well-founded!) method, you can replace almost all components of the cooling system and not get any result at all, so I would recommend using the following algorithm for identifying problems:
1. The simplest and most obvious thing is that it’s a good idea to make sure that your radiator is clean and nothing is blocking its airflow. By the way, contamination with dirt (then turning into dirty and copious adhering dust) from dirty water greatly reduces the temperature and cooling rate of the engine - personally verified.
https://www.youtube.com/watch?v=-m6v0EAqcfU
2. that your fans are working correctly - first one at half strength when the first temperature threshold for turning on the fans is reached, then both at full strength when the second temperature threshold is reached. A common cause of increased boiling is that one of the fans does not work, and the remaining one simply does not have time to cope with the dynamics of temperature increase and cooling. By the way, if you force the fans to turn on using a button, this can help even under loads and immediately shows whether the fans are working and how.
Design and principle of operation
The designers of the Chevrolet Niva used a dual fan unit in the cooling system. This slightly complicated the connection diagram, but sharply increased the efficiency of radiator airflow. The fans are driven by 12-volt DC synchronous motors with a permanent magnet inductor. Electric motors have a closed, non-demountable design and do not require maintenance.
The power of each electric motor is 110 W. The fan assembly draws 18 amps.
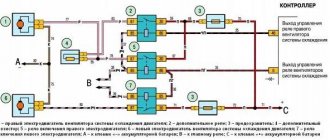
The fans are turned on one by one using an electromagnetic relay controlled by the on-board computer. When the coolant heats up above 99 degrees, the electric fan located closer to the engine air intake starts. The switch-on temperature of the second impeller is 101 degrees. The fan connection diagram is shown below.
The fan power system includes three relays and a resistor, which, if necessary, provides a reduced rotation speed of the first motor. Power is supplied from the battery through fuses that save the wiring and battery in the event of a short circuit. Control signals come from pins 29 and 68 of the motor controller.
The fans automatically turn off when the antifreeze cools to 95 degrees.
Consecutive switching on and off of engines reduces the load on the on-board electrical network. In most cases, it is possible to normalize the temperature only with the help of the first fan. This is especially useful when driving at night, when headlights and side lights put a lot of stress on the generator.
The ability to force fans on can be useful when driving off-road or in city traffic jams. However, the designers of the Chevrolet Niva did not provide the car with this function. It can be implemented independently or at a service station. It is necessary to connect backup relays parallel to the switching contacts and power them from a button installed in the car interior.
Useful video about installing and connecting the forced fan button on the Shnivy:
Important: forced activation increases the reliability of the cooling system. In case of malfunctions of sensors, relays or on-board computer, the driver can manually turn on the radiator airflow.
It is useful to equip the Chevrolet Niva with a switch that forcibly turns off the fan motors. This will protect their blades when fording water obstacles.
Antifreeze.
It is the main component in a car's cooling system. At the beginning of the production of equipment, water was used, but its use had a number of disadvantages - low boiling point, the formation of corrosion on structural elements of the engine and low freezing point. Currently, ethylene glycol-based solutions are used. The advantage of these liquids is their safety when in contact with the skin or the environment. To get rid of corrosive qualities, various additives are added to the composition. If the ambient temperature drops below zero, then such a solution becomes loose, but does not expand and does not destroy the parts of the cooling system.
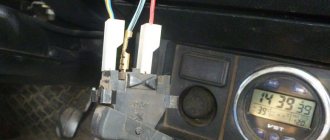
Circuit breakers
The electrical circuits of Niva Chevrolet cars produced before and after 2009 are different. In both cases, 50-amp fuses protecting the electric fan power circuits are located in an additional unit. It is located behind the glove box on the passenger side of the cabin. The figure shows where the fan fuses are located.
If the permissible current is exceeded, the insert melts and the circuit opens. Therefore, fuses are the first thing to check if the electric cooling fan does not work. The performance of a part can be assessed visually or using an ohmmeter (multimeter). To do this, you will first have to remove the fuse from the socket.
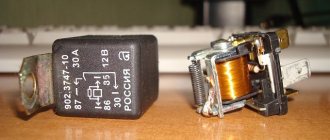
Fan relay
The additional block contains not only fuses. There are also three electromagnetic relays that control the operation of the electric motors of the cooling system. Their control circuits are powered from the ignition switch and on-board controller outputs, and the power current comes from the battery through fuses.
The relay operates as follows:
- Voltage is applied to the control terminals.
- Current passes through the inductor, resulting in an electromagnetic field.
- The steel contacts attract and close.
- The current passing through the relay drives the electric motor.
As soon as the control voltage disappears, the contacts open under the influence of the spring and the fan stops.
You can check the functionality of the relay in three ways:
- Replace the relay with a known working one and test the operation of the system.
- With the engine off and the ignition on, disconnect the temperature sensor connector. You should hear the relay click.
- Dismantle and test the output contacts with a multimeter, applying voltage to the terminals of the induction coil.
Power sensor
The control unit receives information about the antifreeze temperature from a temperature sensor. It is a resistor whose resistance changes with heating and cooling: from 1.3-1.8 kOhm at 30℃ to 155-196 Ohm at 90℃. You can check its performance using an ohmmeter and a thermometer. To do this, you need to remove the part, immerse it in water and measure the resistance at different temperatures.
The sensor is located on the engine head in the area of the exhaust pipe of the cooling system. You can unscrew it with a socket or socket wrench.
We recommend watching a video that shows where the sensor is located and how to check:
Bottom line
In Niva, the designers have developed a competent cooling system, and in order for it to maintain its performance, it needs timely and good care, and it is also necessary to monitor the coolant level and, if necessary, top up.
Home / Catalog / Chevrolet / Chevrolet Niva / Lada / VAZ 2123 from 2001 (+ restyling 2009), repair book in electronic form / ...Show book contents
Content
Introduction
User manual
How to pay and download
Possible malfunctions and their causes
1.Both fans do not work. The electric motors may fail, the temperature sensor may malfunction, or the power wires coming from the battery or ignition switch may be broken.
2. The second fan does not work. Causes: sensor malfunction, fuse or electromagnetic relay failure. It is also possible that the power cable may be broken.
3. The left fan does not turn on. Causes: faulty power resistor or temperature sensor, blown fuse or relay. It is also possible that the power cable may be broken.
4. Only two fans turn on at a time. This happens when an additional resistor in the circuit of the first electric motor breaks.
5. The fan does not turn off. Typically, the fan runs constantly when the relay is broken or the coolant temperature sensor is faulty.
Repair of fans, sensor, relays, fuses and additional resistor is not provided. If these parts break, they should be replaced with new ones.
Replacing fans
If the fan motors do not start when the wires from the battery are connected directly to the power terminals, the devices must be replaced.
To do this, you will need a set of wrenches ranging in size from 10 to 17 mm and a Phillips screwdriver.
Before starting work, you need to drive the car onto an inspection ditch or a lift and turn off the power to the on-board network by removing the negative terminal of the battery.
Fans are dismantled as follows:
- Remove the crankcase protection and mud guard.
- Unscrew the screws and remove the thick spider-shaped plate and a couple of tin covers that are located in front under the bottom of the car.
- Unscrew the radiator frame cross member.
- Loosen the tension and remove the power steering belt and pump.
- Remove the 4 bolts holding the power steering pump.
Useful video showing how to remove and change fans:
Important: to get to the bolt covered by the oil filter, you need to move the amplifier away from the bracket.
- Push the pump back, hanging it on the hoses.
- Remove the air conditioner drive belt.
- Remove the bolt holding the timing belt pulley.
- Remove the pulley and belt.
- Unscrew the four nuts at the corners of the electric fan housing and the two bolts securing it in the middle.
- Remove the fan unit from the studs and pull it down.
Tip: The crankshaft position sensor makes it difficult to remove the fans. Therefore, they need to be pulled out gradually. The left side is lowered first, then the block is moved to the left, raising the right edge so that the casing becomes vertical.
This method is probably suitable for restyled Niva Chevrolet models. On older cars, you will have to remove the radiator grille and bumper, unscrew the fasteners and move the air conditioning and cooling radiators forward. After this, access to the electric fans will be open.
During dismantling, you should carefully remember the procedure. Assembly is carried out in reverse order.
Important: the service life of the fan motors is approximately the same. Therefore, even if one of them fails, both must be replaced. Otherwise, you will soon have to repair the car again.
Chevrolet Niva Gryaznulya › Logbook › Replacement of MH / transfer of MH from regular place
Actually, the plans were to move the ignition module to a new location. Plans accelerated when the module folded.
The story of how the module died.
Initially it manifested itself in the fact that the car stalled at idle. Moreover, this did not happen all the time. Those. you could easily drive 100 km and not feel anything, but it could start right away. At first I drove constantly revving up the gas at traffic lights and! when braking (so as not to stall) I thought about the IAC. I bought it on the market for 300 rubles - changed it (how to change it is a separate topic!) - everything stopped.
Some time later, on a rainy autumn day, on the way home from work, standing at a traffic light, I thought: “How nice it is in the rain not to dodge the splashes of passing cars, but to drive a car yourself.” At the next traffic light this bullshit started again. But the car stopped moving! No, she was driving, but clearly not on 4 cylinders. I had to lower the car and drive home (luckily it wasn’t far - a couple of kilometers) at the speed of a running pedestrian. It became clear that the IAC did not solve the problem. Spark plugs and high-voltage wires (they were changed a long time ago) came under suspicion. But I decided to postpone the replacement and went for diagnostics...
The next morning the car started up and drove as if nothing had happened. Already at the entrance to the familiar service, I again had to drive in low gear. The guy at the service station was busy and was about to leave somewhere, but after listening to my explanations and looking at my face, he dropped what he was doing and agreed to help me. After 5 minutes he said that the problem was with the Ministry of Health. To check, I pulled out an oily module from somewhere in a drawer and, having connected it, went back into the computer. He said that the problem was definitely in it and that a new one was needed, told where, from whom and for how much to buy it. After that, since he was very busy, he sent me to the market, lending me his module for a while, with parting words to return it as soon as possible (Thank you to Uncle! I returned the module on the way back from the market) The car was moving! After following the instructions and purchasing the module, I installed it myself, but in a new place.
Actually about the transfer of the Ministry of Health.
The MZ is located on the side of the engine, quite low. Moving it to a place more distant from the ground is a priority task when frequently storming large puddles and fords (as well as installing a snorkel and installing breathers under the hood). Actually, the task is simple - first you need to remove it from its regular place (along with the bracket on which it is attached), and then find a new place). The simplest option is to install it on the mounting pin of the plastic casing. In this case, you don’t need to do absolutely anything - even the standard nuts that secure the bracket fit into this very stud. (see picture)
pin on which you can screw the MZ bracket
Pay attention to what the pin is holding on to.
The lengths of the wires, both high-voltage and those coming from the brains, are sufficient. But I wasn’t particularly happy with this option because two questions immediately arise. Firstly, in the end the entire structure is held on a thin pin on the engine cover - not very securely. Secondly, what to do with this same plastic casing? It seems like there is no point in it. On the other hand, it’s a shame to throw it away. You can, of course, cut it in the place where it sits on the stud... but it’s easier (in my opinion) to go a little further and drill 2 holes, bend the standard bracket and leave the casing alone.
In the pictures, circles indicate what needs to be unscrewed in order to remove the plastic plug and gain access to the back side of the engine shield for tightening the nuts.
need to unscrew
need to unscrew
need to unscrew
To transfer the MH to this place, you need to build up the wires coming from the brains! In my version, the bracket was bent crookedly, because it was done practically on the knee. Ideally, you need at least a vice and a hammer. In the future I plan to do everything beautifully. Although it will not be clear when this will happen - after all, everything works that way.
Actually, the Ministry of Health itself is in a new place
Cooling system
Engine cooling system: 1 – hose supplying the pump; 2 – coolant pump; 3 – outlet pipe of the interior heater radiator; 4 – heater radiator inlet pipe; 5 – coolant temperature sensor; 6 – electric fans of the cooling system; 7 – plug; 8 – radiator support; 9 – bracket; 10 – upper radiator casing; 11 – radiator; 12 – lower radiator casing; 13 – steam-air hose; 14 – radiator supply hose; 15 – thermostat; 16 – radiator outlet hose; 17 – inlet hose; 18 – expansion tank.
The cooling system is liquid, closed type, with forced circulation of liquid, with expansion tank 18. The pump (see Longitudinal section of the coolant pump) of the coolant is driven by belt 7 (see Diagram for checking the tension of the pump drive belt). Radiator 11 (see Engine cooling system) is tubular-plate, aluminum, with plastic tanks. A casing 6 with two electric fans is attached to the radiator with five nuts. The electric fan has a plastic impeller mounted on the electric motor shaft, which is turned on and off by sensor 5. Coolant is poured through the filler neck of the expansion tank 18. The expansion tank plug has inlet and outlet valves.
Normal coolant volume
The volume of coolant depends on the size of the car engine. A small car will need to be filled with up to 5–7 liters of antifreeze. The larger the engine capacity of the car, the more coolant will be required during replacement.
The dependence of the coolant volume on the car brand is presented in the table below:
| Antifreeze volume | Vehicle type |
| 3 l | Daihatsu Mira, Daihatsu Mor, Daihatsu Opti, Suzuki Alto, Vagon-Ar, Honda Life, Subaru Pleo |
| 4 l | Daihatsu Etray, Mitsubishi Strada 1300cc., Mitsubishi Wits 1300cc., Mitsubishi Fancargo 1500cc., Daihatsu Tarios 1300cc., Toyota Bibi 1500cc., Nissan March 1300cc., Honda Civic 1500cc., Air-Vee 1600cc., A Sher Domani 1600cc., Mitsubishi Toppo Biji, Mitsubishi Pajero |
| 5 l | Toyota Starlet 1300cc., Toyota Tercel 1500cc., Toyota Raum 1500cc., Toyota Corolla Spasio 1600cc., Toyota Corolla II 1500cc., Nissan Lucino 1500cc., Nissan Avenir 1800cc., Mitsubishi Mirage 1500cc., Suzuki Escado 1600cc., Nissan Cube 1300cc ., Honda Logo 1300cc. |
| 6 l | Toyota Corolla 1600, Toyota Curren 1800, Toyota Nadia 2000, Toyota Gaya 2000, Toyota Ipsam 2000, Toyota Levin Trueno 1600, Toyota Opa 1800, Toyota Vista 2000, Mazda Damio 1500, Mazda Familia 18 00, Nissan Sunny 1800, Nissan Premiere 2000, Mitsubishi Lancer 1800, Subaru Legacy 2500, Hrnda CV 2000, Honda Torneo 2000, Honda Step Wagon 2000, Mitsubishi Legnum 2000, Mitsubishi Pajero 10 2000 |
| 7 l | Toyota RAV-4 2000, Toyota Altezza 2000, Toyota Celica 2000, Toyota Mark II2000, Toyota Camry Grace 2200, Toyota Kaldina 2000, Toyota Crown 2500, Toyota Proges 2500, Honda Odyssey 2300, Honda Inspire 250 0, Mitsubishi Airware 2000 |
| 8 l | Toyota: AristoZOOOss., CrownZOOOss., MajestaZOOOss., SoararZOOOss., Hilux SURF 3400cc., Mark II 2500Tcc., Mitsubishi: GTO ZOOOss., Chariot GrandisZOOOss., Suzuki Escado 2500cc., Nissan Bassara ZOOOss., M Itsubishi Diamond 2500cc., Nissan Prisage ZOOOSs., Mazda Tribute 2000cc. |
| 9 l | Toyota: Soarair 2500Tcc., WindomZOOOSs., Kuger ZOOOSs., Harrier ZOOOSs., Estima ZOOOSs., Nissan: Cedric – Gloria ZOOOSs., Laurel 2500cc., MazdaSentiaZOOOSs., Mitsubishi PajeroZOOOSs., Nissan Skyline 2500 cc. |
| Over 10 l | Toyota: Majesta 4000cc. (10), Emer-Es (10), Selsior 4000cc. (11), Granvia 3400cc., Regias 2700cc. (12), Emer-2 2000cc. (13), Nissan Stage 2500cc. (10), Mazda MPV 2500cc. (10), Isuzu Wizard (11) Nissan: TeranoZZOOoss. (eleven |
To replace antifreeze in a car's cooling system, you need to calculate the volume of coolant based on the car's engine volume
It is important to take into account such points as:
- car make and model;
- brand and characteristics of antifreeze.
Basically, to replace antifreeze you will need from 3 to 7 liters of liquid. Moreover, the larger the engine volume of the car, the more antifreeze is needed so that the cooling system can function normally.
If you want to replace the coolant, be sure to use the same brand of antifreeze that was previously added.
Carefully read the coolant manufacturer's recommendations on the packaging and calculate how many liters you need to add to the system specifically for your car. Open the expansion tank and fill the liquid level to the MIN mark. There should be no air in the system.
The correct amount of antifreeze or antifreeze in the cooling system affects the life of the machine and its serviceability.
Niva Chevrolet - engine cooling system - diagram, device
There is a coolant drain plug at the bottom of the left reservoir.
Engine cooling system. Design and principle of operation
Two types of cooling are usually used: When the engine is not warmed up, the thermostat valve is closed and circulation occurs in a small circle: A liquid with a boiling point of degrees is located inside a corrugated cylinder and, when the engine is not warmed up, circulates in a small circle.
Without any of these elements working properly, the entire engine cooling system will be ineffective. "Chevrolet Niva"…
After stopping the engine, the liquid cools, the steam condenses and a vacuum is created in the cooling system. Disconnect the engine control system wiring harness block from the additional resistor wiring block. The fluid circulation in each circuit is controlled by a separate thermostat.
Serious contamination of the external surface of the radiator. The Chevrolet Niva cooling system uses a closed type with forced circulation. During engine startup, to reduce wear, it is necessary to quickly warm it up to operating temperature and maintain this temperature during further operation.
After all, this model has been in use for a year. By following the recommendations, it is possible to avoid almost all problems associated with engine overheating. Expansion tank It would seem, what could be the problem? A simple plastic product, but it ranks first on the list of weak points. The fact is that the quality of the material for the container leaves much to be desired. Many forum pages are written about the cracked tank.
Purpose and principle of operation
It simply cannot withstand the operating pressure of the system. There are two of the most popular solutions to this problem. The simplest option is to reduce the operating pressure.
Yes, the engine will reach operating temperature more slowly than planned by the designers. As practice shows, a delay of a few minutes is not critical, and a whole expansion tank is the reward for such a decision.
In this case, there are no material costs - the cork is pierced with an awl or not screwed in completely. If the liquid boils in the cooling system, the vapor pressure in the radiator increases. When a certain value is exceeded, the steam valve opens and steam escapes through the steam pipe.
After stopping the engine, the liquid cools, the steam condenses and a vacuum is created in the cooling system. There is a danger of squeezing the radiator tubes.
To prevent this phenomenon, an air valve is used, which, when opened, allows air into the radiator.
Some radiators do not have a filler neck, and the system is filled with coolant through an expansion tank. In this case, the steam and air valves are located in its plug.
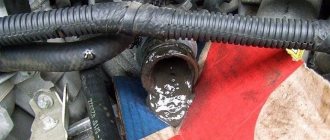
Why is the alternator belt important?
The generator belt drives the pump through the crankshaft pulley. If it breaks, then, in addition to the generator stopping charging the battery and powering all the electrical components of the car, the pump also stops functioning. In this case, the engine has a high chance of overheating, because the circulation of antifreeze stops.
The entire cooling system depends on how the generator belt is tensioned. "Niva Chevrolet" with weak tension will work in the water pump assembly at only part of the power, due to pump slippage. All this leads to additional heating of the engine. Timely inspection and tightening of the belt will protect both you and your car.
General information
Marks on the expansion tank allow you to monitor the coolant level in the cooling system. Checking the level is carried out on a cold engine. The centrifugal pump is installed in the front part of the cylinder block and consists of a housing, a shaft with an impeller and an oil seal.
The pump body and impeller are cast from magnesium and aluminum alloys, and the impeller is also made from plastic. The pump is driven by a belt from the engine crankshaft pulley. Under the action of the centrifugal force that occurs when the impeller rotates, coolant from the lower radiator tank enters the center of the pump housing and is thrown towards its outer walls. From the hole in the wall of the pump housing, the coolant enters the hole in the cooling jacket of the cylinder block.
The leakage of coolant between the pump housing and the block is prevented by a gasket, and at the point where the shaft exits there is a seal. It is mounted either on the same shaft with the coolant pump, or separately. It consists of an impeller with blades screwed to a hub. To improve air flow to the engine and radiator, a guide casing can be installed on the latter.
The fan can be driven in several ways. The simplest is mechanical, when the fan is rigidly fixed on the same axis with the coolant pump. In this case, the fan is constantly on, which leads to unnecessary consumption of engine power. The advantage of cellular radiators is a larger cooling surface compared to other types.
Neck and expansion tank The filler neck and the pipe for connecting the hose are soldered into the upper tank, and the outlet hose pipe is soldered into the lower one. Insulation of the cooling system is ensured by a plug that closes the neck.
It consists of a housing, a locking spring and two valves - exhaust and inlet. If the coolant boils, the steam pressure increases, and when a certain value is exceeded, the steam outlet valve opens, releasing steam through the tube.
The air valve serves to prevent squeezing of the radiator tubes - such a danger arises when a vacuum is created as a result of steam condensation. The valve then allows air inside the radiator.
The expansion tank serves to compensate for fluctuations in coolant volume that arise due to changes in temperature in the system. In addition, through such a tank the coolant system is filled in those radiators where there is no filler neck - then the valves are located in the tank cap. The liquid level is controlled using marks placed on the tank.
Pump The pump is needed to ensure forced coolant circulation. Centrifugal type pumps are used, which consist of a housing, an oil seal and a shaft with an impeller. Such a pump is installed on the front part of the cylinder block, and it is driven by a belt from the crankshaft pulley. The impeller, rotating, creates a centrifugal force, under the influence of which coolant flows from the lower tank to the center of the pump housing and is thrown towards the outer walls.
Through a hole in the wall, the liquid passes into the hole in the cooling jacket, and the gasket and oil seal prevent the coolant from flowing out. Fan To increase the air flow in the radiator core, install a pump; it can be mounted either separately or on the same shaft as the pump.
If the bearing or self-pressing seal of the pump fails, the cover assembly with the roller and impeller should be replaced. Removing the Chevy Niva water pump - Drain the coolant from the engine. Remove the accessory drive belt.