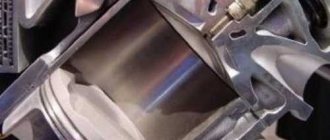
Many car enthusiasts are interested in the question of how to check glow plugs in a diesel engine, since it is not always possible to start the car in cold weather. And there are some nuances here. The fact is that with several faulty spark plugs, a diesel engine can still be started, but only at an outside temperature of +5 °C. If this indicator is lower, then the car will not start even with one faulty spark plug.
Often, because the car is not started, many drivers postpone planned activities or switch to public transport. Only in reality it is possible to check the performance of the candles without resorting to the help of specialists. There are three methods that have already been time-tested and will provide answers to many questions. But first, a little theory regarding the operating principle of these elements will not hurt.
How do glow plugs work?
To find out how to check the glow plugs in a diesel engine without removing them, you need to familiarize yourself with the operating principle of these elements. And they, unlike their analogues for gasoline engines, function somewhat differently. The same can be said about their appearance - nothing in common. And if in units running on gasoline, a spark from a spark plug ignites the working mixture, then in diesel engines the fuel ignites due to pressure.
But there is also one nuance here: if it’s cold outside, the engine will not start, which is facilitated by cold air entering the working chamber. In this case, starting is difficult and the car needs to be warmed up. On older cars, the glow plugs come on every time the engine is started. In modern models they are not always activated, but only at negative temperatures.
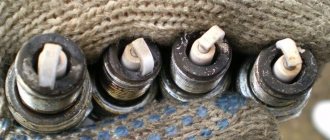
The maximum temperature of the spark plug tip is 1350°C. There are two spirals inside it:
- heating;
- regulating.
With the first, everything is clear - it provides heating. The function of the latter is protective in nature, since it protects the spark plug from overheating as the temperature rises. This is done by increasing electrical resistance.
Signs of faulty glow plugs
Indirect signs of the presence of a malfunction:
- When starting, white-gray smoke comes . This indicates that fuel is flowing but is not igniting.
- Rough operation of a cold engine at idle . The noisy and harsh operation of the engine can be noticed by the shaking plastic parts of the interior due to the fact that the mixture in one cylinder ignites late due to the lack of heating.
- Difficulty starting a diesel engine when cold . You have to do several repetitions of spinning the engine with the starter.
Clear signs of a bad glow plug will be:
- Partial destruction of the tip .
- A thick layer of carbon deposits on the tip near the body.
- Swelling of the glow tube (occurs due to excess voltage).
How can you check the glow plugs of a diesel engine?
How to check?
Depending on the model and age of the car, there are different principles of operation of the diesel engine heating system:
- In older cars, glow plugs usually turn on almost every time the engine is started.
- Modern cars can start successfully even without glow plugs at above-zero temperatures.
Therefore, before starting to diagnose the diesel preheating system, you need to find out at what temperature conditions the combustion chamber is heated. And also, what type of candle, since they are divided into two groups: rod (the heating element is made of a refractory metal spiral) and ceramic (the heater is ceramic powder).
Environmental standards Euro 5 and Euro 6 provide for the operation of diesel engines with ceramic spark plugs, since they have a pre- and post-start heating function that allows the fuel to be burned in a cold engine, as well as an intermediate glow mode necessary to ensure regeneration of the particulate filter.
To check the spark plugs of a Ford, Volkswagen, Mercedes or other car diesel engine, you can use several methods , and depending on whether they are unscrewed or on the engine, the principle will be the same. Functionality testing can be done using:
3 ways to check glow plugs - video
- Battery _ On the speed and quality of incandescence;
- Tester . By checking the break of the heating winding or its resistance;
- Light bulbs (12V). The simplest test for breakage of the heating element;
- Sparking (can only be used in old diesel engines, since new ones are dangerous due to ECU failure);
- Visual inspection.
The simplest diagnosis of glow plugs is to check their electrical conductivity. The spiral must conduct current, its resistance in a cold state is in the range of 0.6–4.0 Ohm . If you have access to the candles, you can “ring” them yourself: not every household tester is able to measure such a low resistance, but any device will show the presence of a heater break (the resistance is infinity).
If you have a non-contact (induction) ammeter, you can do without removing the spark plug from the engine. But it is often necessary to inspect the working part, on which signs of overheating may be noticeable - melting, deformation of the tip, up to its destruction.
In some cases, in particular if all spark plugs fail at once, it may be necessary to check the vehicle's electrical equipment. Namely, the spark plug control relay and its circuits.
We will describe all the ways to check diesel glow plugs. The choice of each of them depends on skills, availability of equipment, tools and free time. But ideally, you need to apply everything together, plus a visual inspection.
Varieties of candles
When deciding how to check the performance of glow plugs on a diesel engine, you need to know what types of them exist. For diesel engines they are available in two types:
- ceramic;
- pin.
The former have a tip made of ceramic, which withstands temperature changes. The protective shell is made of silicone nitrite. The heating of such a spark plug reaches 1000°C, and the engine starts without problems. Such parts are highly efficient and have a long service life.
For pin candles, the heating element is made of an alloy of iron, chromium and nickel, and the internal cavity is filled with magnesium oxide. This candle works at intervals from 4 seconds to 2 minutes.
Useful tips
- Before the onset of the cold season, the glow elements should be checked regardless of whether the diesel engine starts well or poorly.
- Checking on a diesel engine by assessing the spark is recommended only for older cars. You should not test heating solutions in this way on a “fresh” model, which is equipped with a complex electronic engine control system.
- If a malfunction is detected, it is optimal to replace the entire set, rather than one or two failed elements.
- Try to purchase products from well-known manufacturers, since cheap solutions have a noticeably shorter service life and often demonstrate low efficiency of the heating element.
Finally, we would like to add that in order to reliably start a diesel engine in winter, it is necessary to correctly select, charge and maintain a diesel battery, refill high-quality diesel fuel according to the season, and use anti-gels if necessary. Also, in the case of diesel engines, it is advisable to install a diesel fuel pre-heater or a Webasto-type engine pre-heating system.
Signs of a non-working cylinder (tribbing and vibration) of a diesel engine. Troubleshooting: compression, diesel injectors, glow plugs, injection pump and others.
How to replace glow plugs on a diesel engine yourself. Necessary tools, features of removing spark plugs, important tips and recommendations.
Independent implementation of diesel fuel heating: fuel intake, coarse and fine filters. Installation of heating elements. Flow heating.
Choice of spark plugs between NGK and Denso manufacturers. How to choose candles and which brand to choose. Features and nuances during selection.
What you need to know when selecting spark plugs according to your car model: size, heat rating, interchangeability. Choosing candles by design, useful tips.
Purpose and design of spark plugs for a gasoline engine. Design features, types of spark plugs. Heat number, spark gap.
Without a relay, nowhere
As you know, diesel fuel ignites under pressure as a result of strong compression in the combustion chamber. The relay supplies the required current, which heats the tip. The resulting heat heats the intake manifold, engine cylinders and working mixture to the desired temperature. Now it is easier for the fuel to ignite when under high pressure.
But before moving on to the question of how to check the glow plugs on a Nissan Pathfinder (diesel) or any other brand, it’s worth considering one more point. Often the mixture ignites before it even enters the cylinder. The result of this is that the efficiency of the engine decreases or it refuses to start at all. In order to ensure the required heating mode, a glow plug relay is used. Thanks to it, the electrical circuit closes and opens as needed. This ensures the optimal degree of heating of the working mixture.
The relay itself, of course, does not regulate the heating operation, since this is the prerogative of the ECU, which relies on the readings of the OX and crankshaft sensors. Thanks to commands from the block, the circuit is closed and opened.
Modern diesel engines have the option of additional heating when the engine is already running. This allows you to reduce the noise level during operation of the power unit, as well as minimize the amount of harmful emissions into the environment.
Normal operation
Air heating is one of the distinguishing features of a diesel engine. The vast majority of cars have single-pole ("ground" - body) male plugs for each cylinder. These models draw 5-18 amps, while 1.7V bipolar heaters can draw up to 50 amps. Only in some ICE models the air is heated by a single heater screwed into the intake manifold.
When checking glow plugs, you need to know their normal warm-up time.
- Regular glow plugs - take up to 60 seconds to reach operating temperature.
- Fast glow plugs - up to 10 seconds. The special design of the heating element ensures faster heating.
- Self-regulating glow plugs in 5 seconds. The design consists of two series-connected coils, one of which provides rapid heating, and the other regulates and maintains the temperature. Even after the main preheat phase is turned off, the heating element continues to operate for approximately 3 minutes at high temperature (reheat) to improve THA combustion.
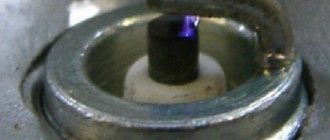
When checking glow plugs, pay attention to their heating. A good element should glow evenly from the tip.
The combustion chamber only covers a small area near the end of the rod, so this is where the amount of heat is most important.
Characteristic symptoms
You should think about how to check glow plugs in a diesel engine if there are the following characteristic signs:
- The engine can be started with great difficulty.
- At idle speed, the power unit operates unevenly.
- There is a white tint in the exhaust.
If the spark plugs were changed not so long ago, this may indicate a defect on the part of the manufacturer. Otherwise, you can be sure that one of the elements is faulty. In any case, it is necessary to carry out diagnostics by visiting a service station or doing everything yourself.
It is worth considering that problems with spark plugs manifest themselves well in the cold season (autumn or winter), while in summer it is quite difficult to determine the malfunction.
Diagnostic methods
In diesel engines, the glow plug is the weak link. It is this part that most often fails, and this can happen at the most inopportune moment. The consequences of such a malfunction will not take long to appear, especially in winter. In this case, you will not be able to start the car.
How to properly check glow plugs on a diesel engine? There are several ways:
- Checking for spark.
- Diagnostics with a multimeter.
- A good method with a light bulb.
It is worth considering them in detail, which will allow you to determine what related tools may be needed.
We diagnose without removing the spark plugs from the car
Among all the methods for testing the spark plug, the method of removing the injector is the most optimal if you think that when unscrewing it there is a high risk of breaking the heating element. On many engines, the edge of the pin can be seen through the threaded holes in the nozzle. Thus, by turning on the ignition on a cold engine, you can check the serviceability of the glow plug.
The injectors also become clogged when the engine is running, but it is almost impossible to unscrew them. Stuck injectors are removed using a hydraulic puller. or an inertia cartridge, which can be made by hand if necessary.
Checking for spark
Diagnosing a glow plug using a battery will provide more accurate information regarding the performance of the element. Moreover, each detail is checked individually.
There is only one nuance here, which for some drivers may be a significant drawback. The point is that you need to unscrew all the spark plugs. This will take a lot of time, especially if you need to dismantle individual parts that block access to the spark plugs. Otherwise, there are no difficulties in solving the problem of how to check glow plugs in a diesel engine.
For diagnostics you will need an insulated wire 0.5-1.0 m long. The whole procedure is as follows:
- One end of the wire is wound to the electrode of the spark plug (you must first remove part of the insulation from it).
- The other end of the wire is applied to the negative terminal of the battery.
- The spark plug body is connected to the positive contact of the battery.
The whole picture will become clear here: if the tip turns red by more than half, then this indicates the serviceability of the glow plug. Otherwise, there will be no heating at all or only the tip will turn red. This already means that the part can only be replaced.
What breaks in heaters
Most breakdowns on all heaters are associated with either low-quality fuel or electronic failure. Let's go through below the main models of heaters that are present on the market, their malfunctions and solutions.
Webasto Thermo Top C malfunctions
Webasto Thermo Top C
Webasto control unit repair
Malfunctions of control units. Most often found on German-made cars. Regular visitors to workshops with this problem are Volkswagen T5s and Tuaregs produced before 2011 (the NF has an Eberspächer). There are also Mercedes and BMWs. As a rule, “brains” are repairable and it costs less than buying a new spare part. Moreover, Webasta sells the control unit complete with a heat exchanger. In our workshop we have a large stock of refurbished control boards for all modifications of thermo Top C. In order to save time, we rarely repair the client unit. Usually a working board is installed and the faulty part remains with us. Moreover, the guarantee for such work is 6 months.
Coked burner TT-C
Coking of the burner (evaporation grid). Found in both petrol and diesel versions. The process of fuel combustion in a heater differs significantly from combustion in an internal combustion engine. Diesel has a detonation flash throughout its entire volume at a temperature of about 1000 °C, gasoline has the same indicators, only combustion occurs in a dome-shaped manner, and in the autonomous heater a torch of the air-fuel mixture burns with a temperature of about 300 °C. Many components of domestic fuel do not burn at this temperature and are deposited in the form of coke.
Burner Webasto TT-C
Webasto TT-C supercharger
Spark plug Webasto TT-C
Malfunctions of Webasto Thermo Top V (Venture)
Heater Webasto TT-V
“Legendary” boiler from a famous manufacturer, which brought a lot of tears to its owners, and allowed many children of the craftsmen who repair it to attend school.
Burner Webasto TT-V
Webasto TT-V pump
Webasto Thermo Top EVO malfunctions
Heater Webasto TT-EVO
Burner Webasto TT-EVO
Webasto TT-EVO supercharger
Webasto TT-EVO fuel pump
Diagnostics with a multimeter
This method is good because there is no need to remove candles and other parts, since the necessary manipulations can be easily done on the spot. All you need is the testing device itself. In this case, you can check each spark plug separately or all at the same time, having previously connected them via a common bus.
How to check glow plugs on a diesel engine with a multimeter? The entire procedure can be carried out in one of three modes:
- dialing;
- resistance measurement;
- current measurement.
To make a call you need:
- Move the device regulator to the appropriate position, and place the device itself in a convenient place.
- Disconnect the wire from the spark plug.
- One probe of the device is applied to the spark plug body, and the other to its electrode.
The presence or absence of a break can be determined by the sound signal. If it is there, then everything is in order (there is no break). If there is no sound signal, then this indicates the presence of a break.
How to unscrew and replace
- Remove glow plugs only when the engine is warm.
- Fill the hole with kerosene, brake fluid or penetrating lubricant several hours before the inspection.
- Immediately before disassembly, blow out the spark plug holes with compressed air to prevent dirt from getting into the cylinders.
- Do not try to unscrew the part in one go if you feel that the base is starting to deform, but the spark plug is not giving up. After turning or half a turn in one direction, tighten it the same amount in the opposite direction before trying to unscrew it again.
- Before screwing in a new element, clean the threads with a trowel to remove soot and deposits.
- Apply sealing anti-seismic lubricant. Some designs may use a sealant to prevent moisture from entering the spark plug socket.
- Do not over-tighten the feed clamp mounting nut.
- Be sure to use a torque wrench when tightening.
Resistance measurement
With this method, you can only identify a completely non-functioning spark plug. However, it is impossible to determine how well the heating element itself works. In this case, you can measure the resistance value with the same multimeter, you just need to know the rating of a specific spark plug. As a rule, if the part is intact, then the resistance should be 0.7-1.8 ohms. This is also an effective method of checking the glow plug in a diesel engine with a tester.
Often spark plugs fire with a high resistance value, which leads to a decrease in current consumption. In this case, the computer “thinks” that these elements have warmed up and turns them off.
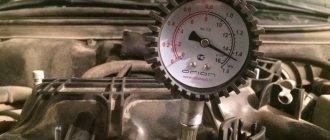
Current measurement
A more reliable result can be obtained by measuring the current, and it is also not necessary to unscrew the spark plug. First you need to unfasten the power wire and connect the probe of the device. Fix the second probe with the spark plug electrode. Now all that remains is to turn on the ignition and observe the readings. If the part is working properly, then the display should show numbers in the range of 5-18 A.
It is worth noting that in the first second the values will jump to the limit, and after 3-4 seconds the current will stabilize. In this case, the reduction in data should be gradual, without sudden jerks.
All spark plugs are checked in this way; their readings should be identical. Otherwise, if the readings of one of the spark plugs are excellent, it is worth unscrewing it and assessing its condition visually.
Good method with a light bulb
How to check the glow plug in a diesel engine with a light bulb? Yes, and with its help you can also detect a malfunction. Any 21 W light source (side lights or brake lights) is suitable for this. Two pieces of wire are soldered to it (the length is chosen arbitrarily). After this, you can proceed directly to the diagnostic procedure.
First disconnect the power wire from the spark plug. Then touch one end of the lamp wire to the spark plug electrode, and connect the other end to the positive contact of the battery. The glow of the light bulb will indicate that there is no break. Thus, you need to check all the candles one by one.
If the light bulb lights up dimly or there is no light at all, then it is better to replace such a candle. This method also does not provide reliable diagnostics, since it is impossible to determine the degree of heating of the working rod.
Replacing an element
When the test shows that the device is not functioning, it needs to be replaced. Even a less experienced car enthusiast can do this. To do this, you will have to disconnect all the terminals from the part and take it out. Then it is important to clean the place where the device was removed. Then you need to carefully unscrew all the spark plugs. Next, carry out the entire process in reverse order, only with a new block: screw the glow parts into the new block, install it in a previously cleaned place.
The location of the candles is shown by red arrows
After this, you should try to start the engine. If this does not work, then you need to check whether all terminals are connected. If everything is installed correctly, but the engine still does not start, then the problem was probably not in the glow elements.
It is important to note that different vehicles may require different types and models of glow elements.
Owners of cars running on diesel fuel should prepare in advance for the cold season and check the functionality of the relay. It is also worth keeping control over the candles themselves. It is especially important to check the performance before a long journey. Otherwise, the trip may be disrupted and postponed until the problem is resolved.
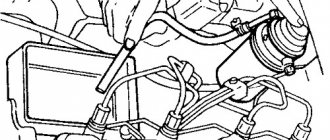
Features of checking the spark plug relay
Many car enthusiasts are interested in one important point: how to check the glow plug relay on a diesel engine? The question is interesting and requires deserved attention.
Typically, such a device is triggered after each engine start. At the same time, you can hear a clearly audible click - this is how it turns on. If there are no sounds, you should think about diagnosing this element. However, it is worth finding it first.
This device looks like a box that is attached to the body of a car. The area of its fixation is usually called mass. To find the relay, just follow the wires coming from the glow plugs.
Each such device has several pairs of contacts. Single-component relays have 4 of them, and two-component relays have 8. Two of them are removed from the coil winding, and the rest are control ones, which close when they receive a signal.
So how to check the glow plug relay on a diesel engine? In each car, the contacts are designated differently, but in most cases they are numbered as 85 and 86, and the control ones - 87, 30. To check, you can use a light bulb, which is connected to the winding contacts, after which voltage is applied to the relay. The serviceability of the device will be confirmed by the glow of the lamp.
How to independently identify the cause of a Webasto Thermo Top malfunction.
To diagnose a malfunction of the Webasto heater, you need a multimeter (tester), we carry out all measurements with a multimeter without disassembling the heater itself. When the self-diagnosis of the heater control unit does not reveal error codes, we proceed.
1.Air intake, 2.air blower, 3.fluid pipe, 4.Glow pin/flame sensor, 5.evaporator grid, 6.Plug connections, 7.Control unit with built-in temperature sensor, 10.Heat exchanger, 11. Combustion chamber, 12. exhaust, 13. fuel supply, 14. water pump, 15. liquid inlet pipe, 16. Fuel metering pump.
Let's start with simple checks. First of all, you should make sure that fuses F1-F3 are working properly. 1 - The Webasto heater did not start in the cold, most likely in the fuel line, or rather in the fuel itself. This means we check the start in a warm garage to eliminate the influence of “summer” diesel fuel on the operation of the Webasto Thermo Top. The problem of a frozen fuel line appears already at minus 10-15 degrees, but it is advisable to connect a separate container with good winter diesel fuel, connect a short fuel pipe to the heater intake, then a warm garage will not be needed.
Indirectly, by the sound of the fuel pump, you can determine the lack of fuel in the system. The sound of the fuel pump with fuel is dull, and without fuel the clicks sound loud and clear. If there is no fuel in the pump, then this could be either freezing or air leakage due to a loose clamp or a dried hose. If the fuel pump does not click at all, This means that it may have turned sour due to moisture or paraffin deposits, sometimes blowing air while simultaneously applying supply voltage for a short time helps, it is not recommended to use liquid to clean carburetors - it can corrode the rubber seal.
The next stage of testing is the electrical part.
Check the presence of supply voltage at the minitimer (connector X8). If power comes to the timer, but it does not work, then this is the reason. If the heater is installed at the manufacturer’s factory with a connection to the CAN bus, then check literally ALL the fuses since it is not possible to specify a specific fuse for all possible car modifications even within the same model, and, fourthly, the operation of the heater also depends on states of sensors not included in it. We check the power supply on the connectors of the Webasto itself (X1-X2) - plus and minus (ground) and the quality of the contacts. There is no power to the stove, we check the wires, even if the corrugation is intact, the wire could have rotted. If both power circuits - fuel and electrical - are normal, then the heater may be blocked as a result of unsuccessful starting attempts,
You can unlock the heater yourself. 3. Unlocking according to the recommendation of the Webasto manufacturer - step 1, remove power from the heater control unit (remote) for 3 seconds. Step 2: Apply power and turn on the heater using timer 1533 or the remote control. step 3, after 3 seconds, turn off the power to the heater control unit (remote) again; step 4, after 3 seconds, turn off power to the heater control unit (remote). Judging by the Webasto manuals, everything should work, and, by the way, it often works
Taking the connectors out of the sockets one by one, we measure with a tester everything that is indicated below according to the diagram and drawing, which indicates which is which.
Glow plug Checked with a multimeter in ohmmeter mode at a temperature of 25 degrees. Resistance of a working element is 0.2-0.4 Ohm
Dosing pump Tested by applying a pulse voltage of 10-12 volts with a frequency of 1-10 Hertz. The resistance of a working pump is 5.2 Ohms at a temperature of 20 degrees. A working pump should provide a volumetric fuel supply of 36-45 grams for 3 minutes at a pump operating frequency of 7 Hertz.
glow pin Checked with an ohmmeter at a temperature of 24 degrees. The resistance of a working element is 2-4 Ohms with configuration No. 1. The resistance of a working element is 0.8-1 Ohm with configuration No. 2
The antifreeze pump must operate when 12 volts are supplied to it. Operating resistance 10 kOhm. However, you should focus specifically on connecting the power directly.
Temperature sensor At 20 degrees, the resistance of the element is 2-4 Ohms.
Overheating sensor At 20 degrees, the element resistance is 240 Ohms.
thermostat 0 ohm.
Solenoid Resistance of a serviceable element is 136-154 Ohms at 20 degrees
If the heater starts, it doesn’t work right. then use a stopwatch to check at what stage the heater malfunctions.
leib:
Volvo XC90. Worth a webasta. It often turns on, sometimes even when the temperature is above 0. When it works, you can smell diesel fuel. After turning off the car, it makes noise for about 2 minutes, only then it turns off. The previous owner simply turned it off. The service station advised me to turn it on. Tell me, does it make sense to use it (Webast)? My car is in a warm garage; I don’t leave it outside often. And is it working correctly for me? Is the noise and smell of fuel normal?
Everything is fine, there is a smell when igniting, the air blower is noisy, after stopping the engine it should cool down by blowing, for me it turns on at a temperature of +10 and below, because... Modern engines take a long time to warm up.
Belarus+:
how to diagnose webasta? I found a program. There is a gas cord for prolifik pl 2303. Will it work?
On a Volvo, the standard heater can be diagnosed by the standard Vida Dice.
leib:
When it works, you can smell diesel fuel.
If there is no soot in the form of white smoke, then everything is fine. If there is soot, then either turn it off or repair it immediately.
People, tell me. The VW T5 car has a standard Webasto Thermo top C heater, and was equipped with a start timer. no problems for a year, everything worked like clockwork. I turned it on periodically even in the summer. in general everything is ok. The trouble is that now it has stopped turning on. Neither as an additional heater at a certain temperature, nor from a timer (writes error F—). Before this, we had to bring the tank to an empty state. Well, I think that's why I was blocked. We connected Vasya, reset the error, but she doesn’t want to unlock (0 to 1 doesn’t change). tried it 20 times, it worked. unblocked. We put a minus temperature on the temperature sensor, started the car - it works, from the timer - it also works. BUT, the work cycle begins with purging. After about a minute, thick white smoke begins to pour out, you can hear the circulation pump and then the sound of combustion. The thick smoke continues for about 5 minutes after starting, then it becomes noticeably thicker, but it still comes out. white (smell of unburned diesel fuel). In general, it worked 10 times and there was a big error on the timer (F—). Subsequent starts = no purging, minimal sounds and an error pops up, turns off. We connect it to the computer. diagnostics = ERRORS: 1. Heater blocked tdb statically (permanently) 2. Heater coolant supply shut-off valve-No. 279 short circuit to ground statically (permanently) 3. Heater glow plug - Q9 open circuit/short to positive statically (permanently) If you erase the errors and unlock again, the heater still works 5-10 times, thick white smoke pours out, and then there is another error. By errors: 1st, this is understandable. The 2nd one regarding the valve is not clear, because I understand that I don’t have this valve (I have a Transporter, and it was installed only on cars with climate control (for heating the interior or the engine). The 3rd error is basically what interests me. They advised me to check the contacts, if it doesn't help, change the spark plug. Others say that the problem may be entirely in the boiler with the flame sensor, etc., and it might be worth replacing it.
Today I took off the Webasto, checked the contacts, everything is fine. I climbed further, got to the candle, took it out, but I don’t know how to check it. There is carbon deposits in the boiler, I cleaned it. I noticed that the gasket on the boiler is cracked in two places, and the most interesting thing is that on the boiler in the same place where the gasket is cracked (if you apply it) traces of “burns” are visible on the metal. I didn’t find the mesh that was in the boiler; there was only soot there (I won’t say that there was a lot, but I dug it out on my palm). In general, after cleaning and reassembling, nothing has changed. big mistake. Tomorrow I’ll reset Vasya’s mistakes and try again.
Can anyone give me some substantive advice? I would like to know exactly what is going on. Why the smoke? How to check a spark plug, etc.
In this short article I want to talk about the diagnostics and repair of liquid pre-heaters, additional heaters and autonomous heaters. It is clear that it is quite difficult to describe all the breakdowns and nuances of restoration on one page, and such material will be difficult to read. I will try to describe the supporting points. What you should pay attention to first of all, what typical mistakes are made and how much it costs.
Webasto repair
But first, I ask you, dear reader, to answer a few questions for yourself.
Before you start resuscitating your battery, you need to understand which component has failed. To answer this question, it is necessary to conduct a diagnosis. And in order to make a diagnosis, it would be nice to understand the principle of operation of a liquid autonomous heater. This is what we will talk about in this chapter.
The operating cycle of any heater can be divided into several stages
If during the ignition or heating process the heater receives a command to turn on and then immediately to start, then a complete purge cycle will occur before restarting.
Please note that the time and temperature data on different heaters differ. For clarification, please refer to the documentation for your specific model.