The main symptoms of a malfunction of the ignition switch contact group
The main signs by which you can understand that the contact group is burnt out and does not work or will soon break.
You can touch it, the contact group gets very hot, turning on the low beam, heater, windshield wipers, radio - at this moment there is a colossal load on the contact group, the contacts get very hot and the plastic begins to melt. The contact group will work for some time, but due to the fact that the plastic has melted, the contact has become even worse - a breakdown is not far off. So the first sign is strong heating of the contact group. The second and main sign is the smell of burnt wires or plastic. If you remove the steering column casing, you will smell a burning smell and see a picture - blackened, burnt wires and a corrected contact group. Consider this article your salvation, you just need to read it to the end.
There is also a situation when you turn the key, but the car does not react. Nexia has a standard problem. This means 99 percent that your contact group has received a hitch. But don’t despair, if you don’t have a contact group at hand, you can drive normally by starting the engine with wires (see How to start a Nexia engine with wires without keys). If when you turn the key, the car does not start, then the contact group is to blame. It also happens that the starter simply does not turn when you turn the key - this is the same trouble.
Fuses used in Nexia
(Click on the fuse you are interested in and find out what it does)
| RELAY 1 | f1 10A | f2 10A | f3 15A | f4 20A | f5 10A | f6 10A | RELAY 3 |
| f7 30A | f8 20A | f9 30A | f10 30A | f11 10A | f12 30A | RELAY 4 | |
| RELAY 2 | f13 20A | f14 30A | f15 20A | f16 30A | f17 10A | f18 30A |
Find out which fuse is responsible for what below.
- Fuse F1 Electronic engine control unit (ECU) - 10A
This fuse is responsible for powering the brain; if you remove this fuse, the car will not start.
- Fuse F2 Tail lights and license plate light - 10A
If your license plate lights and side lights do not work, check this fuse.
- Fuse F3 The fuse was a waste of time, but in some models. — 15A
Also a fuse for the brain, but in most cars there is an empty space here.
- Fuse F4 High beam - 20A
The fuse is responsible for the operation of both high beam bulbs at once, so if the high beam does not light, then check this fuse. If neither the right nor the left high beam headlight lights up, then the reason is most likely in the fuse; if it doesn’t light up on one side, then the light bulb has burned out.
- Fuse F5 Low beam on the left side and left electric headlight adjustment - 10A
Low beam light with electric beam direction corrector, if your corrector does not work and the low beam does not shine, then check the fuse
- Fuse F6 Low beam on the right side, right headlight range control - 10A
Same as f5, but on the right side of the car
- Fuse F7 Fuel pump (fuel pump in the gas tank) - 30A
The fuel pump has a 30 Amp fuse; it is not recommended to install a larger one.
- Fuse F8 Hazard warning light, side turn lamps (turn signals) - 20A
The hazard light may short out the light, if this fuse is overheated, then check the hazard light or turn signals
- Fuse F9 Windshield wipers - 30A
If the windshield wiper doesn't work, it's not a fact that it's a fuse, but it's worth checking
- Fuse F10 Fuel filler neck (fuel door lock actuator) - 10A
In winter, a common problem is that the hatch does not open; if you press the button too much, most likely the electric motor will fail, but before that, check the fuse
- Fuse F11 air conditioning compressor (relay) - 10A
According to the pinout of the fuse diagram on the Nexia, there is a fuse for the air conditioner; if there is no air conditioner, there is no fuse.
- Fuse F12 Radiator cooling fan (low speed) - 30A
An important fuse, always check it to avoid problems with engine cooling.
- Fuse F13 Instrument panel, cigarette lighter, horn, glove box light - 20A
If this pre knocks you out, it means there is a short circuit somewhere. As soon as this fuse burns out, you will immediately understand that the instrument panel will go out and the cigarette lighter will stop working.
- Fuse F14 Nexia cooling fan (maximum speed) - 30A
Always keep the fuse intact so that lack of cooling does not damage the engine.
- Fuse F15 Interior light bulbs, radio antenna - 20A
If the light in the cabin does not light, then the fuse or light bulb is to blame. Check the fuse first
- Fuse F16 Power windows - 30A
If not a single window regulator works, then the front one is burnt out. They usually burn out in winter.
- Fuse F17 Radio - 10A
If the radio doesn't work, look at it
- Fuse F18 Trunk lock drive, central locking, battery-powered radio - 30A
The trunk does not respond to the opening button, and the central locking and radio are silent? It's a blown fuse.
RELAY 1 turn signal
Blower Motor RELAY 2
RELAY 3 fuel pump
If you want to learn more about the fuel pump relay, I recommend reading our article.
RELAY 4 fog lights
The main symptoms of a malfunction of the ignition switch contact group
The main signs by which you can understand that the contact group is burnt out and does not work or will soon break. You can touch it, the contact group gets very hot, turning on the low beam, heater, windshield wipers, radio - at this moment there is a colossal load on the contact group, the contacts get very hot and the plastic begins to melt. The contact group will work for some time, but due to the fact that the plastic has melted, the contact has become even worse - a breakdown is not far off.
So the first sign is strong heating of the contact group. The second and main sign is the smell of burnt wires or plastic. If you remove the steering column casing, you will smell a burning smell and see a picture - blackened, burnt wires and a corrected contact group. Consider this article your salvation, you just need to read it to the end.
There is also a situation when you turn the key, but the car does not react. Nexia has a standard problem. This means 99 percent that your contact group has received a hitch. But don’t despair, if you don’t have a contact group at hand, you can drive normally by starting the engine with wires (see How to start a Nexia engine with wires without keys). If when you turn the key, the car does not start, then the contact group is to blame. It also happens that the starter simply does not turn when you turn the key - this is the same trouble.
Signs of a fuel pump malfunction
Mechanical fuel pumps
In a mechanical fuel pump, malfunctions most often occur due to wear of the sealing gaskets and the formation of leaks between parts of the housing. As a result, the tightness of the structure is broken, air gets in, fuel stops getting into the carburetor and the engine stalls. A similar consequence is caused by membrane rupture and valve failure. At the same time, the car begins to move jerkily until the fuel supply stops completely.
Electric fuel pumps
On cars with mechanical and electronic injection, the signs of a fuel pump malfunction are slightly different, but they can be classified into certain groups:
- The engine does not start. Rotation of the starter with dry spark plugs does not cause flashes in the cylinders. There is no pressure in the fuel line, or it is extremely low; the buzzing of the pump is not heard when the ignition is turned on or the starter is operating.
- The engine does not start, although occasional flashes occur in the cylinders. There is pressure in the fuel line, but without a pressure gauge its value cannot be determined. The candles are dry.
- The engine starts and idles normally, but pressing the accelerator causes it to stop. If you want, it is possible to raise the speed to medium, but attempts to start lead to the engine stalling. There is a black coating on the spark plugs, the operation of the fuel pump is characterized by a changing sound.
- The engine starts, holds idle speed normally, and picks it up easily at neutral speed. When driving at medium and high speeds, a “twitching” is observed. It happens that after a certain mark on the tachometer the speed does not pick up, and the engine stops producing the required power under load. At the same time, the spark plugs are white, and by their appearance it seems that the car is ignited too early or has a lean mixture.
It is worth noting that the above symptoms of fuel pump malfunctions are also typical for other engine breakdowns, and they cannot be used to unambiguously diagnose a fuel pump malfunction. For example, speed also fluctuates if there is a problem with the air sensor, throttle valve, clogged injectors or poor quality fuel.
Car starter design
Every car owner should know the design of the mechanisms and components of his vehicle. If you understand the operation of the mechanism, you can easily and quickly identify the breakdown and fix it.
Main components of the unit:
- electric motor,
- anchor,
- brushes,
- overrunning clutch.
Some car models may have differences in structure. This should not be taken as a deviation; this happens often. If you are purchasing a part, you must inform the seller about the model of the part that was previously used. If you select the element incorrectly, difficulties may arise with its operation, and it will quickly fail.
If the starter does not respond to the rotation of the key and is in silent mode, then the check is divided into the following stages:
- The battery charge level is detected.
- The ignition switch contacts are being checked.
- The traction relay is being diagnosed.
- The operation of the part of the starter responsible for torsion of the clutch and the mechanism itself are checked.
Sample control procedure
The procedure for conducting inspections of the technical condition of vehicles is enshrined in the road safety instructions; recommendations can also be obtained from the Ministry of Transport.
The control plan includes a list of manipulations, the main ones look like this:
- study of the appearance of equipment;
- checking the body, driver's cabin, signals, lights, brakes, battery;
- control of the main systems: air suspension, steering, clutch, engine;
- checking axle parameters, integrity of hoses, turn signals;
- analysis of wheels, tires, bumpers.
Let us remind you that the driver is present when drawing up the inspection report.
Types and scope of checking the technical condition of a vehicle
Technical control is divided into visual and manual. The technician uses the second option if a specific part or system is suspicious. A diagnostic map using some diagrams - that is, bypassing the official expert opinion. Such “tricks” threaten the company with fines from the traffic police, and also increase the risk of accidents. Let's return to the “white” schemes.
Verification methods
Technical control (pre-shift and post-trip) is divided into a full inspection and monitoring of a specific system. A full inspection, required by orders of the Ministry of Transport, is designed to ensure road safety and control all components of the vehicle. Partial inspection is used when one of the systems breaks down or malfunctions. Let's look at the nuances in each machine system.
Brake systems
Checking the brake system.
Brakes are one of the main parts of the vehicle, responsible for the safety of the driver and others.
When inspecting them, the following problems may be revealed:
- reduced system efficiency;
- jamming, interruptions;
- fluid leak;
- failure of brake lights.
If the above is detected, the car is sent for a detailed examination.
Steering systems
Failures here can be like this:
- control jamming;
- violation of adjustment of parts.
The car is also sent to a repair station.
External lighting devices
When inspecting the headlights, a technician may find:
- contact closure;
- Malfunctions of the rear/front lights.
The vehicle is not allowed on the road until the situation is corrected.
Wheels and pneumatic tires
The fastening and external condition of the “shoes” of the vehicle are checked. If necessary, place the car on a jack and tighten the nuts. Rubber damage, bumps, different tread patterns, and worn tires are unacceptable.
Engine and its systems
The engine is the “heart” of the car. Its operation is checked at full and low speed, as well as at idle. An increased concentration of smoke, its entry into the driver’s cabin, and clutch failure are reasons to send the equipment to the station.
Other structural elements
The mounting of the tractor with the semi-trailer, stable mounting of mirrors, canopies and license plates are subject to detailed inspection.
The mechanic also rules out deep dents, damage to the platform, and cracked headlights. If the inspection reveals the above, the parts that have become unusable are replaced and the fastenings are adjusted.
Verification Tools
For full maintenance in the garage, organizations must have:
- several types of jacks (for each type of equipment);
- pressure gauge for checking wheels and tire pressure;
- hammer with a long handle;
- sets of tools (wrenches, nuts).
In large companies, it is advisable to supply equipment for computer diagnostics.
Documenting results
Documenting the results.
The monitoring results are recorded in the logbook. A sample document can be found in the public domain.
An example of the required graphs is:
- make and model (truck, passenger) of the vehicle;
- state number of the car;
- brief information about the driver;
- inspector data;
- time/date of recording the technical condition;
- odometer data, mileage;
- a note about passing a technical inspection;
- signatures of the inspector and the driver.
Also, the results of the inspection are included in the “travel book”.
Unload the contact group of the ignition switch on the Nexia
To unload using a relay, you need to purchase the necessary materials in advance, namely, we will need:
Relay block – 50 rub.
Female terminals for relays (4 pcs) – 5 rub.
Red wire 0.5 m long – 15 rubles.
Black wire 0.5 m long – 15 rubles.
Screw terminal (1 piece) – 2 RUR.
The terminals on the contact group that need to be unloaded are shown in red:
The following is a schematic diagram of the relay:
BEFORE unloading, diagram of connection and operation of the contact group on Nexia:
Connect the relay to the contact group as indicated in the diagram. Scheme for unloading the contact group through a relay:
Using the same scheme, you can install another relay in parallel. After this unloading, you will extend the service life of the contact group and avoid melting of the wiring and burnt plastic in the car interior. Suddenly, if one wire going to “30” heats up, then leave the old wire per kg, and run a new wire from the battery to contact “30”.
Your headaches regarding the contact group will go away, since now the entire load passes not through the pitiful contacts, but through the unloading relay.
By the way, I almost forgot, if you detect melting of the contact group, be sure to replace it with a new one, so I recommend that you read our article about kg. (See Article number of the ignition switch contact group on the Nexia).
ps Share the publication with a friend Nexiavod, so as not to forget how to relieve the contact group on the Daewoo Nexia.
Theme Options
Display
- Linear view
- Combined view
- Tree view
Catalog number and cost of a good starter for Daewoo Nexia
Finding branded original starters for Nexia is very problematic. In order not to resort to auto disassembly services, owners are advised to purchase analogues. Many of them are in no way inferior to the original. The tables below provide a list of brands that have proven themselves to be the best in car use.
Table - Good analogues of the original Daewoo Nexia starter with an 8-valve engine
| Manufacturer | vendor code | Approximate cost, ruble |
| Cargo | 111123 | 2800-3200 |
| Mando | EX96952005 | 4200-5000 |
| Starline | SX2055 | 4600-5300 |
| Kemp | 77645603 | 2500-3100 |
| Lucas Electrical | LRS02107 | 4200-4700 |
Table - Recommended alternative options for the original Daewoo Nexia starter with a 16-valve power plant
| Manufacturer | vendor code | Approximate cost, ruble |
| Nipparts | J5210905 | 2600-3300 |
| Dashi | DSC018 | 2900-3500 |
| Krauf | STB1188 | 4500-5100 |
| Tesla | TT15272 | 3600-4000 |
| WPS | 31223N | 4900-5800 |
How do the parts interact with each other?
Turning the key in the ignition switch of a Daewoo car (its transition to position III) will supply voltage from the battery to the traction relay. The armature of the latter will move the drive lever and the clutch gear will engage with the ring gear of the engine flywheel. At the same moment, the traction relay armature will close the power contacts and voltage from the battery will be supplied to the starter motor. After this, the starter rotor will begin to turn the crankshaft of the engine through the placental gearbox.
But how can high starter rotation speed (and, accordingly, its damage) be avoided? Immediately after starting, when the speed of the gear still exceeds that of the starter, the freewheel is unlocked and begins to slip.
In fact, all of the above happens within 10 seconds. And if the temperature is below zero, then it is allowed that the starter will operate for up to 15 seconds.
VESKO-TRANS.RU
AutoNews / Reviews / Tests
Where is the Daewoo Nexia Starter Relay located?
What should a driver know about the operation of the Daewoo Nexia starter while driving?
The electrical equipment of DAEWOO NEXIA has its own characteristics, which every driver behind the wheel of this car should know about. The fact is that electrical equipment is used here, the direct voltage of which has a nominal voltage of 12 V. All equipment as a whole is a single-wire circuit. Either the battery (when the engine is not running) or the generator (or, conversely, when it is in motion) is responsible for the power itself.
As for the starter, its functions are as follows: when you turn the ignition key, immediately after its command from the battery, an electronic current begins to flow to the starter. The latter will depend on the magnet that is connected to the motor. The engine starts to spin, the fuel ignites, and it starts.
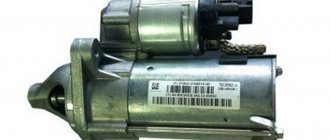
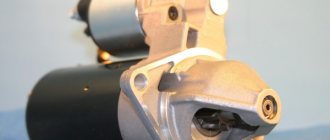
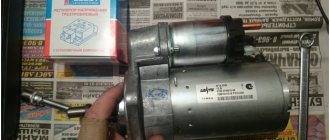
Daewoo Nexia Starter
Thus, the starter of any car (including Daewoo Nexia) is a fundamental element on the way to starting your engine.
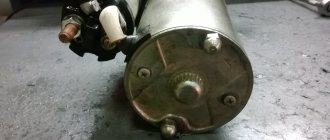
What is this part?
Look at the starter. Visual inspection of this part shows that the Daewoo appears to be a four-pole, four-brush electric motor. It is also combined with a planetary gearbox and an electric traction relay with two coils.
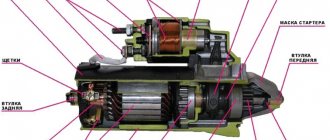
If you disassemble a Daewoo starter for parts, you can identify the following components:
- Drive side cover;
- Screws for fastening the traction relay to the cover on the drive side;
- Retaining ring drive couplings;
- Clutch thrust disc ring;
- Drive coupling;
- Drive lever;
- Gear;
- bearing;
- Vehicle drive shaft;
- Traction relay;
- satellites
- Planetary reductor;
- Bolt-on manifold side covers;
- Clutch bolts;
- Manifold side cover;
- Brush installation;
- Stator;
- Rotor;
- Planetary gear cover.
What to do if Nexia does not start when you turn the key
Daewoo Nexia ignition group restoration 3.mp4
There was an error in the video: relay
does not go to terminal 30, but to 15.
How do the parts interact?
Turning the key in the Daewoo ignition switch (switching to position III) supplies voltage from the battery to push the relay . The latter's mount will move the drive lever, and the clutch gear will mesh with the engine flywheel. The traction relay armature will close the power contacts, and voltage from the battery will be supplied to the starter. The starter rotor will then rotate the engine crankshaft through the placental gearbox.
But how can you avoid high starter speed (and therefore damage)? Immediately after starting, when the transmission speed is still higher than the starter speed, the freewheel opens and begins to slide.
In fact, all of the above happens within 10 seconds. And if the temperature is below zero, the starter to last up to 15 seconds.
Problems with work
Despite the complex device that is the Daewoo starter, it will not be difficult to return it to working condition with minor damage. It is enough to know the reason.
For example, if the traction relay is not working, there could be many sources. If the DAEWOO NEXIA starter does not rotate when the starter is turned on and the traction relay does not work, then the battery may be fine. In addition, the cause may be a short circuit or open relay . The same reasons (along with the final oxidation of the battery, they can also occur if, when turned on, the traction relay turns on, but the valve rotates too slowly.
The starter is turned on, but the armature does not rotate and the flywheel does not work? The problem can be solved by replacing the clutch, drive or flywheel (depending on the breakdown).
If there seems to be an excessive startle noise when cranking the starter, then it may be due to excessive bearing wear (which would be enough to require replacement).
It is possible that only the teeth of the drive mechanism or flywheel are damaged (replacement will also suffice). Although sometimes the problem turns out to be quite minor. the starter mount simply becomes loose (to eliminate this drawback, you just need to tighten the fastening nuts).
In any of these cases, of course, you can fix both the starter and yourself. However, keep in mind that the Daewoo Nexia has a similar part located at the rear of the engine. This means that such work can only be carried out on an inspection hole, trestle or lift. Lifting the cover and removing it from the intake manifold will be very difficult (and there is a high risk of injury). Therefore, if you do not have the relevant experience, in the event of a breakdown, you can safely contact the specialists of a repair shop, where they will quickly and inexpensively solve a similar problem.
Causes of starter malfunctions
Before you begin the repair or replacement process, you need to know the reasons for the unit malfunction. They are quite familiar to many car enthusiasts. There are quite a few reasons for the Daewoo Nexia starter not working, but let’s look at the main ones:
- The battery does not work;
- terminal oxidation;
- traction relay closing;
- open circuit of the traction relay;
- inoperability of contact ignition;
- anchor jams;
- wear and sticking of brushes;
- ignition circuit break;
- clutch is faulty;
- drive gear wear;
- the gear does not fit on the flywheel teeth;
- armature bearing wear.
These are some of the reasons for the impossibility of starting the starter, and therefore the engine.
What is this part?
Let's take a look at the starter. A visual inspection of this part from Daewoo shows that it looks like a four-pole, four-brush electric motor. It is also combined with a planetary gearbox and an electromagnetic two-winding traction relay.
If you disassemble the Daewoo starter into parts, you can identify the following components:
- Drive side cover;
- Screws securing the traction relay to the cover on the drive side;
- Drive clutch retaining ring;
- Drive coupling thrust ring;
- Drive coupling;
- Drive lever;
- Ring gear;
- Drive lever support;
- Drive shaft;
- Traction relay;
- Satellites;
- Planetary gear seal ring;
- Cover mounting bolts on the manifold side;
- Pinch bolts;
- Collector side cover;
- Brush unit;
- Stator;
- Rotor;
- Planetary gear cover.
General structure and purpose of the Daewoo Matiz starter
The Daewoo Matiz is economical and fast, ideally suited for driving in the city.
Thanks to the spacious interior, spacious enough for the Mini class, and good driving performance, it can also be used for country trips.
This car is distinguished by good reliable assembly and high-quality components, including such important ones as the starter.
Starter operating principle
The starter is the very element without which it would be completely impossible to start any car, and Daewoo Matiz is no exception here.
As you know, the starter is part of almost any modern car, being the main unit of the engine starting system.
In essence, it is an ordinary electric motor, equipped with a traction relay, an overrunning clutch and a fairly large number of difficult-to-pronounce parts and elements.
Spare parts catalog for Daewoo Matiz
When starting with the ignition key, an electric current is supplied to the starter through the contact group, the traction relay begins to rotate the bendix, which is geared to the flywheel, and thus the bendix begins to rotate the car engine.
Features of the Daewoo Matiz starter
One of the main features of the Daewoo Matiz car starter is the fact that this model is equipped with starters from two different auto parts manufacturers:
At the same time, determining which brand of starter is installed on your car is quite problematic - this information is not written down anywhere in the documentation, and you can only understand what’s what on a lift.
The main visual difference between starters is the shape of the casing - Mando has a conical casing shape, and Delphi has a semicircular casing. It is by this feature that you can immediately understand what brand of starter we are talking about.
In this regard, quite often problems arise with repairing the starter, when car owners, not knowing exactly what brand they have a starter, order parts for it.
There is one more point - for a model with a 0.8-liter engine and for a model with a 1-liter engine, different starters are needed, that is, even if we are talking about starters from the same company, their components will also be different.
In principle, the starter is a fairly “long-lasting” component - it can last eight, ten or twelve years, and in some cases even more. Much, of course, depends on how intensively the car is used. At the same time, there are not so many most common starter malfunctions:
- failure of the traction relay;
- failure of the starter motor;
- general wear and tear of the starter when the bushings fail.
As mentioned above, in the event of a starter failure, it makes absolutely no difference whether you replace a Delphi starter with a Delphi model, a Mando starter with a similar Mando product, or a Delphi starter with a Mando analogue.
Now, if it occurs to you to overhaul the starter in order to eliminate the malfunction and replace the failed elements, then it becomes important what brand of product you have and what specific parts you are trying to use to repair it. The design and principle of operation of the Daewoo Matiz starter
The design and principle of operation of the Daewoo Matiz starter
Starter repair for Daewoo Lanos, Daewoo Nexia, Chevrolet Lanos
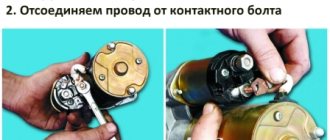
Disconnect the wire tip from the control terminal of the solenoid relay. We ask an assistant to turn the ignition key to position III. The multimeter should show a voltage value of about 12 V.
If there is no voltage, check the contact group of the ignition switch, and then the electrical control circuit of the solenoid relay.
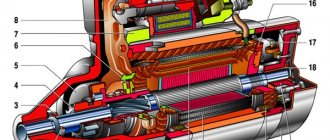
Permanent magnets are fixed in the stator housing.
Rotation from the rotor 18 of the electric motor is transmitted to the drive shaft 9 through a planetary gearbox consisting of a ring gear 7, a carrier made integral with the drive shaft 9, and three satellites. A freewheel roller clutch 5 is installed on the drive shaft. To do this, it is enough to know the reason. For example, if the traction relay does not operate, there can be many primary sources of its occurrence.
Alternatively, the cause could be a short circuit or network break in the relay. The same reasons, together with oxidation of the battery terminals, can also occur if, when turned on, the traction relay is activated, but the armature rotates too slowly.
You can start with them. And this issue is not simple.
And only a master who is closely involved in repairing starters can accurately establish the starter model with only a superficial inspection. And naturally, it is impossible to buy any spare parts in advance.
Fuse diagram
The base of the block is no different for cars produced in 2000 and 2011. Also, the eight-valve version and the sixteen-valve engines are protected by the same fuses.
The standard electrical circuit is deciphered as follows:
- F1 – ECU system, protects the power cores of the device;
- F2 – system of dimensions;
- F3 – not used;
- F4 – head optics high beam mode fuse;
- F5/6 – low beam, correction of the right and left headlights, respectively;
- F7 – fuel system;
- F8 – turns in operating mode, emergency lights and stops;
- F9 – wipers;
- F10 – protective element of the electric lock of the windshield lid;
- F11 – air conditioning compressor;
- F12 – low rotation speed of the stove fan;
- F13 – fuse F13 is multifunctional, the element is responsible for the cigarette lighter, instrument panel, and works as an auxiliary element of the generator circuit;
- F14 – horn and heater fan;
- F15 – interior lighting of the interior, glove compartment and cargo compartment;
- F16 – power supply for electric door windows;
- F17 – comes into operation when the tape recorder is powered from the ignition switch;
- F18 – central locking, radio power supply from battery, luggage compartment lid lock drive.
There are also several relays here.
- Maximum operating mode of the stove fan.
- Turn signals in blinking mode.
- Fuel pump switch relay.
- Front and rear fog lights.
When installing powerful optics, the foglight switch often burns out or fails to cope. To unload the element, users install an auxiliary unit and energize the rear lights to it.
The additional part contains a small number of fuse links:
- F20 – climate control;
- F21 – standard fog lights.
Drivers deal with a constantly burning element in the same way as with a relay. A separate line is drawn and powered through a common switch.
Location and electrical diagram
The Nexia uses DC electrical equipment with a nominal voltage of 12 volts. All energy consumers in a given vehicle are connected according to the same principle. In particular, the negative terminals of the equipment are connected by ground (that is, connected to the body of the car), which, in turn, acts as a second wire. The power supply for all devices comes from two sources: if the engine is not running, then from the battery (battery), if it is running, then from the generator.
The fuse box (hereinafter referred to as the BP) and relay in the Daewoo Nexia car is located at the bottom of the car’s dashboard. Specifically, it is located on the left side of the instrument panel. In vehicles produced before 2008, the PSU is marked N100, and in younger cars - N150. Let us tell you right away that in terms of their design, circuit and purpose of components, the power supply units are absolutely identical. The only difference is in access to them due to the design features of the torpedo.
We present to your attention a diagram of the power supply unit and relay with a description of all the elements.
Power supply diagram for Daewoo Nexia cars - it shows the numbers of all components of the unit and relays Table describing the assignment of fuses of the mounting block
You may also find the relay description useful.
| Detail number | Purpose |
| K1 | This relay is responsible for the operation of the ventilation device of the cooling system. Specifically, this relay is called a “high fan speed relay.” |
| K2 | This element ensures the functioning of the direction indicator lamps. Accordingly, if it fails, you will not be able to signal to other drivers about your intention to turn. |
| short circuit | Responds to the functioning of the fuel pump. If this relay fails, the operation of the fuel pump will be impossible and, accordingly, it will not be possible to start the engine. |
| K4 | Responsible for the operation of the front and rear fog lights. |
| K5 | Provides operation of side lamps and fog lamps. |
| K6 | If this relay breaks down, the operation of the headlight lamps (responsible for low and high beam) will be impossible. |
| K7 | The failure of this component, which is responsible for the speed of the cooling system fan, indicates that the engine may overheat and, as a result, boil. This part must be replaced immediately if it fails. |
| K8 | A breakdown of this relay indicates that the climate control system compressor clutch is not working. |
| K9 | Responsible for the operation of the steering wheel horn. |
| K10 | Also ensures the performance of headlight lamps. |
| K11 | This component ensures the functionality of a melodic signal (sound when doors are opened, seat belts are not fastened - depending on the configuration). |
| K12 | The relay is responsible for activating the fourth speed of the heating system fan. If it fails, then at too low temperatures the heater will not be able to operate at full capacity. |
| K13 | The ignition system ensures operation. If the relay burns out, starting the engine will be impossible. |
| K14 | Responsible for the windshield wiper device. |
| K15 | Rear window heating timer. |
Unload the contact group of the ignition switch on the Nexia
To unload using a relay, you need to purchase the necessary materials in advance, namely, we will need:
Relay block – 50 rub.
Female terminals for relays (4 pcs) – 5 rub.
Red wire 0.5 m long – 15 rubles.
Black wire 0.5 m long – 15 rubles.
Screw terminal (1 piece) – 2 RUR.
The terminals on the contact group that need to be unloaded are shown in red:
The following is a schematic diagram of the relay:
BEFORE unloading, diagram of connection and operation of the contact group on Nexia:
Connect the relay to the contact group as indicated in the diagram. Scheme for unloading the contact group through a relay:
Using the same scheme, you can install another relay in parallel. After this unloading, you will extend the service life of the contact group and avoid melting of the wiring and burnt plastic in the car interior. Suddenly, if one wire going to “30” heats up, then leave the old wire per kg, and run a new wire from the battery to contact “30”.
Your headaches regarding the contact group will go away, since now the entire load passes not through the pitiful contacts, but through the unloading relay.
By the way, I almost forgot, if you detect melting of the contact group, be sure to replace it with a new one, so I recommend that you read our article about kg. (See Article number of the ignition switch contact group on the Nexia).
ps Share the publication with a friend Nexiavod, so as not to forget how to relieve the contact group on the Daewoo Nexia.
Theme Options
Display
- Linear view
- Combined view
- Tree view
We recommend watching:
- The starter does not turn under load
- Starter traction relay device
- VAZ 2110 starter solenoid relay current consumption
- The starter is working but does not turn with the key.
- Nexia or Priora comparison
- Why doesn't the starter start?
Starter replacement
Replacing a starter is quite a difficult procedure, especially for those who have never done it before. But don’t worry, it will seem easy enough. Let's move on to the replacement process itself.
- We dismantle the motor protection.
The master cannot do without an overpass or inspection hole. We drive the car into a pit/overpass, turn off the vehicle and apply the handbrake lever. Open the hood and remove the negative terminal from the battery.
Unscrew the power cable nut.
We look under the car and unscrew the engine protection (if provided).
Disconnect the contact relay.
We find the starter unit, it is located on the gearbox assembly site.
Unscrew the traction relay.
We unscrew the fastening of the positive terminal on the starter and fold the wire to the side. This way we de-energize the starter unit.
Remove the solenoid relay control wires. You need to unscrew the nuts (2 pcs) and move the wiring to the side.
Unscrew the mass nut and remove it.
Disconnect the starter ground wire. It is secured with a nut on the stud securing the starter housing to the mounting site on the gearbox.
Unscrew the starter mount.
We unscrew the fasteners of the starter housing to the mounting pad on the gearbox. The starter is held in place by 1 bolt and 1 locked pin.
We get the starter. At this stage, you can also inspect the gearing on the flywheel. It is worth noting that the bendix and the solenoid relay are far from the only possible causes of starter failure. The starter assembly is still subject to wear: brushes, rotor, stator, bushings. Before repairing the starter, it is imperative and absolutely necessary to carry out a comprehensive diagnosis of the starter assembly. This work can only be carried out efficiently by a highly qualified specialist who is specifically engaged in repairing starters.
- Now, you can either repair it or replace it with a new one.
Starter selection
96208781 - original catalog numbers of the Daewoo Nexia starter manufactured by Daewoo with a cost of 10,000 rubles. In addition, there are a number of analogues that can be used:
Car starter design
Every car owner should know the design of the mechanisms and components of his vehicle. If you understand the operation of the mechanism, you can easily and quickly identify the breakdown and fix it.
Main components of the unit:
- electric motor,
- anchor,
- brushes,
- overrunning clutch.
Some car models may have differences in structure. This should not be taken as a deviation; this happens often. If you are purchasing a part, you must inform the seller about the model of the part that was previously used. If you select the element incorrectly, difficulties may arise with its operation, and it will quickly fail.
If the starter does not respond to the rotation of the key and is in silent mode, then the check is divided into the following stages:
- The battery charge level is detected.
- The ignition switch contacts are being checked.
- The traction relay is being diagnosed.
- The operation of the part of the starter responsible for torsion of the clutch and the mechanism itself are checked.
Basic starter malfunctions
So, what to do if the car does not start and what to do if the starter does not turn? First, of course, you need to understand the main malfunctions of the unit.
- It is impossible to start, although the ignition key is in position III, but the driver does not hear a characteristic click, and the unit itself refuses to turn. As a rule, such a breakdown is associated with a failure of the solenoid relay. However, first of all, you still need to make sure that the battery in the car is charged and working. In this case, it would not be superfluous to check the terminals on the battery - if they are oxidized, they will need to be cleaned. Sometimes a similar problem occurs when the ground cable is poorly secured to the car body; the wire itself may be damaged. If everything is in order with this, you will need to make sure that voltage is supplied to the contact of the relay of the node itself. Diagnostics is carried out using a multimeter or a 12-volt test lamp. If the battery works normally, but the unit still does not turn, the cause of the malfunction must be sought in the ignition switch. Otherwise, the cause of the malfunction will be the operation of the traction relay.
- When starting the power unit, the driver may hear a characteristic click, but still do not twist the unit. In this case, the cause of the malfunction may be a malfunction of the solenoid relay, sticking or wear of the brushes, or failure of the armature commutator. But at the same time, you also need to make sure that the battery is working normally, the ground is securely fastened, and the battery terminals are not oxidized. In addition, it would be a good idea to check whether the terminals on the starter itself are properly tightened; we are talking about a permanent plus, as well as the control contact of the relay.
- The engine starts, but the unit turns with great difficulty. In this case, the cause of the malfunction, as a rule, is wear of the mechanism bushings or contamination of the commutator; cleaning the latter or replacing the bushings will solve the problem. In addition, the problem may be a short circuit or breakage of the armature windings, as well as wear of the brushes. If necessary, the brushes can also be replaced.
- The unit rotates normally, but the flywheel does not turn. Such a malfunction may be due to incorrect operation of the bendix, in particular, the drive gear. The failure may also be caused by a broken drive fork.
- The mechanism turns, but the flywheel does not turn, and an uncharacteristic sound is heard from the engine compartment, in the area of the gearbox housing - a squealing or crackling sound. The reason in this case may lie in the inoperability of the bendix or wear of the teeth of the flywheel crown.
- The unit continues to function after starting the power unit or turns on randomly while driving. If you can start, but the starter does not work correctly, the solenoid relay may have failed. In this case, the drive gear may also not disengage with the flywheel, or it may simply jam on the splines of the so-called anchor. Therefore, first of all, you need to spend time diagnosing these components. If everything is fine with them, then perhaps the cause of the malfunction lies in the contact group. If the starter itself turns weakly, you can find out more about options for solving the problem here.
The process of removing and repairing the starter
- The master cannot do without an overpass or inspection hole. We drive the car into a pit/overpass, turn off the vehicle and apply handbrake lever
- Open the hood and remove the negative terminal from the battery .
- We look under the car and unscrew the engine protection (if provided).
- We find the starter unit , it is located on the gearbox .
- We unscrew the fastening of the positive terminal on the starter and fold the wire to the side. This way we de-energize the starter unit.
- Remove the solenoid relay control wires . You need to unscrew the nuts (2 pcs) and move the wiring to the side.
- Disconnect the starter ground wire . It is secured with a nut on the stud securing housing to the mounting site on the gearbox.
- We unscrew the fasteners of the starter housing to the mounting pad on the gearbox. The starter is held in place by 1 bolt and 1 locked pin.
- We get the starter.
At this stage, you can also inspect the gearing on the flywheel. .
relays and fuses
The contact group is the cause of starter failure. But perhaps the most common cause of starter failure is the failure of the contact group. If the starter works by itself, as the first test showed, then with a high degree of probability the fault can be caused by the contact group of the ignition switch.
The starter drives on the Daewoo NEXIA, what's the problem?
The fact is that when designing the electrical circuit, the engineers did not take into account the high load on the ignition switch contacts. When starting the engine, voltage from the battery is supplied directly to the contact group and when the starter is turned on, a large current passes through the contacts, they heat up and burn out over time.
Paid links
How to prevent the contact group from breaking down Of course, you can simply replace the contact group on Nexia, but there is no guarantee that the story of contact burnout will not repeat itself.
To avoid problems occurring in the future, it is necessary to unload contacts 15 and 30 of the contact group.
To do this, it is necessary to install an unloading relay between these contacts. A regular starter relay from a VAZ will do, connected according to the diagram between pins 15 and Let's understand the connection diagram: Connect the wires to the terminal block. We get to the ignition switch by removing the steering column covers.
What should the driver behind the wheel know about the operation of the Daewoo Nexia starter?
The electrical equipment of the DAEWOO NEXIA car has its own characteristics that every driver sitting behind the wheel of this car needs to know. The fact is that electrical equipment is used here, the constant voltage of which has a rated voltage of 12 V. All equipment as a whole is a single-wire circuit. Either the battery (when the engine is not running) or the generator (or, conversely, when it is running) takes responsibility for the power supply itself.
As for the starter, its functions are as follows: when you turn the ignition key, immediately at its command from the battery, electric current begins to flow to the starter. The latter is acted upon by a magnet and is connected to the motor. The engine starts to spin, the fuel ignites in it and it starts.
Daewoo Nexia Starter
Thus, the starter of any car (including the Daewoo Nexia) turns out to be an important element on the way to starting its engine.
Rules for replacing fuses
To replace a blown fuse or a failed relay, you need to de-energize the corresponding circuit of the vehicle's electrical system (turn off the ignition or remove the terminal from the battery), open the mounting block and remove the faulty part from the terminals. For ease of use, some sets of fuses are equipped with special plastic pliers that facilitate dismantling.
You also need to remember a few rules that will help avoid damage to the electrical system of the Daewoo Nexia:
- Do not use fuses with a higher current rating than specified in the instruction manual. This can cause burnout of contact tracks on the printed circuit board of the unit, breakdown of final energy consumers, and even fire of the car.
- It is strictly forbidden to replace fuses with metal jumpers or short-circuit the legs of burnt fuses with wire.
- You should not save on buying fuses, since products of dubious quality from the lower price range often do not correspond to the rating indicated on the case and, therefore, do not perform a protective function.
Required Tools
To replace the starter on a Nexia, you need a list of tools, which is presented in the table below.
Table - Tools required to replace the front strut
| Name | Note |
| Head | "at 10", "at 13" |
| Extension | Preferably with a ratchet |
| Short open-end wrench | "at 10", "at 13" |
| Screwdriver | With cross and flat blade |
| Socket wrench | “at 7”, “at 8”, “at 10”, “at 13”, “at 15” |
| Rags | To clean dirt |
To remove and install the starter, access is required from the bottom of the vehicle. Therefore, when carrying out operations, it is important to have an inspection hole, overpass or lift.
Daewoo Nexia › Logbook › ► [5] Unloading the contact group
UPD 01/15/2020: Everything is fine)) KG is still the same. UPD 02/04/2019: Everything is still working. On the same old CG. UPD 02/16/2018: Everything works. I haven’t changed the CG for almost 2 years. UPD 04/10/2016: Everything works stably. A year passed without incident UPD 05/31/2016: The contact group itself failed. The reason is not unloading. After overhaul and lubrication, the KG is back in service.
My KG melted on the road. I had driven 50 km before and stopped at the entrance to the city, fortunately at least this way...
I installed a new CG, and in order not to waste any more money, I unloaded it. After this unloading, we have a slightly warm CG, and the low beam has become brighter.
Thanks to the author of the idea Ingener73 and the article Solving the problem of overheating of the CG on the Nexia N150
.
But I used a slightly lighter version from Aleksey68tmb and the article Unloading the KG, powering the headlights.
And so, I took out the fuse box and turned it over to the back side.
We remove contact 30 from the block along with the terminal, red wire
We take a new wire with a cross-section of 2.5 mm, about 30 cm (look at the location), crimp the terminal onto one end, and strip the other end
For convenience, I disconnected the relay mount, they are on a slide and slide out easily, and inserted the terminal of a new wire into the place of contact 30 of the headlight relay
Next, connect the second end of the new wire of contact 30 of the headlight relay
to
the wire of contact 30
, which
goes to the contact group
, and that’s basically it, don’t forget to insulate everything.
To ensure that the light goes out when the ignition is turned off! need to:
The photo shows a thin, long red-yellow wire, arcing upward (arrow 86 in the photo). For me this wiring went as a jumper from contact 86 of the SIZE relay to contact 86 of the HEADLIGHT relay. Let's cut it in half. One end ( numbered 2
), which goes to the SIZE relay (pin 86), we simply
isolate it
.
And the second end ( numbered 1
), which goes to the phased array relay (also pin 86),
we connect to it the old red wire (pin 30)
, which was still removed at first.
And that's it, the light goes out.
By the way, I read somewhere that not everyone has such a jumper. Probably depends on the year of manufacture of the car...
Replacing the Daewoo Nexia crankshaft sensor. How to remove the crankshaft sensor of a Daewoo Gentra car
- Video about where it is located and how to remove the crankshaft sensor (CPCV) of a Daewoo Gentra car.
- Comments on the topic Replacing the crankshaft sensor Daewoo Nexia
- Gazinur
Hello, I have such a problem with the 93 year old 3 Passat. In the morning I can’t start it, I oil it for 5 minutes and then start it. What’s the reason?
Feast
Maybe someone knows the reason, ZAZ Sens 2011, after moving forward, I turn on the reverse gear and start to move into the gearbox, a crunching or clack-clack occurs and vice versa, after moving in reverse gear, when starting to move in front, the same sound is heard...
Ladanchiev Zhar
Today the box is damaged! When shifting to D, it stalls in neutral and when you engage 3rd gear, neutral lights up at the same time.. Camry40 I’ll clean it and report back
Atwood
chord CC7 automatic speed drops to 250 at a traffic light or even stalls. I will change the tubes and wash the throttle and the xx sensor. I hope it helps. Thanks to the author of the video
Ilyukhin Elshad
Hello. Please tell me the possible cause of the problem. There is no possibility of computer diagnostics, since in our city they refuse to diagnose our amulet. The problem is this. The car does not start when cold (at first try).
The starter turns vigorously, the battery is charged, the spark plugs were changed, the high voltage wires were changed, the idle speed control was changed, the crankshaft sensor was looked at (cleaned), the problem does not go away, there are no problems when it’s hot (it starts with half a turn), I don’t even know what happened to by car. After several long starts, the car begins to catch, after which it immediately stalls.
After 2-3 times of restarting, it starts and starts idling. Please tell me what the problem might be, thank you very much in advance.
Zalimkhan
- Lew
- Why are you holding the camera like that?
- Nailya
Can you give me a phone number to contact you? I'm from Omsk, I would like to consult with you!
Danone
Hello, you're great at explaining things thoroughly. You have a grand car. help me, I have a grand 2015. Automatic transmission AMT. In the morning it starts well, then when you drive and then stop, it won’t start until the dachik. DRMV. I take it off.
and then again I put the AF sensor in place. And also, we have a 2015 Grande AF sensor. It is not located at the beginning of the air, but rather at the end where there are several sensors DPS.
, please show me the video in more detail.
Elwin
Is it possible to remove the fuse for the fuel pump instead of the connector?
- Volcano
- Why the hell is it so quiet?
- Tamulenis Nagar
- You didn’t find the owner and sent him away. Handsome(
- Kern
- What is the name of the music?
- Mariana
I read one comment “Problem solved!!! I swapped the crankshaft sensor wires, and finally it started working =)) thank you!” it's like swapping the wires... there was a forum (VAZ 2110 does not start when hot)))
Chege
The music in the background is of course fire!! Handsome! That's all I wanted to say.
leave a comment
Additional fuses for Daewoo Nexia
Nexia owners often equip their car with additional electrical equipment that is not installed as standard. When properly installed and connected, such devices are protected by additional fuses and relays directly in their electrical wiring.
So, for additional lighting devices and DRLs, the fuses are typically located in the engine compartment or under the dashboard. The electrical components of the seat heating system are most often located in the passenger compartment and to access them you need to disassemble the lower part of the center console or remove the tunnel lining in the area of the gearshift lever.
It should be remembered that connecting a large number of additional energy consumers can negatively affect battery charging and the operation of the machine's electrical system.
Fuse box in Nexia
Fuses on Nexia are responsible for the safety of electrical appliances. When a short circuit occurs, the fuse burns out first, thereby protecting the electrical appliance. The fuse box diagram for Nexia 8kl and 16kl are identical and for Nexia n100 and n150 the blocks are also interchangeable. Every self-respecting motorist should have such a diagram at hand. Also, replacing fuses should be done with the engine turned off. The Nexia has a double fuse box; the main fuses and relays are located on the outer visible side, and the remaining relays are located on the reverse side.
To differentiate between each other, fuses come in several colors. Each color has an amp rating.
Red – 10 Amps Blue – 15 Amps Yellow – 20 Amps Green – 30 Amps
Is it possible to repair the solenoid relay?
On older modifications of starters, this was possible. After clicks appear, simply remove the relay and disassemble it. There is a contact pad inside, usually a plate and two contacts. Oxides can form between them, as well as plastic film from a long start-up. We need to clean this part and performance will be restored.
Watch this helpful video.
HOWEVER. New modifications of the relay are NOT SEPARABLE. They cannot be easily disassembled (without destroying the case) and cleaned. Often a replacement is needed. YES, they break down once every 120 - 150,000 km (and maybe less often) and replacing them is not that expensive.
How to check the functionality of the pump?
If the engine is absolutely “dead”, follow this algorithm:
- Turn on the ignition without turning the starter. A working electric fuel pump should respond with a quiet but distinct buzzing sound coming from the rear row of seats. If there is no sound, go to the next step.
- Using the car's operating instructions, find the number of the fuse that protects the pump's power circuit. Try replacing it; if unsuccessful, check the wiring and clean the contacts from oxides.
- If previous manipulations did not produce results, you need to measure the fuel pressure in the fuel rail.
Fuse and relay box Daewoo Nexia N100
Fuse links, fuses and relays for turning on the vehicle's electrical equipment are installed in a block located on the left behind the instrument panel.
| Fuse color | Maximum current, A |
| Grey | 2 |
| Light brown | 5 |
| Brown | 7,5 |
| Red | 10 |
| Light blue | 15 |
| Yellow | 20 |
| Light green | 30 |
| Orange | 40 |
Part of the fuse and relay box covered by the instrument panel cover
| Relays and the circuits they turn on | |
| № | Switched circuits |
| 1 | Relay-breaker for direction indicators and hazard warning lights |
| 2 | Cooling fan (high speed) |
| 3 | Fuel pump |
| 4 | Fog lights |
| Fuses and the circuits they protect | |||
| № | Current, A | Protected Circuits | |
| F1 | ESM | 10 | Electronic engine control unit |
| F2 | ILLUMINATION | 10 | Side lighting |
| F3 | ECM2 | — | Reserve |
| F4 | HEAD LAMP H/BEAM | 20 | High beam headlights |
| F5 | H/LAMP LH L/BEAM | 10 | Low beam and electric corrector (left headlight) |
| F6 | H/LAMP RH L/BEAM | 10 | Low beam and electric corrector (right headlight) |
| F7 | FUEL PUMP | 30 | Fuel pump, injectors |
| F8 | HAZARD LIGHT | 20 | Turn signals (hazard warning lights), brake signals |
| F9 | WIPER | 30 | Windshield wiper and washer |
| F10 | FUEL DOOR | 10 | Electric drive of the fuel tank filler hatch cover |
| F11 | AIRCON | 10 | Air conditioning compressor relay |
| F12 | BLOWER MOTOR (LOW) | 30 | Cooling fan (low speed) |
| F13 | CLUSTER CIGAR CHIME | 20 | Instrument panel, digital clock, cigarette lighter, buzzer, reversing lights, generator, rear window defroster |
| F14 | HORN BLOWER MOTOR (HIGH) | 30 | Horn, electric cooling fan (high speed) |
| F15 | ROOM LAMP ANT | 20 | Interior and luggage compartment lighting, electric antenna drive |
| F16 | POWER WINDOW | 30 | Electric windows |
| F17 | AUDIO (IGN) | 10 | Car radio (powered by ignition switch) |
| F18 | AUTO TRUNK DOOR LOCK AUDIO (WATT) | 30 | Car radio (battery powered), electric rear window defroster, electric trunk lid lock, central locking |
Bottom of fuse and relay box
| Relays and the circuits they turn on | |
| № | Switched circuits |
| 5 | Air conditioning fan (maximum speed) |
| 6 | Intermittent wiper mode |
| 7 | Heated rear window (with automatic shut-off function) |
| 8 | Low beam headlights (when high beam lamps are turned on) |
| 9 | Sound signal |
| 10 | Air conditioning compressor |
| 11 | Electric cooling fan (low speed) |
| 12 | Headlights |
| 13 | Outdoor Lighting |
| 14 | Buzzer |
| Fuses and the circuits they protect | ||
| № | Current, A | Protected Circuits |
| F19 | 30 | Air conditioning fan |
| F20 | 30 | Fog lights |
Replacing fuses and relays
Sequence of execution 1. Prepare the car for work.
2. Remove the instrument panel cover.
3. Using the diagram on the back of the cover and the tables (see above), we find the fuse for the faulty circuit and remove it.
A faulty fuse can be identified by a blown thread.
4. Install a new fuse of the appropriate rating.
5. To replace the relay, remove it from the block, having previously identified the faulty one from the table (see above).
6. Reinstall the block cover.
The information is relevant for Daewoo Nexia models 1994, 1993, 1994, 1995, 1996, 1997, 1998, 1999, 2000, 2001, 2002, 2003, 2004, 2005, 2006, 2007, 2008.
Location and electrical diagram
The diagram of all electrical equipment in Daewoo Nexia cars 8 valves in the body of N100 and N150 1997, 1998, 2004, 2005, 2006, 2007, 2008, 2010, 2011 and 2012 is powered by a 12-volt battery. Connecting devices and devices in these cars follows the same principle. The negative terminals of electrical equipment are connected to ground, that is, to ground or the car body.
The devices are powered from two voltage sources:
- From the battery if the engine is not running and the ignition is on. Activation of the latter is not necessary if the equipment is connected to the battery not through the ignition switch, but directly.
- From the generator unit when the engine is running. When the power unit is started, the generator also recharges the battery, which allows you to replenish the previously used battery charge.
As for the location, in Daewoo Nexia 100 and 150 2005 and other years of production, the fuse box is installed in the lower part of the center console. It can be seen to the left of the control panel. Regardless of the year of manufacture and the body in which the vehicle is made, the position and placement of the mounting blocks, as well as their characteristics and the purpose of the parts are the same. The only difference lies in gaining access to these devices due to some design features of the center console.
Explanation of fuses
Fuse installation diagram
Let's move on to a description of safety components.
| # | Purpose |
| F1 | Designed to protect the electrical circuits of the control module. This part is considered one of the main ones, since the protection of the power unit control unit is assigned to it. If it burns out, problems with starting the engine may occur; the ECM system will not be able to fully perform all the functions assigned to it. |
| F2 | Protecting the circuits of the side light system in the car |
| F3 | The reserve element can be used when installing additional devices and equipment |
| F4 | Protects electrical circuits of high beam optics |
| F5 | Used to provide protection for the low beam optics, as well as the electric control for the left headlamp. If it breaks, the corrector will not work |
| F6 | This fuse also protects the low beam lighting in the car. He is responsible for the operation of the electric control of the right headlight |
| F7 | Fuel pump fuse. A malfunction of this part will lead to difficulties in starting the engine, and starting the engine will be impossible. Part replacement is required to ensure normal operation of the unit. In addition to the fuel pump, the fuse is used to protect the electrical circuits of the injectors |
| F8 | Safety device f8 protects the turn signal and brake light circuits. The failure of the part will result in the driver not being able to warn other motorists about the maneuver he plans to perform, which can lead to an emergency situation. It will not be possible to activate the light alarm. Driving a car with broken brake lights is dangerous. |
| F9 | The electrical circuits of the windshield cleaning and washing systems are assigned to this fuse. If the part breaks, the driver will not be able to supply water from the expansion tank to the glass, as well as activate the wiper blades |
| F10 | Used to protect the electrical wiring of the fuel filler cap |
| F11 | Ensures the functionality of the air conditioner compressor relay. Installed only on vehicles equipped with an air conditioning system |
| F12 | This fuse protects the electric cooling fan. Failure of a part can lead to overheating of the power unit, since the operation of the fan will be disrupted |
| F13 | Fuse f13 is used to protect several components of the electrical circuit at once. We are talking about the dashboard, digital clock in the center console, cigarette lighter, buzzer. The device also protects the circuits of the reversing headlights, which are activated when the corresponding gear is engaged, the generator unit, as well as the rear window heating system. Failure of a part will lead to the failure of a piece of electrical equipment immediately. The performance of the generator is especially important for the circuit. |
| F14 | This part protects the circuits of the steering horn and the electric fan of the cooling system. We are talking about an increased speed device, which is activated in case of emergency overheating of the internal combustion engine. |
| F15 | Used to ensure the functionality of lighting sources in the cabin and luggage compartment, as well as the electric drive of the antenna |
| F16 | This fuse protects the wiring through which the power windows are connected to the battery. If these elements are manual, then the nest remains free |
| F17 | Protection of the audio system connected through the ignition switch. Failure of a part will result in the inability to use the radio. |
| F18 | This component also protects the audio system only if it is connected directly to the battery. In addition, the fuse protects the rear window heating system, central locking and tailgate opener. |
| F19 | Overvoltage protection of the circuit section responsible for the operation of the stove |
| F20 | Anti-fog optics |
User Denis West in his video talked about how to solve the problem in Nexia if the backlight on the instrument panel has gone out.
Relay type and purpose
In Daewoo Nexia 8 and 16 valves, there are also relays in the safety block. Read about their purpose below.
| № | Purpose |
| K1 | Power unit cooling system fan. This element, like fuse f14, helps prevent failure of the ventilation device. Otherwise, the motor may overheat |
| K2 | This relay is assigned to protect the light sources installed in the headlights. If the turn signal is broken, it will be impossible to operate, as will the light alarm. |
| K3 | Used to protect the electrical circuit section of the fuel pump. If the engine cannot be started, the battery is charged and the starter turns normally, you need to check the functionality of the part |
| K4 | This relay is assigned to protect the front and rear fog lights. |
| K5 | Side lights and fog lights |
| K6 | The electrical circuits of the headlight lighting sources are attached to this part. Operation of low and high beam headlights is possible only if this relay is operational |
| K7 | Also responsible for the operation of the cooling system ventilation device. Relay failure will lead to overheating of the power unit |
| K8 | Air conditioning compressor clutch. If problems appear in the operation of the air conditioning system, the unit does not effectively cool the interior of the car or does not turn on at all, you need to check the functionality of the K8 relay |
| K9 | Responsible for the functionality of the horn |
| K10 | The part is assigned to protect the light sources of the headlights |
| K11 | Used to protect against overvoltage the section of the circuit to which the device emitting a melodic signal is connected. We are talking about sounds that indicate the optics are on when the doors are opened and seat belts are not fastened. Not all units are equipped with such a relay, only the corresponding configuration |
| K12 | The part is secured with protection for the fourth speed of the stove ventilation device. A failure of the relay will lead to the fact that in severe frost the heating system will not be able to properly warm up the interior of the car. |
| K13 | Responsible for the functioning of the ignition system. If the device breaks down, you will not be able to start the engine. |
| K14 | This relay is assigned to protect the electrical circuits of the windshield cleaning system. If the wiper blades and washer system are damaged, they will not work. |
| K15 | Responsible for the functionality of the rear window defroster timer |
Difference between Nexia N100 and N150
There are no differences in the fuse blocks in cars with N100 and N150 bodies. All elements in the devices are located absolutely identically and have the same purpose.
User Expert R spoke in his video about how to solve the problem with safety devices if the cooling fan does not turn on.
Daewoo Nexia does not turn the starter
The Daewoo Nexia often encounters engine failure. The good news is that any breakdown can be fixed independently and quickly.
It is important to look for the reasons correctly. Intensive use of the car leads to malfunctions of some mechanisms and components
If you cannot start your car, Daewoo Nexia, the starter does not turn or you hear sounds, then repairs may be required. The unit is responsible for turning on the engine, and if a breakdown occurs, the car cannot move. The task of every motorist is to constantly monitor the operation of mechanisms and components and perform timely maintenance.
How to remove the starter on a Daewoo Nexia
Renault Megane 2 phase 2,1. So if you do not have the relevant experience, in the event of a breakdown, you can safely contact specialized auto repair shops, where they will quickly and inexpensively solve a similar problem. Where is the cabin filter located on the Kia Sportage? Kia Sportage - Where is the cabin filter located?
And how to replace the cabin filter on a Kia Sportage.
How to find a cabin filter on a Kia Sportage? How to Remove the Kia Spectra Starter How to Remove the Kia Spectra Starter Kia Spectra Removal Installation Disassembling the Starter The starter is located on the clutch housing on the rear side of the power unit.
In order to somehow loosen the brake mechanism and remove the drum, I had to cut off the parking brake cable! After which, we still managed to knock down the brake drum without breaking it into pieces. The drum has somehow become unusable! Where is the starter located on the daewoo nexia, I had to remove the entire brake mechanism and turn off the brake cylinder, unscrew the line from it and put a small piece of rubber in the cylinder and screw the line back on!
This method allows you to temporarily use the car without losing brake fluid in order to get to the repair site.
As a result of the completion of the repair work, the following were replaced: In this case, the throttle system or idle air control of the Daewoo Nexia may be clogged. Otherwise, you need to check the spark plugs and armor wires.
We will be glad to see your likes and comments Subscribe to the channel Our group: The starter is turned on, but the armature does not rotate and the flywheel does not work? The problem can be solved by replacing the clutch, drive or flywheel, depending on the breakdown. If it seems that when you turn on the starter where the starter is located on the daewoo nexia there is excessive noise, then perhaps the whole reason is excessive wear of the bearings, which will only need to be changed.
It is possible that only the teeth of the drive gear or flywheel are damaged; replacement will suffice.
Checking the fuel pump
The operation of a mechanical fuel pump is checked by disconnecting the hose from the manual pumping outlet, after which the lever on the pump pumps fuel, which, if there are no breakdowns, should be supplied in a stream in time with the movement. During the procedure, place a rag under the pipe to prevent gasoline from spilling in the engine compartment.
Checking for faults in the electric fuel pump is carried out in the following ways:
Checking the filter on the electric fuel pump
1. Check the filter. Most often, problems with the operation of the device arise when the coarse filter is clogged, which is characterized by the appearance of the following symptoms:
- Decrease in engine power;
- Weak traction at high speeds;
- Difficulty starting the engine;
- Unstable operation at idle and low speeds.
Checking the fuel rail pressure
2. Checking the pressure in the fuel line, based on the results of which you can more accurately determine the problem with the pump:
- At idle speed the pressure should be 0.23-0.25 kPa;
- When starting the engine, the pressure should reach 0.3 kPa;
- In transition mode – 0.28-0.3 kPa.
If in transition mode the pump does not produce the required pressure, then there is a high probability of clogging of the coarse filter mesh. If the pressure in the fuel line when the return pipe is pinched does not reach 0.4 kPa, this means that the degree of wear on the pump is quite high.
3. Check the pump for mechanical damage. If the pump mechanism is significantly worn or dirt gets into it, a characteristic noise will be heard. When the ignition is turned on, the fuel pump works, but with obvious signs of a malfunction of the mechanism.
Good to know…
How to completely or partially change the daewoo nexia and matiz ignition switch (cylinder, contact group)? If you want to save money and buy only the cylinder itself, and at the same time have only one key left, then there is another option that is useful to know about. It will consist in the interchangeability of secrets between the old and new ignition lock cylinder.
- Turn the cylinder, or rather its inner part, until the lock stops, press it with a screwdriver and disengage it. Be very careful when performing this procedure as the retainer and spring may come loose and become lost. There is also a locking tab on the opposite side of the larva; you should also keep an eye on it and protect it from loss.
- By analogy, it is necessary to take the same actions with a new larva.
- Compare the sizes of the secrets with each other.
- If the secrets are the same, you can start replacing them. Change each secret in turn and make sure not to confuse the location of each of them; if the position of at least one is incorrect, the cylinder key will no longer turn.
- If the secretions of the new larva differ in size, then you will have to replace it using one of the methods described earlier.