Constant undercharging of the battery or its absolute discharge at the most inopportune moment is a headache for many car owners. One source of these problems may be the generator. But how to check it? Perhaps it's not his fault at all? Let's figure out together how much the generator must produce for the normal functioning of all car systems and maintaining the battery in a charged state.
How to check the operation of the generator
The battery in a car is an important element of the system, which is responsible for providing the car’s on-board network with electricity. The generator is used to charge the battery while it is active. Unstable operation of a device generating electricity causes a voltage drop in the network and failure to restore the capacity of the power source.
Normal generator performance means timely and complete replenishment of the battery charge level, which decreases under load. Checking the battery charge level from the generator is simple and can be done by the car owner himself.
Diagnostics of an automotive energy-generating device includes a visual inspection of the unit, its elements and related parts, as well as voltage and current measurements. At least twice a year, you should check the tension of the drive belt, excessive weakening of which leads to a decrease in the performance of the generator, and sometimes can lead to breakdown of the device. Once a year, you can check equipment elements - fasteners, diode bridge, voltage regulator and others. Timely maintenance of the battery will also guarantee the absence of problems - cleaning the terminals, adding distilled water.
Diagnostics of indicators such as voltage, current, resistance are also necessary twice a year. To carry it out, you will need special devices - a voltmeter, multimeter or load fork.
Diode in the circuit
ATTENTION! A completely simple way to reduce fuel consumption has been found! Don't believe me? An auto mechanic with 15 years of experience also didn’t believe it until he tried it. And now he saves 35,000 rubles a year on gasoline! Read more"
Installing a diode with a toggle switch is the easiest way to increase the voltage. There is no need to bother, look for a lot of information in books, etc. Everything is as accessible as possible, no special difficulties.
This option of increasing the voltage, despite its simplicity, gives the most reliable result. Ideally suited for domestic and VAZ car models.
The purpose of this method of increasing the voltage in the vehicle's on-board network is to deceive the regulator, which is located inside the generator. As you know, on old domestic car models (kopek, VAZ 2105, etc.) the voltage drop sometimes reaches critical values - sometimes it drops to 12.5 volts. The battery, of course, will not be charged at this voltage.
A voltage regulator is the same brushes, a tablet, a chocolate bar - there are many names, but it is the same element that is responsible for regulating the voltage in the generator. On our domestic cars, mostly older ones, the tablets are of poor quality. They do not regulate voltage well, and as mentioned above, sometimes the current value drops below the baseboard.
So, what you need to do is insert an additional diode into the circuit. By this we will achieve the following: by how much the voltage on the diode is reduced, the regulator will increase the total current in the circuit.
There are several ways to integrate a diode. One of the best - remotely. Take a simple toggle switch and install it somewhere convenient.
Obviously, the toggle switch should be routed through the wire to the generator. You can insert the diode into the slot in the generator bridge, in the place where the wiring runs from the excitation winding to the regulator. That is, we simply insert the diode into the wiring between the bridge and the regulator.
We connect a separate toggle switch to the diode through two wires, as shown in the photo below.
When the voltage in the on-board network is sufficient, for example, in the summer, the diode is simply installed and not used. If the current is low, just turn on the toggle switch by activating the diode. In this way, we deceive the regulator.
What kind of charging should go to the battery from the generator?
It is traditionally believed that 13.5-14.5V should be supplied by the generator to the battery and this is absolutely enough to replenish the battery costs.
It is worth considering that using a battery with a higher power in a car than the manufacturer recommends also requires the installation of a more productive generating device.
It is necessary to take into account the load that the generator must withstand - it is calculated based on the maximum indicators of all electrical appliances and car systems.
Do not forget that the charging current from the energy-generating device will allow you to start the car in the cold season. In order to avoid problems with starting the car, we recommend purchasing generating equipment, the charge current of which will be approximately 10% of the capacity of the power source. That is, a battery of 100 A/h requires a generator that can produce 10A. Please note that for many cars, 100 amp equipment will operate at its maximum capacity, because the power consumption of the automotive system is in the region of 80 amps. Therefore, the choice of a source generating energy must take into account both the battery capacity and network consumption.
What battery should I use?
If you plan to install a 115A generator, you will need a 75Ah battery. The best solution would be to buy a 120 A device and an 80 Ah battery. But if the number of devices in the cabin is outside the permissible range, you can set 150. In this case, the battery must be rated at 90 ampere-hours.
Does the battery overheat if it has more capacity than a standard alternator can produce? Absolutely not. The only problem is that the factory generator will need more power. As a result, the winding may heat up and damage the paint and varnish insulation. It is worth remembering that as the current load increases, the load on the belt and, accordingly, on the rotor shaft, tensioner roller and pump increases.
How to check the alternator voltage on the battery
The potential difference can be diagnosed in two ways - directly at the generating equipment and through the battery. The generator is directly connected to the power source with a thick wire, therefore, to check the level of potential difference, you can measure the voltage at the power source. To do this, you will need special devices - a voltmeter, multimeter or load plug.
The wires of the first measuring instruments are connected to the battery in any sequence. The plug must be connected to the battery terminals with strict observance of polarity. It is generally accepted that the normal voltage in the network should not be lower than 12 volts. At idle speed without turning on all the electrical appliances of the car, this indicator should be at the level of 13.5-14V. A drop in voltage values to 13.3-13.8 volts is considered acceptable.
At the same time, using conventional testing equipment, you can check the resistance of the generator elements - rotor, stator and diode bridge. Diagnostics of rotary equipment is carried out by its winding. It is necessary to connect the probes of the device with slip rings. If the multimeter gives readings from 2, 3 to 5.1 ohms, then this element is working. The current consumption of the winding should be within 3-4.5 amperes.
Its normal resistance is 0.2 Ohm. The diode bridge is checked by the presence or absence of resistance, the indicators do not matter. The only thing worth considering is that there should not be a zero dimension. Measurements are carried out in pairs - positive output and all plates on this side or minus and all elements.
We remind you that for normal charging of a car battery, the voltage supplied by the generator must be from 13.5 to 14 volts.
Weak charging gazelle 402 engine
I glanced briefly at the voltmeter on the instrument panel, but it was in the negative and did not respond to an increase in the speed of the engine, I thought: the belts had come off again (my crankshaft pulley beats in a figure of eight, this happens), so I thought that the pump was not spinning either. I made it home; there were only 150 meters left. I looked - the belts are in place, the generator is turning but there is no voltage. Lately it has been stuck to me not at 3 points, but at two, due to the loss of a fastening bolt in the lower far eye, as a result of which it wobbles quite badly at idle in relation to the engine. Well, apparently something shook in him. In 15 minutes I changed the relay regulator, which is located in the engine compartment on the wing. No changes. I went to dig the Internet and forum.
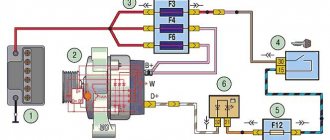
Below is a diagram of checking the charging system on the 402 engine.
Malfunctions of the charging system of group 1-2 GAZ-2410, 3102, -029, -10, 3302 with the ZMZ-402 engine
1. broken contact in the wire from the battery terminal to the power fuse block near the battery - the battery will not charge, but the voltage from the generator will remain for other consumers, the voltmeter will show the voltage of the on-board network
2. the fuse in the battery charging circuit has blown - the battery will not charge, but at the same time the voltage from the generator will remain for other consumers, the voltmeter will show the voltage of the on-board network
3. the contact in the wire from the generator to the power fuse block is broken - the battery will not charge and the voltage in the on-board network will be determined by the battery voltage, the voltmeter will show the battery voltage
4. the contact is broken in the wire that supplies “+” from the ignition switch to the relay-regulator and one of the generator brushes. There will be no charging, the voltmeter will show the battery voltage
5. The contact in the wire from the second brush of the generator to terminal “Ш” of the relay regulator is broken. Charging will not occur, the voltmeter will show battery voltage
6. The relay-regulator has failed - break. Charging will not occur, the voltmeter will show battery voltage
7. there is no electrical contact with the brushes in the brush assembly or brush holder. Charging will not occur, the voltmeter will show battery voltage
8. There is no contact between the brushes and the slip rings on the armature. Charging will not occur, the voltmeter will show battery voltage
9. break in the rotor winding. Charging will not occur, the voltmeter will show battery voltage
10. break in at least one of the phases of the stator winding. Charging will not occur, the voltmeter will show battery voltage
11. At least one of the rectifier unit diodes has failed. Charging will not occur, the voltmeter will show battery voltage
How to check (a control or a tester with a DC voltage measuring scale of at least 15 V can be used to check):
1, 2, 3. control: one end to the battery minus, the other to the wire terminal on the power fuse block - the control should be on, then to the terminal after the power fuse and, finally, to the terminal of the generator with the tester nut: negative terminal of the tester to negative battery, the positive terminal of the tester to the wire terminal on the power fuse block - the tester should show battery voltage, then to the terminal after the power fuse - the tester should show battery voltage and, finally, to the generator terminal with the nut - the tester should show battery voltage
4. disconnect the block from the generator brush holder and the block from the relay regulator, turn on the ignition. Control: one terminal to ground, the second to each of the blocks for each of the two wires. On one of them in each block the control light should light up. We insert the block on the generator into place and check for the presence of “+” on the second terminal in the relay-regulator block. The control should light up, but not at full intensity. This means that faults 5, 7, 8 and 9 are absent. After this, we disconnect the block from the generator again and connect the relay-regulator block. We switch the control with one terminal to “+”, and connect the second terminal to the second terminal of the generator block. The control should light up. This almost certainly means the absence of fault 6 and the complete absence of fault 5. Tester: the negative terminal of the tester is to ground, with the positive terminal of the tester we check for the presence of “+” on one of the wires in each block - the tester should show battery voltage. We insert the block on the generator into place and check for the presence of “+” on the second terminal in the relay-regulator block. The tester should show a voltage slightly lower than the battery voltage. This is explained by the voltage drop across the resistance of the rotor winding. This means that faults 7, 8 and 9 are absent. After this, we disconnect the block from the generator again and connect the relay-regulator block. We disconnect the negative terminal of the tester from ground, connect the positive terminal to the “+” of the battery, and connect the negative terminal of the tester to the second terminal of the generator block. The tester should show the battery voltage. This almost certainly means no fault 6 and no fault 5 at all.
5. The main check is only with a tester: remove the blocks from the relay-regulator and the generator and “ring” the terminals of the blocks among themselves. The test is carried out in resistance measurement mode, the measurement limit is units of ohms. On both wires of the blocks in the corresponding pairs of terminals, the tester should show zero or the resistance of its measuring probes.
6. On the body of the relay-regulator, as a rule, there are the designations “+” and “Ш”. “+” is the power supply to the relay when the ignition is turned on, “W” is the terminal to which the wire comes from the second brush of the generator and which is connected to ground by the relay circuit. With the engine running, disconnect the block from the relay and use a piece of wire to connect terminal “W” of the block to ground. In this case, there should be a fairly powerful spark and the generator should begin to hum or “howl”. This means the relay has failed.
7. Disconnect the block from the generator brush holder and remove the brush holder. Using the control, we do the following: we connect one control terminal to the “-” battery, the second control terminal to one of the terminals of the brush assembly, then we close the battery terminal corresponding to the brush terminal to the “+” terminal. The control should light up. If the control does not light up, you can use a soldering iron to change the faulty brush or replace the entire brush assembly.
8. check: disconnect the block from the relay-regulator, turn on the ignition, connect the control with one terminal to ground, and with the second terminal, check for the presence of “+” on both terminals of the relay block. On one terminal, the control should burn at full intensity - this is a full “+” from the ignition switch, and on the second terminal, the control should burn less brightly - due to the voltage drop on the rotor winding of the generator. If the control light is on only on one of the terminals, then you need to remove the brush assembly, check it at the same time, and clean the slip rings in the generator with fine sandpaper. After this, reinstall the brush assembly and check again for the presence of “+” on both terminals of the relay block.
9. checked by a tester. A resistance measurement scale is set, the measurement limit is up to 10 Ohms, but more than 2 Ohms. The brush assembly is removed and the resistance of the rotor winding is measured using tester probes. It should be approximately 2.5-3 Ohms plus the possible resistance of the tester probes themselves.
Malfunctions 10 and 11 can be checked and corrected only after removing and opening the generator
All other faults are identical to those described for group 1-1. With the exception of the battery charge/discharge indicator lamp due to its absence in the circuit.
An express check of the generator operation is described in paragraph 6.
_______________________________________________________________________________________ All tests were passed successfully, the problem is most likely in the generator itself, and this is:
1. The diode bridge burned out.
2. Break in the rotor or stator winding. 3. Non-contact in the brush assembly. I'm removing the generator. I test it at home on the table using the video:
Does not work. Disassembled. 2 diodes burned out, the ones soldered into the positive plate of the diode bridge. Also, all diodes were sealed off from the positive plate, including the 3rd one, which turned out to be working. And tin is splashed across the generator cover. I’m buying a new bridge and brush assembly, I’ll write about the results later))
The Volga and Gazelle were equipped with the ZMZ 402 engine.
For this version of the car, a generator of type 16 KZATE or 19 ATE1 (Eltra) was used
These generators were completely interchangeable. They were identical in design and allowed the mutual use of parts for repairs.
For Volga engines, generators were equipped with a double-row pulley, for Gazelles - with a single-row pulley. For cars produced in the first half of the 90s, an alternating voltage output from the generator phase was used to operate the tachometer. In subsequent models, the tachometer received a signal from the ignition system, and the generator phase output was no longer needed; if the generator has one, it is simply not connected.
The generator has a traditional circuit. Winding, rotor, diode bridge, brush assembly. The voltage regulator type 13.3702 (131.3702) is separate and connected to the generator by wires.
How many amperes does a car alternator produce per battery?
The current strength required by the electrical system of each car is individual and depends on the number of electricity consumers and their values. And also the charge current must be sufficient to charge the power source.
It is worth noting that ampere readings appear only when there is a load in the vehicle’s electrical system and, accordingly, the battery is discharged. After starting the car engine, the charging current is about 6-10 amperes and drops over time, because the battery is charging, taking on the main energy consumption. If you turn on additional equipment - headlights, radio or heated mirrors, you can see an increase in the charging current values.
When purchasing a generator, pay attention to its technical characteristics, which the manufacturer indicates on the case - that’s where you will find information about the maximum current that will flow to the battery.
In the table below you can see the approximate current values that the generator shows at different loads.
Table 1. How many amperes the generator produces under load.
Replacing the old instrument cluster with a new one
Many car owners of a gazelle or Volga car with an old-style instrument panel strive to change it to a new-style instrument panel, in which most of the indicators have been replaced with modern LED ones, and such an instrument panel looks much prettier and brighter.
So, to remove the instrument cluster, first remove the trim by unscrewing the four screws. Then remove the four screws securing the combination; disconnect the electrical connectors and remove the instrument cluster. Repair the instrument cluster by block replacement of faulty devices. To replace devices, remove the protective glass and unscrew the nuts securing the faulty device on the reverse side.
Signs of a generator malfunction
In modern cars, breakdowns of the electrical system are one of the most common. A large number of electronics requires particularly careful monitoring of the operation and condition of the generator and battery, because their failure can immobilize the car. The most common signs of a generator malfunction are:
- battery indicator light on the instrument panel;
- unstable operation of the battery (its boiling over or undercharging);
- different intensity of headlights;
- extraneous sounds from the generator.
ZMZ 405 Euro 3 No Charging Generator Repair - Download 3 for free
Detailed instructions If the battery charge is weak and nothing really helps, then maybe it’s worth replacing the diode bridge? Initially, you need to start with the concept of a diode bridge. It is an electronic circuit made of diodes assembled in a chain. It converts the outgoing alternating current into direct current. It is worth noting that a non-working or incorrectly functioning diode bridge is the main reason for the failure of the generator and car battery.
Moreover, if this bridge breaks down, it becomes a strong consumer of battery charge and can easily discharge it during the night. However, the diode bridge can also work in the opposite direction and supply a high current to the battery, thereby overcharging it, and as a result, there will be serious faults in the electrical circuit.
If we look more deeply into the principle of operation, we can say this: The main reason for the failure of a diode device is oxidation of contacts, poor contact and moisture ingress.
The battery charging light is on. What is it?
The battery light is on - causes and troubleshooting Each of you has probably noticed a red box on the instrument panel indicating the battery. We all know that it lights up when you turn the key in the ignition and goes out when the engine starts. The same is with the battery, when it is ok, the indicator goes out, in case of problems with the battery, the battery lamp lights up. A few words about how the battery-generator tandem works. Everyone, even a novice driver, knows that the battery interacts with the generator.
After starting the engine, the battery goes into constant charging mode.
Gazelle Sable. Removing and disassembling the generator The generator (BATE) is installed on ZMZ, ; from the generator.
It starts up in the morning, the headlights shine, warmth blows from the “stove” - and thank God! And once every few years, the battery can be replaced with a new one, without even delving into the reasons for its failure. Problems begin when the battery suddenly loses power. The magazine has talked more than once about how and where to look for it. But if trouble strikes you on the road, you first need to get home. How long will the battery last if there is no recharge?
This is what we set out to find out.
Posted on April 04 — In the summer I discovered that the voltage on the car was weak and when preparing the car for a long journey and summer vacation, I installed an Energomashevsky regulator on the car on the advice of forum members! The charge has increased a little since I went and I was happy! But in winter there was not enough charge and by spring the charge dropped to 12 and even lower!
I kept putting off the repair for a month or two - the weather was crap - it was hard to climb into the car in the cold and swearing when I carried the battery home to recharge - I didn’t turn on the lights and the stove unnecessarily - somehow it allowed me to make ends meet!
11) Boiling of the electrolyte in the battery can be caused not only. what is located next to the battery on a Gazelle, for example: undercharging of the battery (despite the fact that 50) If you notice that the generator cannot cope with charging the battery at . 80) Good news for those involved in the auto repair business.
Advice from an experienced car mechanic for dummies with a screwdriver Car equipment is a serious matter and repairing this system requires considerable experience and responsibility from the master. Therefore, the automotive site “Avtomaster” will give you some advice. A barely visible hair should be visible, like standard wires, or a black silicone cord. The use of such wires in a contact ignition system leads to an unacceptable weakening of the spark. The result is difficulty starting the engine in winter.
Other causes of low voltage
A small potential difference in the system is not always associated with a breakdown of the generator or a bad battery. If the diagnosis of these elements does not reveal any problems, then you should pay attention to the following:
- condition of the battery terminals - connection density and oxidation;
- electrical wiring problems - oxidation, violation of its integrity;
- output contacts to electrical appliances;
- correctly selected energy consumers.
Each contact must be tightly adjacent and intact, that is, there must be no formations (for example, sulfation) that will disrupt the flow of current. Incorrect connection of contacts leads to accelerated battery discharge even when the car is not running.
To improve the connection of the elements of the car's electrical system, it is necessary to clean all contacts and restore the integrity of the wires by replacing them or connecting them and wrapping them with insulating tape.
In conclusion, I would like to repeat that stable operation of the car requires constant monitoring of all elements, and the generator should attract special attention. The battery is charged from it and provides electricity to the entire car system. Pay attention to all elements: generator brushes, slip rings, voltage regulator, equipment winding.
The most correct measurements should be carried out when the battery is fully charged and in various modes. Remember that the manufacturer links the characteristics of the generator to the number of engine revolutions - they help produce a certain current.
Detailed video on how to check the generator:
Do you have experience diagnosing an alternator and solving problems in a vehicle's electrical system? Please share your experience and opinion with our readers in the comments. If you have questions about the topics covered, we will be happy to answer them.
For correct operation of the car, it is necessary to regularly check the functionality of the car generator. If this unit fails, the battery will no longer receive main power. This state of affairs (when the car is “powered” only by the battery) leads to a rapid loss of power to the entire car.
Timely monitoring of the technical condition of the electrical source will allow you to avoid accidental failure of the element, saving your money and mental strength.
The breakdown of the power unit generating current is determined by one of the following signs:
The light on the dashboard is constantly on (signal of insufficient current);
The battery constantly runs out;
electrical equipment malfunctions or does not work at all when the engine is turned on;
burning smell from the engine compartment;
The NODE makes uncharacteristic sounds (for example, rustling).
Generator device
The pulley transmits energy from the motor to the shaft using a belt.
Covers on the housing are needed to accommodate the rotor supports, install the unit on the motor and secure the stator. The back cover is needed for the brush assembly and outputs for powering electrical equipment. The stator produces power through a three-phase winding. The rotor is a steel shaft with two bushings. The terminals of this winding are connected to copper rings. The regulator stabilizes the voltage under various factors:
rotor speed delta;
temperature changes in nature.
The brush assembly is a plastic element with brushes attached to it that interact with the rotor rings. The electric generator also includes six diodes (three in “-” and three in “+” heat sinks).
Reasons for failure
If the symptoms described below appear, carry out diagnostics. You can do it yourself or take the car to a car service. To determine the cause of the failure, special equipment is needed. If you decide to figure it out yourself, master a multimeter tester.
Five possible sources of difficulty are described below:
bearing wedge (lubricant is used up, sometimes the belt breaks - you will need to replace or rebuild the unit);
the winding has burned out (a common cause is the reagents used to treat winter roads);
brush wedge (cause - wear of graphite cores);
the regulator relay is faulty (this element prevents the battery from overcharging and stabilizes the voltage);
The diode bridge is broken.
Generator check
The main sign of a malfunctioning energy source is interruptions in U (voltage). In this case, check the functionality of the system and figure out how much the car’s generator transmits to charge the battery.
When testing, follow the advice of experienced car owners:
check whether the fasteners are connected correctly;
check the quality of the belt tension;
valves should indicate a current of 12 Volts (V) and below;
When changing wiring, observe the cross-section diameter (the original and new ones ideally match).
If the element in question has received significant mechanical damage, we recommend entrusting its analysis to experienced auto repair shop employees.
How long should the generator charge? The algorithm for working with a multimeter looks like this: measure U at the battery terminals with the engine not running (the norm is 12.5-12.7 V). Start only the engine and repeat the measurement without load “at idle”. How many volts are supplied to excite the generator? “Healthy” indicators are from 13.8 V to 14.5 V (with a current strength of 80 to 140 Amperes).
The next step is to give maximum load by connecting additional equipment (headlights, radio, heated windows, etc.). With a working unit, the values under load will be from 13.7 V to 14 V. A value below 13 V is considered critical.
If you don’t have a multimeter, there is another way to diagnose at idle speed: turn on the engine, load it a little (for example, with the headlights on), remove the “-” terminal from the battery (you need a 10 key). The car, like the headlights, works stably - EVERYTHING is in order. If the car stalls or the headlights are dim, you need to further understand the issue.
How to disassemble?
This procedure is quite simple. This operation requires a minimum of tools and an hour of free time. The procedure is carried out in several stages. On the right you need to turn off the ignition and remove the terminals from the battery.
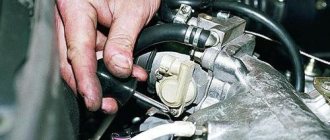
It is also necessary to remove the wires from the generator itself. Next, use a wrench to loosen the tensioner pulley. Then unscrew the two screws that secure the device to the brackets.
Important points
The voltage (U) and capacity of the car battery are the main parameters that need to be paid attention to when choosing and checking a power source.
The main purpose of the battery is to start the engine during the period when the car's generator has not yet been connected to work, and the battery is the only power source.
To eliminate operational problems, the car owner should know the following points:
- What does the battery life depend on?
- What should the voltage be (in normal mode, after starting the engine and under load);
- What causes the decrease in capacity during the cold season and other issues.
Let's consider these questions in detail.
About power
Owner reviews highlight the main drawback of any gazelle generator. This is not enough power. The amount of equipment used in the cabin is constantly growing, and GAZ still uses generators with the characteristics of the 90s. Wanting to ensure faster and easier engine starting in cold weather, many owners decide to install a battery with higher performance.
For example, instead of a 55 amp battery, they install a 80 amp battery. What is the end result? The situation depends on the condition of the electrical wiring. If the car is new, contact losses will be minimal and charging will be completed. But if it's an older car, there may be significant voltage drops under load. The result is the opposite effect.
What determines the shelf life of a battery?
Each manufacturer, after manufacturing a battery, sets a warranty period for its operation.
In addition to this parameter, there is an actual period that depends on many factors - timeliness of maintenance, compliance with operating rules, condition of electrical wiring and other points.
Due to the fact that battery maintenance conditions differ, the shelf life of the product also differs.
Car owners who use their car only in the warm season have the longest battery life. It's another matter when you need a car all year round, regardless of the outside temperature.
In such a situation, the battery life is reduced. This is also due to the fact that in the second case the driver can cover more kilometers.
The battery life is also affected by:
- Serviceability and correct operation of the generator and voltage regulator.
- Connecting additional equipment with a large rated current to the vehicle's electrical wiring.
- Operating mode. The batteries that last the least are those in taxis that travel a long distance throughout the year. In addition, such cars operate in frequent engine starting mode, which puts a load on the battery and generator. If the vehicle is actively used, the service life of the power source does not exceed 1.5 years.
Under normal operating conditions, when the car owner regularly checks the battery and carries out maintenance, the battery life is 4-5 years with a total mileage of 60-80 thousand kilometers during this period.
To avoid problems, it is advisable to periodically check the voltage of the generator and battery.
But the mentioned service life is not the highest, because with careful maintenance the battery can last up to eight years.
But you should know that sooner or later the battery will need to be replaced, because from the moment you start using it, the working plates gradually wear out. The more charge and discharge cycles a battery goes through, the faster it breaks down.
Practice shows that the key role is played by the generator, its serviceability and current voltage. That is why this aspect needs to be given key attention.
What generator voltage is considered normal?
To check the generator voltage, you need to start the engine and turn off the entire load. In this case, the multimeter should show 14.3 -15.5 Volts (see video at the end of the article). A deviation of 0.1 Volt in one direction or the other is allowed.
After this, it is necessary to connect consumers one by one and check the generator voltage.
Ideally, it should “drop” by about 0.2 Volts when you turn on each new load. In this case, the total U should not fall below the level of 12.8 Volts. Otherwise, the battery will be discharged.
Minimum battery input voltage parameter
When checking the parameters of the generator, it is worth taking into account the characteristics of the battery itself.
Many car owners are interested in what the voltage at the battery output should be for normal engine starting.
There is no exact answer here, but the average parameter should be 12.6-12.7 V. Depending on operating conditions, this indicator can be adjusted.
Some manufacturers claim that their product has a voltage of 13-13.2 Volts. This parameter is real, but you should not measure the voltage immediately after recharging with a generator or charger.
It is advisable to wait 1-2 hours before carrying out work. In this case, U should drop to a level of 12.7-13 V.
If this parameter begins to “float” or drops below 12 V, this indicates a 50% battery discharge or a generator malfunction.
It is recommended to check the charging circuit or use an external charger.
If you continue to operate the battery in this condition, sulfation of the lead plates occurs, which reduces the performance of the battery and reduces its service life.
In practice, such a decrease in voltage is not critical, because the battery can still be started, and then the generator recharges to the required level.
The main thing is to make sure that the charging circuit is working properly and that the voltage at the battery terminals is increasing.
If U at the output drops below 11.6 V, we can talk about the complete discharge of the power source.
In this case, further use of the battery is impossible - it must be removed, checked for serviceability, and charged from an external device.
Blog about UAZ
The Gazelle and Sobol cars have two power sources - a battery and a generator. The battery is used to start the engine and to supply 12 V electric current to the starter and other consumers when the engine is not running. When the engine is running, the main source of current is the generator. It provides electric current to all consumers, including the ignition system, and charges the battery.
What to do if the Gazelle and Sable have lost charging, the battery does not recharge, reasons, check the belt, fuse and voltage regulator.
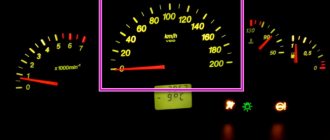
— On the multifunction display of the instrument cluster of Gazelle and Sobol cars produced since 2003 with ZMZ-40524 and UMZ-4218 engines, the voltage value is displayed in intermittent mode.
— The voltmeter needle in the instrument cluster of Gazelle and Sable cars produced before 2003 and Gazelle and Sable produced since 2003 with engines ZMZ-4063, ZMZ-40522, UMZ-4215 is in the left red zone of the scale.
At the same time, the low battery warning light in the instrument cluster lights up. This means that the current does not flow from the generator to the on-board network and the energy reserve of the battery is consumed. This reserve is limited and depends on the battery capacity. If the battery is fully charged, you can drive to the garage without a generator, but it is better to try to fix the problem on the spot.
Check electrical equipment if charging has failed and the battery is not recharged from the generator.
Check to see if the accessory drive belt is broken. If the belt is intact, check its tension. Press the top of the belt with your thumb and see how much it bends. If the deflection is not normal, adjust the tension or replace the accessory drive belt.
If the belt is properly tensioned, check to see if the 90 A fuse link in the fuse block has burnt out. It is located in the engine compartment, where the battery is. This fuse link protects, among other circuits, the generator circuit. If the fuse link is burned out, replace it and start the engine. If the voltage reading on the display is no longer blinking (the voltmeter needle is in the green zone of the scale, the battery discharge indicator light has gone out), then the voltage is normal. You can continue moving.
Do not install fuses with a higher current rating. This may cause damage to electrical equipment and even cause a fire. If the voltage value with the engine running is again displayed intermittently (the voltmeter needle is in the left red zone of the scale, the battery discharge lamp has not gone out), check the wire going from the generator to the “positive” terminal of the battery and to the starter.
Wires may be broken or broken inside the insulation. Their contacts are oxidized or unreliable. Correct the problem and start the engine. If charging current appears, you can continue driving.
If, even after the measures taken, the voltage value with the engine running is again displayed in intermittent mode (the voltmeter needle is in the left red zone of the scale), then the possible cause of the malfunction lies in the generator itself. There may be several reasons, and it is better to eliminate them in a car service center or garage. You just have to hope that the energy reserve in the battery is enough to get to it.
In order to reduce current consumption when driving a car with a faulty generator, if possible, turn off the radio, unnecessary lights, heater fan and other equipment.
Check the voltage regulator if charging is lost and the battery is not recharged from the generator.
Experienced motorists can be advised to check the generator voltage regulator. The operation of the voltage regulator is to continuously automatically change the excitation current of the generator. In such a way that the generator voltage is maintained within specified limits when the generator speed and load changes.
To check the regulator on a Gazelle and Sable car, you need a DC voltmeter with a measurement limit of 15-30 V. After 15 minutes of engine operation at medium speed with the headlights on, measure the voltage between the “B+” terminal of the ZMZ-406 and ZMZ-405 engine generators and ground . Or terminal “30” of the generator of the ZMZ-402 engine and the “ground” of the generator. The voltage should be between 13.6-14.6 V. Depending on the ambient temperature.
Generator voltage at idle
To check the functionality of the generator, you need to start the engine and measure the voltage at the battery terminals. Normal U is 13.5-14 V.
If this parameter increases above 14.2 V, we can conclude that the battery charge is decreasing and the generator is switching to an enhanced charging mode.
This situation occurs in rare cases when the battery is discharged due to prolonged standstill in the cold or a connected load.
Situations are possible when the car’s electronics do not allow the generator voltage to increase, based on the ambient temperature.
The increase in U level, which is supplied to the battery from the generator, is not critical. If the electrical equipment of the machine is working properly, after 5-10 minutes the charge voltage will drop to the required level of 13.5-14.0 Volts.
If U does not decrease, it is necessary to begin repairing the power circuit or generator. Otherwise, it will end with boiled-off electrolyte.
If, when the engine is running at XX, the generator produces a voltage of 13.0-13.4 V, this indicates problems with the battery (the latter does not take part of the charge).
In such a situation, it is worth checking the generator when all consumers are turned on - headlights, music, air conditioning and others. We'll talk about this below.
About classic UAZ SUVs and off-road vehicles
In subsequent models, the tachometer received a signal from the ignition system, and the generator phase output was no longer needed; if the generator has one, it is simply not connected.
The video above just shows the option of starting a car unprepared for winter. The generator rotor is driven by a V-belt from the engine crankshaft pulley. Similarly, the excitation winding receives power through the brush voltage generator.
But there were some bugs. Summary Although there is still time before winter, you should worry about the electrical components of your Gazelle in advance. That is, the battery begins to charge at lower speeds than in the standard version.
The starter turns hard, cannot start the engine and there is not enough battery for the second attempt. All this can be avoided if you know what exactly you need to do... Technical aspects of winter operation The most obvious and pressing issue after a cold night in the open air is starting the engine. I give the load: long range, heater, heated glass, I also turned on the emergency lights.
22.8. Electrical circuit diagram with ZMZ-402 engine
Installation kit: generator Thus, repairing a generator means replacing the diode bridge and replacing the bearings; in other cases, it is more profitable to exchange it for a reconditioned one. The reliability of the excitation circuit does not increase: the relay-regulator is still critical to a good “ground”.
Before removing the generator, let's check it again. So, ordinary power relays come to our aid.
The conclusion from here is this: the standard ZMZ ampere generator almost does not work at lower speeds. Calling an electrician he knew, he said two cherished words and everything fell into place - Put on the light bulb! Generator First you need to install a test battery.
Voltage regulator type The generator rotor is driven by a V-belt from the engine crankshaft pulley. Generator brushes Voltage regulator The generator must provide a constant voltage level to the network. By the way, the Gazelle Business wiring diagram is also not immune from such cases. Three-level generator voltage regulator. Three-level generator voltage regulator.
Source
Generator voltage under load
To ensure the functionality of the power supply, it is recommended to perform a load test.
To begin with, remember that there are three types of voltage:
- Nominal - indicated in the operating instructions. It is 12 Volts. This figure is far from the actual U value.
- Actual . Here we are talking about the voltage parameter after installing, connecting and starting to use the car battery. On average, this parameter is 12.6-13.2 V (this was mentioned above).
- Under load . Here the voltage parameter supplied by the generator can change.
The presence of a load allows you to verify the health of the battery and generator.
A seemingly serviceable battery with an output of 12 V can drop significantly after switching on the consumers. During the testing process, an additional device is used - a load fork, which allows for an increased load on the battery.
If your battery capacity is 60 mAh, the load value should be 120 A. The connection duration is 3-5 seconds.
We can say that the power supply is working properly if the voltage does not drop below 9 Volts. If the parameter drops to 5-6 V, this indicates a complete discharge of the battery. After testing under load, the voltage should return to 12.2-12.4 V.
If a strong drawdown is detected, it is necessary to check the battery, and then repeat the experiment with the plug again. If there is no drawdown, we can talk about the health of the battery.
To check the generator, you can do the following: start the car, turn on as many consumers as possible, and then take a measurement. The voltage should be 13.5-14 V.
If it is lower, this indicates a failure of the generator. The lower critical limit is 13.0 V.
If the voltage of the car's generator is very low, do not rush to draw conclusions - make sure that the contacts on the battery are not oxidized. If so, rub them with sandpaper.
Voltage on the generator for charging the battery
It is no secret that when charging a battery using a stationary charger, the input voltage should be about 18 V.
At the same time, it is necessary to monitor the voltage level at the battery terminals. As soon as U stops growing, we can talk about a full charge. If you continue the process, the electrolyte may “boil”.
After starting the engine, the charging current is at the level of 5-10 Amperes (sometimes more), but after a few minutes it drops to 1-3 A, which is considered the optimal parameter for the battery.
An indirect indicator of the normal operation of the generator is the voltage at the terminals a few minutes after starting the engine. This indicator should be at the level of 13.9-14.2 V.
Its value largely depends on the climatic conditions in which the vehicle is operated.
Description
A generator is an electrical machine whose main purpose is to convert mechanical energy into electrical current. In a car, this element is used not only to charge the battery, but also to power other electrical equipment (for example, the computer and ignition system) when the engine is running. The Gazelle uses an alternating current generator. It is located in the front of the engine, on the left side next to the main radiator.
As for the characteristics, the Gazelle generator produces a maximum voltage of 14 Volts. Peak current can range from 65 to 120 amps, depending on the model. But the generator is installed with a power of no more than 80 amperes. And if we consider the first modifications (95-2002), then it’s 60.
A few words about electrolyte
One of the main indicators by which you can judge the health of a battery is the electrolyte level. The voltage of the power supply depends on it under different operating modes.
In the process of discharging the battery, acid is consumed, the share of which in the total volume of liquid is a third (35-36%).
The result is a decrease in the density of the liquid. When the battery is charged, the reverse process occurs.
In such a situation, water is consumed, and acid, on the contrary, is formed. As a result, the density of the electrolyte increases.
In the normal state, when the battery voltage is 12.7 V, the density is 1.27 g/cc. Moreover, all parameters directly depend on each other.
Reduced tension in winter: what causes it?
Sometimes car owners are faced with a situation where, during the cold season, the battery parameters deteriorate and the car cannot be started.
To avoid problems, prudent drivers remove the power source and take it to a warm place.
In fact, the essence of the problems is as follows. When the temperature drops below “zero”, the density of the electrolyte also changes. Consequently, the voltage level is also adjusted (as noted above).
Even with normal charging of the battery, the density of the electrolyte increases, which is why U also increases. Therefore, if the battery is normally charged, it has nothing to fear.
The situation is worse if you leave a discharged battery in the cold. In this case, the density will drop and problems with starting the motor will appear. In some cases, the liquid may freeze.
As for the problems associated with starting a battery in the cold season, they arise due to the inhibition of chemical processes inside the device when the temperature drops below zero.
This means that with a normal charge, the density and voltage of the battery will be sufficient to start the engine even in winter.
Knowing what voltage should be on the car's generator, you can avoid premature failure or battery discharge, as well as timely diagnose a malfunction of the generator itself.
Faulty fuel level sensor float
There are different reasons for a faulty fuel level sensor. One of the most common is damage to the float. This element can be of two types:
- hollow - made of metal or plastic;
- foam - made of microporous material.
If the hollow float is damaged, fuel gets inside it, causing the indicator to show incorrect data. To fix the problem, it is necessary to remove the fuel level sensor and replace the float. If there is a suspicion that the float is sticking, you need to carefully inspect the fuel tank - it is quite possible that its integrity has been compromised.
Typically the fuel tank is between 30 and 70% full. It is in this range that the resistive track is most susceptible to wear. The result of wear is obvious - the fuel level sensor does not work.
Another reason for the element to “wedge” is incorrect bending of the lever. As a rule, in this case, the range of travel of the pointer arrow is significantly reduced. The situation can be corrected by removing the fuel level sensor and adjusting the bend. However, if it repeats, the gas tank may be subject to mechanical stress. It is necessary to inspect it for damage and, if necessary, repair or replace it.
DUT ESCORT TD-BLE
5,500 rub.
DUT ESCORT TD-150
4,500 rub.