The Mitsubishi Outlander is a compact crossover, first introduced by the Mitsubishi brand in 2001. However, official sales were launched only in 2003.
Below we will look at how to change the oil in a variator on a Mitsubishi Outlander 3, talk about the frequency of work, and highlight the main brands of oil and their features.
We will pay special attention to the replacement procedure, as well as subtleties and nuances that are not indicated in the manufacturer’s manual.
Brands of oils and their analogues, filling containers for the Mitsubishi Outlander 3 variator
It is important to pay special attention to the choice of lubricant for the Mitsubishi Outlander 3 variator. Mistakes in this matter can lead to deterioration of the mechanism and additional malfunctions
To avoid such consequences, it is important to buy only original oil from proven developers. Mitsubishi Dia Queen CVTF-J1 lubricant is poured at the Mitsubishi plant
Mitsubishi Dia Queen CVTF-J1 lubricant is poured at the Mitsubishi plant.
Subsequently, you can use an improved version of the composition for the variator - CVTF J4.
This brand of transmission fluid is indicated on the dipstick.
For a full range of activities, about 12 liters will be required (including washing)
But it is important to know that the filling volume of the CVT, according to the manual, is 5.5 liters. And after a major overhaul of the transmission it increases to 7.1 liters
But we will dwell on this issue in more detail.
4 liters of original transmission fluid, at the time of writing, will cost about 4,000 rubles.
To avoid falling for a fake, consider the following recommendations:
- buy oil for the Mitsubishi Outlander 3 variator only at official retail outlets;
- first study the product parameters on the official resource;
- compare the product information on the website and on the product box;
- look at the current levels of protection (color, seal, packaging, etc.).
If you have any doubts about the quality, it is better to refuse the deal, because the use of low-quality lubricant carries risks for the gearbox. It’s better to spend time choosing, but be sure of the quality.
To avoid mistakes, here are the article numbers of the main types of oil for Mitsubishi Outlander 3:
- Dia Queen CVTF-J1 - MZ313973 (1 l), S0001610 (4 l).
- Dia Queen CVTF-J4 - MZ320185 (1 L), MZ320261 (1 L, Genuine CVT Fluid Eco J4), MZ320262 (4 L, Genuine CVT Fluid Eco J4).
As an alternative, it is possible to use Nissan NS-2 series lubricants, which are also suitable for use in the Mitsubishi Outlander 3 variator. Here, focus on the following articles - 999MP-NS300P (1 l), KLE52-00004 (4 l).
As a last resort, it is allowed to purchase analogues of the following types:
- ELF ELFMATIC CVT.
- Pentosin CVT 1.
- MOPAR CVTF+4.
- AISIN CVT Fluid Excelent (art. CVTF7004, CVTF7020).
- IDEMITSU MULTI CVTF (art. 30301201-746, 30455013-520).
Taking into account the experience of car owners, the use of RAVENOL ATF NS2/J1 Fluid is not recommended due to the high risk of CVT failure. Many car owners complain about its quality.
Note that some of the lubricants discussed above are made at the same plant, so the main attention must be paid to cost and quality. To change the oil in the Outlander 3 variator, you will need additional items:
To change the oil in the Outlander 3 variator, you will need additional items:
- Mitsubishi upper filter with article number 2824A006 (a rubber gasket is included in the kit);
- pan filter with article number 2824A005;
- Mitsubishi drain plug gasket with article number 2705A013 (not necessary for the first replacement);
- Mitsubishi sealing gasket with article number 2920A096;
- Pan gasket 2705A015.
You will also need:
- open-end or socket wrenches 10 and 19 mm;
- container for draining old oil for 6-10 liters;
- liquid for washing the pan;
- watering can.
After preliminary preparation, you can start working.
Subtleties and nuances that are not mentioned in the manual
Replacing the lubricating fluid in the Mitsubishi Outlander 3 variator box is a responsible process that requires taking into account some important points.
Let's highlight the main ones:
- You will have to tinker with unscrewing the battery support pads, so prepare suitable keys in advance or think about how you will get to this place.
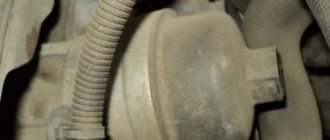
- For convenience, the heat exchanger bolt (the one at the bottom) should be unscrewed from the fender liner.
- When removing the pan, be careful, because there is still about 500 ml of oil there. Also, pay attention to the size of the bolts. In some Mitsubishi Outlander 3 CVTs they may differ.
- Before purchasing a pan gasket, count the number of bolts that must match the holes in the gasket itself. Centering lugs are not included in the count. Usually there are 18 of them.
- Use caution when removing the CVT filter. Its edges are very sharp, so there is a risk of skin damage.
- It is recommended to clean the coarse filter in a special bath with a cleaning solution. You won't get away with regular blowing.
- When pulling the coarse filter bolts, it is important not to strip the threads. Use a torque wrench. The average tightening torque is 7.9 N*m.
- It is recommended to wash everything from oil with gasoline on the table, because it is more convenient.
- The amount of oil that is drained for the first time is different for everyone - from 6 to 8 liters. Remember that a lot of dirty fluid remains in the pan and must also be drained.
- The oil level in the Mitsubishi Outlander 3 variator must be measured only with the engine running and warm, with the gear lever in the “N” or “P” position. After completing all activities, it is recommended to drive several tens of kilometers. Make sure that the car is standing on a flat surface, and the level itself should be in the area of the letter “H” between the middle and top marks (temperature 800C). When the oil is not heated, its level varies in the area of the letter “C” between the lower and medium marks.
- The protrusions on the dipstick do not play any role, so do not pay attention to them when measuring the liquid level. They are needed so that the dipstick stays in the tube and when measuring the oil does not smear on it.
In general, 5.5-6 liters are enough for replacement, but it is better to take 12 at once to flush the variator. Another option is to buy three four-liter cans. At the same time, the latter still has about 50% left for refilling. If you drain more from the torque converter, it can take up to 8 liters, but this is not necessary.
Necessity and frequency of replacement
The transmission fluid in the Mitsubishi Outlander CVT needs to be changed. The operation of the box is associated with conditions of increased loads. The task of lubrication is to minimize loads and make the wear process as small as possible.
Functions performed by the liquid:
- Elimination of overheating of parts and mechanisms of the box by removing excess heat;
- Elimination and removal of wear products formed in the box;
- Anti-corrosion protection of mechanisms and box parts;
- Filling voids at the junctions of box parts;
- Conversion and transmission of energy through the box;
- Creating a friction clutch in a box.
Correct performance of these functions leads to the fact that the lubricant ages and becomes unusable. Increased temperatures and friction forces are the main enemy of transmission fluid, which saturates the oil with wear products. An excess of particles turns the lubricant from an ally into an enemy of the box. Inclusions act as an abrasive, accelerating the wear process of the mechanism. Changing the oil in the Mitsubishi Outlander automatic transmission avoids negative impacts and extends the life of the variator.
The Japanese designers who developed the variator claim that the unit is capable of working out its design life without replacing the transmission fluid. This statement does not correspond to the realities of our region in which the vehicle is used. Experienced mechanics regularly change the oil in the Mitsubishi Outlander variator at least once every 80 thousand kilometers.
Characteristic features of the Mitsubishi CVT
The design of a continuously variable transmission, or variator, is more complex in comparison with an automatic transmission. In addition, if you compare automatic machines from the point of view of maintainability, the variator will turn out to be demanding in terms of maintenance. This is due to a large number of electronics and fine adjustments of the mechanism, however, with proper care, the box can last much longer than its competitors.
Changing the oil in the Outlander variator is a fundamental process, without which there is no question of normal operation. The procedure is not complicated, but it requires skill. According to the recommendations, the frequency of replacing transmission fluid in the variator is every 70-80 thousand kilometers. However, with some nuances, the oil is changed urgently, even if the mileage has not reached the established standards.
Factors indicating the need to replace the working fluid:
- Box vibrations;
- Slipping in the gearbox when driving on a flat road;
- Jerking in the box when accelerating;
- Reduced dynamics when accelerating;
- Incomprehensible sounds from the box (grinding, humming, knocking, etc.).
Each manifestation requires immediate replacement of the transmission fluid. If this process is neglected, further operation will result in expensive repairs and even replacement of the mechanism.
Changing the oil in the Outlander variator
Moving on to the process of changing the oil in the variator, first set its current level. For this you can use a probe. For maximum accuracy of this indicator, it is necessary to warm up the machine to operating temperature (90 degrees). Taking out the dipstick, you will see three marks that form two intervals - these are “COLD” and “HOT”. So, the oil level on a warm car should be about 0, and after changing the fluid it should be at the same level. Carefully monitor the oil level in the variator - it should not be more or less, otherwise it will negatively affect the further operation of the box.
Stages of changing the oil in the Outlander variator
We will divide the entire procedure for replacing transmission fluid into several conventional stages, each of which consists of an alternate set of works.
Stage No. 1 - Drain the oil from the variator
- We drive the car to a special site for this kind of work - it can be a garage with a pit or an overpass.
- We measure the transmission fluid level using a dipstick.
- We remove the crankcase protection, or move it, unscrewing a couple of front bolts and loosening the rear ones, and wipe the variator crankcase with a rag prepared in advance.
- We fasten the watering can to the variator housing so that it is located in the place where the drain plug is located (to secure the watering can, you can use wire or rope);
- We begin to unscrew the drain plug, having previously placed a container for waste liquid under the watering can;
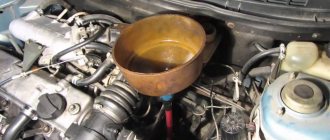
- When it’s hot, we drain the old oil from the box - this way it will come out to the maximum, and will also take away with it all the unwanted deposits that have accumulated in the box over 90 thousand kilometers.
- We determine the amount of drained transmission fluid - exactly the same amount of oil needs to be added.
- We wait about an hour until all the transmission fluid comes out of the variator (about 5.8 - 6 liters of waste should drain out).
Stage No. 2 - Flushing the variator
- As soon as the oil stops dripping from the box, you can screw the plug back in (don't forget about the washer).
- Now we move upstairs, take a clean watering can, and pour into it exactly the same amount of oil as we drained.
- Through the hole into which the dipstick is installed, carefully pour new transmission fluid. Check again that you have poured exactly the same amount of oil.
- Having finished filling the new transmission, we return the dipstick to its place and get behind the wheel.
- We start the engine and wait a couple of minutes, after which we smoothly, without jerking, shift all gears one by one, the delay between shifts should be approximately 30 seconds. We repeat this action about ten times. This procedure is necessary in order to mix the remnants of the old lubricant with the new oil.
- After that, we turn off the engine and return under the car. We substitute a container to drain the used fluid and repeat the oil change procedure, usually the same amount is drained as the first time (5.8 - 6 liters).
- When all the liquid has drained, dismantle the variator housing by unscrewing the fastening bolts with a wrench or socket. When removing the crankcase, remember that there is still oil left and it is hot. Carefully drain any remaining oil from the crankcase. In total you will get about 6.2 - 6.3 liters of transmission fluid.
- Now carefully inspect the variator housing for wear products (metal shavings, carbon deposits, etc.). If they exist (and they definitely will), we proceed to cleaning the crankcase using special cleaning agents or acetone.
- It also wouldn’t hurt to inspect the components and assemblies of the variator itself for defects and obvious malfunctions. They shouldn't be in a normal box.
- After checking everything, remove the transmission fluid coarse filter and also clean it. We wait until it dries.
- While we wait, carefully remove the old crankcase gasket, using either a knife or a slotted screwdriver (Just first, of course, carry out troubleshooting and make sure that a replacement is really needed).
- We return the filter to its place, install the crankcase in place, first checking that all parts are in place after cleaning (for example, magnets).
- If the plug is twisted, return it to its place.
Stage No. 3 - Pour new oil into the variator
- We repeat the procedure for filling in new fluid (remember that you need to fill it in the same amount as you drained the last time).
- We start the engine and check the gear shift.
- We check the oil level in the variator using the dipstick and, if necessary, add little by little.
- We go down under the car and check for any leaks.
- After driving a little, we periodically check the oil level in the box (it should not disappear).
Replacement procedure
The algorithm of actions consists of several stages - removing old oil, washing, replacing the filter and filling in a new lubricant. Let's look at each of the steps in more detail.
Removing old grease
Procedure:
- Warm up the oil in the variator; to do this, drive for several kilometers.
- Place the machine on an overpass/pit or lift it using a lifting device.
- Remove the front transmission protection, if it is installed (information for those who do not have it - number 2306 V2).
- Pull out the transmission fluid dipstick.
- Place a watering can to remove the waste liquid, and lower its end into the prepared container.
- Wear rubber gloves to avoid getting burned or use a rag.
- Unscrew the drain cap with a 19mm socket.
- Wait until the oil is completely drained. This volume should correspond to 6 liters.
Note that you can do without a watering can, but in this case the container must be brought directly to the hole.
Cleaning the Mitsubishi Outlander 3 variator (with complete replacement)
For this:
- Tighten the gearbox drain hole (use a plug and washer).
- Fill 6 liters of clean lubricant.
- Place the dipstick in the variator hole.
- Start the power unit and keep it running for two to three minutes.
- Move the automatic transmission knob to different modes. At each stage, take a short break in switching every half a minute.
- Perform the switching process at least 10 times.
- Stop the engine and drain the fluid according to the diagram above.
Replacing the filter and cleaning the pan
Follow these steps:
- Remove the air duct. To do this, unclip the clips and pull them up (there will be two of them).
- Remove the variator housing and drain the remaining dirty oil.
- Inspect the crankcase and gearbox magnets for damage, clean them from dirt and metal shavings. At the same time, inspect other elements of the variator (at least visually).
- Replace the pan filter or wash it (use a 10mm socket, you need to unscrew three bolts - one long and two short). Be careful because it also contains oil. If you decide to just rinse, then use any liquid, for example, to clean the carburetor. After this, wipe the filter and its mounting bolts with a clean rag.
- Change the pan filter gasket 2824A005 to prevent air leaks.
- Clean the magnets from dirt.
- Before installation, wipe the pan thoroughly and use something degreasing.
- Remove the battery and its support. The stand is fixed using four bolt connections. To unscrew a wide bar, you may need a long arm for the key, because otherwise it is difficult to get under.
- When removing the heat exchanger, be careful, oil will flow from all the cracks, so it is better to do this with the pan removed. Replace seal 2920A096 immediately.
- Pull out the CVT filter and replace it. Please note that when replacing, very often the rubber gasket remains at the bottom. It usually comes off. It needs to be taken out and replaced (comes with a new filter).
- Reinstall the clean magnets and gaskets.
- Place two filters, a heat exchanger, and a tray in their original places.
Important! You can do without removing the battery and support. In this case, it is necessary to unscrew the bolts from the pit.
For this:
- Jack up the car.
- Remove the left front wheel, plastic protection with clips and fender liner.
- As a result, access to the heat exchanger will appear.
Filling with new oil (carried out through the hole for measuring the dipstick level):
- Place a funnel in the inspection hole to avoid spilling oil.
- Fill with lubricant to the required level (about 5-6 liters).
- Start the engine and let it run at idle.
- Smoothly and consistently change gears with a short stop at each (1-2 seconds). Do this several times.
- Measure the oil level in the Mitsubishi Outlander 3 variator again, and top up if necessary. See below for details of measuring the oil level in the variator.
- Check the gearbox for leaks and, if identified, eliminate the cause.
This concludes the activities. Theoretically, you can skip the work of flushing and cleaning the crankcase, but it’s better not to do this. When choosing a flushing agent, the original oil for the variator is suitable. It is not recommended to use anything else.
After completing the work, after 30-40 km, check the variator housing for leaks. If everything is fine, top up and continue operation.
Changing the Oil in the CVT of Mitsubishi Outlander 3
To ensure the operation of the box, high-quality lubricant must be used there. Below is an annotation on how to change the oil in a Mitsubishi Outlander variator and advice on the timing of this task.
How often does it need to change the oil?
Level control and required volume
- How to change oil in artisanal conditions?
- Consequences of untimely shift
- Video “Visual aid to changing lubricant”
First of all, let's look at the mileage at which car enthusiasts change the lubricant and filter in the Mitsubishi Outlander 2008, 2011, 2012, 2013 and 2014 model years.
The official instruction manual does not indicate when and how it is often necessary to change the fluid in the boxes.
The manufacturer does not foresee the change of consumable water; it is poured into the machine entirely for the service life of the vehicle. But this does not mean that the lubricant does not need to be changed.
The substance is changed when the following symptoms occur:
- when driving on smooth asphalt, slipping occurs from time to time;
- in the area of the gearbox selector in the cabin you can feel vibrations that appear from time to time or on a constant basis;
- Unusual sounds began to be heard from the box - grinding, noise;
- There are difficulties with shifting the gearshift lever.
Changing the oil in the variator Mitsubishi ACX 1.8 CVT 2010
Such signs can vary and manifest themselves differently in different cars; it all depends on the criteria and correct use of the box. Approximately, the need to change water for motorists appears after 100-150 thousand kilometers. In order to prevent problems in the work of the box, experts advise changing consumables every 90 thousand kilometers.
A unique product for Outlander CVTs
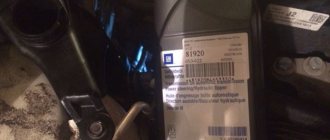
Only a unique product should be poured into the Mitsubishi Outlander. DIA QUEEN CVTF-J1 lubricant has been developed specifically for the variators of these cars. It is designed to work in JF011FE boxes, which are equipped with Outlanders. The manufacturer does not recommend using other oils.
Although probably car enthusiasts successfully fill the boxes of their cars with water produced by Motul. If you believe the car manufacturer, then the introduction of non-original and low-quality oils leads to malfunctions in the gearbox and complicates the maintenance or repair of the unit.
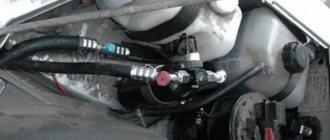
To check the lubricant level in the boxes, use the dipstick located in the gearbox. The location of the meter is indicated in the photo.
To diagnose the level, start the engine and warm it up to operating temperature. The oil will become less viscous and the inspection procedure will be clearer. Remove the dipstick from the variator.
It has two marks - HOT and COLD. On a warm engine, the lubricant may be at the NOT level.
Location of the dipstick for level control
Changing the lubricant is a relatively easy procedure. To complete it, you will benefit from 100% of the funds and do everything possible without the help of others.
Before your shift, prepare:
- wrenches 10 and 19, it is better to use socket wrenches;
- fresh oil for filling into the variator, about 12 liters will be needed;
- seal for installation on a pallet;
- a new washer for installation in the pallet plug if the ancient part is worn out or damaged;
- a cleaning agent for the pan, in order to remove wear products with its use, ordinary acetone or a special liquid is used;
- funnel;
- a stationery knife or a Phillips-head screwdriver;
- container where you will drain the old grease.
Work order
Before starting to work directly with the lubricant in the Mitsubishi Outlander box, we determine the level. It is advisable to perform the procedure after the box has warmed up (temperature of the working fluid is 90°C), using a special probe with which the unit is equipped. Having removed the probe from the holder, special marks are applied to the surface: “Cold” and “Hot”. On a properly operating, warmed-up unit, the value corresponds to the “Hot” label. The level of the new fluid is brought to the initial value.
Important! It is extremely important to maintain a constant, correct level of working fluid in the box. Changing the value, either upward or downward, leads to negative consequences for the operation of the unit.
Procedure:
Draining the working fluid from the box:
- We install the vehicle on a pit, overpass, lift;
- We measure and remember the initial value of the liquid in the box;
- We dismantle the device protecting the bottom of the box;
- We install a watering can to drain the waste from the box, lower the end of the watering can into a previously prepared container;
- Unscrew the drain plug of the box;
- We drain the waste from the box;
- We measure the drained amount of oil from the box, the volume corresponds to six liters;
What is needed for replacement
According to the passport, the total amount of oil in the Mitsubishi Outlander variator is 7.3 liters. However, replacement will require about 5 liters. A complete replacement on this box is a rather labor-intensive operation.
Therefore, the vast majority of car enthusiasts practice partial. Moreover, in this case the oil is renewed by almost 70%.
For replacement, it is recommended to purchase original oil from Mitsubishi CVT Fluid J4 or its equivalent. When using analogues after replacement, you must be extremely attentive to the operation of the variator.
If any malfunctions occur in the operation of the CVT box, you should replace the oil with the original one as soon as possible. However, with the right selection, this happens extremely rarely.
Filter 2824A008
The fine filter must be changed. It is located in the heat exchanger housing. On the restyled Outlander model, the location of the filter is slightly changed: here it is installed in a separate housing mounted on the engine crankcase.
Additionally, you need to purchase a copper gasket for the drain plug and a box housing gasket. If the replacement is made for the third or fourth time, it is advisable to replace the sealing ring of the fine oil filter housing and the coarse filter.
Preliminary actions
Anyone can change the transmission fluid in the Mitsubishi Outlander 3 variator, the main thing is the desire to do it. In order to minimize inconvenience and not stop the process due to the lack of necessary tools, it is necessary to carry out preliminary preparations.
Necessary materials:
- Open-end wrench or socket wrench, size 19 mm;
- Open-end wrench or socket wrench, size 10 mm;
- Oil for gearbox, Mitsubishi CVTF-J4 brand (original), twelve liters;
- Intermediate seal for box tray 2705A015;
- Box crankcase gasket washer;
- A container where the old oil from the box will be drained;
- Means for flushing the variator;
- Watering can.
Motors and gearboxes installed on Mitsubishi Outlander
The first generation car was equipped with two gasoline engines of 2.0 and 2.4 liters, and in 2004 a car with a turbocharged 2-liter engine with a power of 202 liters was released. With.
From 2005 to 2012, the second generation Mitsubishi Outlander was produced with a 2.0-liter manual transmission engine and a CVT, as well as a 2.4-liter power unit with a CVT only. As for the most powerful 3-liter version with 223 hp. s., it was equipped with a 6-speed automatic transmission.
In 2012, the third generation Mitsubishi Outlander was introduced, but sales began only at the end of 2013.
In 2014, the car underwent a restyling, in which the appearance and a number of technical components changed.
The car is offered in three engine options: 2.0, 2.4 and 3.0 liters with manual transmission, automatic transmission and CVT.
Namely:
- 2.0 4WD 4B11 146 hp
- 2.4 MIVEC 4B12 167 hp
- 3.0 4WD 6B31 230 hp
We will dwell on the option with a continuously variable transmission in more detail.
Differences between CVTs on Outlander XL and Outlander 3
Many motorists are skeptical about CVTs, preferring to purchase cars with an automatic transmission. This is mainly due to the capriciousness of the mechanics. By right, in previous models of Outlanders, the transmission was noisy and also had poor speed dynamics. In the third generation, the manufacturer improved the mechanism. Thus, Outlander 3 cars have great acceleration properties. In addition, the gearbox operates in silent mode.
Resource and replacement time
Mitsubishi Outlander automatic transmission oil change
Talk that the lubricant used in the transmission is designed for the entire service life of the car should not be taken seriously. There are reasons for this. The lubricant may lose its properties due to:
- dirt or particles of wearing parts getting into it (most often these are small particles of gradually deteriorating clutches);
- due to prolonged operation of the automatic transmission under high loads;
- due to overheating of the transmission, which also occurs as a result of engine overheating.
Taking into account Russian operating conditions, the oil change in the Mitsubishi Outlander automatic transmission should be done once every 60 - 80 thousand km. mileage Thus, it is possible to significantly increase the resource and improve the operation of the node. In cases where the lubricant smells burnt or contains foreign matter, maintenance should be performed immediately. Remember that automatic transmissions are designed for a relaxed driving style. Sharp starts from a standstill and rapid acceleration are disastrous for them.
Preparing for replacement
Changing the oil in a Mitsubishi Outlander automatic transmission is done from a pit or a lift. To carry out the work, in addition to the materials described in the previous paragraph, you will need the following set of tools:
- a set of open-end wrenches, sockets and wrenches, or better yet, a standard suitcase with tools (almost all operations, including dismantling the air filter and battery platform, require the use of various heads, which make no sense to list separately);
- pliers;
- screwdriver;
- an empty container with a volume of at least 6 liters (preferably with a scale so that you can estimate the amount of drained waste);
- funnel for pouring new liquid;
- cleaning rags;
- carburetor cleaner or similar composition that does not leave greasy stains;
Carburetor flushing fluid - good silicone sealant (only necessary if the pan area has been hit or there is other damage to the mating surfaces of the variator housing and the pan).
What is oil degradation and how to reset the meter
In the Mitsubishi Outlander 3 ECU with a CVT there is a so-called oil degradation counter. The official name is CVT oil degradation level. When calculating the parameter, only the temperature of the lubricant in the gearbox is taken into account.
During operation, the counter awards points according to the following principle:
- t, C less than 90 - no points;
- t, C between 90 and 99 - 1 point/min;
- t, C from 100 to 109 - 2 points/min;
- t, C from 110 to 119 - 4 points/min;
- t, C from 120 to 139 - 6 points/min;
- t, C from 140 and above - 8 points/min.
As soon as the temperature reaches 138 C, system information appears about gearbox overheating. If this parameter increases to 149 C, the variator operates in emergency mode.
This counter is intended only to inform the driver and does not send any commands to other elements of the car.
Information from the degradation counter can be obtained using a MUT-3 scanner or other similar devices. As an option, it is possible to use the ELM 327 diagnostic adapter with Android software such as hobDrive, Torque Pro or cvtz50.
When changing the oil in the variator, it is not necessary to reset the counter. It is advisable to do this according to the manufacturer’s recommendation, so service station specialists do not skip this manipulation. You can do the reset yourself using the cvtz50 software.
POPULAR WITH READERS: Changing the oil in the 2.5 Nissan Teana J32 engine
You can analyze the meter parameters by comparing the received data with the information on the odometer. After pouring new lubricant into the Mitsubishi Outlander 3 variator, we take the odometer data as zero.
Next we do the following analysis:
The information from the degradation counter is three or more times less than the number on the odometer. Mitsubishi Outlander 3 CVT gearbox is in good condition. The temperature is normal. There were no overheats. The parameters of the degradation counter and odometer differ by less than 1/3 or are almost equal. This indicates frequent overheating of the gearbox. It is recommended to change the oil and at first monitor the temperature of the variator using any of the software mentioned above. The number on the degradation counter is greater than the data from the odometer. This indicates severe overheating of the transmission
It is important to contact specialists as soon as possible to resolve the problem.
Many car owners have a “0” on their degradation meter. This is normal, because if there is no overheating above 90 degrees Celsius, points are not awarded.
The likelihood of overheating is very low, thanks to the presence of a radiator, so the lubricant rarely heats up above 85 degrees Celsius. Older versions of the Mitsibisi Outlander (before CVT8) had an old type of radiator that did not do its job very well.
Judging by the information from the CVTz50 program, the oil temperature in the variator in summer and winter is in the range from 50 to 85 degrees Celsius (average).
To reset the grease degradation counter in the Mitsubishi Outlander 3, you will need:
- CVTz50 software;
- WiFi/Bluetooth adapter ELM327 bluetooth V4.
The CVTz50 program is paid and costs about 150 rubles.
Its capabilities:
- reading and resetting errors of the variator box and power unit;
- studying and setting the oil wear counter to zero;
- adjustment of XX speed and leading angle;
- control of transmission operation data;
- indication of temperature statistics (per month).
To reset the degradation counter on the Mitsubishi Outlander 3, do the following:
- Install the latest version of CVTz50 from Google Play.
- Install diagnostic connector adapter ELM
- Wait for it to be detected by Bluetooth or Wi-Fi (depending on the type).
- Start your device and check the connection. To do this, press the “Monitor” button of the variator operation.
If everything is done correctly, a log of information exchange between the adapter and the program appears on the display.
Next, find the oil degradation point and reset it to zero.
If desired, you can reset the data using MUT-3.
To do this, take the following steps:
- Turn off the ignition (key position in the lock - Lock).
- Connect MUT –III to the OBD diagnostic connector.
- Turn on the ignition (key position - ON).
- Use the special MUT-III option to reset. Go to CVT oil degradation level, and then to Clear CVT oil degradation level and click Clear.
- Turn off the car ignition (Lock position).
Replacing the variator with Outlander 3
The process of replacing the variator with an Outlander 32 is quite labor-intensive, so it is first important to make sure that the causes of the box malfunction are not related to low oil level, problems with the clutch release drive, weak fastening of the gearbox, etc. The weight of the variator is quite large, in addition, from -due to the shape of the box, it is not so easy to hold it, so removal and replacement must be carried out with the assistance of an assistant.
To remove and replace the variator with an Outlander 3, you cannot do without keys 12, 14, 17, a socket head 14, pliers, a flat screwdriver, and a mounting spatula. The procedure will be as follows:
- Mitsubishi Outlander 3 must be placed on a lift or inspection ditch.
- Remove the decorative casing of the power unit.
- Remove the battery, tray and battery mounting shelf.
- Remove the air filter.
- After removing the bolts, remove the oil pan and the front engine splash guard.
- Drain the lubricant from the variator or automatic transmission (depending on the configuration).
- Drain the coolant.
- After removing the bolts securing the engine control unit, move it away without touching the wiring harness blocks.
- Unscrew the clamp securing the wiring harness and remove the clamp with wires from the bracket.
- By pressing the lock of the block with the input shaft speed sensor wires, disconnect the block from the sensor.
- Do the same with the sensor wires that determine the rotation speed of the output shaft, which is located near the heat exchanger.
- After removing the bolt securing the ground wire to the cooling system tube bracket, move the ground wire away from the protection of the Outlander 3 variator.
- Disconnect the wiring harness of the automatic transmission (variator) valve control unit by turning the block lock counterclockwise.
- Fix the mode switching mechanism.
- After removing the nut securing the end of the cable for controlling the automatic transmission (variator), disconnect the end of the cable from the lever.
- Having clamped the antennae of the tip retainer with pliers, move the cable back and remove it from the slot in the bracket.
- Disconnect the wiring harness of the automatic transmission (variator) mode switch, holding the block clamp, move it away so that it does not interfere with work.
- After releasing the clamp of the wiring harness clamp, remove the clamp from the variator bracket.
- After removing the bolt securing the wiring harness, move the bracket with the wires away from the variator.
- Using pliers, clamp the ears of the clamp that secures the automatic transmission (variator) breather hose, move the clamp along the hose, and disconnect the hose and pipe from each other.
- Using a screwdriver, pry up the piston retainer that secures the power unit mudguard and remove the retainer from the hole.
We recommend
“Adjusting the clutch: sequence of actions depending on the situation” Read more
- Proceeding in the same way, remove the other fasteners, after which you need to remove the engine splash guard.
- Using pliers, squeezing the ears of the clamp securing the upper hose of the automatic transmission (variator) heat exchanger and the cooling system pipe, move the clamp along the hose, disconnect the hose and the heat exchanger pipe.
- Similarly, disconnect the lower hose from the heat exchanger pipe.
- After removing the bolts used to secure the heat exchanger tube bracket, move the tube to the side.
- Using pliers, clamp the ears of the clamp used to secure the lower lubrication cooling hose of the Outlander 3 automatic transmission (variator), move the clamp along the hose, and disconnect the hose from the pipe.
- In the same way, it is necessary to remove the upper lubricant cooling hose of the automatic transmission (variator).
- Using a wrench, remove the nut of the bolt that secures the front engine mount to the protective beam bracket, and remove the bolt.
- Remove the protective bar by removing the two bolts used to secure the front engine protective bar to the radiator frame.
- After removing the bolt securing the rear engine mount to the automatic transmission (variator) bracket, disconnect the support.
- Disconnect the wire ends from the starter terminals and the starter itself, remembering to first remove the protection from it.
- Remove the front wheel drives.
- Remove the Outlander 3 driveshaft.
- Place a support under the power unit or lift it using a lifting mechanism.
- Remove the torque converter hatch cover, first removing the mounting bolts.
- Turn the crankshaft clockwise, holding it by the mounting bolt so that the bolt securing the torque converter to the drive disk is visible in the hatch.
- Holding the drive disk of the torque converter with a mounting blade so that it does not rotate, remove the bolts securing the transformer to the drive disk. With each replacement, new bolts must be used.
- Place a support under the variator (automatic transmission) or lift it using a forklift.
- It's time to remove the transfer case.
- Remove four bolts each from the upper and lower fastenings.
- Remove the three nuts that are used to secure the left engine mount bracket.
- Remove the support, remembering to hold the variator. Slightly lower the rear of the transmission, making sure that the box studs come out of the holes in the left engine mount bracket. Move the variator to the left as much as possible (so that the input shaft of the box comes out of the torque converter), remove it from under the car.
- Install the variator and the removed components in the reverse order.
Is it necessary to reset the counter?
Motorists who operate cars with CVT transmissions installed on them are naturally interested in one question. It concerns whether the counter needs to be reset.
The answer here is clear. On vehicles with CVT, zeroing is a mandatory procedure. If you are serviced by an authorized dealer, the specialists themselves will be able to reset the sensor and begin a new aging count. Performing a reset yourself is more difficult.
Many service books state that it is necessary to reset the oil aging sensor in the box. There are 2 main reasons why this is done:
- This information makes it clear in what mode the car and the variator itself are operated. That is, specialists and ordinary motorists can find out if there are problems with the CVT after its last reset.
- If you remove the oil aging sensor on the variator after replacing it, this makes it easier to determine the next replacement date in the future.
- On some cars, if you do not reset the parameters, the meter will cause an error to appear when connecting specialized diagnostic equipment.
From the position of a car owner, he does not really need such information. But this is a good way to find out the details of the operation of a car with a CVT when buying a car on the secondary market.
The presence of errors when connecting a diagnostic device or a large number of points over a short period of operation allows us to naturally assume that the variator was operated in very difficult conditions, and therefore quite serious problems may arise with it in the near future. The buyer would rather refuse to buy such a car.
Alas, CVTs are still far from perfect. These are the most vulnerable and delicate gearboxes, very susceptible to stress. The delicacy of CVT forces buyers in the secondary market to be extremely careful when purchasing used cars with a CVT.
Only after making sure that the variator was not loaded and was operating normally can you agree to the deal. An oil aging meter will provide significant assistance in this matter.
How to check the oil level
Periodically you need to check the oil level in the Mitsubishi CVT box to prevent its volume from falling below the set level. To do this you will need:
- Start the car, drive for some distance until it warms up a little to a temperature of more than 70 degrees.
- Place the machine on a flat surface.
- Move the switch lever to any position to fill the torque converter with oil, then set it to “P” or “N” mode.
- Pull out the dipstick, wipe it off from grease, then put it back in place and check the fluid level after removing it again. With normal volume, the indicator should be between the HOT marks.
A deviation upward or downward indicates, respectively, an excess or deficiency of transmission oil.
How to drain oil from a variator?
- First you need to drive the car onto a lift or into a pit;
- Using a dipstick, we measure the oil;
- you need to remove the crankcase protection, you can move it away, to do this you need to unscrew the front bolts and loosen the rear ones, then you need to wipe the gearbox housing with a rag;
- then you need to attach a watering can to the crankcase near the drain plug;
- You need to unscrew the drain plug, don’t forget to put a bucket for old oil.
The car has not yet had time to cool down, so as much oil as possible will leak out, and with it all the deposits. You can also see how much oil has leaked and the same amount will need to be refilled. Then you need to wait about an hour for all the oil to drain out. Approximately 6 liters of old oil will drain. There is approximately the same amount of oil in the CVT Passat B6.
List of works during maintenance 4 (mileage 60,000 km)
After a run of 60 thousand km on TO-4, it is necessary to repeat the work carried out during TO 1 and TO 2 plus two more procedures:
- Replacing the fuel filter. The gasoline filter is replaced with a new one without replacing the electric fuel pump. For replacement, an original kit is used, which includes coarse and fine filters. For 2.0 with front-wheel drive - a Mitsubishi 1770A250 fuel filter is used - 10,800 rubles. For everyone else - Mitsubishi 1770A251 (MR514676) - 9950 rubles.
- Replacing engine coolant. Mitsubishi motors Super Long life Coolant premium is poured at the factory. This antifreeze can be ordered under the number MZ311986, the cost of a 4-liter container is 5580 rubles.
The original coolant is manufactured using LLC technology - Long Life Cooliant, which means carboxylate antifreeze consisting of organic acids and phosphates. When selecting analogues, you can use any Japanese LLC liquids, blue or green, without silicates. There are no analogues among European brands, as they are made using a different technology. The liquid is produced in finished form and is not diluted with water.
For replacement, original antifreeze is recommended: Mitsubishi Super Long life Coolant, green MZ320712 - 4l - 3800 rubles, and MZ320291 - 1l - 880 rubles.