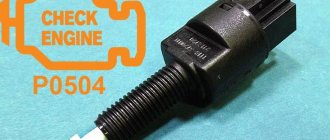
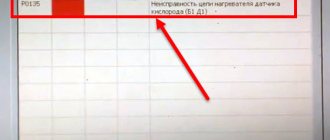
Diagnostic Trouble Code P0504 stands for mismatch of signals from sensors 1 and 2 brake pedal or Brake Switch A/B Correlation. Appears when the ECU receives conflicting information about the current position of the brake pedal.
Most often, error P0504 is recorded in Lada (Kalina, Granta, Priora, Vesta, Largus), Datsun (On-DO, mi-DO), Renault (Logan, Duster), Toyota (Corolla, Land Cruiser Prado) and other models, in in which this information is transmitted to the controller from the four-pin brake light switch.
We will tell you why error P0504 occurs and how to find and eliminate the cause of discrepancies in brake sensor signals in this article.
Error P0504 on VAZ cars
There is a problem that ruins the life of pretty good cars from the Kalina-2 series. I have a hatch, automatic. It's a normal car, it runs well, it's quite comfortable, there are no special problems.
But there is a problem that ruins life! This is error P0504 “Mismatched signal from the brake pedal sensors.” What's happening. When you are trudging through a dense and long traffic jam, you almost always drive on the brake pedal. You won't stop, but you won't accelerate either. It is at this moment that the error pops up. AvtoVAZ fights back, saying the driving style is incorrect. Great, but this is nonsense! Why doesn’t Mitsubishi give me such an error in the same situation? Well, okay, if it would just display an error and just reset it and that’s it. But the situation tends to get worse. It is expressed in the fact that the floating contact in the sensor over time begins to hang in a closed state, to become welded, simply put, and when you release the brake pedal, the car does not respond to the gas pedal and only after slamming your foot on the brake pedal, the contact falls off and the car starts to drive. Not only do you turn into a nuisance on the road with this behavior of the car, but also a dangerous nuisance, because the car can simply jerk when the sensor is triggered. As a result, a sensor costing 170-200 rubles makes a car worth 450,000 rubles stupid.
I disassembled the sensor, I categorically did not like how it was built inside, with a crooked spring, with contacts of different sizes, with traces of burning and welding. Moreover, I disassembled the sensor that came from the factory with the car. Over the course of 9,000 km, three of them have already been replaced, and we are planning to install a fourth, because the car again began to feel dull and flash with error P0504. People are starting to put transistors into the sensor circuit in order to reduce the current and voltage, so that the contact does not become welded, and to replace the sensor with sensors from Toyota and Audi. I myself bought a sensor from Audi and will install it. But explain to me what kind of disgusting this is? More precisely, ask AvtoVAZ a question - what kind of disgusting? After all, the problem with the sensor is not only on my car, type the question into Google, go to drive2 and you will see that almost everyone who has a K-2, Grant, etc. I'm struggling with this issue. Is this a design flaw, a bad supplier, etc.? It turns out I'm afraid to use the brakes on my car! Well, isn't it nonsense? What does AvtoVAZ’s answer about the wrong driving style mean? Driving on highways is easy and simple, but the car lives most of its life in the city, and the city means traffic jams! Do you have any driving style in traffic jams?
What to do if it is not possible to purchase a sensor
It also happens that error p0504 appears at the most inopportune moment, for example, when you are in some outback and it is not possible to purchase a new sensor.
In this case, you should remove the same sensor and try to disassemble it. It is quite possible that the contacts in it simply burned out. A breakdown of this type is not uncommon, especially on the Lada Granta.
But there is another, fairly common reason for such a breakdown. This is a spring that has become so stretched over time that it can no longer perform its intended functions. To fix this problem, simply replace the spring.
And in conclusion, I would like to note that if error p0504 appears on the on-board computer of your Lada Granda quite often, then we can say with almost 100% certainty that the brake sensor is to blame.
To eliminate a constantly recurring problem, you should simply purchase a new sensor from a specialized store. It is very noteworthy that if your car is still under warranty, you can contact an authorized dealer to fix the problem, since the problem is covered under warranty.
If you do not have such a desire, simply replace the sensor with a new one. It will cost you about 200 rubles. Agree, quite a small amount of money, for the sake of saving which, it may not be worth contacting the service center with a warranty card.
By the way, you can also replace this element of the car either at a service center or with your own hands. But for the last step you will need the appropriate tool and some skills.
Causes and symptoms of malfunction
Most often, error P0504 worries owners of Lada: Grant, Priora, Kalina and other VAZ cars with an ECU. Often a defect appears on GAZ cars, for example, GAZelle NEXT. But owners of foreign cars are less likely to contact the service to eliminate error p0504 and replace the sensor (frog). Most likely, the quality of foreign spare parts is much better. What symptoms indicate that the brake pedal sensor is faulty:
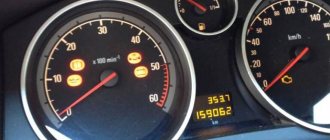
- The engine begins to work unnaturally: it feels like it either stalls while driving, then immediately starts.
- The traction disappears at around 40 km/h, but after applying the gas, the former agility is restored. Then the defect appears again.
- The brake lights do not light up, or on the contrary they work constantly.
The cause of incorrect operation of the “frog” can be: mechanical damage, oxidation of contacts or wire breakage. Sometimes a failure occurs due to the burnout of both brake light bulbs. Due to the listed defects, an error appears in the system under code p0504. It can be removed, but it will appear again soon.
Technical description and interpretation of error P0504
Trouble code P0504 reads “Brake pedal sensor malfunction A/B correlation. Often, in programs that work with an OBD-2 scanner, the name may have the English spelling “Brake Switch A/B Correlation”.
Your vehicle's powertrain control module (ECU) issues a P0504 code in response to a recognized failure in the brake light circuit. The vehicle's computer monitors all circuits for abnormalities such as no voltage or out of range conditions.
The brake light switch is tied to several circuits, each of which can lead to a dangerous situation. The brake light switch itself consists of two signal outputs, and if the switch is faulty, the problem is detected and this code appears.
This is not a costly failure in terms of parts cost or labor involved in replacement. But for your safety, it is necessary to carry out repairs as soon as possible.
Symptoms of malfunction
The main driver symptom of P0504 is the MIL (Malfunction Indicator Light) illumination. It is also called Check engine or simply “check light”.
They can also appear as:
- The brake lights will either remain on continuously or not illuminate when the pedal is pressed.
- It will be difficult or impossible to move.
- The car may stall while moving if you press the brakes.
- With this problem, cruise control cannot be activated.
Wiring and light bulbs are common factors in code 0504.
Again it is worth paying attention to the components.
If the owners of the Granta did not leave reviews, it would be incorrect to blame the functioning brake lamp for a malfunction. However, this point does occur. The active spiral of the 1-pin brake light bulb stretches over time, while the antennae that hold it close with the rest. In this situation, it makes sense to install new brake lamps, which can help correct error P0504. Possible causes of the Check Engine error and alert may be:
- burnt contacts on the limit switch;
- weak contact of the light bulb base;
- short circuit of the brake light power supply wiring.
These errors are easy to check. There is a voltage at the sensor supply wires of 0.12-0.15 V - which means you need to look for a short circuit or oxidation on the contact blocks/boards. Note that there should be no voltage on the supply wires.
What is error P0504 on Lada Granta
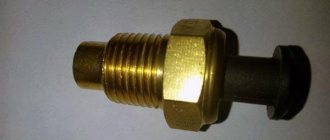
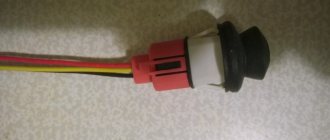
Error P0504 is in any case associated with the brake pedal sensor. Calling it a sensor, however, is not entirely correct, since it is a regular limit switch with two contacts. A simple device with a spring-loaded contact pad that supplies voltage to the brake light lamps when the brake pedal is pressed.
Brake pedal limiter Lada Granta
The problem is that on Grants with an automatic transmission and an electronic gas pedal, the readings of this switch are taken into account when calculating the transmission algorithm.
This means that when the limit switch contacts are closed, a signal is received from the ECU to the throttle valve, which seeks to limit engine power.
In this case, the brake lights may light up, or they may not work at all if the lamps are working.
In this case, the cause of error P0504 is a broken brake light switch spring.
Causes of error P0504 Granta
An error regarding an incorrect signal from the brake pedal switches occurs in some cases solely due to an unadjusted limit switch. The fact is that after flashing the electronic control unit M 74 and M 74.9.
7 engineers made some adjustments to the engine control algorithm, which ultimately should have had an impact on reducing the amount of harmful emissions.
In practice, changing the firmware only strangled the engine and caused a bunch of problems with sensors and limit switches.
The end switch and its catalog number
The Lada Granta has both a brake pedal position sensor, a limit switch and a brake light switch installed in one housing. The first reason for the appearance of error P0504 is incorrect adjustment of the position of the sensor housing.
How to adjust the Grant brake pedal sensor
The sensor is fixed to the bracket with two nuts screwed onto a plastic housing. The upper nut is responsible for the position of the sensor relative to the brake pedal. The nominal gap between the pedal platform and the heel of the sensor should be 2-3 mm when the pedal is fully released.
Adjusting the brake pedal sensor gap
If there is no gap, the sensor may be triggered at the slightest touch of the pedal, which leads to error 0504 and activation of the Check Engine warning light.
After simply adjusting the gap with two keys, we start the car and look for errors.
P0504 will not reset immediately, but if the problem was an adjustment, the error code will disappear after 10-15 minutes of running the engine at idle speed. If this measure does not help, we check and look for the reason further.
Broken brake pedal sensor
One of the likely reasons for the appearance of this error on Grant is a malfunction or defect of the brake pedal end itself.
The quality of AvtoVAZ components has always left much to be desired, and this happened this time too. Even domestic sensors, as a rule, are equipped with cheap Chinese springs and contacts.
As a result, the springs break and the contacts simply burn out after 5-8 thousand mileage.
The left sensor is not working, the rod does not return to its original position
The sensor rod does not return to its original position (due to the spring), so the system perceives the signal from the sensor as a signal that the brake pedal is pressed. In this case, the ECU interprets the situation as simultaneous pressing of the gas and brake pedals, thereby forcibly closing the throttle valve.
In some cases, replacing the brake pedal sensor solves the issue with error P0504 on Grant, but if a known-good sensor after installation did not lead to any results, we dig further.
Lamps and wiring - causes of error 0504
And again about the components. If it were not for the reviews of Lada Grant owners, it would be difficult to accuse a working brake light of sabotage. But the fact remains a fact. The working spiral of a single-contact brake light lamp is stretched, and the antennae that hold it close with others. In this case, replacing the stop lamps will help get rid of error P0504.
Burnt contacts on the limit switch itself, poor contact on the lamp base, shorted wiring in the brake light power supply network - all these are possible causes of the error code and Check Engine message. This is easy to check.
If there is a voltage in the region of 0.12-0.05 Volts on the lead wires at the brake light, you need to look for a short circuit or oxidation on the boards or terminal blocks.
There should absolutely be no voltage on the supply wires.
How serious is the P0504 code?
It is very dangerous when the brake lights do not work. The car driving behind you cannot correctly assess the situation and your actions, which can lead to an accident. Likewise, if pressing the brake pedal does not disengage the cruise control system, the consequences can be very dire.
What needs to be repaired for error code P0504?
In most cases, fixing the cause of the P0504 code is quite simple. Here are some of the most typical situations:
- replacing a burnt out light bulb;
- repair or replacement of wiring or connectors;
- replacing the brake switch;
- replacing a blown brake light fuse;
What to do if the sensor is not on sale?
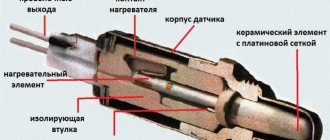
But what to do if this spare part is not for sale in the outback? It happens. Then you need to remove the sensor and disassemble it. The contacts may be burnt, this is a disease of this sensor!
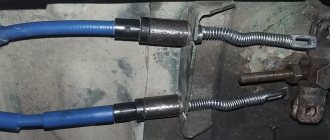
The arrow marks the spring and the contact connector of the sensor.
Another common problem is that the spring loses its functionality and needs to be replaced!
Diagnosis of the error
Determining the error code using an OBD-II scanner, it is cleared. All possible causes must be checked. From simple to more complex. You need to start with fuses and light bulbs. If the problem persists, you need to check the brake light switch, wiring, and connectors.
Common diagnostic errors
Often, when the brake light comes on, it is not the driver who assumes that the problem is a burnt out bulb. Replacing the light bulb may not solve the problem, because the source could be the wiring or switch. If the fault is in the switch, then replacing the fuse will do nothing. The new one will also burn out.
Symptoms
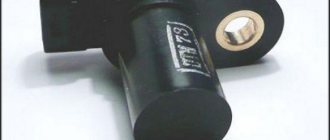
This is what the culprit looks like, due to whose error the car can behave extremely unstable at idle, as well as when revving above 1500 rpm.
Although this detail is small, it can cause quite a lot of trouble.
Reasons for the error
A P0504 code may mean that one or more of the following problems have occurred:
- Short circuit in the brake light switch signal circuit.
- There is a malfunction in the brake light switch, the failure of which is due to wear.
- There is a problem with the fuses, sometimes they fail due to moisture getting into the circuit or the brake light burning out.
- If the wiring harness, or more specifically the connectors, are loose or disconnected, it will cause a correlation problem between the switch and the ECU.
- And of course, the ECU itself could fail.
How to change the clutch sensor on a Priora
We study, check and change brake and clutch pedal sensors on Kalina and Priora
Well, the widespread computerization of cars has reached such a unit as the clutch. No, the electronic unit does not yet control the process itself, but it already controls this process. To do this, a sensor is installed under the clutch pedal to monitor the progress of the clutch.
Operating principle of the electronic engine control system (ECM)
In a modern car, all process control, except for the rotation of the steering wheel, and even then, is entrusted to the computer, or Electronic Control Unit (ECU). It contains a program with many different tables.
In general, the ECU receives data about the state of the car, speed, revolutions, and activated mechanisms from a large number of sensors.
Based on the results of these observations, the ECU, using these tables, includes certain ignition modes, fuel supply and other executive functions.
The role of the clutch sensor
It would seem, what does the clutch have to do with it? And here's what it has to do with it. When the clutch engages, the most sensible thing to do is to reduce the engine speed. But not to idle, but according to the speed of the car. This is not always available to the driver, especially a beginner. And here the computer will come to the rescue. Reacting to the signal from the clutch sensor, it can independently adjust the engine speed.
Important! In addition, in accordance with the Priora speed sensor, the ECU can obtain information about the serviceability of the clutch.
Summarizing the above, we can say that the presence of a sensor on the clutch allows:
- saves fuel;
- make driving easier;
- monitor the serviceability of the coupling;
- increase its service life.
Therefore, its serviceability is an important factor in the Priora control system.
Design and location of the Priora clutch sensor
In principle, this is the simplest switch. In the position when the clutch is disengaged and the pedal is not pressed, the sensor circuit is open. If you press the clutch drive, the limit switch of the sensor closes and the signal “clutch is on” is sent to the ECU.
It is located on the clutch pedal mounting assembly, where the very tip of this pedal is located opposite the sensor end switch.
Symptoms of this part being faulty
Since this element is connected to the ECU, it reacts to its failure first of all. That is, it gives peculiar signals that are reflected on the instrument panel and are noticeable in the behavior of the Priora when driving.
- turning on the “Check Anger” light;
- twitching when starting to move;
- a sharp drop or, conversely, an increase in speed when the clutch is engaged.
There can be three malfunctions in total: a breakdown of the sensor itself, a break or short circuit in its circuit, and incorrect adjustment of the position of the limit switch on the pedal.
Attention! Only Prioras, which have an electronic throttle, are equipped with such a device. Cars with a regular throttle cable do not have one. It is also available for all-wheel drive VAZ
It must be remembered that these are two types of sensors, and they are not interchangeable!
It is also available for all-wheel drive VAZ. It must be remembered that these are two types of sensors, and they are not interchangeable!
In general, the “Check” warning lamp lights up in cases where the ECU has not received a signal within 2 seconds when starting from a stop or during four shifts on the move without a signal. Accordingly, the signs mentioned above appear.
And only after that remove it. This is a simple procedure. The clutch sensor is attached with only two self-tapping bolts, and it is not difficult to remove it with a short, shaped screwdriver. Well, then, on the spot, decide whether to start going to retail outlets in search of a new unit, or try to restore the old part. Well, put it in its place.
After finishing work on the Priora, do not forget to reset the ECU error memory.
How to Troubleshoot or Reset Trouble Code P0504
Some suggested steps to troubleshoot and fix error code P0504:
- With the help of an assistant, check the brake lights. Make sure they work, turning on and off, and that the bulbs are in order.
- If the brake lights stay on continuously, the brake light switch is either not adjusting properly or is faulty. The same applies to faulty lamps. Move the driver's seat back and look under the dashboard. Squeeze the tabs on the electrical connector located on the brake light switch and remove the connector.
- Using a voltmeter, check the voltage on the red wire in the connector. Place the black wire on the ground and the red wire on the red wire terminal. The voltmeter should show a voltage of 12 volts, if not, you should check the wiring to the fuse box.
- Connect the connector to the switch and measure the white wire with the pedal pressed. You should have 12 volts with the pedal pressed and no voltage with the pedal released. If there is no voltage, replace the switch. If there is voltage on the white wire with the pedal released, also replace the switch.
- If the switch has an adjustment, check it. The switch must be in good contact with the brake pedal lever and fully depressed.
- If the brake lights are working fine but you still have a code, check the other wires at the brake light switch. Remove the connector and check the remaining wires for power. Make a note of the location of the power wires and replace the connector. Secure the rear wire next to the power wire with the pedal pressed. If there is no power, replace the switch.
- If the power was turned on when the pedal was pressed in the last test, the switch is OK. There is a problem when connecting to the control unit or with the vehicle control unit itself.
- Connect the control unit and the brake pedal sensor via ground. If the voltmeter shows 12 volts, then the control unit is faulty. If there was little or no voltage, replace or repair the harness from the control unit to the sensor.
Diagnosis and problem solving
The main problem is considered to be a discrepancy between the data in the PCM and the brake pedal sensor. Therefore, let's take a closer look and describe some suggested steps to troubleshoot and fix error code P0504.
The brake light switch is located under the instrument panel at the top of the brake pedal lever. The brake booster raises the pedal to the fully extended position. The brake light switch is mounted on a crossbar support bracket directly behind the brake pedal mounting bracket.
The only way to access the switch is to move the front seat back, lie on the backrest and look up under the dash. You will see a bracket with a switch near the top of the brake pedal lever. The switch will have four or six wires.
The switch rests on the bracket so that its drive rod is in contact with the brake pedal lever when the pedal is fully extended. At this moment, the switch is pressed on the brake pedal lever, cutting off the voltage supply.
When you press the brake pedal, the lever extends to engage the switch and turn on the brake lights. After releasing the pedal, the lever presses the bar again, turning off the brake lights.
Therefore, with a high degree of probability, we can say that replacing this sensor will eliminate problems with error P0504.
Brake pedal sensor Lada Kalina
The Kalina brake pedal sensor is a technical device that is used to monitor the degree of impact on the brake pedal. Quite often, car owners of the VAZ line complain about breakdowns or incorrect adjustment settings of the product.
Fortunately, the process of adjusting or replacing a part is not very difficult if certain nuances are observed.
Performance diagnostics
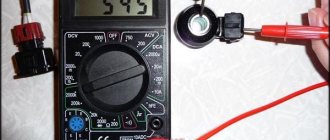
Checking the functionality consists of: 1. Testing the product with a multimeter. 2. Disassembly and visual inspection of the internal components of the part.
3. Replacement sensor is not known to be good.
The first method involves alternately measuring the contacts of the dismantled sensor. The point is to check each contact individually and in pairs (second and third contact). This is quite convenient to do, since at the place where the contact chip is connected, all connectors are numbered.
The second method is used to identify faulty or deformed internal elements of the product (in most cases, damaged springs).
There should be no traces of oxidation or contamination. If there are any, clean them out.
The third method is quite simple and trivial. Install a new part to replace the one whose serviceability you doubt.
When the system is restored to normal operation, the malfunction indicator (check engine) should go out (if it does not disappear within 15 minutes, the error should be reset manually).
Signs of a faulty brake pedal sensor Lada Kalina
In order to understand that the Kalina brake pedal position sensor is the cause of the vehicle’s incorrect operation, pay attention to the following signs:
- presence of error “P-0504” on the dashboard;
- a significant decrease in power and engine responsiveness when pressing the gas pedal;
- increase in engine speed (short-term) when changing gears.
Main causes of sensor failure
In order to identify the reasons that interfere with the normal operation of the device, it is necessary to disassemble it and carry out a thorough inspection to identify deformations and damage. The following defects are most common:
- the internal (small) spring, which is located on the rod, shows signs of deformation or distortion;
- the contact terminals of the product have physical oxidation;
- backlash of the moving contact;
- Quite low quality of factory production (defective, flimsy internal elements of the device).
Adjusting the brake pedal sensor Kalina
If the sensor is in good condition, and incorrect operation of the internal combustion engine continues to bother you, try adjusting the product yourself
Please pay attention to the following features:
- The sensor must be screwed in clockwise until the brake pedal begins to move down. Then you will need to slightly unscrew the product and secure its position using the fastening nut.
- The result should be such that when there is no action on the pedal, the sensor rod is recessed into the housing, and when the pedal is applied, on the contrary, it is completely released from the housing.
- As for the working gap, it is adjusted using two nuts (one at the top, the other at the bottom). The adjustment is carried out using the upper nut, which is tightened, and the lower one, on the contrary, is unscrewed. The entire process is carried out until the button is completely recessed into the body when the brake pedal is applied. However, you should not overdo the adjustment; in other words, you should leave a small gap or travel margin (approximately 2 to 5 millimeters).
Removal and installation
Replacing the brake pedal sensor on Kalina is carried out using an adjustable wrench set to “19”. The sensor itself is located above the brake pedal under the steering column. Conventionally, the removal stages can be divided into 5 steps:
- Before starting electrical work, it is recommended to disconnect the negative wire (terminal) from the battery.
- Then you need to move into the car interior on the driver’s side. For ease of operation, it is advisable to move the driver's seat in the opposite direction from the dashboard.
- Find the location of the sensor. Find a contact chip with wires. Press and hold the 2 plastic fasteners located on both sides of the chip. Pull the connector out of the sensor connector.
- Take the wrench in your hands and loosen the fastening nut. After which the sensor can be unscrewed freely.
- The installation process is similar to the removal procedure, except that you will need to make adjustments (tuning), the process of which is described in detail in the previous section.
Why does the indicator work?
If the handbrake lamp does not light up at all when it is activated, the reason is most likely trivial:
- diode burned out;
- wires are broken.
This small problem can be fixed at any car service center for literally pennies. In principle, there is nothing wrong with the diode not lighting up. But its repair cannot be delayed for long. After all, in case of real problems with the brake system, he will not be able to notify you about it in time.
It is much worse if the handbrake indicator is constantly on or lights up while driving. In this situation, it is extremely undesirable to operate the car without understanding the strange behavior of the diode.
The most common situation is when the handbrake light is constantly on. The reasons for this can be very different: from harmless clogging or oxidation of the contact sensor to a stretched cable in the handbrake system.
How to change
The sensor is located slightly above the brake pedal lever. To find it, you need to look under the torpedo. On Lada Priora, Grant and Kalina, a 19 mm open-end wrench will be required for dismantling. The replacement process looks like this:
- Remove the negative terminal from the battery
- Disconnect the 2 plugs from the sensor.
- Loosen the locknut with a 19 mm wrench (remember its approximate location).
- Unscrew the sensor counterclockwise.
- Install a new one and secure it with the adjusting nut.
- Connect the battery.
- Turn on the diagnostic equipment and clear the old error P0504.
The old sensor is quite repairable. In most cases, the cause of the malfunction is a broken spring. If you disassemble the body and install a new spring, the “frog” will work again.
Car owner's comment: On my Lada Grant, a spring broke in the sensor and began to close the contacts of the limit switches. When I left the car overnight, the ignition did not seem to turn off, which is why the battery ran out completely several times. I bought a new battery, but the problem did not go away until I made diagnostics and replaced the sensor. At the same time, the Check Engine did not light up.
How to remove and install
Disconnect the negative terminal of the battery. Move the driver's seat as far back as possible, lift the steering column up, and remove the carpet. The sensor is located near the brake pedal, to remove it you need to remove the block with wires (by snapping the latches), and then:
- (Priora, Kalina, Granta, Niva 4x4) loosen the lock nut and unscrew the sensor.
- (Largus, Vesta, XRAY) turn the sensor counterclockwise 90 degrees and remove it from the bracket.
Installation of the brake pedal sensor is carried out in reverse order. Adjust it if necessary. We tighten the sensor until the pedal goes down. Then turn it out a little (counterclockwise 90 degrees) and secure with a lock nut. It should be so that when the brake pedal is released, the switch rod is completely “recessed”, and when the pedal is pressed, the rod should completely come out of the switch body. The process of removing and installing the sensor is also shown in the video:
Which one to buy
Experts and service workshop specialists recommend purchasing an original brake sensor. It is of better quality and lasts longer.
Table 1. Price of brake pedal position sensor
| Manufacturer | Code | Cost, rub. |
| AvtoVAZ | 11183720010 | 170 |
| Avar | 2113720 | 180 |
| AMY | 11183720010 | 95 |
Before changing the “frog”, you can “ring” it with a tester to make sure the part is working.
How to replace the sensor?
If you have received error code 0504, to perform this simple procedure you will need to provide access to the pedal bracket on the Lada Granta, on which our “ill-fated” sensor is actually present, or rather, above the pedal assembly. A well-carried out replacement will guarantee long-term operation.
Let's get started.
- Remove the negative terminal from the battery terminal.
- We press out the plastic retainer (use a screwdriver).
- Next, remove the block with wires.
- Turn the sensor in a clockwise direction.
- We remove the faulty part.
We install the new component on a Lada Granta car in the reverse order. Don’t forget to first release the pedal to be able to insert the new product into its socket. We turn the component against the direction of the arrow until the corresponding click appears.
About alternative sensor options
Since domestic “devices” for the Lada Granta car are not able to prevent an unpleasant situation, it is possible to use other devices that act as analogues. Such a component could be a brake light switch from Volkswagen, or more precisely: “FACET 7.1126”. This switch is slightly more expensive than the “native” one (560 rubles) and has the following features:
- four contacts;
- threaded leg with a similar diameter of 12 mm.
To successfully install the indicated analogue, you will need to acquire an adapter for the terminals.
Summarizing
Summarizing what has been said about the possible reasons that caused the failure and error P0504, it’s time to draw up an indicative checklist according to which you should act when searching for the cause. Once you find the problem, you can reset the error.
- Adjusting the gap in the middle of the brake pedal and limit switch rod.
- Cleaning and repair, installation of a new brake pedal sensor. To do this, you need to check the return of the rod, as well as the spring stiffness. The number of the brake pedal limit switch is 2118-3720010.
- Inspect fuse F23 (the number does not always match).
- Checking and installing sensor lamps.
- Inspect and clean the connections of the rear light, pedal end switch, and so on along the chain.
- Checking or dismantling the on-board computer, as well as flashing the electrical control unit.
Sources
- https://AccBook.ru/to-avto/regulirovka-pedali-tormoza-kalina.html
- https://AutoNevod.ru/obd2-codes/p0504
- https://granta-service.ru/remont/oshibka-r0504-lady-granta-prichiny-i-kak-ee-ispravit.html
- https://kalina-2.ru/otechestvennie-avto/p0504-oshibka-vaz-kalina
- https://avto-o.ru/novosti/p0504-kalina.html
- https://saturn-lada.ru/remont/oshibka-0504.html
- https://osensorax.ru/remont/oshibka-p0504
- https://medwegonok.ru/oshibka-r0504-priora-16-klapanov-kak-ustranit-oshibku/