02/28/2022 6,884 VAZ Chevrolet Niva
Author: Ivan Baranov
With the onset of cold weather, it is important that the car interior is heated, creating comfortable conditions for the driver and passengers. The article discusses cases when the stove of a Niva Chevrolet car does not work, the main malfunctions, and describes how to repair the unit.
[Hide]
Car heating system
The Chevrolet Niva SUV has a heating system that not only heats the interior in winter, but also cools it in summer.
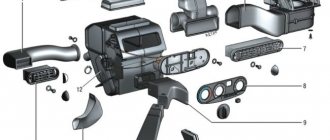
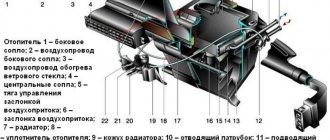
Its design includes:
- Control block;
- radiator;
- coolant pump;
- pipes;
- evaporator;
- tap;
- compressor.
In addition, the design has a resistor and a fuse that are responsible for functionality.
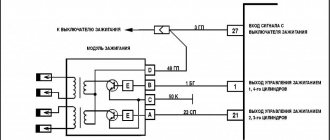
Heating system diagram
Why doesn't the heater work on a Chevrolet Niva? Fix it yourself
A fairly common breakdown is that the stove on a Chevrolet Niva does not work, which owners of this model often encounter. And what’s most unpleasant is that this breakdown, as a rule, manifests itself in the cold season, when it is, to put it mildly, not entirely comfortable to carry out any repair work.
Happy owners of heated garages are in a much better position. Let's make a reservation right away
– this breakdown can be eliminated extremely simply and quite quickly, but to ensure the scope of work will have to mobilize existing technical skills – preparatory activities are characterized by well-known difficulties.
The stove in the Niva Chevrolet does not work, as practice has shown, the main cause of the breakdown is the failure of the resistor responsible for the operation of the electric fan that pumps hot air into the cabin. Sometimes malfunctions of the stove are accompanied by a distinct smell of burnt insulation.
The fuse may have blown:
It should be borne in mind that a similar malfunction can also be caused by the failure of the corresponding fuse responsible for the operation of this resistor. Therefore, before attempting to get to the resistor (this will be discussed below), it makes sense to first check the functionality of the fuse.
If the problem is there, then you won’t have to do anything other than simply replacing the old fuse with a new one - the repair will end almost before it even begins.
Replacing the resistor
Having made sure that the fuse is working, we take steps to fix the problem: now it’s clear - it’s all about the resistor. Replacing it with a new one is not that difficult, it’s just that the location of this part creates some difficulties - getting to it is quite problematic.
To solve the problem
, just loosen the glove compartment and pull it out a little (there is no need to remove it completely). Let us warn you right away: free space is limited, so a small Phillips-head screwdriver is best.
Having reached the resistor, turn it off (pull out the terminal), and then unscrew the fastening screw. We install a new one in place of the failed resistor and perform the above steps in reverse order. At this point the repair can be considered complete. Naturally, before starting assembly, we check the stove for functionality.
A few words about the resistor itself
. Purchasing this part should not be a problem - it is not in short supply. The cost is also not amazing (about 200 rubles). Any resistor model for the 2110 line will do.
The resistor, being a mandatory component of the stove, is a speed controller connected in series to the circuit of electric fans. The injection of air heated by the stove into the cabin depends on it.
We hope that the above simple tips will help car enthusiasts resolve the issue on their own.
, without resorting to the services of a car service (it’s no secret that garage auto mechanics can easily diagnose a complete breakdown of the stove, forcing a gullible client to pay a tidy sum for its replacement).
We hope that after reading the article, you will easily cope with a non-working stove on a Chevrolet Niva without resorting to outside help.
The only requirement is accuracy and thoroughness, i.e. avoiding annoying errors during the work process, such as accidental wire breaks and the like. It is better to spend a little more time, but do the work at a high quality level.
Possible faults
Various problems with the Chevrolet Niva are possible: the heater blows cold air, the fan may not work, etc.
The cause of the problem may be the following:
- The stove tap does not work;
- radiator pipes are damaged;
- the additional resistor does not function;
- radiator is faulty;
- The control unit does not work.
To restore the functionality of the system, you need to know how to troubleshoot problems and repair faulty elements or replace them.
Improvement No. 3. Installing the grille on the air intake
When disassembling the heater, a large number of tree leaves and insect remains were found in the air intake casing and in the honeycombs of the heater radiator grille, which also reduced the efficiency of the heater. Therefore, after cleaning and flushing the heater core, I took measures to prevent the radiator from clogging.
To do this, I bent a wire frame to the size of the air intake inlet, covered it with a nylon mesh with a 1x1 mm cell, and installed it at the bottom of the rubber seal of the air intake inlet. It was perfectly fixed there in the fold, like an accordion, without additional fastening.
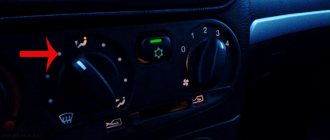
How to fix a resistor?
Before repairing a resistor, you need to make sure that it is inoperative. To do this, you need to turn on the ignition and check its operation - how the air will blow. This device is responsible for the operation of the fan, or more precisely, its rotation frequency. If the fan does not work in the first three speed positions, then the device is faulty.
Checking the device for serviceability
To change the resistor, you need to pull the glove compartment forward without removing it. Disconnect the wiring harness. Next, remove the device and install a new part. After the process is completed, you should check the operation of the fan at different speeds (author - Andre Vladimirovich).
New&Pomos
The main reasons why the Chevrolet Niva heater does not work and how to eliminate them
It often happens that with the onset of cold weather, owners of the popular Chevrolet Niva SUV model are faced with a problem when the heater in the cabin does not work. Quite an unpleasant phenomenon that requires immediate resolution. It is the question of solving this problem that we will deal with in this material.
Car heater system
Heating system for a Niva Chevrolet car
The automotive heating system of a Chevrolet Niva SUV consists of the main structural elements and components that are responsible not only for heating the interior, but also for cooling it in the summer. The heating system consists of the following elements:
- Heater radiator;
- Control block;
- Heater pipes;
- Coolant pump;
- Compressor;
- Evaporator.
These are the main elements, but there are also small ones such as a resistor and fuse, which are also responsible for the functioning of the stove as a whole. So, we will not consider how the heating system works, but will only analyze the main points that may be the causes of stove malfunctions. The car's heating system is shown in the photo below.
Causes of malfunction
Often, a breakdown of the stove in the interior of a Chevrolet Niva car is not particularly difficult, so to eliminate it, you should know the main reasons, or, more precisely, the components that fail.
So, the following factors can be the causes of stove malfunction:
- Additional resistor malfunction. This resistor is used to control an electric fan that blows hot air directly into the car interior.
- Malfunction of heater pipes.
- Leak at the connections of the pipe and the heater radiator.
- The stove control unit is faulty.
- Heater malfunction.
Let's look at how to eliminate the main causes of stove failure, how repairs are carried out and what you need to know to carry them out.
Resistor - how to fix it?
Initially, you need to make sure that it is the Niva Chevrolet fan resistor that has failed. This can be found out as follows: if, when the ignition is turned on, none of the first three speed positions work, then the problem lies precisely in this small part. The fourth speed will function in this case, since the resistor does not affect its operation.
Checking the resistor for functionality
So, the resistor is responsible for the operation of the fan, or rather for its rotation frequency. By switching the regulator, the resistance changes, directly affecting the speed of the stove fan.
To replace the fan resistor, follow these steps:
- Disconnect the negative terminal from the battery.
- Inside, you need to loosen the glove compartment clamps and slightly pull it towards you.
- Behind the glove compartment there is a resistor, which is removed by removing the terminal block and unscrewing the screw.
Replacing the resistor is not particularly difficult and will take no more than 5 minutes. After installation, we check for functionality.
Condition of the pipes
Another common malfunction is wear of the pipes (which occurs in rare cases and requires their replacement) or damage to the clamps on them. Coolant (antifreeze) passes through this connection and its leakage is observed over time during operation. You can determine this leak by feeling the carpet in the car interior. If there are traces of coolant or an odor, the products need to be replaced.
You also need to pay attention to the condition of the clamps securing the pipes; perhaps one of them is not tightened, or has been damaged, and because of this, a leak has formed into the interior.
If a product such as a radiator is being replaced, it is recommended to install new pipes together. During operation, they lose their elasticity, and liquid may leak.
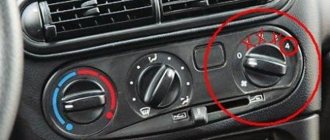
Control block
If the heater control unit fails, then it will need to be replaced. The stove control unit is a front panel on which the stove operating mode switches are located.
In the event of a malfunction, this product will require repair, which involves removing the unit and further replacement. Product repair can be entrusted to an experienced electrician, who can determine the exact location of the fault in a matter of minutes and carry out repairs. If you are sure that it is impossible to operate the control unit in the future, then you can replace it with a new one. The process of removing the control unit is simple, but it will take about an hour if you remove it yourself.
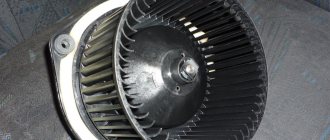
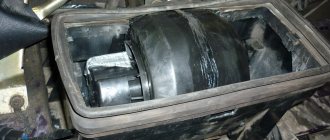
Fan
If the stove fan does not work, then you need to check the serviceability of the electric motor. The fan acts as an air blower that enters the car interior. The fan can be repaired, but first it needs to be removed. The extraction process is described in the relevant materials. After removal, the fan is checked from the battery. If the engine is faulty, then it is replaced. You can replace the fan as a whole by first purchasing a new one.
Heater (radiator)
The last element that requires attention if the heater in the cabin does not work is the heater. If the heater radiator becomes clogged, then heater repair is required. To avoid this, it is necessary to fill the radiator not with ordinary water, but with distilled water or antifreeze. The use of powder-based sealants is also not allowed, as they lead to clogging of the radiator honeycomb. In this case, no repair will help and the radiator and heater will need to be replaced.
Thus, starting from the simplest and getting to the most complex moments of stove malfunction, you can notice that small devices (fuse, resistor) often fail. Good luck troubleshooting the stove in your Niva Chevrolet.
Replacing the heater (radiator)
Replacement is carried out if antifreeze begins to leak. The radiator is located behind the glove box, in a niche on the left side of the front passenger's feet.
New replacement product
The procedure includes the following steps:
- First, turn off the on-board network by disconnecting the negative terminal from the battery.
- Then you need to remove the glove compartment and side panel.
- Drain the antifreeze from the block.
- Next, unscrew the air duct blowing on the legs so that it does not interfere with removing the parts.
- Then remove the cabin air filter.
- Having unscrewed the snail, we move the damper body to the side. Then you should disconnect the wires, and take out the volute and motor.
- Next, unscrew the evaporator screws and disconnect the hose. Moving the evaporator to the side and gently pressing it to the floor, remove the device.
- Then disconnect the pipes. If there are new pipes, the old ones can be cut off.
- After unscrewing the two fastening screws, remove the heater radiator from the niche.
- We install a new device. Assembly is carried out in reverse order.
- Add coolant.
After replacing the radiator, you need to check the functionality of the stove.
What to do if the Chevrolet Niva heater fan does not work: causes and troubleshooting
The fan of the Niva Chevrolet car interior heating system is the most important component of the car. Even with a working radiator, the heater will not work properly if there is no air movement. When the Niva Chevrolet heater fan does not work, the cause of the breakdown should be sought not only in the electric motor, but also in the electrical wiring switching devices. This article will discuss in detail the main symptoms of this type of malfunction, as well as how to eliminate them.
How the heater and cooling fan works in Niva Chevrolet
The movement of air through the heater radiator is carried out by a DC motor . The impeller is installed directly on the rotor shaft, which minimizes power losses. The fan electric motor is securely mounted in a sealed casing, which is located under the windshield of the car, so to repair it, you will need to remove some interior elements.
Attention! The maximum impeller speed can reach 3000 rpm, but only if the original electric motor model is installed.
The operation of the electric heater motor is controlled from inside the car using a special switch.
Additional resistor
To ensure a comfortable temperature inside the car, it is not always necessary to operate the fan motor at full power. To reduce the speed, additional resistance is installed in series in the electrical circuit . This simple but effective method can significantly reduce the intensity of the air flow.
For more precise adjustment, the resistor has 3 resistance values , and given the possibility of direct connection, the rotation of the motor rotor can be set in 4 different speed modes.
The standard product provides the following current indicators , which is directed to the electric motor after passing through the internal spiral of the limiter:
- 5.1 A – first speed.
- 9.0 A – second.
- 14.0 A – third.
Attention! Depending on the type of motor installed, the maximum current at fourth speed can range from 18 to 25 Amps.
Symptoms of a problem
Malfunctions of the interior heating fan will be especially noticeable in the winter season. Failure of this system can be manifested by a complete lack of rotation of the electric motor, constant operation of the motor at maximum speed, or periodic turning on of the device. Regardless of the cause of the malfunction, replacing the Niva Chevrolet heater fan or repairing it can be done with your own hands.
Heater and cooling fan repair
If the motor winding is burned out, then only experienced craftsmen can do the rewinding themselves at home . If the motor completely fails, you will need to purchase an original product or its equivalent.
Replacement of the electric motor is carried out on your own or at a service station. If repairing the electrical system of a car is being done for the first time, you should strictly follow the step-by-step instructions, and also carefully monitor the correct connection of the wires.
Attention! It is not recommended to use used engines for replacement, because it is quite difficult to accurately assess their condition.
What kind of malfunctions can there be?
If the engine is working properly, but the cooling fan is not working, then this condition of the ventilation and heating system may be caused by a simple wiring break. In this case, a thorough visual inspection is carried out while simultaneously testing the electrical circuit with a tester.
Sometimes a malfunction of the cooling and heating system manifests itself in the constant rotation of the fan motor at maximum speed. Despite the apparent insignificance of such a breakdown, it can lead to an excessive increase in temperature in the cabin.
In addition, operating the stove in this mode produces the maximum noise level, which also creates discomfort. The reason for this “behavior” of the ventilation and heating system may be a malfunction of the additional resistor. Replacing this element allows you to completely eliminate the damage.
DIY troubleshooting
If the Chevy Niva cooling fan does not turn on, then if you have at least a little experience, you can try to fix the problem yourself. The main advantage of repairs without the involvement of third-party specialists is saving money and time . Also, during the work, other elements and devices that are located at the location of the stove can be checked.
The disadvantages of self-repair may include making serious mistakes , which will lead to failure of not only the products being repaired, but also related parts. In some cases, replacing parts may result in a short circuit and fire in the vehicle.
If, despite all the possible disadvantages, you decide to repair the Chevrolet Niva yourself, then the recommendations below will help minimize the risks and possible damage from unprofessional intervention in the electrical system of the car.
Step-by-step instruction
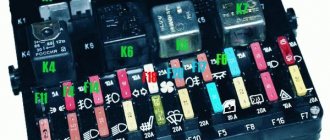
If the stove fan does not turn on, then first you should check the fuse , which is responsible for the safety of the wiring circuit of this electricity consumer. The Chevrolet Niva relay and fuse mounting block is located under the steering column. To get to it, you will need to unscrew the screws and remove the cover by pulling it towards you.
The location of the fuses inside the block may vary significantly depending on the car model, but in both old and restyled models, the protective device located in cell F18 is responsible for the heater heater. Such a product must operate at a current strength of more than 25 Amperes. You can check the functionality of the fuse with a tester or multimeter.
Attention! When installing a high-power fan motor (25A), the standard fuse is replaced with a product with a response current of 30 Amps.
If the fuse is in good condition, it is possible that the heater fan malfunction is caused by a failed electric motor. To make sure that this part has actually burned out, you will need to dismantle it.
This work is performed in the following sequence:
- Remove the glove compartment. To perform this operation, you will need to unscrew several screws, remove the cover stops and the side casing.
- Unscrew the screws securing the electric motor.
- Disconnect the wires.
- Open the hood and remove the windshield wipers and the panel underneath them.
- Remove the cabin filter.
- Unscrew the four nuts holding the air duct box in place.
- Remove the engine from the engine compartment side.
You can check the electric motor using a multimeter, or by directly connecting it to a 12 V current source. If the motor is faulty, it must be replaced with a new original product or its complete analogue. Otherwise, it is recommended to lubricate the bearing and reassemble the interior heating system in the reverse order of removal.
Attention! If the cabin filter is significantly dirty, it also needs to be changed.
If the heater fan motor constantly runs at maximum speed, then most likely the additional resistor is faulty. As a rule, this part cannot be repaired and you will need to use a new product in order to select the operating mode of the stove. To replace this part, you will also need to dismantle the glove compartment as described above.
Once this part is removed, the work of replacing the resistor is performed in the following sequence :
- Remove the wire terminal block.
- Unscrew the screw securing the resistor.
- Remove additional resistance.
- Install and connect a new product.
- Connect the wires.
- Install the glove compartment.
Attention! Before replacing the additional resistor, it is recommended to check its functionality using a multimeter.
Sometimes the cause of a fan malfunction is a broken motor operating mode switch. The work to resolve this issue is similar to the steps above. If no broken wires are detected, this part is removed and then checked with a multimeter. Even if there is no closed circuit in one of the modes, it is recommended to replace the part.
The duration of operation of the electric motor or other components will depend on the quality of the spare parts used , so it is advisable to use only trusted retail outlets or order parts directly from the manufacturer.
Conclusion
If there is a malfunction in the interior heating system, it can be repaired within 1-2 hours. In some cases, it will take much longer to visit a car repair shop, and the cost of repairs can be significant.
You shouldn’t delay heating repairs: winter in Russia traditionally comes suddenly - it will be extremely uncomfortable for the driver to use a car with a faulty heater. In the summer, if there is no air conditioning, additional interior ventilation will also not hurt.
My account
After removing the glove compartment, access to the heater valve opens. A rod is attached to the crane lever using a clamping bracket. Use an open-end wrench size 7 to loosen the nut located on the bracket.
The traction cable is removed from the crane lever. Using an open-end wrench, the fastening of the rod is loosened. Using a 10mm socket, unscrew the two bolts securing the faucet to the wall of the engine compartment. The mounting bolts of the heating tap are unscrewed with a 10 mm socket wrench. The heater tap is removed from its niche and replaced with a new one.
The heating tap is removed from its seat. The tap is assembled and installed in the reverse order. Initially, you should disconnect the hose from the pipe. This action is quite difficult, since the hose sits tightly on the pipe. If you move incorrectly, your hand may slip and you may be injured.
For this reason, we recommend that you wear gloves to avoid such unfortunate consequences. Now, using a screwdriver, unscrew the screws that secure the seal, pressing it against the partition.
To dismantle the stove faucet, it is necessary to drain the antifreeze. Open the faucet as far as possible. We substitute the hose and insert one end into the basin. To drain the antifreeze, you need to unscrew the plug on the cylinder block. Lightly hold the hose with your hand and gradually open the cap located on the expansion tank.
We do this work carefully, as the stream of antifreeze will gradually increase
In order to remove the stove valve, it is necessary to completely drain the antifreeze. Loosen the clamp on the carburetor heating pipe and remove this part from the fitting. After all the coolant has flowed out, screw the plug into the block and tighten it well. Antifreeze leakage from the stove In used cars, coolant often begins to leak from the stove. The reason for this is usually wear and tear on the pipes or a malfunction of the heater tap.
Since antifreeze circulates under pressure, all connections must be tight. However, during prolonged use, hoses and gaskets lose their elasticity and burst. After inspecting the heating system and identifying the leak, the worn part is replaced with a new one. When making repairs, you should not use clamps made in China due to their poor quality.
Due to loss of elasticity, the stove pipes crack over time and leak antifreeze. The coolant can also leak from the heater radiator itself. In this case, it will have to be replaced with a new one.
Replacing a Chevrolet Niva Chevrolet heater core
https://youtube.com/watch?v=PgDz4rJ2GJ0
The stove does not heat well. To diagnose the malfunction, turn on the ignition, start the stove and try to change the intensity of the air supply. If at the first three speeds the air is not supplied or is supplied cold, the cause of this is a faulty resistor that needs to be replaced.
The reason for the inability to switch speeds is the failure of the resistor. If the resistor is OK, the diagnosis continues. If it is low, add antifreeze to normal and check it after a few days.
If the level has noticeably decreased, you should pay attention to the hoses and pipes, wear of which is usually the cause of coolant leakage. One of the reasons for poor heating of the interior by the heater may be a low level of coolant in the system. If the control unit malfunctions, it will have to be removed
Faucet replacement process
Repairing the unit at home is only possible if you have the appropriate tools - it’s easier to contact a car service center.
Another reason for the stove stopping may be a dust-clogged cabin filter.
In this case, the load on the electric motor increases, which, in turn, leads to failure of the heater fuse. In this case, it should be washed. This is true when purchasing and operating used cars. However, it can sometimes fail. Replacing the heater cable Sometimes it is not possible to change the position of the heater damper.
The reason for this is a broken cable. To replace it, you will need a standard set of tools and a headlamp. Replacing the cable is carried out as follows. The driver's seat moves back. The handles are removed from the damper control panel and the screws are unscrewed.
The panel is dismantled on the left side at the location of the driver's feet. To access the cable, you will need to remove the heater control mechanism. The latches securing the cables are removed. The recirculation damper mechanism is dismantled and the cable is removed.
Each end must be twisted into a ring and securely fixed. Using a cable, the position of the air supply flap is changed. Assembly is carried out in the reverse order.