If in the past the cigarette lighter was used for its intended purpose, now it has become a kind of 12V socket, and its functions include connecting various electrical gadgets, such as a fan, a vacuum cleaner and chargers for them. Therefore, failure is a big problem for the car owner and requires an immediate solution.
You can learn how to replace and repair a VAZ 2107 cigarette lighter, as well as its structure and diagram, from this article.
According to the original idea, the car cigarette lighter was used so that the driver could light a cigarette from it instead of matches at any convenient time. Over the rather long period of operation of this device, its structure has not changed, and it can be found in any model of the domestic automobile industry, including the very first ones.
↑ Cigarette lighter device
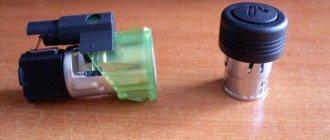
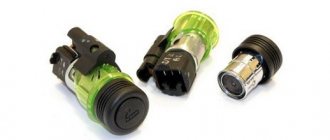
Its device itself consists of two main parts: a cartridge and a socket and includes a small number of components:
- The handle is made of plastic, shaped like a button.
- The metal rod is located in the center of the socket. It functions as the positive pole.
- The metal body of the cartridge acts as a negative pole.
- The insulator located between the body and the rod eliminates the possibility of their contact.
- Nichrome spiral. Used as a heating element and also provides a plus and minus connection.
↑ The principle of operation of the cigarette lighter
It is possible to heat up to a sufficiently high temperature by the current that approaches the heating part. As soon as the coil reaches a certain temperature, the current supply is stopped due to a thermal relay.
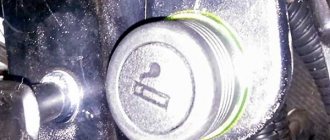
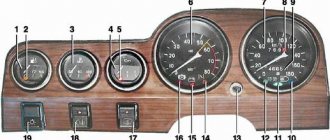
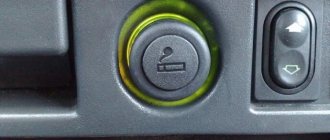
The device itself and its socket are located in a convenient place for the driver - on the dashboard. This place is designed from the outside as a recess with a metal frill. Inside there is a central contact that receives the positive from the battery.
When the panel is turned on, the built-in light is turned on.
In order to start the heating mode, you need to press the handle, thanks to which the cartridge is immersed in its place and fixed there with bimetallic plates.
Next, the positive contact of the cartridge is combined with the positive contact of the socket, the same goes with the negative terminal of the socket and the negative terminal of the cartridge.
Afterwards, the spiral heats up due to the current flowing through it and reaches the required temperature in 15-20 seconds. A specific click is a sign that the bimetallic plates have separated due to increased temperature and the cartridge has taken its standard place.
↑ New ways to use the cigarette lighter
With the advent of modern technologies, the functionality of such a simple thing as a cigarette lighter has changed and become much more diverse than usual. Now it is increasingly being used as a socket for a variety of electrical devices. However, you can only use those devices that do not require more than 12V for power. Therefore, developers began to produce a wide range of such devices for the car. In addition to the above, these include:
- heater;
- seat heating;
- devices for interior lighting and so on.
Such special devices provide an input for connecting to the cigarette lighter. There are also splitters on sale that can be used to connect several devices at the same time.
Worth remembering before work
You need to remember that fuses are in the electrical circuit, so you need to take precautions:
- The car must be turned off
- The ignition must be turned off
- The battery must be installed and the terminals must be connected, otherwise there will be no “power” to the electrical circuit
- Do not bridge the contacts of one fuse with another using a multimeter.
What I would like to add in conclusion, guys - the first two methods are available to everyone, that is, it’s trivial to pull it out and look, but the third one with a tester... buy it, it’s a really useful thing in the car, if you decide to figure it out yourself, we just can’t replace it!
↑ VAZ-2107 cigarette lighter diagram
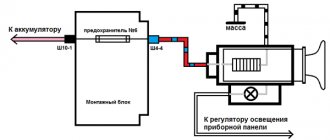
The cigarette lighter uses three wires to operate:
- "minus" mass;
- “plus”, carried out through the battery fuse;
- “plus” is in operation only when external lights are used, as it is connected to the instrument illumination lamp from the side lights.
Protection against various ignitions and overheating is also provided, so the battery is equipped with a fuse. The possibility of the cartridge jamming in the socket is excluded.
Typically, such fuses are made in the form of a low-fusible metal washer, which melts at an excessively high temperature and cuts off power to the battery, causing the cigarette lighter to become de-energized.
Also, some of these devices have a fuse built into the socket. Its difference lies in the simple replacement when the washer melts.
But recently, bimetallic fuses have been used quite often and are used many times. It is many times more profitable than other types because not only prevents the fuse from blowing, but after some time the contacts can open again.
What to do
The cigarette lighter is not directly responsible for the operation of any component of the car, but its operation negatively affects the comfort of the driver and passengers of the car. If the device is damaged, it must be repaired or replaced.
Where is the fuse for the cigarette lighter?
The VAZ-2107 cigarette lighter fuse is located in the fuse and relay mounting block. In VAZ cars this block is located in the engine compartment on the passenger side. To gain access to the fuse, you must remove the transparent plastic cover of the mounting block. The cigarette lighter fuse is marked F 6 and is rated for a current of 10 amperes.
How to disassemble the cigarette lighter
The socket and removable cartridge are inexpensive parts that can easily be found at any auto store. If they stop working, it is impractical to repair them; a complete replacement is performed. To do this, disconnect the ground bus from the battery and disassemble the socket fixed on the front panel of the VAZ-2106, performing the following procedure:
- remove the heater cartridge from the socket;
- we pick up the panel on which the clock and cigarette lighter are located and drag it with a flat-head screwdriver until the latches click;
- carefully remove the dashboard; there may be short wires behind it;
- remove the dashboard connection terminals;
- unscrew the locking nut;
- remove the outer casing along with the backlight;
- remove the internal cigarette lighter socket.
Connection diagram for cigarette lighter VAZ-2107, 2106, 2108, 2104
The VAZ-2107 cigarette lighter must be connected in accordance with the diagram of an identical model - 2104:
- black wire - ground;
- red - goes through the fuse to the battery positive;
- yellow - included in the instrument panel lighting circuit.
Replacement
If the standard device for some reason does not satisfy the car owner, the cigarette lighter is replaced with a device of a more attractive appearance - a European standard cigarette lighter. This procedure is much easier to carry out than installing an injector on a VAZ-2108. Installation of a European cigarette lighter requires the need to widen the standard hole with a file or sandpaper: the modern device has a slightly larger diameter.
Which to choose
The socket for connecting external devices is a simple and unpretentious device. Its breakdowns are extremely rare and repair work is easy to carry out on your own. When making a purchase, you need to pay attention to the integrity of the wires and the quality of the threaded connections.
If for some reason the cigarette lighter stops working, the car owner believes that the color of its backlight does not match the design of the instrument panel, or there are simply not enough sockets for the simultaneous operation of all necessary devices, the device can be replaced with a splitter with several standard sockets.
- What kind of oil to fill in the VAZ 2107 engine injector
- Which fuse is responsible for the cigarette lighter of the VAZ 2109
- Where is the fuse for the cigarette lighter of the VAZ 2112
- Fuse for cigarette lighter VAZ 2114
↑ The cigarette lighter does not work. What is the reason and what to do?
Please note that rechargeable devices are not durable and reliable, they cannot last for a long time and tend to break down. You can only improve the fixation by increasing the pressure of the presser feet.
The structure of the device itself is simple: it consists only of a central contact and two presser feet. The location of the central contact is always different and can be either deep or close. And the reason for poor contact is that over time the connection between the plug and the socket becomes worse and worse, this leads to sparks and then a short circuit.
↑ Possible cigarette lighter malfunctions: signs and causes
↑ The plug does not lock into the socket or there are problems with fixation
The reason is the antennae, which tend to wear out over time and can no longer hold the cartridge.
The solution to this problem is quite unsafe, since the car owner in this case has to manually hold the head in the socket until it is completely warmed up. But there is another, more reliable and effective solution - to bend the cigarette lighter antennae.
↑ The spiral burned out while in the cartridge
The simplest solution is to change the cigarette lighter head. But you can also renew the old coil if you clean it of any soot that has formed.
According to the theory, in twenty seconds the connected coil will reach the desired temperature until it turns red and the head will pop out. If this happens in more or less time, you can adjust this time by bending or straightening the contacts.
If all of the above methods do not help, the only option is to completely replace the head.
↑ Fuse blown
In most cases, the blame for this falls on the owner of the car because... this happens when connecting several more devices using a splitter. Due to this, a lot of pressure is exerted on the cigarette lighter due to the load, which clearly exceeds the intended one. In such cases, be sure to not use the nest for too long. But the driver ignored this rule, which led to the breakdown.
A standard fuse is designed for a load of 10A; you should not use parts with a larger rating because this leads to complete combustion of the battery socket.
↑ Wiring break
Such problems are unlikely to be the fault of the driver, since they occur during use and are a common result of long use, during which they can become pinched or worn out. All this leads to loss of electrical communication.
This problem can be solved by replacing the damaged section of wiring. After replacement, it is imperative to create high-quality insulation for them so that ignition does not occur in the future. A multimeter will help you find this break.
Diagnostic measures
Situations where cigarette lighters do not work on cars are not as common now as they used to be. But still, such a breakdown is quite likely.
In this situation, you need to understand the reason why the malfunction occurred. Depending on the diagnostic results, the motorist will have to carry out the appropriate work to correct the problem.
Diagnostics may include the following activities:
- First, you should carefully check all connections and make sure that no wires have burned out. Here you will have to perform partial dismantling of the unit.
- Check for damage to the wiring on the cigarette lighter body and how firmly they are connected.
- Be sure to open the fuse box where the element responsible for the cigarette lighter is located. It must have a corresponding label or inscription.
- Make sure there are no signs of burning or signs of clogging of the socket itself or its contacts. Quite often, when foreign objects enter, the system’s performance is disrupted.
- Assess the current condition of the socket plug.
One of the most common problems is a blown fuse. On many cars, this is responsible for several systems simultaneously, including the cigarette lighter.
This means only one thing. If the fuse element is blown, then power will not be supplied not only to the cigarette lighter, but also to other systems with which it is connected. The simultaneous failure of several systems in a car most likely indicates problems with the fuse.
This is interesting: How to make a car window defroster (anti-ice) with your own hands?
But fuses don't just blow. Therefore, it is also worth understanding why the burnout occurred and how to avoid repeating a similar situation in the future.
Checking with a multimeter (or tester)
This means that they can test both fuses that have already been removed and those installed in the machine block.
The multimeter has a sound test mode. When you turn it on, if you close the probes, you will hear a squeak, which means there is contact.
So - you can remove the fuse, if you do not have a transparent case, just install the probes on the fuse contacts! If we hear a squeak, it means it’s working; if there’s no sound, it means it’s burned out. But again, pulling out each one and checking it is extremely inconvenient!
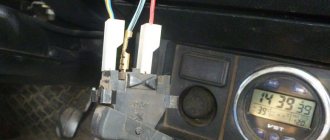
Therefore, the manufacturers took care of us, on the top of the fuses there are open “points” from the contacts, you just need to insert the probes from the multimeter into them, and you can check a large number of elements without removing them. Personally, I can check almost the entire block in a couple of minutes! You can see this in the video below.
This is exactly how they test at service stations, because often they lost the book with the circuit, and it takes a long time to find where it is, but a multimeter is usually always at hand.
Physical examination
At the moment, all fuses are made with a transparent plastic case, that is, the “thread” located inside is visible to the naked eye. If the fuse is blown, simply pull it out of the connector and check, this is the “visual method”!
Why is it complicated and not always used - yes, because there are dozens of fuses in modern cars (can reach up to 30 - 40), and the cooler the car, the more there are. And it’s visually impossible to figure out which one burned out!
They are installed in sockets and only the back is visible. Here you need to combine a diagram (the first method) and a physical examination. But there is a much faster and fairly easy method of checking, we use a multimeter if you have one.
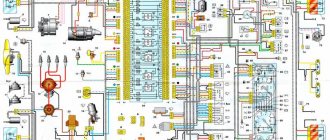
Schematic check
What it is? If any device does not work for you, for example a cigarette lighter, there is a high probability that it is the safety element that has burned out. For each car, there are diagrams that indicate what and which one is responsible for. You need to find the number or location and check it, often this is enough. The check could be like this: we simply install a new one, if it works, then that’s the problem.
↑ Repair and replacement of the cigarette lighter on the VAZ-2107
Repairing the cigarette lighter, just like replacing it on a VAZ 2107, is identical to other domestic models due to the similarity in details, so the method can be used not only on this car.
First you need to figure out what tools you will need:
- screwdrivers of different types;
- pliers;
- small forceps or tweezers;
- soldering iron;
- a flashlight or lamp that can be moved;
- insulating tape;
- gloves.
↑ Repair sequence
- The first step is to de-energize the vehicle. This can be done by removing the negative terminal on the battery. Next, you need to find the car fuse socket inside the car and make sure there is good access to it. To do this, you can move the driver's seat back as far as possible, since according to the standard it is located in the central part.
- Next, you need to remove the cartridge from the socket and remove all unnecessary objects and fragments using tongs, and illuminate the surface with a flashlight during the process.
- After this procedure, you need to inspect the fuse itself, which can be found in several places: under the dashboard, hood or driver's seat.
- Once you find the fuse box, you need to find the right one. Its location is indicated in the operating instructions or on the hidden part of the hood.
- When you find the part you need, check its jumper. This is a very important part, so if it burns out, replacement is required.
If changing the part does not solve the problem, use another method.
- Remove the cigarette lighter, grab the edge with pliers and gently, without applying any force, pull it out to avoid damage to the wiring.
- Inspect the item. If a tear or poor quality connection is detected, use a soldering iron and repair the wires.
- You should also carefully inspect them for abrasions, which must be isolated.
- Once you are sure that the part is working properly, return it to its place.
All this information will help you if the cigarette lighter does not work.
Replacing the cigarette lighter step by step guide
Replacing the cigarette lighter on a VAZ 2107 is carried out as follows:
- Remove the negative terminal from the battery.
- For convenience, move the driver's seat back.
- Remove the cigarette lighter socket from the socket.
- Using a flat screwdriver, carefully pry up the additional instrument panel on the right side. After releasing the latches from the grooves, remove this panel along with all the devices.
- Disconnect the power supply wires from the cigarette lighter.
- Unscrew the nut securing the cigarette lighter.
- Remove the cigarette lighter housing along with the backlight lamp.
- Pull the cigarette lighter socket out.
- We install the new cigarette lighter in the reverse order.