How does a Niva transmission work?
Niva is a car that has been produced since 1977.
It differs from other domestic cars in that it has permanent all-wheel drive. Few car enthusiasts know what this means, although they have heard a lot about this feature of the vehicle; a diagram of the device can easily be found on the Internet. All-wheel drive in the Niva is equipped for all 4 wheels, and the center differential is locked. When the engine starts to rotate, an impulse is sent to the gearbox and transfer case, after which the torque is distributed to the front and rear axles simultaneously. Afterwards, the gearboxes are activated, and behind them the front and rear wheels of the Niva begin to rotate. Torque causes 4 wheels to rotate at once, which is why it is called full torque. But the rear wheels still drive.
https://www.youtube.com/watch?v=t1XX1XpmIzo
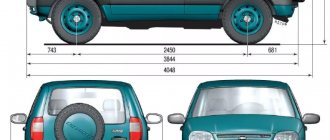
The VAZ 2121, in other words, “Niva”, entered mass production in the 70s of the last century. This car belongs to the class of off-road passenger cars. In the history of the domestic automobile industry, Niva became the first car whose design used all-wheel drive. Let's take a closer look at the transmission device.
The transmission in the Niva family (2121, 2131) is designed in such a way that all-wheel drive is supplied to 4 wheels. Also characteristic is the presence of a center differential. The transmission includes a gearbox, a transfer mechanism, a pair of cardan shafts, and both axles. A characteristic feature of the 2131 model is its elongated body.
Then it goes through the cardan shafts to the gearboxes. The front gearbox transmits torque to the wheels through the differential and constant velocity joints. Likewise for the rear, also protruding, driving wheels. It is precisely because the torque is distributed to 4 wheels simultaneously that the drive is called full drive. The designation is as follows – 4WD. Another domestic car, designed on a similar principle to the Niva, is the UAZ.
avtoexperts.ru
From time to time, every car owner is faced with a situation where the vehicle begins to jerk when starting to move when pressing the gas pedal or driving at low speeds. This behavior of the car is often caused by not too serious disturbances in the operation of the internal combustion engine and other systems. However, they need to be diagnosed and eliminated as soon as possible. Otherwise, they can lead to a complex breakdown, which will take a lot of time and money to fix.
When can a car “jerking” appear and what are the causes of the phenomenon?
In the vast majority of cases, the symptom of unstable driving can be diagnosed in the following situations:
• While the vehicle is starting to move (pushing away).
• During slow driving at low engine speeds.
• If necessary, accelerate suddenly while driving on the road.
• While the power unit is operating at high speeds.
In addition, the described behavior of the vehicle may also occur in other operating modes. The reason for this may be malfunctions of the following systems and components of the machine:
1. System for supplying the fuel mixture to the combustion chamber.
2. Ignition system.
3. Incorrect operation of the transmission.
4. Malfunctions in the operation of the car's electronic engine control unit.
How to troubleshoot?
Let's take a closer look at the main and auxiliary systems of the car, which can cause the vehicle to “jerk” while driving. We will also focus on how to eliminate diagnosed problems.
Fuel mixture supply system
Quite often, the cause of unusual behavior of a car while driving is improper operation of the fuel supply system to the engine or the injection system of the air-fuel mixture into the combustion chamber. In other words, the internal combustion engine cannot obtain the required amount of gasoline or diesel fuel. As a result, there is not enough torque from the shaft to transfer mechanical force to the suspension, and you end up with a dip in power.
To get rid of troubles, you need to:
• Check the operation of the throttle assembly.
• Test the functionality of the idle speed sensors.
• Check the correct position of the throttle valves.
• Check the functionality of the mass air flow sensor.
In most cases, the defect is found in the injectors, which are responsible for injecting the fuel mixture. Less commonly, an uneven ride is associated with the air passages that connect the injector and the air filter. Depressurization is possible, which leads to loss of pressure.
The problem found can be corrected by replacing damaged parts. You can do this yourself, but it is better to seek help from service center specialists.
After carrying out the work, it is important to additionally check the tightness of connections along all fuel and air supply lines.
If your car is equipped with a carburetor, you need to check the idle air valve and also make sure that the body of the device itself does not contain cracks, chips or other defects.
Ignition system
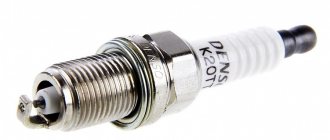
The next most common cause of a car “jerking” is a breakdown in the ignition system. This leads to the fact that the fuel mixture in the cylinders ignites at the wrong time. In addition, this may also occur due to the fact that low voltage current is supplied to the spark plugs. And the resulting spark is not enough for ignition to occur.
Causes
According to the official statement of the manufacturer, all-wheel drive Chevrolet Niva, a little noise is allowed even in the absence of malfunctions. This is due to the fact that the gear clutches of the transfer case, gearbox and drive shafts are made taking into account thermal clearances. The size of the latter takes into account manufacturing tolerances and the coefficient of thermal expansion of materials. Knocks and noises when starting off and changing gears are caused by insufficiently smooth engagement of the clutch.
However, gaps are not the only cause of knocking. They occur when gears, bearings and transmission shafts wear out. Axles with gearboxes also make a lot of noise when the level of transmission oil in the crankcase is insufficient.
What causes extraneous sounds?
Knocks are usually the root cause of wear of the play assembly. Noises are associated with friction of parts. A knock when starting off is the simplest breakdown that can be fixed independently. Situations often occur when it is almost impossible to determine the presence of a car malfunction. To fully understand this issue, you need to know the reasons that contribute to the problems.
The main causes of knocking can be associated with breakdowns:
- CV joints;
- checkpoint;
- fastening the wheels and racks of the power unit.
But this is by no means a complete list. In fact, there are many more reasons. It happens that it is impossible to determine where the knocking comes from when starting off. In this case, diagnostics will come to the rescue; before starting, you will have to put the car in an inspection hole and carefully check all the details of the engine compartment. Let's consider all possible troubles separately.
How to enable differential lock on Niva
The Niva and its various modifications allow you to operate 3 differentials at once. Thanks to this factor, the vehicle’s cross-country ability increases significantly when driving in rural areas. The forced locking format involves connecting the driving wheels together, causing them to spin at different speeds. This approach allows you to use the maximum possible traction characteristics of the engine, which are transmitted to the wheels.
To lock the differential on the Niva, the manufacturer has provided a clutch for the locker. When forced locking is turned on, the wheels become interconnected and rotate in the same mode. When the inter-axle lock is activated, the axles located at the front and rear interact and distribute traction to all wheels. This mechanism is easy to use, which is confirmed by the unique cross-country ability of the Chevrolet Niva.
How to fix it?
To properly move off a Chevrolet Niva, you have to “catch the clutch” twice to select the gap: when starting the car from a standstill and when changing gears. The work of both legs is important here. You need to release the clutch as slowly as possible while simultaneously squeezing the accelerator.
When bearings and gears wear out, play occurs, which cannot be compensated for by smooth operation of the pedals. In this case, it is necessary to replace the worn parts as soon as possible, before the knocking noise when changing gears of the Chevrolet Niva causes serious damage.
The same applies to noise caused by a lack of oil in the crankcase of axles and gearboxes. Operation of these components without lubrication is not allowed.
A car with an automatic transmission jerks when driving
Car diagnostics were not invented to suck money out of unknowing car enthusiasts - first of all, it is an opportunity to identify upcoming breakdowns and eliminate their occurrence before the car has to be “hospitalized.”
If a car with an automatic transmission jerks when driving, then the first reason may indeed be hidden in the low air temperature. This occurs due to freezing (thickening) of the oil; preheating will save the car.
Your car may be jerking because it simply doesn't have enough oil. Check its level, it is possible that the reason lies there.
The third reason also lies in the oil. Remember the last time it was changed. Regular replacement will help avoid many problems in car operation.
When to use and how to disable blocking
It is preferable to enable forced blocking in various modifications of the Niva in the following situations:
- The blocking must be turned on in advance if you have to overcome a difficult route.
- On sharp climbs uphill or when driving downhill.
- While crossing terrain with a top layer of sand.
- When you have to drive on snow drifts or an icy road.
Wheel locking is not necessary when driving quietly on a flat road within the city. Grip on asphalt surfaces will be decent, and traction will be distributed evenly by default.
Useful video
To use the lock installed on the Niva effectively, use the following recommendations from experts:
- When driving on good quality road surfaces, install the front transfer handle at the front and the rear at the rear.
- The front handle is moved back if the road becomes slippery. Once the slippery area has been passed, switch the levers to normal mode.
- If the Niva is stopped, the lock may not engage when the clutch is depressed. This occurs due to the alignment of the teeth with the gear teeth. What should you do in this case? Moving as if on a turn, engage the lock. The differential will turn and the gear teeth will come closer to the teeth. If turning off is difficult, do it while the vehicle is moving, maintaining a minimum speed and squeezing the clutch.
Also interesting: How to properly use the transfer case on Niva 2121
Eliminating prerequisites
The misalignment of the transfer case occurs due to an undeveloped design. Therefore, many craftsmen strive to modify the fastening so as not to bother with alignment once a year. A special frame is used for this. In recent years, it can be purchased in stores, but you can also make it yourself. The advantages of this modification are the following:
- The transfer case is mounted on the rigid base of the subframe. The attachment to the body is made through a subframe, this allows to reduce the level of vibration transmitted to the body;
- It plays the role of a kind of protection for the crankcase;
- Also worth mentioning is adding additional rigidity to the side members.
- Among the disadvantages, we can mention a slight decrease in clearance. Although, in light of the advantages, this does not play a special role.
To assemble the subframe you will need a square pipe. Some people use a corner, but in this case the structure will be less durable. The support plates are made of sheet steel. Before assembly, you should cut off the old transfer case mounting bolts. Now it will be installed on the subframe. The pipe is cut to size and the frame is welded. After that, holes are drilled in the crossbars for fastening the transfer case. It is important not to make a mistake with the sizes. The next step will be assembling the mount to the body. Sheet steel support plates are welded to the subframe. Holes are drilled in it. After fitting, you need to drill holes in the floor of the car.
M12 bolts should be used for fastening
, as well as thick washers.
After installing the subframe, do not forget to treat it with an anti-corrosion compound. This will increase the service life of the part. This is how, through simple manipulations, you can get rid of one of Niva’s sores. Conclusion
. Even great cars have flaws. The domestic SUV Niva is no exception. During active use, vibrations emanating from the transmission may occur. That’s when the question arises of how to center the transfer case on the Niva. In fact, this work is not difficult, but there are some nuances that are better to know before starting work. Some people, knowing this feature of this car, install a subframe, this can significantly reduce the noise of the transmission.
Rules for applying blocking on Niva
To ensure that the locking mechanism lasts for a long time, use the following rules:
- It is necessary to switch the transfer case when the Niva does not move.
- The differential can also be engaged while the vehicle is moving.
- To ensure efficient and long-term operation of the device, it is advisable for the Niva driver to turn on the lock from time to time. Once a week in winter is enough.
Where is the lever responsible for switching located? Pay attention to the area between the wings located in front, there are 2 levers there. One makes it possible to change gears at the gearbox, the other successfully controls the transfer case.
The basis of the transfer case is a gearbox, which includes 2 stages. The control lever comes directly from it, you can move it forward and backward - this is how the gear is changed on the Niva. The direction of movement of the lever to the left and right allows you to activate the differential lock and vice versa to disable it.
Why is downshift needed?
It is difficult to imagine a transfer case without the main functional component - a reduction gearbox. Positioning the lever in the rear direction reduces the transfer case value to 1.2.
By fixing the lever at the front, the gear ratio can be increased to 2.1. The lever in neutral indicates gear ratio 0.
You can often encounter the following type of misconception: switching the rear handle can increase the power characteristics of the motor. But this is not true. It serves to change the gear ratio between the engine and the wheels. By increasing it, the traction forces on the wheels will increase. There is also a reduction gear in the dispensing mechanism.
DON'T SPEND MONEY ON REPAINTING! Now you can remove any scratch from the body of your car in just 5 seconds.
Its operation can be controlled using the rear handle. When we shift the lever back, we will have a gear ratio of 2.135 - this is a low gear. It is recommended to downshift such a gear only when the car is stationary and the clutch is depressed. Despite the fact that the manual does not contain such a restriction, novice and inexperienced Niva drivers are not recommended to switch while driving, since the Niva transfer mechanism is not equipped with a synchronizer.
Differential locking
Sometimes you can come across a misconception about why a small handle is needed next to the shift lever on a Niva. Some car owners believe that it is needed to connect front-wheel drive. However, the front-wheel drive of this car is permanently connected. As is the rear one. Cars of the Niva family have permanent all-wheel drive. The handle actually serves to switch the operating modes of the differential of the transfer mechanism.
In the “forward” position, the differential operates as usual, but if you move it back, the differential is locked, and the forces from the motor are applied to the differentials of the axles, which makes the drive more rigid. It is worth noting that there are also special types of locks for front and rear axles.
In theory, when used in conditions where the car is stuck, it will be able to overcome the obstacle if there is sufficient traction on at least one wheel. In this case, it is better to lock the differential before overcoming an obstacle, but never after entering an area that is difficult to overcome. This application of locking will avoid wear and damage to the transmission.
Centering method
To carry out this work you will need a lift, although with some skill you can get by with simple supports. First you need to prepare the car. If there is a lift, it is raised up. If supports are used, the corners of the machine are jacked up one by one and it is placed on them. Please note that all supports must be stable, otherwise the work will be unsafe. You should also prepare the tool in advance. If there are no plans to simultaneously replace other parts, then it is quite possible to get by with a ratchet and a “13” head. During operation, an assistant must be in the cabin.
Adjustments are made in the following order:
- To begin with, you should evaluate the condition of the splines on the cardans. If they are very worn, then most likely you will not be able to perform the alignment correctly. In case of significant wear, parts should be replaced;
- The transfer case mount is inspected. Often the displacement can be seen with the naked eye;
- Next, loosen the transfer case mount. Just don’t unscrew it completely;
- After this, start the engine and “accelerate” the car to a speed of 80-90 km/h. In this case, the transfer case will fall into place on its own;
- The crucial point is to consolidate the result obtained. This can be achieved in 2 ways. Mechanics argue which one is better, but both are used in everyday life. Most often, the engine is turned off, and with its help the transfer case and cardan shafts are stopped.
- All that remains is to quickly tighten the nuts. Disadvantage here 2. Stopping the box in this way can have a negative impact on its condition.
- Also, you need to tighten the fastener as quickly as possible, otherwise it will be of no use. A more reliable, but technically complex method is to tighten with the engine running;
- The car is lowered to the ground and testing is performed.
If the vibration persists, the procedure should be repeated.
Tips for owners
To make driving your car comfortable, read some important points:
- The usual, standard arrangement of the front and rear handles is forward and backward, respectively. Movement in this mode can and should be carried out in areas characterized by even and smooth surfaces.
- Locking the differential by switching the front handle to the rear position is best on roads characterized by increased slipperiness. This measure will give Niva stability. It is worth understanding that after overcoming the problem area, the handle will need to be returned to its original position.
- As noted earlier, downshift should be activated before a potential obstacle, but not while the car is already stuck.
- It is worth understanding that activating the lock when the vehicle is stationary is sometimes impossible, even if the clutch is depressed. This may be caused by the clutch teeth hitting the gear teeth. In this case, you can try to activate the lock by starting to drive slowly and make a slight turn. If problems arise with disabling the lock, it is recommended to perform the same procedure with the clutch depressed and the steering wheel slightly rocked.
Also interesting: Disassembly and assembly of the Niva 2121, Niva 2131 gearbox
Troubleshooting
If there is a knocking noise when shifting gears in a Niva Chevrolet, you need to immediately diagnose the car. It is recommended to do this at a specialized service station, as they have all the necessary equipment.
Primary signs and consequences can be calculated independently:
- characteristic sound in neutral - you need to check the oil level, and also check the drive shaft bearing, with a 90% probability it requires replacement, you can fix the malfunction yourself;
- a knocking sound appears when turning on or changing gears - the locking device has become unusable, the synchronizer clutches require replacement, the transmission mount is loose;
- knocking is present in the box only while driving - the synchronizing clutches or bearings are worn out, the oil level in the box has dropped to a critical level;
- shocks are present when starting from a stop or changing gears in motion - the clutch pedal is not fully depressed, the oil level is low (90% when the shocks do not stop), worn gears.
Diagnostics allows us to identify a malfunction that is rare for such a problem - a breakdown of the link. This unit connects the transmission and the rod together by means of transmitting rotation in the box.
In turn, a problem with the rocker is identified if additional problems are present:
- gear shift lever play;
- difficulties with switching;
- difficulties in adjusting the mechanism.
The examination will help eliminate or confirm the need to adjust the transmission drive, since failure of this element can also lead to knocking. A sign of a malfunction in this case will be the erroneous inclusion of speeds.
Computer diagnostics will help identify problems with the clutch. If they are present, then when you start moving or already on the road, a characteristic twitching will appear. If no action is taken, a complete replacement of the unit will be required.
It is recommended to pay attention to all parts of the mechanism when checking the clutch. They will help you understand more clearly why there are extraneous sounds or rapid wear of nearby parts.
How to use a transfer case in a field, box design
The relatively complex scheme for distributing torque from the internal combustion engine to the wheels is explained by the universal purpose of the Niva 2121 - if used correctly, it can be used comfortably in the city and along muddy country roads. Such properties are ensured by the presence of a transfer case with a center differential lock, complementing a 4- or 5-speed manual transmission, depending on the year of manufacture.
The normal position for the RK handles, ensuring adequate behavior on the road of good quality:
- Front - from yourself
- Rear - towards you
The special operating mode of the transmission is switched on not long before the car begins to overcome an obstacle (rut, mud, ford or rise). The transition to the lowest row must be done while stopping. Returning to top gear is allowed on the go, although it causes problems for beginners due to the lack of the usual synchronizer.
It is somewhat more difficult to properly handle the forced manual locking of the center differential. On the contrary, it turns on when the car moves slightly (up to 20 km/h) due to misalignment of the grooves on the locking clutch, satellites and ring gear. To simplify turning the lever into the desired position, taking into account the Niva 2121 transfer case, pick up a small speed, then, shaking the steering wheel, pull the handle towards you.
Problems can also arise when disengaging the lockout, as the clutch teeth literally catch on the ring gear. Engage reverse and, rocking the steering wheel, push the lever away from you. This action is performed immediately after overcoming a difficult section in order to avoid overloading the gearbox. It is most effective to disable the differential together with the transition to lower stages.
AvtoVAZ explained what to do in case of vibrations and jerks when starting a LADA car
12 May 2022 LadaOnline 96 604
Some owners of Lada Priora, Granta, Kalina or Vesta cars experience vibrations and jerking when starting to move (the car jerks). One of the reasons for this malfunction may be in the clutch. How to act in the event of such cases is indicated in the AvtoVAZ information letter.
Information letter No. 5-17 dated 01/23/17
When owners of LADA cars of the KALINA, GRANTA, PRIORA, VESTA families, equipped with a 1.6 liter engine and gearboxes 2180/2181/2182, complained about “Vibrations, jerking when starting the car”
Carry out diagnostics according to the attached methodology, Appendix 1.
If you need to replace the clutch kit:
- If the vehicle is equipped with a driven clutch disc 21703-1601130-30
, in the absence of violation of operating rules, replace the clutch kit under warranty with: pressure plate
21703-1601085-30
, driven disc
21703-1601130-31
; - If the vehicle is equipped with a driven clutch disc 21703-1601130-31
(standard installed only on LADA VESTA GFL120 (KP 21827) vehicles) or a driven clutch disc
21703-1601130-32
(standard installed only on LADA VESTA vehicles GFL110 (KP 21807)) it is necessary to draw up a CLO with a description of the work performed and act in accordance with the recommendations received in response to the CLO.
Fill out the AGO for the work performed with a description of the reasons for the non-compliance and using the defect code, 1601130-051-001 “Vibration, jerking when starting a car with AMT”
, with attachment of a photo of error codes or 0
“Vehicle vibration when starting off”
, depending on the vehicle configuration, defective part 1601130, labor intensity item in accordance with the current collection of labor intensity.
Diagnostic technique
Methodology for diagnosing a car and eliminating the defect notes “Vibration, jerking when starting the car”:
1.
Test drive to confirm the defect. Is the defect confirmed?
- YES - go to step 2:
- NO - no repair work is required.
2.
Checking for the presence of fault codes in the ECM and KURKP. Are there any fault codes?
- YES - eliminate the causes of their occurrence in accordance with the relevant technical specifications, and then proceed to step 1;
- NO - go to step 3.
3.
Are there any comments on the stability of the engine at idle and low speeds?
- YES - eliminate the comment and go to step 1;
- NO - go to step 4.
4.
Are there any leaks of working fluids (oil, coolant) in the gearbox area? Was there a risk of getting caught in the clutch?
- YES - eliminate the causes of their occurrence and go to step 5;
- NO - go to step 6.
5.
Remove the clutch. Are there any signs of oil and/or coolant on the clutch friction surfaces?
- YES - replace the clutch kit and wipe the flywheel with acetone/degreaser to remove oil and/or coolant;
- NO - go to step 6.
6.
Are there any damage to the power unit mounts?
- YES - eliminate the comments and go to step 1;
- NO - go to step 7.
7.
Are the tightening torques of the power unit mounting bolts adequate?
- YES - go to step 8;
- NO - reach the required values and go to step 1.
8.
Are the tightening torques of the bolts of the belt securing the gearbox to the engine maintained?
- YES - if there are no violations of the operating rules, replace the clutch kit;
- NO - reach the required values and go to step 1.
Note: the most obvious starting mode in which vibration appears is smooth starting on small slopes. At the same time, when starting, you must not allow the engine speed to drop below idle speed.
Let us remind you that you can determine which transmission is installed on a Lada Vesta car by the values from the fourth digit of the VIN code (GFL11 - VAZ manual transmission; GFL12 - AMT; GFL13 - Renault manual transmission).
By the way, we have already described how the clutch is replaced under warranty, as well as other AvtoVAZ regulations.
Keywords: Lada Vesta clutch | clutch Lada Kalina | Lada Granta clutch | Lada Priora clutch | gearbox Lada Vesta | gearbox Lada Kalina | gearbox Lada Granta | gearbox Lada Priora | AvtoVAZ order
6 0
Found an error? Select it and press Ctrl+Enter..
About improved clutch discs for Lada Vesta and XRAY What kind of clutch is on the Lada Vesta and XRAY and what are the reviews about it Clutch of Lada Granta, Kalina, Priora and its possible malfunctions
The device of the VAZ Niva transfer case
The transfer case mechanism includes more than 60 independent parts, which is confirmed by the presented drawing. Therefore, it is quite prudent to name the main elements and their purpose.
- Frame
- Differential housing
- Shafts
- Couplings
- Oil seals
- Satellites
- Gears
- Flanges
- Levers
A pair of gears are tightly seated on the drive shaft, one of them (large) is intended for high gear, the second (small) is responsible for low gear. They have serrations with straight and oblique profiles. The first ones are in contact with the coupling, the second ones - with the intermediate shaft. The inclusion of one or another row causes the coupling to move along the hub in the horizontal direction, after which it is connected to the gear on the transfer case drive shaft.
The intermediate position turns off the gearbox (the gearbox is open), and the vehicle cannot be moved in this mode. The front helical gear on the intermediate shaft is used to control the differential. The locking is engaged, or the rigid coupling of the drive shafts of both axles, is carried out through a clutch. The design is typical for modifications 21213 and 21214, and the latter is additionally equipped with a speed sensor drive.
In the operating state (with the transfer case reduction gear connected), the gear ratio in the first stage changes from 4.4 to 7.83, the second - from 2.52 to 4.58, the third - from 1.63 to 2.9, in the fourth - from 1.2 to 2.14, fifth - from 0.98 to 1.75, which is expressed in an increase in traction on the wheels.
The transfer case is not present in all VAZ passenger cars, but only on cars with two drive axles. In the transmission, the transfer case (TC) is installed at the rear of the gearbox; a rear driveshaft is attached to its shank, which connects the transfer case to the rear axle. The front axle is also driven by the steering wheel; it is connected to the transfer case by a front driveshaft.
The reduction gear in the Republic of Kazakhstan is designed to obtain high torque, it is used to overcome difficult sections of the road, and helps to cope with off-road conditions. The VAZ Niva transfer case contains the following main parts:
- the body itself;
- front axle drive shaft;
- intermediate shaft;
- drive shaft;
- gears;
- bearings;
- differential housing;
- satellites;
- differential lock clutch;
- gear shift clutch;
- flanges (for connection to cardan shafts);
- oil seals;
- control levers.
Fasteners and bolts - we look at many points regularly
You need to check the tightness of the wheel bolts regularly, because incorrectly tightened bolts can cause a lot of problems. But this is not the only reason for a possible knocking sound when starting off. If knocking sometimes accompanies gear changes, as well as sudden stops and acceleration, you should check the fastening of all parts of the engine compartment, including the engine. Problems can be hidden in quite unexpected places:
- if the fastening is broken, the generator begins to dangle and knock on the surrounding metal, while it does not give a charge;
- the starter and retractor relay may rattle if the fastening bolts are poorly tightened;
- The engine itself, if the mounting pad has burst or failed, may wobble and knock;
- the crankcase protection often causes knocking and cracking noises if one of the fastenings of this unit is torn off;
- a battery without fastening can easily wobble in free space, producing a knocking noise during a sharp start;
- Wheel fastening is a classic problem with such manifestations of a problem; they need to be checked constantly.
This list can be continued endlessly. During operation, any part can loosen its fastening and dangle, causing various troubles in the form of knocking and crackling noises when starting off. But solving this problem is often easier than ever. It is enough to check the fastenings of all the listed mechanisms and components and return everything to the required positions. The most difficult thing to restore is the engine mounts, but even this breakdown will not cost you a lot of money in repairs.
Possible problems
Harsh operation and insufficient attention to how to use the transfer case on the Niva 2121 lead to the appearance of:
- Vibrations in the body while driving
- Vibrations at start
- Gula
- Noise when maneuvering
- Tight switching modes
Experience shows that the culprits are: insufficient oil level, incorrect centering of the steering wheel, loosening of the support fastenings and damage to the rubber bands. An additional influence is exerted by the condition of the cardan and the engine itself.
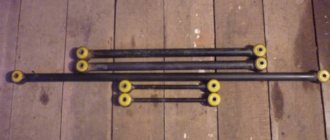
Eliminate vibration with additional fasteners
Installing the third support of the transfer case on VAZ 21213/21214 vehicles allows you to reduce the level of vibration of the transfer case; with this support it is easier to center the transfer case. The part can be purchased at auto stores or made yourself. The finished product comes with three long studs (for model 2121); to install the third support on this machine, you will need to unscrew the short studs from the transfer case housing and install new studs from the kit. We carry out repairs as follows:
- dismantle the front passenger seat in the cabin;
- remove the floor tunnel lining;
- in the cabin we move aside the carpet covering the body amplifier (in front of the handbrake lever);
- remove the transfer case (alternatively, you can simply hang it up, but removing the third support makes it easier to install);
- We attach the bracket of the new support to the body of the RC;
- we install the transfer case in place, center it in the optimal position, and fasten the side supports;
- we combine the third support with the body, drill two holes in the bottom;
- Using washers, bolts and nuts (from the kit) we attach the support to the bottom of the body.
Vibration is eliminated more effectively by installing a subframe under the transfer case. You can also make such a device yourself or buy a finished product at a car store.
In order to install the subframe, the transfer case must be removed. It is more convenient to carry out such work in a pit; we carry out repairs as follows:
- leave the car in neutral gear;
- disconnect the propeller shaft from the transfer case, it is advisable to mark the driveshaft flange and the drive shaft so that during installation, align the driveshaft according to the marks - this way, the occurrence of unnecessary vibrations is eliminated;
- dismantle the muffler mounting bracket;
- remove the gearbox traverse;
- jack up the transfer case, remove the side fastenings of the transfer case;
- We treat the places where the subframe fits to the body with Movil;
- place the subframe on the gearbox studs;
- we mark the attachment points of the subframe on the side members, drill holes, attach bolts to the body;
- we tighten all fastenings, except for the transfer case supports themselves;
- we perform alignment of the steering wheel;
- Finally tighten the transfer case supports.
It should be noted that installing an additional support or subframe on the steering wheel does not always lead to the desired effect; in some cases, vibration only increases.
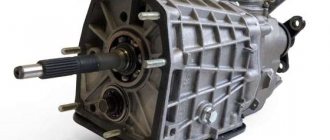
Features of transfer case Niva 2121, VAZ 2131, Lada 4x4
The Niva 2121 transfer case is used to change the amount of torque and distribute it between the front and rear axles. The box has two gears with ratios of 1.200 and 2.135. The front and rear axles are constantly driven and connected by a center differential, which redistributes torque between them depending on the resistance to wheel movement.
The Niva 2131 transfer case is attached to the body floor on two rubber-metal brackets. To adjust its position relative to the intermediate shaft flange, the holes in the brackets are made oval, and adjusting shims can be installed between them and the body. The procedure for centering the box is described in the section Determining the causes of vibration and centering the transfer case.
Also interesting: Transfer case Niva 2121: principle of operation, repair
The housing parts of the transfer case are cast from aluminum alloy and are connected to each other with studs and nuts. There is a hatch in the upper part of the crankcase, closed with a stamped steel cover. The front cover is centered on the crankcase using two locating pins. There are cardboard gaskets between the covers and the crankcase (during repairs, you can use a sealant gasket instead).
The drive shaft is mounted on two ball bearings in the sockets of the front cover and crankcase. The front bearing inner race is sandwiched between the shaft shoulder and the thrust ring by a self-locking shaft flange nut. The rear bearing inner race is sandwiched between the shaft shoulder and the thrust washer by a nut at the rear end of the shaft.
There are two drive gears on the drive shaft. The front (large) is the highest gear; it rotates freely on a heat-treated shaft journal. The rear (smaller) gear - the lowest gear - rotates freely on a heat-treated bushing mounted on the shaft with tension. The gears have two crowns. The helical (large) rings are in constant mesh with the corresponding gears of the intermediate shaft, and the gear shift clutch is connected to the spur (small) gears when the gear is engaged.
The Niva 2131 intermediate shaft is a block of two helical gears that are in constant mesh with the drive shaft gears. The front gear is also in mesh with the driven gear mounted on the differential housing.
The intermediate shaft rotates in two bearings: the front one is roller, the rear one is ball bearings. The shaft is secured against axial displacement by an adjusting ring in the groove of the outer ring of the rear bearing, which is sandwiched between the crankcase and the rear cover (the same as that of the drive shaft). A steel drive gear for the speedometer drive is pressed into the front end of the shaft.
On a VAZ-21214 car with distributed fuel injection, in addition to the mechanical speedometer drive, a speed sensor is installed on the transfer case.
The front end of the drive shaft of the Niva 2121 front axle rests on a ball bearing in the front axle drive housing, mounted on the front cover of the transfer case. The inner ring of the bearing is sandwiched between the shaft shoulder and the thrust ring by a self-locking shaft flange nut. The bearing is secured against axial displacement by a retaining ring that fits into a groove in the front axle drive housing.
The differential housing is detachable, both parts are connected by six bolts. The same bolts also secure the driven gear to the differential housing. The latter is mounted on two ball bearings. The inner race of the front bearing is held from displacement by a spacer spring washer resting on a retaining ring in a groove in the differential housing.
The groove on the outer bearing race includes a mounting ring, sandwiched between the transfer case front cover and the front axle drive housing. Thus, the differential housing is held against axial displacement by the front bearing; the rear bearing is not fixed. The front of the differential housing has splines along which the locking clutch moves. When the lock is engaged, the clutch is connected to the gear on the front axle drive shaft, connecting it to the differential housing.
In the holes of the differential housing of the VAZ 2121 there is an axis of the satellites, held by two retaining rings. Under one of the rings there is a spring washer that prevents axial movement of the satellite axis. The satellites (bevel gears) located on the axle are in constant mesh with the axle drive gears.
The transfer case control is manual, with a mechanical lever drive. The driver uses the rear lever to change gears, and the front lever to engage the differential lock. The design of the gearbox control drives is similar. The lever swings in the longitudinal direction on an axis installed in the bracket eyes in front of the Niva 2131 transfer case.
To reduce friction, plastic bushings are inserted into the hole in the lever. The lower end of the lever fits into the groove of the rod and is fixed with a figured spring. The other end of the rod is connected to the fork of the corresponding clutch (gear shift or differential lock) and is secured with a bolt. The rod at the exit from the box is sealed with an oil seal and protected from dust by a rubber corrugated cover.
To fix the drive in the selected position, a ball lock is used - a spring-loaded ball fits into the grooves on the rods. There are three of them on the gear shift rod - for “neutral”, high and low gears; on the differential lock rod of the VAZ 2131 there are two (“on” and “off”). A switch is screwed into the front axle drive cover, which closes the warning lamp circuit when the differential lock is engaged.
Read news about the new Niva
- All-terrain vehicle fracture 4x4: photo of step-by-step assembly video of a trip on an all-terrain vehicle
- Homemade all-terrain vehicle on low-pressure tires (45 photos)
- Dismantling and assembling the gearbox Niva 2121, Niva 2131
- Nissan engine on a Niva – Replacing a Niva engine with a Japanese one
- FROST car air conditioners // Online store // Prices // Air conditioners for cars Lada VAZ, VolksWagen Polo, Daewoo Matiz
- Transfer case Niva VAZ - do-it-yourself repair and replacement
- Transfer case Niva 2121: principle of operation, repair
- Gearbox VAZ-21213 Lada Niva, VAZ-21214 Lada 4x4, diagram
Knocks in the suspension and transmission of Chevrolet Niva
If extraneous knocking noises appear in the suspension of a moving vehicle, it is necessary to immediately determine their source, regardless of whether the knocking is constant or appears only when driving over uneven surfaces.
WARNING Faults in the vehicle's suspension and steering can lead to a serious accident!
USEFUL ADVICE It is better to check the condition of the suspension by placing the car on an overpass, inspection ditch or lift, and if this is not possible, you can do this work on a free flat area, although with less convenience. In any case, you will need an assistant.
Start your check by carefully inspecting the condition of the suspension parts.
1. Check the condition of the rubber-metal hinges of the lower...
2. ...and the upper front suspension arms...
3. ... rubber bushings of the stabilizer bar and the reliability of fastening their brackets.
4. Carefully inspect the suspension arms. Cracks and mechanical damage to the levers, especially at the attachment points of the ball joints, are unacceptable.
5. Check the reliability of fastening and the condition of the upper cushion and...
6. ...lower mounting of front and...
7. ...rear shock absorbers. Replace cushions and bushings with rubber that is torn, cracked, or pressed out on one side.
8. Check the wear of the ball joints...
9. ...and front suspension supports.
10. To check the hinges, lift the front wheel with a jack (or hang the car on a lift, placing a support under the lower arm and lowering the car slightly to unload the hinges).
11. Rock the wheel in a vertical plane, with an assistant pressing the brake pedal to eliminate possible play in the hub bearings. If play is felt (the upper outer edge of the brake caliper moves more than 0.5 mm; this distance can be measured, for example, using an indicator), it means that the hinges are worn out, they may make a knock when driving over uneven surfaces and need to be replaced.
12. Rock the wheel in a vertical plane, holding the top with one hand and the bottom of the wheel with the other while releasing the brake pedal. Increased knocking from the central part of the wheel indicates a large gap in the hub bearing.
13
When checking the rear suspension, pay attention to the condition of the hub bearings, shock absorbers, springs, longitudinal and transverse rods and the fastenings of the shock absorber rods to the body. Carefully inspect the rear axle crossbar bracket on the body
USEFUL TIPS After replacing individual parts of the front suspension, it is necessary to check and adjust the alignment angles of the front wheels. This operation must be carried out on a special stand in a car service center, since incorrect installation of wheels leads to increased tire wear, increased fuel consumption and deterioration of vehicle stability and controllability.
Pay attention to the exhaust system. Very often, due to the use of non-standard elements or breakage of the muffler suspension elements, it can be a source of strong knocking, especially when changing the throttle
To check, stop the engine, carefully inspect the exhaust system, check the reliability of the muffler fastening and suspension. Holding the end of the exhaust pipe, rock the muffler up and down and from side to side - there should be no knocking.
Knock (noise) in the cardan transmission
It is quite difficult to diagnose the serviceability of the cardan transmission by the noise it produces. If you are unable to pinpoint the source of the noise, contact a qualified professional.
Knock (noise) in the rear axle
It is quite difficult to diagnose the health of the rear axle based on the noise it makes. If you are unable to pinpoint the source of the noise, contact a qualified professional.
Knock (noise) in the front axle
It is quite difficult to diagnose the health of the front axle based on the noise it makes. If you are unable to pinpoint the source of the noise, contact a qualified professional.