Hello, readers of the blog RtiIvaz.ru. Today we will look at how to replace the timing belt of a Kalina with an 8-valve engine.
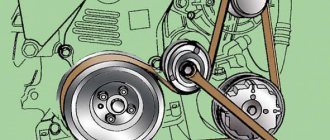
To begin with, here is a diagram for installing the timing belt of Kalina with an 8-valve engine:
FIGURE 1 Timing drive Kalina 8 Kl and location of marks
As can be seen from the schematic image, first of all, you need to correctly set the marks on the camshaft and crankshaft pulleys.
In the photo below, please see the position of these marks:
FIGURE 2 Crankshaft pulley on Kalina 8 Kl
FIGURE 3 Camshaft pulley 8 valve Kalina
STAGE 1
We drive the car into the inspection hole and lift the front right wheel with a jack. We remove the wheel and, opening the hood, let the engine cool. It is desirable that the engine temperature is approximately 60 degrees Celsius. Before getting to the Kalina timing belt, you need to remove the generator belt and its drive pulley on the crankshaft.
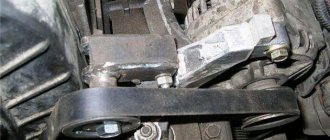
The generator drive device is shown in the photo below:
FIGURE 4 Installing the generator belt for 8 valve Kalina
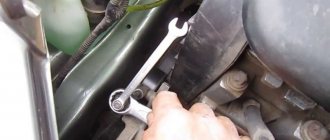
As can be seen from the photo, the generator belt is tensioned using a roller. To remove the poly V-belt, you need to loosen the tension on this roller. To do this, you first need to loosen the rod locknut with a wrench (19). We loosen the lock nut and use a wrench ( we tighten the rod itself until the belt loosens and it becomes possible to remove it. Now it’s time to get to the generator drive pulley on the crankshaft. To do this, you need to go down into the pit and remove the engine “boot” protection on the right side. Also you need to remove the flywheel protection, which is secured with three bolts (10) from the bottom of the engine, on the gearbox housing. We remove the protection and, by inserting a flat-head screwdriver between the teeth of the ring gear and the gearbox housing, we will lock the flywheel. This is necessary so that when the bolt is unscrewed, the crankshaft does not turn. Bolt ( the key 17) is tightened very tightly, so to unscrew it, you will need to apply some force. To do this, it is better to use a socket with the same size and a pipe as a lever. After tearing off the bolt, unscrew and remove the generator drive pulley.
STAGE 2
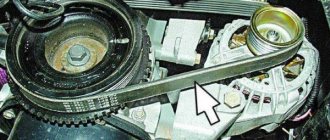
We leave the pit and remove the upper plastic engine protection. It is attached to the engine with four clips; you just need to carefully pull it off from each clip in turn. Next, remove the timing belt protective cover of the Lada Kalina. To do this, you need to unscrew the three mounting bolts with a wrench (10). One of them is located in front of the casing, and the other two are on the side. Having unscrewed the bolts, we removed the casing, and the entire gas distribution mechanism drive opened in front of us (see photo).
FIG.5 Timing drive Kalina 8 Cl
Now the crucial moment has come! It is necessary to install the entire Kalina timing belt drive strictly according to the marks. To do this, you need to take a socket head (19), preferably with an extension, and screw back the bolt that we unscrewed when removing the generator drive pulley.
Using this bolt, turn the crankshaft clockwise until the marks on the crankshaft and camshaft gears match. The locations of these marks are indicated in the illustrations above.
It is better to turn it by the crankshaft, but it is not advisable to do this with the camshaft. This must be done because the Kalina timing mechanism is driven precisely by the crankshaft, and not by the camshaft.
Next, you need to use a wrench (17) to loosen the bolt securing the tension roller and loosen the tension of the timing belt. Remove the belt and tension roller to check the condition. Usually, when replacing the Kalina timing belt, the roller is also changed, since most often the bearing on it has, albeit a small, play. And this is unacceptable. Checking the condition of the pump. You need to tug on the pulley without removing it, and if there is play, it is better to replace it immediately.
The pump may work for a while, but then it will still fail, and to replace it, you have to open the entire drive again and replace it. And it also happens that it jams and because of this the belt breaks. Then you have to open this entire system again and repeat all the work again. It is advisable to check the condition of the crankshaft and camshaft seals. To do this, you need to remove the corresponding gears and the rear cover of the gas distribution mechanism.
After checking the condition of the seals, we will replace them if necessary, which will save you from unnecessary work in the future.
STAGE 3
So! We removed the timing belt, checked the condition of the pump and seals, and, if necessary, replaced them with new ones. Next, we can begin assembling the Kalina timing belt drive.
We install the previously removed camshaft and crankshaft gears into their seats. If during the process of removing them the marks have shifted, then they must be installed strictly in their places.
Forced tuning
Unfortunately, since 2011, designers have abolished the tensioner on Kalina. They were guided primarily by considerations of economy, but they did this without any modification to the generator. In practice, cases of its premature failure immediately became more frequent. Therefore, owners began to install the tensioner on their cars themselves.
It's not very difficult to do this. True, you will have to purchase not only the tensioner itself, but also the generator bracket. The only problem is removing the standard belt. It is very difficult to remove because it is very tight at the factory. You can simply cut it, as you will have to buy a new one. The fact is that the Kalina generator belt without a tensioner has a size of 820 mm, but 880 will be needed.
Replacing the tension roller, removing the generator drive belt tensioner
When replacing the generator drive belt, it is necessary to check the condition of the belt tension roller. The roller should rotate silently, evenly and without jamming. Otherwise, and also if traces of grease appear from under the cuffs of its bearing, replace the roller with a new one.
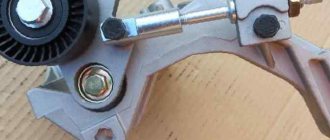
Elements of the generator drive belt tensioner
: 1 — cup washer of the bottom bracket mounting bolt; 2 — spacer washer for the lower bracket fastening bolt; 3 — bottom bracket fastening bolt; 4 — bottom bracket; 5 — washer; 6 — threaded tip; 7 — adjusting pin; 8 - lock nut; 9 — upper bracket; 10— bushing; 11 — bolt for fastening the upper bracket/threaded tip; 12 — tension roller washer; 13 — tension roller support sleeve; 14 — tension roller; 15 — tension roller mounting bolt; 16 — tension roller cover.
To replace the tension roller, loosen the tension on the generator drive belt (see “Checking the condition and replacing the generator drive belt”).
Using a screwdriver, pry off the roller cover (for clarity, shown on a dismantled tension device).
Using a 17mm spanner, unscrew the bolt securing the roller to the lower bracket of the tensioner.
For clarity, we show the operation on a dismantled tension device.
The bolt thread is left-handed, so unscrew the bolt clockwise.
We take out the tension roller with the bolt, support sleeve and washer. Install the tension roller in the reverse order. If it is necessary to dismantle the generator drive belt tensioner, loosen the belt tension. Then.
. Using a “13” head, unscrew the bolt securing the upper bracket of the tensioner to the generator bracket.
Remove the washer from the bolt (located on the inside of the tensioner bracket), remove the bolt and bushing.
Using a 13mm head, unscrew the bolt securing the lower bracket of the tensioner to the generator bracket (shown on a dismantled engine for clarity).
We take out the tensioning device assembly. We remove the bolt securing the lower bracket of the tensioner by removing the spacer and two cup washers from it. If necessary, disassemble the generator drive belt tensioner. We assemble and install the tensioner in the reverse order.
To avoid unpredictable consequences for the main power unit of the Lada Kalina, it is worth changing the timing belt on time. Since untimely replacement can lead to major repairs and a blow to the owner’s wallet. Of course, not every car enthusiast can do this himself and has to contact a car service center.
Let's sum it up
This completes the dismantling procedure. Now you know how to tension the alternator belt. The steps for reinstallation are also very simple, so there is no particular need to comment on them. Upon completion of the entire list of installation procedures, we check the tension level for compliance with the specified requirements. We start the engine and observe the operation of the unit. If no side factors are detected, then the work was done correctly.
Also in LADA Kalina it is possible to remake the tensioning device, which is confirmed by this video:
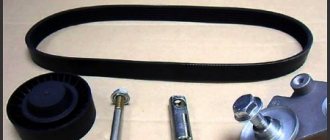
The process of replacing the timing belt on an 8-valve Lada Kalina
As with any repair, you should start by looking for tools. So, to replace the timing belt and pulley of the Lada Kalina 8-valves you will need:
- Wrench 17 (open-end and socket).
- Head for 10.
- Flathead screwdriver.
- Special key for tensioning.
When you have decided on the necessary tool, you can proceed directly to replacement:
- To make it easier to replace the timing kit, the alternator belt should be removed.
- Unscrew the 3 bolts securing the timing case and remove the cover.
Removed the timing belt cover
We combine the marks. Rotate the right front wheel with your hands until the marks touch
We remove the pulley. Very detailed in this photo
Removed the timing belt
Thus, it can be seen that replacing the timing belt and pulley on the Lada Kalina 8 valves is quite easy. On average, this process takes up to 4 hours.
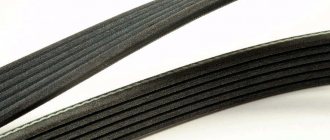
Belt and roller selection
The quality of the timing belt and pulley plays an important role in engine performance.
Experienced Kalinovods from our community do not recommend that you take a Dayco timing belt. The photo shows a DAYCO belt with a mileage of 20,000 km.
At the same time, the choice should be approached carefully and thoroughly. The operation of the injection and exhaust gas systems depends on their high-quality and complex work. Since the timing belt and roller are considered consumables, therefore they change more often than the main parts of the power unit.
Article number and price of the belt
So, let's look at the original and non-original timing system parts that can be installed on the 8-valve Lada Kalina.
21126-1006040 is the original timing belt article number , which is produced by the AvtoVAZ plant. At the same time, it is considered reliable with a service life of up to 30 thousand km. The average market price is 1300 rubles.
There are quite a lot of analogues of the original part on the spare parts market. Some of them are of better quality than the original timing belt for the 8-valve Kalina. Let's look at which manufacturers make non-original spare parts for the gas distribution mechanism for VAZ -1117-1119 8 valves.
Table indicating manufacturers, articles and prices
| Manufacturer's name | Catalog number | Average price in the Russian Federation in rubles |
| Master-Sport | 1137-SD-PCS-MS | 570 |
| Grand prix | JH8025 | 800 |
| LYNXauto | 137FL22 | 960 |
| Hola | TH1372 | 1000 |
| Contitech | CT1137 | 1280 |
| Finwhale | BD137 | 1550 |
| Dayco | 941071 | 1650 |
| Bosch | 1 987 949 662 | 1860 |
| Gates | 5631XS | 2150 |
| Luzar | LTB0127 | 2280 |
| Optibelt | ZRK1593 | 3340 |
| Pilenga (belt+roller) | CT-P1137 | 4720 |
| Trialli (belt+roller) | GD770 | 5060 |
New Bosch timing belt
As you can see from the table, the choice of non-original timing belt is quite large. Every car enthusiast will be able to choose for his 8-valve Lada Kalina the option that he considers most acceptable.
2302-6-01-03_cr
So far, we have shown operations that will allow, if necessary, to change the tension of the accessory drive belt. But to replace the belt, we have to dismantle the right support of the power unit, since it passes through the belt.
From the bottom of the car, remove the middle and right mudguards of the engine compartment. You can see how to do this in the article “Replacing Lada Granta coolant”. Next, we should remove the fender liner of the right front wheel or, having freed all the fastenings of the fender liner in the front and middle parts, bend the fender liner by the brake disc of the wheel.
We hang and remove the right front wheel and release the fender liner fastenings according to the diagram.
Article number and price of the video for Lada Kalina
An integral operation of selecting a belt is also selecting a timing pulley. As in the first option, there is an original and several analogues that can be used. Let's look at the article numbers and prices for the timing pulley Lada Kalina 8 valves:
- The original catalog number of the timing belt roller of the 8-valve Lada Kalina is: 21126-1006135. The average cost of this part in the Russian Federation is 700 rubles.
- There are quite a lot of analogues of the original timing pulley, which are successfully certified for use on a car and differ only in quality and service life. Let's consider which timing pulley can be installed instead of the original one on a Kalina with 8 valves:
Table indicating manufacturers, part numbers and prices for a non-original timing pulley
| Manufacturer's name | Catalog number | Average price in the Russian Federation in rubles |
| Master-sport | 21126-1006135-ST-PCS-MS | 580 |
| QML | BT1006 | 650 |
| Pilenga | PT-P1571 | 670 |
| Torque | KR5016 | 680 |
| Caffaro | 320-99 | 720 |
| Trialli | CM172 | 735 |
| Optimal | 0-N2044 | 750 |
| LYNXauto | PB-3012 | 1080 |
| Gates | T42150 | 1300 |
| Dayco | ATB2543 | 1450 |
| Ina | 532060410 | 1470 |
| SNR | GE372.00 | 1500 |
| Ruville | 57207 | 1550 |
| Coram | C834 | 1850 |
| Outlog | RT1663 | 2000 |
This is a Chinese video, the quality is not very good, it quickly became noisy
A fairly large selection of timing rollers is available to the owner of the 8-valve Lada Kalina. It is worth noting that most of the products from the table have high quality workmanship and also have a service life of about 40,000 km.
Reasons for failure and consequences of not timely replacement
There are several reasons for the failure of the timing belt on the Lada Kalina with 8 valves.
Due to poor quality, the timing belt slides closer to the driver's side
Let's consider the main ones:
- Wear. During operation, the belt heats up, which leads to its stretching. In turn, the consequences are the formation of cracks.
- Quality workmanship of the part. A bad part can last much less than its intended service life.
- Incorrectly selected spare parts. If a part is installed incorrectly or is not the correct one, the engine will not work correctly and the gas distribution process will be disrupted. This leads to increased wear of the elements of the power unit or replacement of the cylinder head.
Consequences of untimely replacement of the timing belt and pulley
On the 8-valve Kalina, the engine is “not plug-in” - in slang this means that the pistons do not meet the valves in the event of a timing belt break
The consequences of untimely replacement of the timing belt can be both minor and large-scale, which will hit the owner’s wallet. On the 8-valve Lada Kalina engine, the valves do not bend, so if the timing belt breaks, you will only need to replace it and find out the reason. Either the belt broke on its own, or it was helped, for example, by a jammed pump.
So, let's look at the main troubles that can happen:
- Wear of piston and liners.
- Increased oil consumption.
- Worn camshaft and valve guides.
- Bent cylinder head valves.
- Timing gear deformation.
We exhale, we are not in danger of bending the valves
If you have an 8-valve engine, then bending the valves and replacing them, as a rule, does not threaten you, but if the “head” is 16-valve, you are definitely guaranteed to replace these elements. However, in this article we will look at how to change the timing belt on a younger brother, when a breakdown does not entail any unpleasant consequences, and all work can be carried out almost in the field and with minimal knowledge.
Major breakdowns
There are three main types of timing belt failure:
- The integrity of the belt structure is compromised - in this case, the belt delaminates, and the internal threads on its surface become visible to the naked eye. These problems occur due to mechanical damage or due to incorrect adjustment. This belt must be replaced immediately.
- Over-tension or under-tension of the belt - the tension roller is responsible for the degree of belt tension, which allows the belt to rotate around its own axis and allows it to be adjusted correctly. If the belt is too tight or too loose, it will fall into an indecent state very quickly.
- A break is the most unpleasant situation that can happen on the road with a timing belt. In this case, the engine will completely stall and it will be possible to start it again only by installing a new element.
To avoid such troubles, the manufacturer recommends checking it every 15,000 kilometers and replacing it every 75,000 kilometers. In fact, it should be changed as soon as visible cracks are detected on the surface.
Advantages of a tensioner
Why weren't designers happy with the previous adjustment methods? Why did they add an extra video? It's not just about convenience. The tensioner significantly increases the service life of the generator. Without a roller, the entire load falls on its bearings. If the belt is tensioned normally, then there is nothing to worry about. In this case, the generator will last many thousands of kilometers. However, very often car owners overtighten the belt, and this is bad.
The load on the bearings increases many times over, so they quickly fail. In itself, this is not so scary and expensive, although repairing a generator is quite labor-intensive. But the car owner does not always recognize the breakdown in time. The bearings gradually “break”, the rotor moves and begins to cling to the stator winding. The result is the need to purchase a new generator. Of course, the Kalina generator belt tensioner pulley can also fail, which happens quite regularly, but that’s only 400 rubles, not twelve thousand.
Step-by-step work on replacing the timing belt
Before you begin replacing the timing belt, you need to prepare your work area and all the necessary tools. For work we will need:
- New timing belt.
- The key is "10", "17", "19".
- Flathead screwdriver.
- Tensioner pulley key.
Execution order
- Open the hood and remove the plastic engine cover.
- We dismantle the belt protection by unscrewing three bolts to “10”.
- Remove the right wheel and protection.
- This is what the timing belt diagram looks like, according to it we set the marks.
The location of all marks is shown schematically.
The marks are marked with arrows.
We fix the screwdriver where the arrow points.
Using a “17” wrench, unscrew the fixing bolt.
We dismantle the weakened belt.
Installing a new belt
- We put the belt on the crankshaft pulley.
- We begin to tension the two branches of the belt, first fix it on the pump pulley, then wind it by the tension roller.
- Then it drives it onto the camshaft.
- We tighten the belt using a tension roller, while simultaneously fixing the latter using a special key. (Rotate the roller counterclockwise).
- We make sure that all the teeth lie flat on the gears.
- Tighten the generator pulley mounting bolt and turn the crankshaft clockwise by giving one revolution.
- We make sure that all the marks match and remain in place.
Snapshot53252323
In order to improve visual control, remove the plastic engine casing. To check the condition of the belt, engage fifth gear in a manual transmission, push the car (or rotate the suspended wheel) and inspect the belt along its entire length. On a car with an automatic transmission, remove the right mudguard of the engine compartment and, by rotating the crankshaft by the bolt of the auxiliary drive pulley, check the condition of the belt.
With any of the gearboxes, the following method is also possible: apply chalk marks to sections of the belt and, turning on the starter for short periods of time, turn the crankshaft at small angles. We inspect the belt along its entire length, checking the areas covered by the marks.
Video about setting marks on Kalina's 8-valve valve
When performing all work, do not close the hood and start the engine. If everything is installed correctly, then there should be no extraneous noise or creaks in the operation of the motor. With a well-tensioned drive, the engine should not move in “waves”, that is, regardless of the speed, the engine should not deviate from stable operation. If the belt is tensioned too much, a peculiar “hum” from the tension roller may be observed. If this happens, loosen the roller and fix everything again. Upon completion of all work, reinstall the belt and engine cover.
Symptoms of a problem
Damage to the tensioner is usually easy to diagnose. It is often noticeable visually. Running the car for a short time without an alternator belt helps to identify the problem. This often allows the damage to be localized. You should think about replacing the Kalina generator belt tensioner in the following cases:
- Presence of traces of rust and corrosion on the roller axis.
- A characteristic whistle when the engine is running.
- Short service life of the alternator belt.
- Curvature of the roller relative to the belt.
If the cause of the malfunction is precisely established, you can proceed to its elimination.