Today, if a car owner likes to do adjustments and repairs on his own, then he needs to have a computer with special software that tests the operation of the engine. However, with the help of certain programs, it is possible to conduct a complete diagnosis of the vehicle’s condition: fuel, electronic system, engine, etc.
Injector adjustment
Fuel injection, which is performed using an injector, has a number of features. Often cars with injectors are purchased used, and after some time a problem with fuel consumption appears, and malfunctions in the operation of the engines are simply noticeable. These problems are expressed in the fuel system, because of this, fuel consumption increases noticeably, the car does not produce the required power, and sometimes it simply stalls. This is where you need to adjust the injector; you can do this at a car service center or yourself.
If you decide to do this yourself, then for full adjustment you need a special computer program, for convenience, a laptop and a cable with connectors for your injector. As for the program, here you need to purchase software specifically for your car and model. The fact is that each car memory control unit has its own program, which controls everything from the ignition, and therefore it is important to choose the right test for it.
Once connected, you will have full access to information and processes occurring in various vehicle systems and will be able to read error data. The obtained data should be compared with the basic data, they are available in the catalog or noted in the program itself, however, you need to have some knowledge and understanding. Having identified the errors and knowing the correct data, it will be easy for you to set the injector clock to the desired injection frequency and correct operation.
In addition to the factory basic programs, today you can purchase firmware with various settings that adapt the injector and the operation of the car as a whole to your requirements.
Chip tuning is an adaptation of the injector
In modern automotive slang, fine-tuning an injector to suit your requirements is called chip tuning. As a rule, this is done in order to realize the operation of the injector and engine with maximum capabilities. Factory settings leave a so-called reserve, while the engine does not operate at full power; such firmware removes restrictions and improves many indicators.
ECM modification is the name given to setting the injector to maximum capabilities. During the testing process, the default software is replaced, configured and modified, and calibration data is taken while the vehicle is moving. Such data is taken several times in various configuration forms, for different cars and saved, after which these templates can be used for tuning and overclocking your injector. Often, such firmware allows you to adjust the environmental friendliness of car exhaust, increase power or reduce fuel consumption. It is impossible to say unequivocally about the effectiveness of the firmware; first you need to install new data in the car’s brain, then test the car on the move. Please note that the firmware may require the use of fuel of a different octane number, and the firmware must be tested in certain weather conditions. The software is quite flexible and allows you to configure the engine and car to meet specific requirements, taking into account fuel consumption and the requirements of the car owner.
After such settings, you can achieve the best performance from your car, increase engine power, balance fuel consumption, adjust all technical aspects of the car, thus reducing wear on certain parts, systems and the engine. However, there are some important points that should be observed after debugging, for example, the injector and the engine will become more selective in fuel quality. But this will pay off in a number of positive ways:
- engine starting will speed up;
- in high gear you will not feel jerking when accelerating, power will be added smoothly;
- there will also be smooth movement at low load;
- It is important that fuel consumption will decrease; it happens that consumption decreases from half a liter or even up to three liters.
I would like to note that firmware for non-standard software should be done either expertly yourself, or entrust it to specialists who have proven and licensed firmware. Depending on whether the software is correct and the job done, you could end up with a completely new car, or you could ruin it. Untested firmware may show impressive results at first, but very quickly the engine will deteriorate and you will have to fork out for repairs.
How to properly adjust idle speed
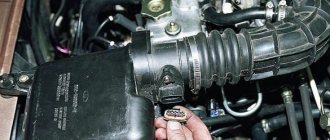
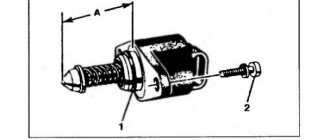
In an engine with injection injection, the idle speed regulator plays a very important role, which is responsible for supplying fuel at idle speed, as well as for supplying air to the engine. It is regulated by an electric motor with a conical needle, and the feed is regulated by an on-board computer. If the regulator is faulty, then floating speed appears or the engine stalls altogether. To properly adjust the regulator, do the following in the order shown:
- remove the terminal from the battery;
- (IAC) completely remove the regulator;
- the landing channel for connecting the regulator must be blown with compressed air;
- disassemble the regulator; if the internal guide bushing is very worn, it should be replaced;
- inspect the regulator needle, it may be damaged, in this case only replacement is needed;
- with an electrical tester you need to check the winding for breakdown, and also check and clean the winding contacts;
- now reassemble everything in reverse order and install the regulator;
- now test it in different engine operating modes.
Despite the complexity of the injection system, it is very flexible, easy to configure and repair, but like any mechanism it requires maintenance and prevention.
Hello, dear car owners! Many still remember the times when our people's cars were the legendary Muscovites and Zhigulis.
And every self-respecting car enthusiast, armed with a wrench and a screwdriver, considered it his duty to adjust the carburetor of his car to suit himself.
Gasoline engines of modern cars are equipped with a fuel injection system. This system is completely tied to the electronic “brain” of the car and it is unlikely to be possible to debug its operation with a wrench and a screwdriver.
Today's car enthusiasts, who want to carry out most of the maintenance operations on their car themselves, have in their arsenal, along with keys and screwdrivers, computers with special software.
How to adjust and configure an injector with your own hands
Contents of the article: Hello, dear car owners! Many still remember the times when our people's cars were the legendary Muscovites and Zhigulis.
And every self-respecting car enthusiast, armed with a wrench and a screwdriver, considered it his duty to adjust the carburetor of his car to suit himself.
Gasoline engines of modern cars are equipped with a fuel injection system. This system is completely tied to the electronic “brain” of the car and it is unlikely to be possible to debug its operation with a wrench and a screwdriver.
Today's car enthusiasts, who want to carry out most of the maintenance operations on their car themselves, have in their arsenal, along with keys and screwdrivers, computers with special software.
Self-adjustment of the injector
Having become the owner of a car with a fuel injection system, often not entirely new, most of us, during operation, begin to notice certain deviations in the engine’s operation that we would like to correct. Either we don’t have enough traction, or it seems to be eating more fuel than it should, or it doesn’t work smoothly. It is in such cases that adjustment of the injector is necessary.
To adjust the injector yourself, you need a laptop with installed software that matches the make of your car and a cable for connecting to the on-board computer. The on-board computer has its own firmware, the “brain” of the car, with the help of which all processes are controlled.
By connecting to the on-board computer, you will be able to observe the vehicle parameters, as well as any errors present. Having a certain amount of knowledge, you can easily remove errors yourself.
And with the help of non-standard firmware, which is now easy to obtain, you can make changes to the main firmware of the car’s on-board computer, and thus customize the dynamics of your iron friend.
Chip tuning: customizing the injector for yourself
Injector tuning or chip tuning is the modification of the electronic engine control system in order to obtain the greatest possible improvement in its performance characteristics.
On an experimental car, the factory software is refined and adapted to local fuel and specific weather conditions, and the fuel consumption settings are perfected.
And only then, using modified software, the injector of your car is configured.
As a result, your car will receive:
- fast start
- smooth running at low loads,
- smooth traction in high gears,
- reduction in fuel consumption by 0.5-3 liters per 100 km.
It is strongly recommended that you trust the settings of the injector to qualified specialists working with licensed software. Installing untested software may make you happy with your car's sporting performance, but not for long. Next, as a rule, follows expensive engine repairs.
Adjusting the idle speed on the injector
One of the executing organs of the engine is the idle speed controller (IAC), which is a stepper motor with a conical needle.
The IAC regulates the air supply to the engine, receiving commands from the on-board computer. It is its malfunctions that cause floating engine speeds.
Adjusting the injector idle speed is performed in the following order:
- disconnect the battery;
- remove the idle air control;
- rinse and blow out the landing channel with compressed air, disassemble the regulator, check the guide bushing and replace it if there is increased wear;
- visually inspect the needle and replace it if visible defects are detected;
- Use a tester to check the serviceability of the regulator winding and clean its contacts;
- install the regulator in place, connect the power connector, connect the battery;
- start the engine and check its operation in different modes;
Adjusting the idle speed on a fuel-injected car
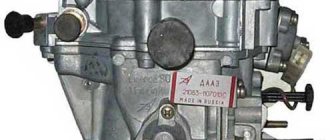
In the case when we are talking about floating engine speeds, stopping the engine when the car is put in neutral gear, or increasing speed when the engine is fully warmed up, this may indicate a malfunction of the idle speed controller or a lean mixture. A similar conclusion can be drawn in the case when the speed on a cold engine is too low.
Idle speed regulator Lifan Solano
In any case, this can all happen due to excessive air supply.
The mixture must be adjusted by a computer that collects data from a number of sensors (we have already written about injector sensors above). For some time, it can open or close the injector valves with the value that is needed for the engine at the moment.
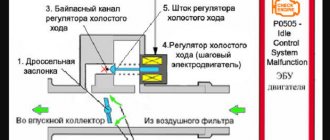
Procedure
The idle speed control is an executive element of the engine (mechanical sensor), and if it is not operating correctly, the light indicating a malfunction will not light up. The regulator is a stepper electric motor including a cone needle. The regulator may be located on the throttle body to ensure a specific level of airflow bypassing the closed throttle body. And it, in turn, is set by the car’s electronic system so that the engine runs stably and evenly, regardless of external factors.
- First you need to disconnect the battery.
It will not be enough to simply turn off the ignition. You need to turn off the "mass".
We dismantle the idle air regulator - The second point you should pay attention to is unscrewing the fasteners that hold the regulator. This will allow you to remove it completely. As we said, the regulator can be found on the throttle body, to which it is screwed with a pair of screws. In some car models, the screws can be filled with special paint or, even worse, drilled out. In such a situation, it may be necessary to completely dismantle the throttle body, after which disassembly and removal of the regulator will be carried out.
- Point number three involves cleaning the landing channel. It will be enough to rinse it and then treat it with a strong air stream. This is done using a can of compressed gas or a conventional compressor. The regulator must be disassembled with great care so that its winding is not damaged. Now it’s time to check the guide bushing, especially if the conical needle can move freely around its axis with clearance. If this is the case, then the bushing must be replaced with a new one. In a situation where the conical needle does not contain significant damage or abrasions on its surface, it can be left. But, when you have even the slightest doubt about its serviceability, then it must be completely replaced with a similar model.
- The fourth paragraph of the instructions talks about the process of determining the integrity characteristic of the pressure spring. Also, using a special measuring device, you can check the integrity of the regulator winding. In addition, it would not be superfluous to clean the contacts of this very winding. And only after this can you reassemble the idle air control. But, before installing the regulator on the car, it is necessary to measure the distance from the flange of its body to the tip of the cone needle. This figure should be twenty-three millimeters. If the distance differs from the specified one in any direction, then the needle must be replaced with a new one. This also applies to situations where there is no visible damage to the needle.
- The fifth and final point is that you will need to install the idle air control in its place. As you could already see during the process of dismantling it, it has its own seat. It is located in the throttle body. After this, you can connect the control plug to this same regulator. Next, turn on the car's electrical power again. And this is where the “interesting” part begins. You need to start the engine and test it under different operating conditions. If the problems persist or have not disappeared completely, then you may need to re-disassemble the idle air control. But, if the second attempt is not successful, then the breakdown should be looked for in other places. In particular, the reason may be the firmware of the on-board computer, especially if you bought the car second-hand.
Additional advice is that you can only adjust engine speed on an engine that has been well warmed up beforehand.
Alternative reasons
Advanced software and chip tuning
ATTENTION! A completely simple way to reduce fuel consumption has been found! Don't believe me? An auto mechanic with 15 years of experience also didn’t believe it until he tried it. And now he saves 35,000 rubles a year on gasoline! Read more"
Modern gasoline power units equipped with an injector are completely dependent on an electronic “brain”. It is unlikely that it will be possible to set up the entire system the old fashioned way, using a wrench and a screwdriver.
Along with a set of required tools for setting up the mechanical part of the system, the injector owner who is interested in independently servicing the motor and tuning it must also have a computer with built-in software.
Injector diagnostics
Self-adjustment of the injector involves correcting specific deviations that require adjustment. As a rule, this is due to insufficient traction, increased fuel consumption and failure of factory settings.
To make adjustments, you will need, as mentioned above, a computer or laptop with software installed that is customized for the brand of a particular car. You will also need a cable to connect to the BC. As you know, the BC has its own firmware, which controls all processes in the injection system.
By integrating a laptop with a bookmaker, you can easily monitor the technical characteristics of the car, study its condition and look for errors. Having a certain amount of knowledge in this matter, you can easily remove all errors.
As for the shortcomings of the native firmware, today this can be easily solved. You can simply add the updated firmware to the BC, or make changes for yourself.
Adjusting the injector to suit you is already a modernization, modification, or in other words, chip tuning. It is also carried out with the aim of improving performance characteristics.
However, you should know that the software must fully comply with a number of constant parameters: fuel quality and climatic conditions.
Revision, if done correctly, will improve the following:
- at high speeds, the vehicle dynamics stabilize;
- the car will get off to a fast start;
- fuel consumption will decrease by 1-3 l/100 km;
- with low loads on the car, smooth running will be ensured.
However, it is unlikely that it will be possible to carry out high-quality chip tuning without qualified knowledge. It would be better to entrust this operation to specialists at a car service center. It is not uncommon for a car to please its owner for just a couple of days after installing untested software at home. Then major renovations began.
Repair (tuning, adjustment) of mechanical injection KE Jetronic.
Oh, this jetronic, how much nerves it spent on its owners and servicemen, how much money was wasted, how many curses the German developers heard...
Mechanical injections, in particular KE3-Jetronic, have become notorious due to their complexity, capriciousness, incomprehensibility, non-repairability, high cost, etc. Numerous reviews on the Internet confirm this, but what if we say that mechanical injection, also known as jetronic, “spider” and “turtle” (yes, whatever they call it) is actually not as scary as it might seem? In this article we will try to analyze the main issues and important points regarding mechanical injection, whether it is worth buying a car with such an injection, how much the repair costs, how to set up the injection and, most importantly, how to diagnose it yourself.
Why not? Mechanical injection can be repaired without problems (with the right approach); in extreme cases, it can generally be replaced with electronic injection “Invent”, “Liscar” or “January”.
Let's consider a typical situation: You bought a car with mechanical injection, but then the first problems began, there can be a great variety of them: the car does not start or starts poorly, accelerates poorly, the speed fluctuates, black smoke comes from the exhaust, failures during acceleration, stalls while driving, twitches, consumes gasoline, and so on. What to do? We know how the carburetor works and how the electronic injector works, but this will not help us much here; a mechanical injector is completely different.
First of all, we need to make sure the quality of the fuel poured in and replace it if necessary. It is also worth checking the electrical part: ignition coil, armored wires, distributor. Next, you should make sure that there are no air leaks in the system; most often the “turtle” breaks or cracks and the car begins to behave strangely.
Most often in mechanical injection, parts such as the fuel pump, PND (Pressure Disk Potentiometer), coolant temperature sensor fail, and the fuel distributor (spider, dispenser) becomes dirty. Let's take a closer look.
A mechanical injector operates at a higher pressure than classic electronic injection, so even if the gas pump pumps gasoline and this is clearly audible, this does not mean that it is working properly; in fact, it may not pump up the required pressure and the car may not start at all or not develop momentum. Measuring the pressure produced by the fuel pump will help here.
The HDPE is a small board with graphite tracks, which can fray over time and the sensor will no longer give correct readings, as a result of which the car’s dynamics and idle speed may disappear, and the car may begin to accelerate itself (emergency mode). The HDPE is simply removed and tested with a conventional multimeter, and worn tracks can also be determined visually. If the HDPE is faulty, you can buy a new one, it costs 3,500 rubles, and many people install an HDPE emulator from Winners, such an emulator costs 6,000 rubles.
DTOZH (coolant temperature sensor) - if this sensor malfunctions, the car may begin to over-enrich the mixture and, as a result, black smoke will appear from the pipe, and the car may simply not start. You can try to remove the sensor chip and look at the reaction of the car, if the black smoke stops coming out - there is only one option, the sensor needs to be replaced, it is very inexpensive, but defects can occur.
Over time, your fuel distributor (dispenser) may become dirty, hence poor dynamics and incorrect engine operation. You can remove the injectors from the manifold and check the operation of the dispenser using the “filling” method: remove the corrugation (turtle), lift the pressure disc up and fix it, immerse all the injectors in identical containers and periodically turn on the ignition to check how much fuel is poured into each of the containers, if a large one is visible difference in the indicators, then you can start cleaning the dispenser. You can try to wash it indiscriminately, but as a rule this does not give a strong long-term effect, so you can disassemble it and wash it. You need to disassemble without fanaticism, otherwise you can tear the gasket that is located between the two halves of the dispenser (although this gasket can also be bought new). After assembly, you need to check the filling again.
Using the same method, you can check the condition of the fuel injectors; during operation, they should emit a dense fuel mist with a characteristic loud squeak; if the injector flows, streams, or creates drops, then it definitely needs to be replaced. Unfortunately, there is no point in flushing mechanical injectors, since their malfunction is of a mechanical nature, namely the breaking of the injector fuel needle seat. A new nozzle costs 2000-2500 rubles. You can buy a used one, but you should check it right away. By the way, there is a myth that new injectors have not been produced for a hundred years, but this is not true, new injectors can easily be found in existential catalogs and more.
Let's say you did a high-quality diagnosis and determined that your HDPE is faulty, and some fuel injectors are also faulty. The cost of repairs is already approaching 8-10 thousand rubles. In this case, you can think about installing electronic injection; such an injection can be assembled and installed even from a VAZ car and it will work better than the original mechanical one, and it will cost you about 8-15 thousand rubles. If you have a larger budget, then you should pay attention to electronic injections “Invent” and “Liskar”; they are more expensive, but much easier to install.
The content of the article:
Hello, dear car owners! Many still remember the times when our people's cars were the legendary Muscovites and Zhigulis.
And every self-respecting car enthusiast, armed with a wrench and a screwdriver, considered it his duty to adjust the carburetor of his car to suit himself.
Gasoline engines of modern cars are equipped with a fuel injection system. This system is completely tied to the electronic “brain” of the car and it is unlikely to be possible to debug its operation with a wrench and a screwdriver.
Today's car enthusiasts, who want to carry out most of the maintenance operations on their car themselves, have in their arsenal, along with keys and screwdrivers, computers with special software.
Self-adjustment of the injector
Having become the owner of a car with a fuel injection system, often not entirely new, most of us, during operation, begin to notice certain deviations in the engine’s operation that we would like to correct. Either we don’t have enough traction, or it seems to be eating more fuel than it should, or it doesn’t work smoothly. It is in such cases that adjustment of the injector is necessary.
To adjust the injector yourself, you need a laptop with installed software that matches the make of your car and a cable for connecting to the on-board computer. The on-board computer has its own firmware, the “brain” of the car, with the help of which all processes are controlled.
By connecting to the on-board computer, you will be able to observe the vehicle parameters, as well as any errors present. Having a certain amount of knowledge, you can easily remove errors yourself.
And with the help of non-standard firmware, which is now easy to obtain, you can make changes to the main firmware of the car’s on-board computer, and thus customize the dynamics of your iron friend.
Chip tuning: customizing the injector for yourself
Injector tuning or chip tuning is the modification of the electronic engine control system in order to obtain the greatest possible improvement in its performance characteristics.
On an experimental car, the factory software is refined and adapted to local fuel and specific weather conditions, and the fuel consumption settings are perfected.
And only then, using modified software, the injector of your car is configured.
As a result, your car will receive:
- fast start
- smooth running at low loads,
- smooth traction in high gears,
- reduction in fuel consumption by 0.5-3 liters per 100 km.
It is strongly recommended that you trust the settings of the injector to qualified specialists working with licensed software. Installing untested software may make you happy with your car's sporting performance, but not for long. Next, as a rule, follows expensive engine repairs.
Adjusting the idle speed on the injector
One of the executing organs of the engine is the idle speed controller (IAC), which is a stepper motor with a conical needle.
The IAC regulates the air supply to the engine, receiving commands from the on-board computer. It is its malfunctions that cause floating engine speeds.
Adjusting the injector idle speed is performed in the following order:
- disconnect the battery;
- remove the idle air control;
- rinse and blow out the landing channel with compressed air, disassemble the regulator, check the guide bushing and replace it if there is increased wear;
- visually inspect the needle and replace it if visible defects are detected;
- Use a tester to check the serviceability of the regulator winding and clean its contacts;
- install the regulator in place, connect the power connector, connect the battery;
- start the engine and check its operation in different modes;
The fuel injection system, despite its apparent complexity, is quite adjustable and customizable. With high-quality and timely maintenance, it will delight you with impeccable performance for many years.
How to adjust and configure the injector
Many people over 40 have not forgotten those times when the only cars in the country were Muscovites and Zhigulenkis. And every experienced motorist at that time considered it an honor to be able to adjust the carburetor to suit himself. With the release of injection cars, it would seem that the need for such a setting has disappeared, but this is not entirely true. The secrets of how to adjust the injector will interest many amateurs.
Adjustment of valves
Adjusting the valves This procedure can also be attributed to customizing the injector.
Adjustment is carried out for precise operation of the valve timing and is included in the mandatory technical regulations. As a rule, the service life is every 20 thousand km. vehicle mileage. In some cases, the adjustment period is reduced if, for example, a characteristic clattering sound is heard in the power unit. In addition, it is necessary to adjust the valves after any, even minor, timing belt repair.
In any case, compared to chip tuning, this procedure is simpler and can be done with your own hands without any special difficulties.
What does correct adjustment give:
- the functioning of the power unit cylinders is improved;
- service life increases;
- oil and fuel consumption is reduced.
The valves need to be adjusted when the internal combustion engine is cold. It is imperative to wash your car, especially the engine compartment, before carrying out the procedure. The fact is that when you open the cylinder head cover, all the dirt can get inside the engine.
Adjustment procedure:
- a level place is found for the car;
- the ignition is turned off;
- the handbrake is activated.
Before moving on to the adjustment procedure, a beginner should thoroughly study the design of the GDS mechanism and clarify where the thermal gap is located.
After bringing the crank shaft into the desired position, the adjustment begins:
- The cover is removed from the cylinder head by unscrewing the nuts around the perimeter;
- the old gasket, no matter what form it is in, is thrown away (it is better to install a new one);
- the timing belt tension is checked, the marks are set according to the manual;
- The piston of the 4th cylinder is set to the TDC position, then the valves of this cylinder are adjusted.
Here's what the adjustment specifically means:
- you need to insert a flat tape-dipstick between the valve hole;
- then check that it fits in with little force and moves freely.
If this is not the case, the dipstick moves tightly or moves too freely, then adjustment is needed. All other valves are checked in the same way.
The only difficulty in the valve adjustment procedure may be turning the crank shaft. This can be done in two ways: using a key or pushing the car. Obviously, the first method is much simpler than the second.
Another equally important step in setting up the injector is adjusting the idle speed. Here, the IAC sensor, which is an electric motor, is responsible for control. It is he who is responsible for supplying air to the fuel assembly. It does this based on the BC readings. Adjustment in this case will involve washing, purging the sensor or replacing it in extreme cases.
Tired of paying fines? There is an exit!
Forget about fines from cameras! An absolutely legal new product - Traffic Police Camera Jammer, hides your license plates from the cameras that are installed in all cities. More details at the link.
- Absolutely legal (Article 12.2);
- Hides from photo and video recording;
- Suitable for all cars;
- Works through the cigarette lighter connector;
- Does not cause interference to radios and cell phones.
Order with a discount
Modern cars are improved every year. They differ significantly from their predecessors not only in the design of the exterior and interior, but also in the presence of more complex components and assemblies. And if to set up a carburetor-type fuel supply system it is enough to have a set of keys and screwdrivers, then adjusting the operation of the injector without computer equipment on which special software is installed is impossible.
How to adjust idle speed on a carburetor
Let's start with a simpler dosing system. The main advantage of a carburetor is deservedly considered the ability to quickly service the device with your own hands, using a minimal set of available tools.
To adjust the idle speed in this case, you will need to have several wrenches and screwdrivers. The main task will be to set the speed when the engine is able to operate stably, while the crankshaft speed will be the minimum possible for stable operation of the unit.
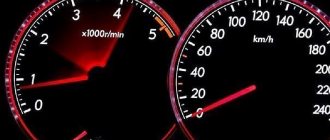
Let's look at adjustment using the Solex carburetor as an example. First of all, it is advisable to have a tachometer, which will help determine the crankshaft speed. On some cars, such a device may not be structurally present, while on others it is included as standard and is located on the dashboard.
If there is no tachometer, it is best to connect a separate device, which will allow you to set the speed more accurately. In some cases, you can set the idle speed without a tachometer, focusing only on the operation of the internal combustion engine in this mode based on external signs. The downside is that it is usually not possible to set XX as accurately as possible. You will also need to have a flathead screwdriver for adjustment. A screwdriver will be needed to turn the fuel mixture quality screw.
- So, before starting manipulations with the carburetor, the engine must be warmed up to operating temperature.
- Then you need to press the “choke” all the way, the air damper should be in the fully open position.
- Next, the engine is turned off, after which, on cars without a tachometer, you should connect the external device according to the instructions and recommendations.
In some cases, you can use a multimeter tester. The positive output is connected to output K on the ignition coil, the negative output is connected to ground.
- Now you can start the engine, after which you need to turn on the dimensions, high beams, set the maximum speed of the interior heater fan, electric heated windows, etc. In other words, energy consumers need to be involved. After this, you can proceed to adjusting the idle speed on the carburetor.
As a rule, for most systems of this type, the idle speed is 750 - 800 rpm. It turns out that it is necessary to set the idle speed within the specified limits, and the internal combustion engine must operate stably.
To do this, on the Solex you need to rotate the adjusting screw, which is responsible for the amount of the fuel-air mixture. Upon completion, the crankshaft should rotate at a frequency of 750 - 800 rpm. However, in many cases the adjustment does not end there.
The fact is that if you adjust XX only with the mixture quantity screw, then in some cases it is not possible to set the desired speed. For this reason, additional adjustment of the mixture quality screw is necessary.
There may be a separate plastic plug on the specified screw, which will need to be removed. This can be done by piercing the plug with an awl, after which a metal hook is inserted into the hole for removal. You can also screw a self-tapping screw into the plug, and then remove the element without much difficulty.
Before starting adjustments with the XX quality screw, you should also check the correct ignition setting (ignition timing, ignition timing), the condition of the spark plugs and spark plug armor wires. You will also need to eliminate the possibility of third-party air leaks. At the same time, you need to be prepared for the fact that adjustments will need to be repeated several times until the desired result is obtained.
The whole process looks like this:
- At the very beginning, you should rotate the quality screw with a flat-head screwdriver so that the crankshaft speed increases to the maximum. To do this, you need to carefully turn the screw clockwise or counterclockwise. The main thing is to find the position of the screw when the XX speed is maximum. This can be determined by the tachometer or by ear (in the absence of instruments for determining the crankshaft rotation speed).
- Now you can begin to turn the mixture amount screw, ensuring that the speed is at around 900 rpm. Tightening the screw clockwise causes the throttle valve of the first chamber of the carburetor to open slightly, resulting in an increase in engine speed.
If you unscrew the screw counterclockwise, then the damper closes and the speed will decrease. It turns out that you need to find a position for the mixture quantity adjustment screw at which the speed is at around 900 rpm.
- Having set the speed, we move on to the quality screw. The specified screw is tightened so as to obtain 750-800 rpm. If you cannot immediately achieve the desired indicator, you should repeat the setup procedure from the very beginning.
Let us add that when installing a non-standard carburetor on the engine or in case of carburetor repair (cleaning, replacing screws, jets), before making adjustments, you should first completely tighten the quality screw clockwise, and then release it back 3 or 4 turns. Only after this can you proceed to further settings.
Additional recommendations for setting XX on the carburetor
After the setup process has been completed, you should check the operation of the engine not only at idle, but also taking into account other modes. This means that the set of revolutions when you sharply or smoothly press the gas pedal should occur smoothly, without failures or failures. Also, the engine should not stall after the accelerator pedal is sharply released.
Any failures or pauses are a reason to repeat the settings. The first step is to return to adjusting the quality of the mixture, enriching the mixture with the quality screw. With this enrichment, you can raise the speed to 900 rpm. It is worth noting that high-quality and accurate tuning can reduce the overall toxicity of exhaust gases from a carburetor internal combustion engine.
We also recommend reading the article on how to fully adjust a Solex carburetor. From this article you will learn about the features of adjustments of the specified carburetor model, selection of jets, adjustments of the accelerator pump, transition modes, setting up the second chamber, etc.
In a number of cases, a situation arises when it is not possible to adjust the idle speed using the mixture quality and quantity screws (there is no obvious clear reaction of the engine to the rotation of the screws, or the indicated reactions are completely absent). This indicates a problem when fuel enters the carburetor chamber and the engine is running, but the mixture does not flow through the idle system.
This problem can occur when the carburetor solenoid valve is not fully tightened. The valve plug may also not be installed securely enough. As a result, fuel passes by the idle jet, which is installed in this valve or its plug. The XX jet may also be selected incorrectly, have a hole that is too large, etc.
To check this, you will need to disconnect the wire from the solenoid valve with the engine running. Normally the engine should stall. If this does not happen and the motor continues to operate, then the valve itself needs diagnostics. If no problems with the valve are identified, then you will need to set the fuel level in the float chamber and also check the needle valve. Then the carburetor adjustment should be repeated.
We also note that sometimes it is still not possible to achieve correct operation in all modes of the motor. In other words, after setting the idle speed, problems begin in transient modes, during sharp accelerations, etc. In this case, modification or tuning of the carburetor may be necessary. Sometimes the problem can only be solved by replacing the dosing device with a more suitable or serviceable analogue.
Dismantling
Before replacing or cleaning the injectors, they will need to be removed from the fuel rail. To achieve this, the following activities are carried out:
- Make sure the engine has cooled down properly. It is not safe to work on a hot engine;
- Disconnect the power wires from the fuel pump to de-energize the device;
- Try to reduce the pressure in the engine power system as much as possible. To do this, the engine starts, and then you need to wait until it stalls at idle speed;
- Repeat this procedure several times until the car simply stops responding to turns of the ignition key;
- That's it, now our goal is the fuel rail. To remove it, you must first remove the terminals from the battery, turn off the power to the ramp itself, disconnect the fuel supply hoses, and also disconnect all electrical appliances going to it. These are pressure, idle, throttle position sensors;
- If you have an 8-valve engine, then you do not need to remove the receiver. This step is relevant for engines with 16 valves;
- Experts do not recommend removing the intake manifold without dismantling the throttle valve and the hose going to it. It is better to unscrew and disconnect everything at once, which will allow you to continue working more conveniently;
- Cover the exhaust manifold openings with something to protect them from foreign objects;
- Using a hex wrench, you can unscrew a couple of bolts and remove the fuel rail along with the injectors;
- Make sure that there are no distortions when removing the ramp, otherwise problems may arise with the dismantling processes;
- We remove the injectors. To do this, remove the mounting brackets that hold the electrical connector. You also need to remove the bracket that holds the injector in its seat.
Adjustment process
After connecting the laptop to the car’s on-board computer, you have the opportunity to monitor all the parameters of the vehicle in its various systems and see a list of errors that negatively affect the operation of the internal combustion engine. To identify errors, the data obtained in this way must be checked against the basic parameters. In most cases, the program itself indicates a deviation from the norm. If not, then you need to look for the error by its code in the catalog.
After determining the causes of deviations from the norm, errors can be easily eliminated by adjusting certain parameters that affect the operation of the injector.
Operating principle and structure of the injector
VAZ 2110 how to clean the injector yourself
Below are the operating principles:
- There is a channel inside the injector that is filled with gasoline;
- the shut-off needle regulates the injector channel and thus controls the supply of gasoline;
- the locking needle is pressed by a spring so that it fits tightly to the injector channel;
- when the needle is raised, a wide stream of fuel is formed, which drips onto the engine cylinders, having previously been well mixed with air;
- the outlet (from where the fuel comes) closes when the needle is lowered, thus stopping the fuel supply;
- The injector contains an electromagnetic coil that regulates the position of the needle: when current is supplied, the needle rises, when there is no current, it lowers.
Diagnostics of the functioning of the injector and obvious signs of a malfunction
Objective signs of injector clogging, when you need to immediately flush the injector on a VAZ 2110:
- as the temperature outside dropped, the engine cooled down and began to start with great difficulty;
- at idle the engine is extremely unstable;
- when you press the gas pedal, you can objectively feel its complete or partial failure;
- reduction in acceleration speed and overall engine power;
- increase in gasoline consumption;
- increased toxicity of engine gases (emissions);
- since the fuel mixture receives an insufficient amount of oxygen, the temperature in the internal combustion chamber rises, which in turn entails a significant increase in engine detonation;
VAZ 2110 injector cleaning
- Popping noises can be objectively heard directly in the exhaust system itself with constant frequency;
- failure of various sensors, including the catalytic converter, and prematurely.
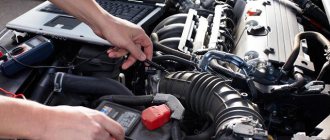
Procedure
To work, we need a laptop and a diagnostic cable.
Laptop
A laptop or tablet computer running a desktop version of the Windows operating system, as well as special software that is designed specifically for your car brand. Of course, you can connect a desktop computer, but then be prepared to take it outside, directly to the hood of the car.
Diagnostic cable for connection to the ECU
You will also need to purchase a cable to connect the on-board computer to the laptop. As a rule, these cables are divided into several main types, which do not differ very much from each other. Just decide which version of the connector is used in the car. In the oldest models this is the first version, and in newer ones this is the second version of the connector. The port is shaped in such a way that you will not be able to connect it incorrectly.
As soon as the connection to the on-board computer is completed, in the program running on the laptop, you can view all the parameters of the vehicle’s operation, as well as any errors that arose during the process. Error codes can be found in the documentation accompanying the program or on the Internet.
If necessary, new firmware can be installed on the on-board computer. This is done using the capabilities of the same diagnostic program.
Car chip tuning
Chip tuning - this word refers to the simple adjustment of the injector and electronic engine control system in order to improve its performance.
Firmware can prepare the car for the quality of local fuel, certain operating temperature conditions, and also determine exactly how much fuel the engine will consume in normal modes.
Advantages of chip tuning
Among the main advantages that a car receives after such modifications are:
- accelerated start from a place,
- smooth movement with minimal load,
- as well as the most even traction that occurs when working in the highest gears.
And, of course, if you are pursuing the goal of saving, you can significantly reduce fuel consumption. Depending on the car model and previous settings, consumption can be reduced by half a liter to three liters per hundred kilometers.
You can’t do without a special diagnostic program
However, it is recommended to carry out all settings only at a service center. As a rule, specialists from such service stations work only with proprietary software, and also install only those firmwares that have already been tested in real conditions. If the firmware is not of sufficient quality, then you will have to pay for the car’s sporting achievements.
Expensive engine repairs in such a situation are guaranteed.
This is what a set of diagnostic equipment looks like