Related links:
cylinder head 16V
A successful way to increase power at high speeds is to modify the head carried by the cylinder block. First of all, modifications to the cylinder head inlet and outlet channels are required. This is necessary to improve cylinder filling by reducing losses in the cylinder head channels. It is necessary to take into account that the mixture of gases in the channels moves at sound speeds (hence the noise of intake and exhaust). Any local inconsistencies and roughness lead to flow inhibition, in fact, to deterioration of filling and loss of power.
Based on all that has been said, the following amount of work follows:
- the need to refine the channels: increasing their diameter, changing the geometry and developing the necessary radii of curvature.
- modification of the valve seat: removing the sharp edges of the seat (when the valve begins to open, the sharp edges create strong resistance).
- combination of the intake manifold with the channels in the head of the block: any local inconsistencies greatly slow down the flow rate.
- grinding of channels to frequency class 4..5 (almost mirror surface)
This work is delicate and painstaking. As a result of all these actions, it is possible to increase power by 15%. The scope of work on the head is completed by installing a r/shaft with changed phases and a split gear for more accurate phase alignment.
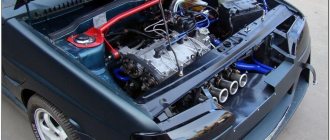
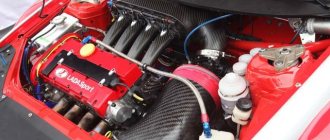
Modified intake manifold. The diameter of the standard channel in the inlet pipe of the 16V cylinder head is 34mm. The diameter of the modified channel is 39mm.
Modified intake manifold compared to the standard one. Modified “horns” intake manifold. Channel diameter 39mm. Modified valves Modified valves Modified valves Modified valves Modified valves
Work carried out during the modification of the cylinder head (cylinder head) in KarTuning.
- Increasing the diameter of the cylinder head seats or replacing them with larger ones (if necessary).
- Removing old valve guides.
- Increasing the diameter and changing the shape of the cylinder head channels
- Reducing channel roughness by grinding.
- Combination of intake and exhaust manifolds with channels in the head.
- Modification of the cylinder head combustion chamber.
- Pressure testing of the cooling jacket.
- Modification of intake and exhaust valves.
- Installing longer valve guides in the cylinder head.
- Processing of valve seats - restoration / straightening of working chamfers.
- Checking the tightness of the seat-valve pair using a vacuum tester.
- Measuring the volume of the combustion chamber in the cylinder head (if necessary).
- Milling the head plane.
- Preliminary check of clearances in pushers. Checking the operating range of hydraulic compensators (16 valve cylinder heads only).
- Preliminary assembly of the cylinder head and checking the stroke of the springs before the coils close.
- Setting the required valve spring preload.
- Installation of valve stem seals and final assembly of the cylinder head.
Technical characteristics of modified cylinder heads.
Cylinder head 8V (front wheel drive)
- The diameter of the inlet channels of the cylinder head is 32 mm.
- The diameter of the cylinder head exhaust channels is 29 mm.
- The diameter of the intake valves is 37 mm.
- The diameter of the exhaust valves is 31.5 mm.
- Modified valves.
- The diameter of the valve stems is 8 mm.
- The upper valve plates are standard (possibly modified to accommodate spring release; titanium).
- Valve guide material: alloy cast iron.
- The valve guides are longer than standard.
- Valve springs are standard (schrick possible, force 943N).
- Standard pushers (or solid pusher, diameter 35mm).
- Machining of valve seats with additional chamfers (radius chamfers are possible).
- Cylinder head camshafts on request - from standard to sports with valve lift of 13.5 mm
The combustion chamber
When studying combustion chamber tuning, it would be a good idea to read the article >> increasing the compression ratio as these types of tuning influence each other.
Space "ears" around the valves
If you intelligently modify the space in the combustion chamber that passes close to the valves when they open, you can significantly increase the throughput, thereby increasing the filling and power of the engine.
In a “two-valve cylinder”, if the combustion chamber has a compact structure, part of the circumference of the valve plates moves most of the way close to the edge of the combustion chamber, creating a low-flow area for the air-fuel mixture and for the release of burnt gases. If this zone is expanded, the filling of the cylinders can be increased and the power can be increased accordingly. In dome-shaped combustion chambers, or in block heads with a V-shaped arrangement of valves relative to each other, this processing technology is ineffective, since the valves, when opened, move towards the center of the cylinder and move away from the walls at a considerable distance. You need to bore to the places where the head meets the cylinder block and around the valves, creating the so-called “ears around the valves”. A gasket or an imprint of the old contact areas will help determine the area to which you can bore. Boring is carried out using cutters. Attention ! Bore very carefully, especially make sure not to get the rotating tool into the contact area of the block head seals.
Improved docking during modification of GRC valves
Poor-quality joining of these elements is one of the features of most VAZ models. Poor processing leads to air turbulence, which does not allow adequate air supply.
Refinement of a cylinder head of this kind includes getting rid of uneven surfaces by careful grinding. Before starting work, experts recommend installing the collectors on the joints, since the standard mounting option allows for possible displacement. If you work inattentively, this can lead to a negative result, which, naturally, must be avoided.
Compressor for VAZ 2107
Another way to increase the power of a power unit is to install a compressor. This device will help pump fuel, which, in turn, will invariably entail an increase in the power characteristics of the engine.
Most car owners recommend installing a compressor of a certain brand, namely PK05D, since this particular device has the characteristics that are optimally suited for the VAZ 2107. An important factor will also be considered that the installation of PK05D does not imply its introduction into the piston group of the “Seven” engine. In addition, the compressor operates surprisingly quietly, so the driver and passengers will not experience discomfort while driving.
To install a compressor on a VAZ 2107, you will need to perform a number of actions:
- Remove the generator belt by loosening the pulley fastenings with a screwdriver.
According to various estimates from car owners, installing the PK05D can significantly improve the handling of the “seven”, as well as significantly increase power when climbing hills, overtaking and acceleration.
Cylinder head boring
Another problem of the domestic automobile industry is the presence of excess casting in the area of the guide bushings. This reduces their already small cross-sectional size. Using special ball cutters you can get rid of this disadvantage. Cylinder head boring should be done extremely carefully so as not to spoil the entire system.
It is important to know that the inner surface of the bushings cannot be made perfectly smooth, as this will lead to a deterioration in fuel evaporation. The result of this stage of tuning the VAZ cylinder head should be a perfectly round cross-section without the presence of factory casting residues. Next to this element there are other important components of the vehicle. For example, oil channel, cooling channel. Therefore, when boring the cylinder head, it is important not to damage them.
The video shows the boring of a 16-cl. cylinder head. and valve:
Refinement of the cylinder head - changing the dimensions of the valve system section
This type of VAZ cylinder head tuning solves two issues:
- Increases the cross-section of the valve system.
- Reduces all of these elements.
Unfortunately, this process will not be complete without some investment, since such modification of the cylinder head requires replacement of the guide bushings. The consequence of such an upgrade, in addition to throughput, will be a reduction in the weight of the system to forty percent of the original.
Combustion chamber parts
Modified intake and exhaust valve.
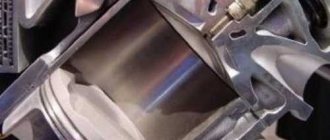
The combustion chamber. Piston crown. It is not visible to the naked eye, but under a microscope, the smooth metal looks like mountain ranges with a mass of protrusions and depressions. Polishing smoothes out these irregularities, thereby reducing the actual contact surface area. When polishing the metal, the contact area of the burnt gases with the surfaces inside the combustion chamber is reduced, due to which the heat transfer is reduced and the gases, when expanding, can do more useful work, because if the temperature of the gas decreases, its pressure also decreases, which leads to a loss of power.
You can learn more about heat losses by following the link >> Heat losses
Another plus arising from the first:
Since less heat is lost into the metal, the temperature of the working surfaces (piston, valves, combustion chamber) decreases, which has a beneficial effect on the engine’s knock resistance and resistance to overheating. Also, polishing and smoothing all sharp corners reduces aerodynamic drag during the movement of gases at the inlet and outlet. (especially when passing through narrow gaps, during the initial opening of the intake valve, purging, etc.) Polishing prevents carbon deposits, reduces stress concentration, reducing the possibility of cracks in the combustion chamber and valves. For those who find polishing difficult. Advice! Try polishing with a special felt wheel for an angle grinder. Costs about 100 rubles. At high speeds, using regular goya paste, polishing goes very quickly and is a lot of fun!
Engine Lada 2101-2107. Boring of cylinder heads. Part 2.
The story will mainly be about how the cylinder head of the VAZ 2101-2107 was modified:
After disassembling the block, it was time to disassemble the cylinder head. To do this, I needed a tool: a desiccant and a beater for the valve guides. This was all bought. A universal beater for engine repair, of this type:
1. Desiccant - 120 rubles 2. Set of mandrels - 200 rubles 3. Key for lapping valves - 70 rubles
I sorted everything out without a book, let’s say by intuition. =) I really like to figure out everything myself, how and what is taken apart and done, moreover, with a full understanding of the operation of the system. Among the peculiarities during disassembly, I will say one thing: some valves do not want to come loose. This is not a reason to be upset = ) ) ) Take a spark plug wrench, place it on the valve plate and hit it with a hammer or sledgehammer. Then you take the desiccant again and everything desiccates perfectly. If you know this method, you will dry out the valves in 5 minutes. The guides are easy to knock out, there will be no difficulties with this! The rule is: knock out the cylinder head on a cold one, hammer in on a hot one! Then everything will be as it should!
I laid out all the spare parts neatly on the shelves so that they weren’t lying around underfoot and everything was correct and clear. It was necessary to do this from the very beginning of analyzing the engines... everything comes with experience!
Then it was time to cut the intake manifold and cylinder head. After practicing boring channels on a test manifold, I realized my mistake - I was taking the channel in the wrong direction. It's not very good. I think I wasn't the only one who had this error. Here's what it is:
crookedly bored manifold
On the left is a smooth, undirected channel, on the right is a curved and directed channel) the difference, I think, is noticeable to everyone. What is the method for smooth boring of a channel? I found a way to avoid such channel slippage so that everything would be smooth and the channels would be round. This method is just banal drawing. The manifold channels are smooth and round by nature (unlike the cylinder head channels). Therefore, you measure how many millimeters you need on each side and draw... like this:
And now you definitely won’t take away the channel. You will know which direction to move. A very convenient method. I recommend it to everyone. Seven times measure cut once. I sharpen the channels with sandpaper, but it’s a chore, I agree, but it’s still reliable. The chances of cutting into the cooling channel are low. Therefore, work is much calmer. The tool is used like everyone else: drill -> hose put on a little and tightened with a clamp -> fabric (rags) -> sandpaper wrapped overlapping. The downside of this tool is that the hoses often break. After a long time of sawing the channels, washing and externally sanding the collector, it turned out like this:
Hooray! The collector is bored out. Channels are 32-33 mm in diameter. That is, the exhaust valve fails and dangles in the channel. Sharpening the commutator is very tedious. The problem is the hoses keep breaking...so be patient. After the collector wasted away, he decided to go buy some goodies:
So, here is a complete list and prices for all parts: 1. Reamer for valve guide - 200 rubles 2. Pin driver - 100 rubles 3. VALEO clutch - 2700 rubles 4. Main and connecting rod bearings ZMZ - 185 and 149 rubles 5. Set of engine gaskets – 495 rubles 6. SM rings – 715 rubles 7. SCT oil filter – 121 rubles 8. Suppressor – -54 rubles 9. Tensioner shoe – 45 rubles 10. Pins – 160 rubles. But I took the wrong ones. I need from 2108... 11. AMP valves (Poland) - 900 rubles 12. AvtoVAZ 2101 guides - 270 rubles 13. AvtoVAZ rockers - 850 rubles 14. AvtoVAZ camshaft bed - 400 rubles 15. Mandrel for rings - 250 rubles 16. Countersinks - 900 rubles 17. Retaining rings, gearbox bolt, ratchet nut – 200 rubles Looks like I didn’t miss anything = ) ) )
Now it's time to cut the cylinder head.
1. It all starts with combining the channels with the collector. For this we need a metal tube. Personally, I bought a copper connector for two wires at a plumbing store. It was perfect for my job. Let's take it. We grind to the required radius so that we can then insert the manifold - cylinder head into the cooling channels, thereby obtaining their immovable connection to each other, so to speak, without play. Alignment is very important when cutting cylinder head, this cannot be neglected. Otherwise, all your work will be done down the drain if the alignment is incorrect... so, we got this part
2. After fitting, cutting, etc., you get these pins in the cooling channels. It is important to make sure that they stand tightly, do not fall out or wobble.
3. I'm done with the fitting. The collector sits smoothly and without wobbling on the cylinder head. The goal has been achieved. Now we take regular plasticine and paste it over the channel like this
green plasticine on the channel =)
4. Then sprinkle it with any metal chips (this is necessary so that the plasticine does not stick to the collector, which will later lean against it)
green plasticine sprinkled with gold crumbs
5. We lean the collector and see the imprints of the channels on the plasticine:
imprints of the collector channels are visible on the plasticine
6. We cut off the dented plasticine with a stationery knife, thereby making scratches and simply removing the excess, put new plasticine in between the one that was placed earlier... and repeat the same operations
7. In the end, this outline emerges of how the channel needs to be cut so that everything fits evenly. Would you say it looks crooked? But no. At first I thought that I had screwed up. Then, after reading a bunch of topics on this issue on the Internet, I saw that this is the case for absolutely everyone. = )
After checking the valve, it turned out that everything turned out just perfect. The valve slides through the channels without touching anything, as if it were one single channel. I am very, very pleased with the combination! I didn't expect such a brilliant result. That’s probably all I wanted to tell you about the combination, otherwise many people ask questions, I hope that this explanation will be useful. I also want to say THANK YOU to such sites/forums as vaz2101.ru and vaz.ee, as well as some users of drive2.ru, I read a lot of useful information on them and tried to put it all in one post so that you don’t have to read all this crazy number of posts = ) ) )
What can I say about cutting the cylinder head channels itself? 1. They cut much faster and better than collector channels. Due to the lack of flexible hoses. I didn’t need a flexible hose when cutting the cylinder head. 2. For cutting, it is advisable to buy a set of any cutters, just to fit it. It will be needed when roughly removing the build-up under the guide in the exhaust channel and for removing sharp kinks in channels in general.
After alignment, we cut the channels. The intake was cut very quickly and very simply compared to the manifold. I was very happy. Wasted. And I thought that I would squander the release just as easily, well, a little harder due to the larger influx. I was wrong. The exhaust, compared to the intake, is cut much harder, precisely because of this stupid, incomprehensible influx made by the factory...
1. first, using a cutter, I cut down the guide as far as possible from the side of the combustion chamber
2. as soon as there is room for the sandpaper to crawl, we sharpen...
3. cut off. we get a channel that is already twice as large as the stock one) ) ) although only the influx was cut down.
4. then we trim everything with a cutter and remove it with sandpaper on a flexible hose and get such beauty
You saw the overall result in the first photo.
thank you all for your attention, for reading these many letters... success to you with your projects!
The cylinder head turned out to be 33x29 Costs
Issue price: 9,000 rubles
Preparation for sanding
For self-grinding, we will first need a set of feeler gauges and a metal ruler, with its help we will determine how strongly the cylinder head is bent and the degree of its unevenness. This is more of a method by eye, since only visually can you understand where and how much it costs to grind. In addition to such unevenness, there may also be cracks and similar defects. This indicates that the engine overheated well and detonated. To identify such cracks, it is worth painting the cylinder head with slow-drying paint and wiping it off after a few minutes. Where the paint remains there will be a crack. It is advisable to use bright colors of paint. Unfortunately, only large cracks can be seen, but microcracks can only be seen with the help of special instruments.
In any case, no matter how bent the cylinder head is, the first thing you need to do before starting grinding is to check for both large and micro cracks.
16-valve engine for the "seven"
The VAZ 2107 is equipped with an 8-valve power unit from the factory. Of course, one of the easiest tuning methods is to replace it with a 16-valve engine. Traditionally, the engine from the VAZ 2112 is chosen, since it is almost identical in size to the engine from the VAZ 2107 and meets all the requirements for power and efficiency.
Installation of a 16-valve engine on a “seven” is carried out according to the following algorithm:
- Prepare the motor for installation. To do this, you need to remove the flywheel and grind the crown from the inside. Turning is necessary so that the starter parts are more easily connected to the flywheel clutch. In addition to turning, you will need to replace the input shaft bearing with a bearing from 2112, otherwise the new engine simply will not fit into the seat.
Video: installation procedure
https://youtu.be/L_hzV-k1ozw
A 16-valve engine instead of an 8-valve is the best option for those drivers who want to feel quick feedback from their actions while driving, optimize engine power and the resource of the entire car as a whole.
Thus, any type of tuning of the VAZ 2107 engine can turn the car into a faster and more durable model. However, when performing any type of work, you must adhere to regulations and safety precautions; otherwise, it is better to contact experienced specialists.
Source