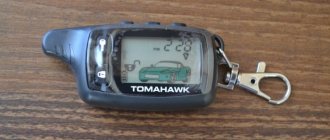
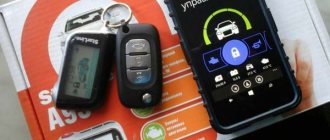
In this article we will tell you how to set the time on the Starline A91 key fob. The instructions are simple, even a blonde can do it.
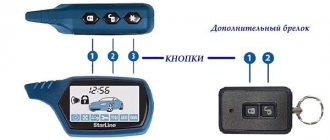
- On the Starline A91 alarm system, the time setting is adjusted by button 3 of the key fob. Press and hold it until a series of beeps (1 long 3 short);
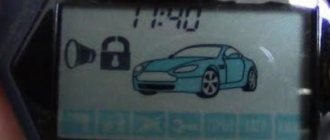
- The time display will flash on the display. Using buttons 1 (+) and 2 (-) you need to set the exact time in hours;
- Next, to save the result and proceed to setting the minutes, briefly press button 3 again. A scoreboard will appear on the monitor again, but this time to enter the exact time in minutes. To increase or decrease the value use the same 1 and 2 key fob buttons;
- You don't need to press anything to save the result. Just wait for 10 seconds, the system will remember the set time and display it on the main display.
- However, the time setting on the Starline a91 key fob is not limited to hours and minutes. If you click the 3rd key again, a menu will appear to enable/disable the alarm. Using keys 1 and 2 select the desired option.
- If you need to change the moment the alarm goes off, briefly click on key 3 again. A display will appear. The required time is set in the same way, using keys 1 and 2. There is no need to save anything.
- But that's not all. Another press of the program button 3 initiates the timer setting mode. Using familiar manipulations, set the desired value for hours and minutes, and also select the command: ON/OFF.
Let's summarize. The soft key (3) enters the time menu, as well as navigates through internal sections. Lowering or increasing indicators, as well as activating/deactivating the timer and alarm clock are performed using keys 1 and 2. Saving is automatic.
Reasons why the watch on the key fob fails
The time and date parameter is extremely important, so you need to periodically check its correctness. There are times when the clock gets lost and this can happen for a number of reasons. The most common one is a discharged power element. Each key fob is equipped with a battery, the charge indication of which is displayed on the main screen. Obviously, with minimal charge or its complete absence, this indicator may go astray.
Mechanical damage is also a common cause of malfunction. Cracks in the key fob, its body or screen can lead to poor contact with the power supply itself. The result is loss of power and constant reset of settings.
If the key fob is completely intact, the nutrient element is in order and the contact is tight, but the time is still periodically lost, then the cause is a software failure. About setting the time on the Starline A93 key fob.
In addition, it is worth remembering that after replacing a tired battery with a new one, the main parameters of the security system are reset to factory settings. Accordingly, the time after replacing the element will be 00-00.
Setting the clock on the Starline key fob
A few words about the security system
These developments of security systems are among the most modern and reliable 12 Volt devices, have interactive authorization, encryption keys are individual for each product, and have a function such as remote start at a set time on the control panel timer or engine temperature. Performance is maintained even in conditions of strong radio interference in urban areas.
The use of interactive authorization eliminated the possibility of intelligent electronic hacking and provides high resistance to all code grabbers known today. This became possible after the use of conversational encoding algorithms, using individual encryption keys, as well as a new, previously unused frequency hopping method.
This encryption method is used for both control panels, both for the main key fob and for the additional one. The existing START/STOP button of this system fits well with machines that also have such a button. The device has good resistance to changes in outside air temperatures. High performance is maintained at temperatures from minus 45 degrees to plus 85 degrees.
Troubleshooting the alarm key fob
Some problems with incorrect display of the clock parameter can be resolved yourself. If the reason is a faulty or discharged battery, then you can replace the part yourself. To do this, you just need to open the back cover and install a new battery.
It is also advisable to check the contacts when replacing. If there is a suspicion of their oxidation or lack of conjugation with the nutrient element, then they need to be cleaned and bent.
Mechanical damage in the form of cracks in the display or breakage of the key fob body is “treated” by replacing the part. The new remote control can easily be “linked” to the old car. If the time is periodically “reset” or displayed incorrectly, then this is a software failure. Service center specialists and programmers will help you here. They will be able to conduct a thorough diagnosis, determine the cause of the malfunction and decide whether the remote control can be repaired or whether it will require a complete replacement.
Reducing the warm-up time on the A91 alarm key fob
The system involves fine-tuning autorun parameters. You can program the engine start time and increase or decrease the warm-up duration.
- Find the service button, turn off the ignition and press five times.
- Turn on the ignition - the Starline alarm will make five confirmation sounds, and the AF indicators will appear on the display.
- Press button three. The screen lights up with the letters SF.
- Press and hold button 3 until a melodic signal sounds. Then release it and briefly press it again. The screen will confirm.
- Press key three depending on the parameter we need. Indicator 2=1 means that the car will warm up for 10 minutes.
- Turn off the ignition so that the Starline system accepts the commands as a basis.
You can turn on the silent mode of the Starline alarm. The car will react to attempts to penetrate only with light. To turn off the sound, you need to press the first key for a long time, and after the sound signal, briefly press button two.
The Starline key fob will sound a beep, and an indication of the silent security mode will appear on the screen. The car itself will blink its headlights once and close the doors. If they or the trunk are not closed tightly, the car is not set to the parking brake, the system will warn you about this with 4 light signals.
How to set the clock on the StarLine A91 key fob
One of the most popular Starline alarm models are the A series systems. Setting this parameter here is quite simple and is the same for all types. Below are instructions using the Starline A91 modification as an example:
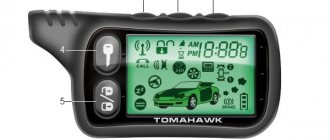
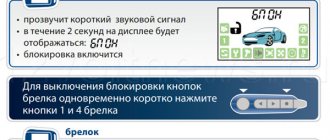
- The remote control is equipped with three functional buttons, each of which is responsible for a certain number of functions. To set the time on the Starline key fob, you will need to hold down the third button for a few seconds, until it emits a melodic signal. Afterwards, another sound should sound, and two melodies should also be played. Now the owner has entered the time settings mode, and the clock indicator blinks on the display.
- Using the first and second buttons, the “Clock” parameter is changed. In the first case, it increases, in the second, it decreases. After setting the correct parameter, you must press the third button again. The “Minute” indicator now starts flashing. Its adjustment is carried out in the same way, by pressing keys 1 and 2.
- The next click on the third button switches to the alarm setting mode. The procedure for programming it is exactly the same - the first button is responsible for increasing the parameter, the second - for decreasing it.
- Pressing key 3 again allows you to activate or deactivate the alarm. In this case, the first button turns it on, and the second button deactivates it.
- Another click of the third button allows you to go to the alarm timer setting menu. Parameters are reduced or increased in the same way.
- It’s very easy to finish setting the clock on the Starline remote control - just don’t press anything for 5 seconds. The system will remember and save the changes made.
Description of the Starline 63 alarm system with auto start
Below is a detailed video review that will help you understand exactly how to fine-tune your watch.
About setting the current time
The alarm control panel allows you to perform several different functions. Among them there are the following modes:
- Setting the current time on the display;
- Fixing the time when the alarm clock turned on;
- The ability to enable or disable it;
- Turn on the timer to start the countdown;
- Function to start or stop it.
The time is set as follows:
- You must press and hold button No. 3, which is designed to adjust the clock readings. You need to hold it until one melodic signal is heard, then one short one, and then two similar short signals. After such actions, the clock icon begins to blink. Button No. 1 increases the clock readings, and button No. 2 decreases them accordingly;
- After this, you need to briefly press button No. 3 to set the minutes. As a result of such actions, the minute icon begins to blink. Again, the first button increases the readings, and the second decreases them;
- Briefly press the third button again and the alarm will begin setting. When the alarm icon flashes, you can again increase the readings with the first button and decrease the readings with the second;
- Again, briefly press the same button to set the alarm minutes. Also, buttons one and two increase and decrease readings;
- The next short press of the third button will turn the alarm on or off. You can turn it on with the first button, and turn it off with the second;
- If you continue to briefly press the third button, the mode for setting the timer readings is called up. After the timer clock icon flashes, use buttons one and two to increase or decrease the readings;
- Another short press of the third button will cause the timer minutes icon to blink. They are adjusted with the same buttons one and two;
- Further pressing of button three will turn the timer on or off. You can turn it off with the first button, and turn it back on with the second button.
As you can see, there is nothing complicated about this. We told you how to configure and set the time on the StarLine A91 key fob. We hope that after reading this article, setting the time will work out and no additional questions will arise.
What happens if you don’t configure the alarm remote control?
Of course, the alarm will continue to perform its basic functions if the time and date on the Starline key fob are not configured. The car will still remain under guard, the attacker will not be able to start the power unit, and the owner will receive an audio notification about hacking attempts.
However, many useful functions will not perform correctly. For example, automatic engine warming is carried out in conjunction with a clock. That is, if the owner needs to leave at 8 am, then the car can start at 7:50, reach operating temperature and warm up the interior by the specified time.
How to turn off the siren on Starline A91
But the system is “tied” to its internal clock, and if its parameter is displayed incorrectly, then the car will warm up at a different time. As a result, the driver will get into an unheated cabin and start driving on a cold engine. This is not good for the engine, because unheated oil does not provide sufficient lubricating properties.
After repeated procedures, the car may require major repairs. So, correctly setting the time on the Starline key fob not only makes life easier, but also takes care of the proper operation and safety of the car.
Functions of the Starline key fob
Several alarm options are tied directly under the clock. The main one is timed autostart. The owner can set the time when the engine will turn on and reach operating temperature before leaving the house. This is convenient because the interior is warmed up at the same time.
Starline can turn on a timer for the turbine. After active driving on turbocharged engines, some elements of the intake tract heat up to about 800 degrees Celsius. Cooling occurs due to engine oil circulating through the system. Therefore, turning off the turbo engine immediately after aggressive driving is not recommended. Starting the turbo timer is a useful function that depends on the clock.
You can set an alarm clock and auto-start on it. This setup will be one-time only. Setting an alarm clock is convenient if the owner is going to do unusual things after hours (pick someone up from the airport, meet someone, etc.). At the set hour, the Starline key fob will play the wake-up melody and give the command for auto-warming. During daily use, you will need to constantly restart the system: go to the top menu (clock-alarm-timer) and there turn on the alarm again.
Setting up the key fob and labeling the buttons
On the body of the StarLine A91 alarm key fob there are three main buttons that are responsible for setting up the entire security system. Well, how to activate the desired option using them, see the table below:
| Button number | Single press | When held for a long time | When double clicked |
| 1 | Turning on the alarm and then locking the doors | Silent vehicle arming | Activating the shock sensor |
| 2 | Removing the car from the alarm system, followed by unlocking the doors | Silent disarming | Deactivating the damage sensor |
| 3 | Checking the current state of the security system and temperature conditions in the car interior | Selecting the engine start mode: by timer, by temperature, or by alarm clock | Activating the automatic engine warm-up mode |
| "Jack" | Emergency alarm reset (turns off the siren and unlocks the car) | — | — |
It is worth noting that the “Valet” button is located not on the key fob itself, but in the interior of the car, so that it is not noticeable. But if the battery is discharged, or the door is opened with a key (without first resetting the alarm from the key fob), it becomes the only salvation for the car owner. After all, when it is pressed, the security system automatically switches to service mode, which gives the driver the opportunity to get to home or to the nearest service station.
Setting up additional features
Previously, we found out that the StarLine A91 alarm system has auto-start functions based on a timer and engine temperature. Here's how to set the required engine start mode:
- By timer – key 3 is pressed once, after which the current timer value (from 2 to 24 hours) appears on the LCD display of the key fob. In order to increase it, just press button 1. But button 2 is responsible for decreasing the reading;
- For temperature – key 3 is pressed twice so that the icon with a thermometer flashes on the LCD display of the key fob. Well, you can set the desired temperature mode in the same way as in the case of a timer: button 1 - increase the value, and button 2 - decrease it.
But before you set up the Starline A91 alarm to autostart based on temperature or timer, you need to set the time on the key fob in advance. And this is done again with key number 3, which must be pressed until the device makes a characteristic melodic sound.
Factory reset
To reset the Starline A91 alarm settings, use the following algorithm:
- turn on the ignition and press the service button located in the car 10 times in a row;
- turn off the ignition, and the siren will emit 10 short signals, notifying the user that he has switched the alarm to reset mode;
- press the service button once, after which one siren signal sounds;
- press button No. 1 (lock) on the key fob, after which the system notifies with a short single signal that the factory settings have been reset;
- To exit the reset mode, turn on the ignition or wait until the system automatically exits this mode. As confirmation, the side lights flash five times and the key fob emits a melodic signal.
All. The alarm has been reset to factory settings.
Thus, the Starline A91 alarm system can perform automatic functions, or it can perform mechanical functions, configured by pressing buttons. A significant part of its functions are changed by programming. Therefore, by customizing the system, you can create a convenient and reliable anti-theft system that will serve you for a long time and without failure.
Benefits of using it
- The product is highly resistant to hacking attempts, thanks to the use of new encryption methods;
- The presence of the “Megapolis” mode allows the use of products in places with a lot of radio interference;
- You can use several different methods to remotely start the motor;
- All inscriptions and pictograms are made in Russian;
- The use of modern software developments has made it possible to achieve an increase in the speed of operation of devices by approximately 20% compared to other models of similar devices.

