Installation of oil nozzles on a VAZ 2112 car
The main unit of the VAZ 2112 car is the engine. Severe temperature operating conditions of the unit lead to its overheating, especially the main elements, which are the pistons. To reduce the temperature while the car is moving, their bottoms are cooled with oil. For these purposes, special nozzles are pressed into the second, third, fourth and fifth main bearing supports. These are tubes with spring-loaded balls inside. When the engine starts running at high speeds, the oil pressure increases, which puts pressure on the balls located in the injectors. The springs begin to compress, holes open in the tubes, and oil from the VAZ 2112 injector gets onto the piston from below. At idle speed, the oil pressure reduction valves, which contain the VAZ 2112 oil injectors, are closed, which ensures normal lubrication of the crankshaft liners.
Advice: When overhauling the engine or repairing it, you need to replace the oil injectors on the VAZ 2112 with new ones. During operation, they wear out, and most of all they become clogged, the valve spring weakens. This leads to a decrease in engine speed, a drop in oil pressure and poor spraying.
Injectors installed on Priora
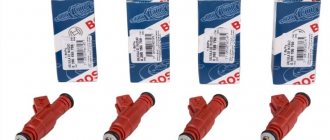
The Lada Priora car is equipped with imported injectors produced by the German company BOSCH.
These devices are highly reliable. Their service life can reach 160 thousand kilometers. However, car service specialists strongly recommend changing injectors every 120 thousand km. Almost all Prioras are equipped with German injectors from BOSCH
Injectors for 8 and 16 valve engines
You should know that the injectors of the 8-valve Priora engine are no different in appearance from the injectors of the 16-valve engine. These are all the same devices from BOSCH, consisting of a housing, a coil, a diffuser and a fuel grid. When choosing injectors for a Priora, you need to think not about the number of valves in the engine, but about its volume. Because the markings of injectors for 1.5 liter engines are different from the markings of injectors for 1.6 liter engines. In the first case, the BOSCH injector should be marked 0-280-158-110, in the second - 0-280-158-502. You can clarify the markings in the car’s operating instructions, at the end of which there is a summary table with digital designations of all BOSCH injectors depending on engine size.
Table of applicability of injectors for VAZ cars
Replacement or cleaning?
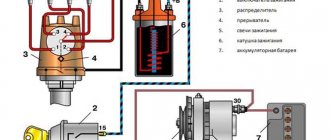
Complete diagram of the cooling system of a 16-valve VAZ-2112 engine
In order to understand what needs to be done with the injector, change it or simply clean it, it is better to diagnose them on a special stand. Under such conditions, you can test it in operation under different pressures, and also visually see how tightly it closes, and whether it is “snotty.”
If any of the injectors needs to be replaced, then you should buy a new one with exactly the same part number as the old one. Also, during installation of cleaned injectors, all O-rings should be replaced (2 pieces on each injector - approx.).
Installation is carried out strictly in the reverse order, similar to the removal procedure.
Checking and replacing injectors on a VAZ 2170 Priora
VAZ 2112: how to properly bleed the brakes
/ VAZ/ vaz-2170/ Engine/ Power system/ Checking and replacing injectors
Signs of injector failure may include:
– difficult engine starting;
– unstable engine operation;
– the engine stalls at idle;
– reduced crankshaft rotation speed at idle;
– the engine does not develop full power, insufficient engine response;
– failures in engine operation when the vehicle is moving;
– increased fuel consumption;
– increased content of CH in the exhaust gases.
You will need: a 5-point hex key, a flat-blade screwdriver, a 17-point key (two), an autotester.
| 1. Disconnect the connecting block of the injector wiring harness and the engine harness by pressing the lock. | 2. Perform an initial check of the injector windings. To do this, connect the ohmmeter to the contacts of the pads one by one. |
| Note There are five contacts in the block: four for supplying a control signal to the injectors and one common “+12 V” (a crimson wire with a black stripe is connected to it). |
3. In turn, connect the four control contacts to the common contact and measure the resistance in each case. It should be 11–15 ohms. If in one or more measurements the resistance value differs from the specified value, the tested injectors or their wiring harness may be faulty.
4. For a more accurate check and replacement of injectors, remove the fuel rail from the car (see “Removing and installing the fuel rail”).
| 5. Use a screwdriver to pry off the spring retainer of the injector... | 6. ...remove the clamp... |
| 7. ...and remove the injector from the fuel rail. Remove the remaining injectors in the same way. | 8. To identify a faulty injector, connect an ohmmeter to the injector contacts. It should show a resistance of 11-15 ohms. If the winding resistance is not normal, replace the faulty injector, as it cannot be repaired. |
| Note Check the injector for the shape of the sprayed fuel spray and for leaks at specialized service stations, since such a check directly on the car is very fire hazardous. |
| Warning The injectors of the VAZ-21126-00 engine of the VAZ-2170 Lada Priora have an original design and are not interchangeable with the injectors of VAZ injection engines of other models. Buy new injectors with exactly the same markings. |
| 9. Whenever removing injectors, be sure to replace the O-rings on all injectors on the ramp side. Using a screwdriver, carefully pry the edge of the ring... | 10. ...remove the sealing ring from the injector... |
11. ...and similarly remove the ring from the sprayer side.
12. If you are installing old injectors, carefully wash their nozzles with solvent or carburetor cleaner.
| Warning Install new sealing rings carefully, without using any tools, after lubricating them with engine oil. |
| Note The sealing rings on the injectors are identical to other rings installed on early VAZ models with fuel injection systems and are interchangeable with them. |
| 13. Before installing the injectors, lubricate the O-rings with engine oil or WD-40. | 14. Install the injectors in the reverse order of removal, securing them to the ramp with clamps, after tightening them a little. |
15. Having installed the fuel rail, connected the fuel line and connected the wiring harness block, secure the minus terminal on the battery, turn the ignition key 3-4 times to position “I” (ignition) at intervals of 2-3 s between turns on and check for leaks pipe connections and injector seals.
16. Install all removed parts in the reverse order of removal.
Repair
Before removing the injectors from the dismantled rack, it is advisable to check their functionality. To check you will need:
- four identical containers,
- tester,
- wires.
Functionality check
- Connect the gasoline supply and drain hoses and the power connector to the rail with injectors.
- Place the rack over the measuring cups.
Place the rack over the measuring cups
The shape of the cloud should be approximately the same for all nozzles
After the war, Germany received a ban on the development of injectors for aircraft engines. And engineers began adapting direct injection systems for passenger cars, discovering another important advantage compared to carburetors - efficiency.
Vladimir Berestenev
Replacement or flushing?
Some problems can be eliminated by cleaning and flushing. Others are “treated” only by replacement.
Table: problems with injectors
| Malfunction | Remedy |
| reduced performance | flushing, replacement if flushing fails |
| leakage | flushing, replacement if flushing fails |
| increased productivity | replacement |
| valve sticking | replacement |
| unstable valve sticking | flushing, replacement if flushing fails |
| overestimated or underestimated winding resistance | replacement |
In these cases, flushing is not a panacea. This method should be used taking into account the mileage and quality of service during operation.
During operation, the injector nozzles inevitably become coked and clogged with resinous deposits. The picture is aggravated by low-quality fuel, which can introduce additional pollutants.
For some time, fuel atomizers continue to operate without any visible changes, but sooner or later contaminants accumulate, changing the shape of the spray and reducing performance.
Advantages of oil injectors
How to choose and install a GPS antenna for a car radio
The pistons of the cylinder block are cast from a special aluminum alloy. Three piston rings are mounted on each element: at the bottom there is an oil scraper ring, at the top there are two compression rings. On the VAZ 2112 engine model, the pistons have a flat bottom, on which there are four recesses for the valves. The original VAZ 2112 oil injector for cooling the pistons is installed on an engine with sixteen valves. Due to additional cooling of the pistons and lubrication of the cylinders, the engine life is increased. Installation of oil cooling nozzles allows you to:
- Reduce wear on cylinders and connecting rods and piston groups.
- The piston is subjected to significantly lower thermal loads, which do not allow changing the geometric dimensions of the parts.
- When starting the engine when it is cold, oil is supplied to the pistons quite quickly.
Replacing oil injectors
The following depends on how well the oil injectors work in the VAZ 2112 unit:
- Lubrication of the cylinder mirror, which protects it from scuffing.
- Cooling the bottom of the piston.
- Removal of excess heat.
The photo shows new and old injectors. Their difference is only in color, but regardless of this, the old ones need to be replaced.
Oil injectors of the VAZ 2112 engine on the left are old, on the right are new
The main reason why oil injectors fail is the destruction of the valve spring. Because of this, the pressure on the crankshaft journals drops, which leads to increased wear on the connecting rod bearings and journals. To replace the oil injectors of a VAZ 2112, you need to use an aluminum or copper drift to knock them out towards the crankshaft.
So:
- The old injector is removed and a new one is installed in its place, on the crankshaft side of the VAZ.
- The new element is pressed in with gentle blows of the hammer. In this case, you need to use a spacer made of soft material.
- The instructions indicate that it must be planted with force, to a certain place. Then the nozzle stops and goes no further.
Installing an oil nozzle on a VAZ 2112 car
How to change oil nozzles on a 16 valve VAZ 2112 engine can be seen in the video. If clogged oil injectors are replaced in a timely manner, the cost of engine repair will be significantly reduced.
Article: 21120-1004081-02more, additional articles: 21120100408102, 2112-1004081-02hide
Order code: 136359
In stock Available for order – >10 pcs. Data updated: 03/06/2021 at 01:30
Order code
136359 Articles 21120-1004081-02, 21120100408102, 2112-1004081-02 Manufacturer AvtoVAZ Catalog group: ..Engine Engine Width, m: 0.005 Height, m: 0.005 Length, m: 0.03 Weight, kg: 0.007
Product reviews
Where is it used?
Reviews
There are no reviews for this product yet.
Write a review
Articles about the product
- “Crystal” VAZs: Lada Granta and Lada Largus April 9, 2013 Today in the next article in the series “Crystal” VAZs or typical breakdowns of domestic cars” we will talk about the latest developments of the Volzhsky Automobile Plant: Lada Granta and Lada Largus. Let's talk about the history of the creation of these models, as well as their characteristic malfunctions.
- Injector VAZ-2112 AvtoVAZ piston cooling Article number: 21120-1004081-02, 21120100408102, 2112-1004081-02 Order code: 136359 70 ₽ or place an order by calling 8 800 6006 966
Availability of goods in warehouses and stores, as well as the price of the goods is indicated on
06.03.2021 01:30
.
Prices and availability of goods in all stores and warehouses are updated once an hour.
If there is a sufficient quantity of goods in the store you need, you can buy it without pre-ordering. Internet price
– valid when ordering on the website or through a call center operator by phone
8-800-600-69-66
. Subject to sufficient quantity of goods at the time of order.
Price in stores
– retail price of goods in store sales areas without pre-order.
The period for moving goods from a remote warehouse to the warehouse of an online store.
The parts data presented on this page is for informational purposes only.
672a95a801c6b3289c6cf840291dd845
Add to cart
Available to order:
Order quantity:
Product successfully added to cart
!
Tuning VAZ cars
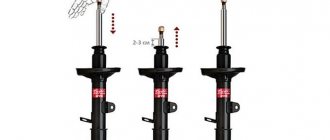
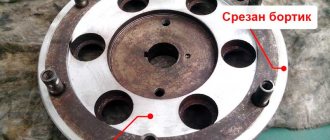
In VAZ models that do not have oil nozzles and the engine is hot, it is advisable to install such elements from the VAZ 2112 engine. In this case, the most heavily loaded parts of the engine will receive additional cooling. The VAZ 2112 oil nozzle is installed using a drill in the cylinder block. Initially, a hole of small diameter is drilled, then with a large diameter to a depth of 5 millimeters. There is not much space to install the injectors, so the top of the injector is cut off, as shown in the figure below.
Modification of the oil nozzle of the VAZ 2112 car
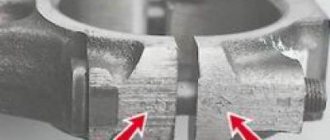
It is better to install the injectors as shown in the figure with red dots.
Installing an oil nozzle from a VAZ 2112 engine on a VAZ 2121
In this case, the devices will “sit” more in the block, and if the oil spray hole is directed correctly, the crankshaft will not touch the crankshaft. Using a hammer and file, if necessary, you can adjust the installation of the nozzle. You need to act carefully so as not to damage the body of the part; it cracks and breaks very easily.
Claim
1. A method for manufacturing a nozzle for oil cooling of pistons, which involves the manufacture and hermetically sealed connection of two halves of the nozzle, wherein the axis of the through channel in the nozzle connecting the oil line with the nozzle part lies on the interface between the halves of the nozzle, and each of the halves of the nozzle contains a zone to which supplies coolant from a common line in the block, a zone that supplies coolant to the piston, and a zone that forms a compact jet, ensuring smooth transitions from one zone to another.
2. The method of manufacturing an oil piston cooling nozzle according to claim 1, characterized in that the axis of the through channel in the nozzle connecting the oil line with the nozzle part lies in the same plane.
3. A method for manufacturing an oil piston cooling nozzle according to claim 1 or 2, characterized in that parts of the nozzle are made of metal.
4. A method for manufacturing an oil piston cooling nozzle according to claim 1 or 2, characterized in that parts of the nozzle are made of plastic.
5. A method for manufacturing oil piston cooling nozzles according to claim 1 or 2, characterized in that parts of the nozzle are manufactured by precision casting.
6. A method for manufacturing an oil piston cooling nozzle according to claim 1 or 2, characterized in that parts of the nozzle are manufactured by stamping.
7. A method for manufacturing an oil piston cooling nozzle according to claim 1 or 2, characterized in that the parts of the nozzle are connected by soldering.
8. A method for manufacturing an oil piston cooling nozzle according to claim 1 or 2, characterized in that the parts of the nozzle are connected by gluing.
9. A method for manufacturing an oil piston cooling nozzle according to claim 1 or 2, characterized in that the hole in the nozzle part of the nozzle is calibrated to the required diameter of the flow section.
10. A method for manufacturing an oil piston cooling nozzle according to claim 1 or 2, characterized in that a separately manufactured nozzle is installed in the nozzle part of the nozzle between the connected parts.
11. Piston oil cooling nozzle, which is a housing with a through channel made in it for supplying cooling oil from the oil line to the channel of the nozzle part located at the outlet, consisting of two halves hermetically connected to each other, with the axis of the through channel in the nozzle communicating with the oil line with the nozzle part, lies on the interface between the nozzle halves, and each of the nozzle halves contains a zone to which coolant is supplied from a common line in the block, a zone that supplies coolant to the piston, and a zone that forms a compact jet, ensuring smooth transitions from one zone to another.
12. The nozzle according to claim 11, characterized in that the axis of the through channel in the nozzle connecting the oil line with the nozzle part lies in the same plane.
13. Nozzle according to claim 11 or 12, characterized in that the connected parts are metal.
14. Nozzle according to claim 11 or 12, characterized in that the connected parts are plastic.
15. The nozzle according to claim 11 or 12, characterized in that the opening of the nozzle part is calibrated to the required diameter of the flow section.
16. The nozzle according to claim 11 or 12, characterized in that a separately manufactured nozzle is installed in the nozzle part of the nozzle.
What injectors are installed on VAZ 2110–2112 cars
The main advantage of injectors for VAZ cars of the tenth family is that they are interchangeable. There are only two types of sprayers - produced by Bosch and Siemens. And each of them, regardless of marking and year of manufacture, can be replaced with another.
Bosch injectors are traditionally manufactured in black housing
When selecting, there is only one limitation - engine size. 1.5 injectors are not suitable for 1.6 liter engines.
The Siemens injector has a blue tip
Both Bosch and Siemens injectors of any marking can be installed on 8-valve and 16-valve engines.
Table: how to select injectors for VAZ 2110–2112 by marking
| Siemens | Bosch |
| Injector DEKA VAZ 6238 | 0 280 150 996 and 0 280 158 110 |
| Injector DEKA VAZ 6393 | 0 280 158 502 |
| Injector DEKA VAZ 20734 | 0 280 158 017 |
| Injector DEKA VAZ 20735 | 0 280 158 022 |
| Injector DEKA VAZ short 20734 | 280158017 |
| Injector DEKA VAZ short 20735 | 0 280 158 022 |
The main causes of injector contamination.
The main, but far from the only reason for clogging of injection engine nozzles, is undoubtedly the quality of the fuel. In Western Europe, almost no one cleans injectors; manufacturers only recommend changing them after 120-150 thousand kilometers. But the injectors of cars that are operated in the territory of the former USSR have to be cleaned every 15 - 30 thousand kilometers. There is only one reason for the poor quality of fuel - the desire to receive excess profits from the sale of fuel and lubricants. As a result:
- Insufficient capacity for the production of A-92 and A-95 gasoline, but A-98 at domestic gas stations is in most cases a myth and a cunning marketing ploy - nothing more;
- Violation of fuel storage conditions. Often, the same tanks are used to store gasoline A-76, A-80, A-92, A-95, A-98, in which various tar deposits accumulate over the years of operation, dissolved by fuel with a higher octane number. As a result, tar deposits are washed into the tanks of our cars, leading to failure of the fuel system;
- The use of manganese-containing additives in the production of fuel, which increase anti-knock resistance. These are so-called anti-knock agents, which allow you to turn low-octane gasoline into high-octane gasoline with a slight movement of the hand. For example, an A-80 can “by magic” become an A-95, and there will be no detonation and its consequences as such. The additives, in turn, cause increased wear of the spark plugs and accelerated contamination of the fuel filter with fine brick-colored particles.
Diagnostics and replacement of oil injectors
Among the weakest points of oil injectors, it is worth highlighting the shut-off valve springs. Temperature loads and changes in pressure lead to metal fatigue, which causes failure and non-working parts must be pulled out for replacement. Such problems lead to a drop in pressure on the crankshaft and cause wear on the connecting rod bearings and main journals. Replacing injectors can be considered using the example of a VAZ 2112, which will give a good understanding of the upcoming work.
- Using a soft metal drift, the oil nozzle is removed by knocking it towards the crankshaft;
- Installation of the nozzle is carried out regardless of the condition of the removed one, and cannot be restored;
- The new element is pressed in using gentle hammer blows through a gasket made of soft material;
- The nozzle must reach the stop provided by the technological connector and limit its movement.
If a breakdown is suspected, the oil nozzles are checked using special equipment. It is most convenient to carry it out using a pneumatic-vacuum tester. The vacuum created cannot exceed 1 kg/cm, and the instrument needle should not tend to zero during testing. In this case, the test is considered successful and no replacement is necessary.
Installing injectors on a VAZ 2106 or servicing them on newer models shows high efficiency in the operation of the power plant. Reducing wear and preventing critical temperatures will allow you to forget about engine problems for a long time and focus on the road.
Monday, March 14, 2016
Installation of oil nozzles in a VAZ classic engine
Of course, not everyone agrees with this opinion, believing that the engine manufacturer calculated in advance the need to install additional equipment, however, there will be no disputes and evidence of the benefits of oil injectors, but a specific implementation process on the VAZ 2106 engine. Additionally, I will show the effectiveness of the solution, refuting the erroneous opinion of a famous blogger, who believes that with this implementation of the installation of piston cooling nozzles, the oil from the nozzles will not reach the target. Details below.
To be oil injectors or not to be?!
Expecting to assemble a reliable and durable motor based on the VAZ 2106 engine, I had no doubt about the need to install oil injectors, but how best to install them remained a difficult task due to a certain misconception that I had acquired by watching an earlier video - Travnikov’s internal combustion engine theory, in which he stated that the installation of oil nozzles used in the VAZ 2112 engine in the crankshaft main beds, popular among “tuners,” is not a reasonable solution. Allegedly, the crankshaft counterweights cut off the oil supply, making their operation ineffective.
| Piston cooling nozzles 2112 |
Thoughts on the oil nozzle in the connecting rod
I began to think about how I could install the oil injectors differently. Remembering the standard implementation of the first VAZ models and some other engines, for example Ford, in which a hole in the connecting rod acts as an injector, I began to look closely at this option. However, in my opinion, this implementation has more disadvantages than positive aspects.
| Ford connecting rod with injector hole |
The advantage is that it is easy to implement, but the disadvantage is that the injector only works for a limited time, the oil gets only to the cylinder wall and not to the bottom of the piston, and the worst thing is that when you try it on a VAZ 2130 crankshaft being installed, the injector works at the moment of the working stroke, where the oil pressure cannot be reduced, to avoid rupture of the oil film in the connecting rod journal.
Oil nozzle 2112 in the crankshaft main bed
Well, there is only one option left that can be easily implemented, namely the installation of oil injectors from the 2112 engine in the crankshaft main beds. Although the blogger warned against the stupidity of this idea, I decided to check it out myself.
Fearing that everything was so bad and the nozzle really didn’t hit the bottom of the piston, I made a guaranteed “sight” - I soldered a thin tube from the accelerator pump of the Solex carburetor onto the nozzle, which I could direct to the required place.
| Trying on an injector with a soldered tube to direct the oil stream |
However, having drilled holes for the injectors and checked the direction of work, installing an additional guide oil pipe from the injector was not necessary. Almost the entire revolution of the crankshaft does not block the supply of oil to the bottom of the piston from the nozzle, so the option of soldering additional. tube, I canceled it.
Where to direct the piston cooling nozzle
Unlike many implementations found on the Internet, I decided not to rack my brain on the question of where and at what angle to direct the oil nozzle and directed the nozzle in the same way as the AvtoVAZ plant installs them in 8-valve Grant engines, in which the nozzle is directed towards side of the candle. This place is the most heat-loaded, it is logical to cool it.
The exact direction of the nozzle was indicated by the user flanker
in the Lada Kalina Club forum diary the link is here, for which I am very grateful.
| Direction of operation of the oil nozzle in the VAZ 2112 engine. Photo by flanker |
Technique for drilling holes for the injector in the 2106 engine
| Template for precise direction of the hole for the oil nozzle |
| Setting a template to guide the drill |
Attention! Only the first 4 beds are drilled, but the fifth cannot be touched, since it is already additionally loaded with work to stop the crankshaft from shifting with the help of half rings. It is best to drill not with a drill, but with a cordless screwdriver, for example Interskol DA-18ER, since the drill has a low torque and drills at high speeds, at which there is a high probability of breaking the drill. Since the bed has a slot for supplying oil to the bearings, at first the drill can clamp in this place, so I recommend going through this place during the reverse rotation of the drill, so although it drills slowly, it does not clamp.
So, having placed the template and directed the guide on it in the desired direction, we place a screwdriver with a 3mm drill installed along the template mark and drill a hole. Having drilled the first hole and inserted the knitting needle into it, you will notice that the hole is located exactly where the template guide was directed, the error may be no more than 1 cm.
Procedure for removing oil injectors
Before you begin removing injectors from any car of the tenth VAZ family, you will need to relieve the pressure in the fuel system. Removing any element that is under pressure in any way can result in personal injury.
How to get rid of excess fuel
To relieve the existing fuel pressure, you need to turn off the fuel pump and exhaust the remaining gasoline:
- Fold down the cushion from the back row of seats.
- Below it is the fuel tank hatch.
- Unscrew the screws securing the hatch.
- Disconnect the wiring harness from the pump housing (the wires supply power).
After this, start the engine and wait until it stalls. It is recommended to turn the ignition on several times to ensure that there is no gasoline left in the system.
Next, you can begin to remove the injectors. It is recommended to prepare the necessary tools in advance:
- open-end wrench 17;
- a flat screwdriver with a narrow blade;
- Phillips screwdriver;
- hex key 6;
- rags.
All elements of the repair kit are usually at hand for any driver
How to remove parts from the engine
Dismantling steps:
- Remove the air filter box (it will interfere with free access to the engine).
- Remove the wiring harnesses from the injectors.
- Then you will need to disconnect the wires from the idle speed control and from the throttle sensor.
- Next, remove the vacuum seal from the pressure regulator (it has a white braid).
- Using a 17 key, unscrew the bolts that secure the fuel frame to the body. To make it more convenient, you can remove the gas cable.
- It is better to unscrew the fasteners of the plate with which the ramp is pressed using a hexagon.
- The fuel rail must be removed very carefully, with the nozzles facing up.
- On a 16-valve engine, dismantling will take longer, since the ramp has a more complex structure and several types of fasteners.
- Next, you can remove the injectors themselves - to do this, disconnect the fastening brackets of the electrical connector with your finger, and then the injector bracket. During removal, gasoline may leak; it is recommended to place a cloth under the ramp.
To install a new injector, the socket is first thoroughly cleaned of dirt and fuel, and only then can the product be screwed in. It is better to drop a few drops of gasoline onto the rubber ring before installation - this will make the nozzle fit into the mounting hole more easily. All work is then carried out in reverse order.
A few words about the procedure for working with wiring
At the end of today’s article, we’ll look at exactly how you should proceed if you want to change the wiring. As an example, let's take standard models of the VAZ brand - 2110, 2109 and the like. So, to competently work with car data electronics you will need:
- First, prepare for repair procedures. The implementation of this goal lies through:
- Purchasing the required wiring and devices;
- Search for the necessary connection diagrams;
- Selection of auxiliary tools: harnesses, fasteners, gloves for work, etc.
- After this, acting according to the diagrams of the currently installed electronics, we completely remove it. Naturally, before this you need to turn off the engine, disconnect the battery and put on gloves;
- Then the actual replacement of the VAZ wiring begins. Here you also need to act taking into account the connection diagrams. First of all, we connect the injector wiring according to the principle “from the oldest element to the youngest”. Next, we connect the main wiring outputs (ECU contacts) with the current source, and at the end we connect other electronics.
What injectors are installed on VAZ 2110–2112 cars
The main advantage of injectors for VAZ cars of the tenth family is that they are interchangeable. There are only two types of sprayers - produced by Bosch and Siemens. And each of them, regardless of marking and year of manufacture, can be replaced with another.
Bosch injectors are traditionally manufactured in black housing
When selecting, there is only one limitation - engine size. 1.5 injectors are not suitable for 1.6 liter engines.
The Siemens injector has a blue tip
Both Bosch and Siemens injectors of any marking can be installed on 8-valve and 16-valve engines.
Table: how to select injectors for VAZ 2110–2112 by marking
| Siemens | Bosch |
| Injector DEKA VAZ 6238 | 0 280 150 996 and 0 280 158 110 |
| Injector DEKA VAZ 6393 | 0 280 158 502 |
| Injector DEKA VAZ 20734 | 0 280 158 017 |
| Injector DEKA VAZ 20735 | 0 280 158 022 |
| Injector DEKA VAZ short 20734 | 280158017 |
| Injector DEKA VAZ short 20735 | 0 280 158 022 |
Cleaning procedure
Cleaning injectors can provide the car owner with the following benefits:
- restoring the original functionality of the device;
- reduction of fuel consumption;
- optimization of motor operation.
That is, in case of contamination (use of low-quality fuel), it is possible to flush and clean the valves in order to restore them to functionality.
Open the hood and make sure all vehicle systems are working properly
Several cleaning methods
Experienced drivers know that there are several ways to clean injectors on a Lada Priora. Moreover, each of them has both its pros and cons.
The first option is to use a detergent additive - the liquid is added to gasoline and, after entering the gas tank, it enters the injectors. Usually one bottle of the additive (0.5 l) is enough for a whole tank of fuel. In this case, absolutely all parts of the fuel system are washed. However, the disadvantage of this method is the lack of drainage of dirt - it will remain in the system.
The second option involves using a solvent. It is considered the most effective, since flushing is carried out while the engine is running. However, it is necessary to replace the spark plugs immediately after using the solvent, as they may stop functioning.
Ultrasonic cleaning of injectors can be considered the most modern method. However, the average car owner cannot always afford to buy this type of equipment.
The Lada Priora car owner can clean and replace faulty injectors on his own - the main thing is to carefully monitor the progress of the work. The solenoid valve on the Priora is considered a fairly reliable element of the fuel system, so you will rarely have to perform any type of work with it.
Home →
Maintenance and Repair →
What are injectors?
An injector is a special mechanical sprayer located in the “head” of the engine, through which fuel is supplied to the cylinders under high pressure.
Injector malfunctions
Among the most common causes of injector failure may be the following:
- The injector nozzle is coked - in this case, increased fuel consumption may be observed, vehicle dynamics will decrease, and engine starting will be difficult at subzero ambient temperatures. Otherwise there are no differences.
- The injector valve does not close hermetically (“the injector is snotty” - note) - here there may be increased fuel consumption, “tripleting” and increased detonation (about checking the knock sensor here), unstable idling.
- Valve sticking - engine troubles. In order to diagnose it, with the engine running, turn off the power supply to each injector in turn. With a non-working injector, no changes in engine operation will be observed, but with a working injector, the speed will drop.
Injection vehicles VAZ 2110, 2111, 2112 are equipped with imported injectors. This gives the models increased resistance to low-quality fuel and increases engine life. Owners of cars of the tenth VAZ family can independently repair and change injectors if necessary. The valve replacement steps are not particularly difficult even for beginners.
The importance of direct oil supply
A lack of thermal clearance is the most dangerous and can cause not only overheating, but also engine seizure. Even the slightest scuff can lead to imbalance and subsequent repairs. Oil scraper rings also have the opposite effect under critical loads, and the condition of the power plant can only be improved by ensuring the sliding of moving elements. In a modern engine, oil nozzles serve to lubricate the piston group, regardless of the dynamics of movement. Equally important is heat dissipation, which reduces detonation and ensures safe driving.
Even if the installation of oil nozzles was not provided for by the manufacturer, the implementation of such a system will help relieve the load on the engine. If we take the VAZ car as an example, then the 2106 model needs improvement, and the VAZ 2112 already has a well-organized solution for the piston group. Such a system has important criteria that are reflected in the operation of the motor.
- Reduced wear and increased service life of the connecting rod and piston group and cylinders;
- Reduced thermal loads and the impossibility of critical temperature expansions;
- More confident cold start and no problems during the operation of the power plant;
- Sufficient lubrication of the entire working surface of the cylinder.
Making pistons from aluminum alloys and installing oil scraper and compression rings ensures ease of movement and uniform distribution of lubricant, but performance characteristics will always be higher for a car with oil injectors.
Cleaning methods
There are three main ways that will allow you to clean your injectors. Decide for yourself which one to use.
Way
Peculiarities
Quite effective, but financially expensive. Plus, working with chemicals is risky because it is very dangerous to your health. Cleaning is carried out only in full compliance with safety regulations
Car services will now do everything for your money. But you'll have to pay a lot. Don’t forget that finding a really good, responsible and inexpensive service station is something out of the realm of fantasy. Therefore, either questionable quality of work, or impressive money for effective cleaning
The most economically profitable way to save money and complete the task efficiently. You should choose this option only if you have an idea about the design of the motor, the location and functions of the injectors
Important nuances
There are a few things to keep in mind when cleaning your injectors. Here they are:
- You cannot save on flushing fluid. The injector is too important an engine part. And it is extremely sensitive to the quality of the flushing fluid. The optimal choice for washing Priora injectors is a product from Wynns, developed specifically for injection engines. The cost of a liter bottle is 700 rubles;
The plastic bottle must be removed carefully after washing the Priora injectors.
Replacing injectors is a long procedure. Nevertheless, it is quite within the power of a novice driver if he has at least a vague understanding of the structure of an injection engine. When cleaning the injectors, the situation is much simpler: you just need to be able to use a drill and know where the main fuel hose is located.
Operating principle of oil nozzles
Well, here we come to the most interesting part, sorry for the long introduction. Oil jets provide additional oil cooling.
Actually, the principle of operation is very simple - the nozzle cuts into the oil line (more on this below) and sprays oil into the bottom of the piston. Not from above (as many people think), but downwards, where the connecting rod is located.
Oil not only relieves excess temperature, but also better lubricates the engine cylinder. Moreover, the pressure is quite strong, but it does not always hit.
At low speeds (idling), the injector DOES NOT WORK! This is done in order not to “take away” the oil pressure from the friction pairs. After all, the oil pump at idle speed is not so productive, and the pressure in the system is not high. If you still “open” the injector, then the pressure in the system will drop even more, and there really won’t be enough oil on the friction pairs (on the crankshaft, camshaft, etc.). YES, and the temperature at idle is not so high, so there is simply no need to operate the injector.
Medium and high speeds. This is a completely different matter, the fuel in the cylinders begins to burn much more, the speed is high, and overheating occurs. This is where the nozzle opens and begins to spray oil, effectively removing heat.
The system is very thoughtful and effective, proven on more than one motor.
Three types of engine cooling
If you take an internal combustion engine (be it diesel or gasoline ), its design, to put it mildly, is not ideal! I have already written that the efficiency of a gasoline unit is only 20–25% , a diesel unit is 40–50% (which is better, but also far from ideal). And most of the fuel, to put it exaggeratedly, is converted into heat (heat losses), in gasoline versions they can reach up to 35%! And this is a lot.
But that's not the point. To prevent our engine from simply overheating and jamming, we need effective cooling. Moreover, we mainly need to cool the so-called piston group and timing system (after all, the main temperature is there).
What cooling systems do we know:
PASSIVE
Personally, that's what I call her. The metal that makes up the block can be made massive, with ribs, for effective heat dissipation. The material can be cast iron or, say, aluminum, pistons and rings (compression and oil scraper) can be made massive (like connecting rods, crankshaft, etc.) - they perfectly transfer temperature to the block. The combustion chamber is not so voluminous, and such an engine will cool itself - say, when moving. Air flows will pass through the “ribs” cooling the structure. Probably everyone remembers ZAZ cars (in common parlance “Zaporozhets”), and so, it was cooled using the air method.
PROS: There is no unnecessary equipment that takes power from the engine - such as a pump. There are also no radiators, antifreeze (antifreeze), thermostat, etc. Which extremely simplifies the design of both the motor and the cooling system
CONS: Nowadays this system is practically not found. All due to the fact that there is really not enough of it in the hot months, the engine simply overheats. There is also no liquid heating in winter, which is extremely inconvenient! This design is now found only on mopeds, motorcycles and some agricultural equipment.
ACTIVE (or forced)
As you guessed, this system is a modern car. In simple words, a large number of channels pass through the block head and the block itself, in which coolant ( antifreeze or antifreeze ) circulates. It is she who removes heat and, with the help of radiators, dissipates it into the environment. The system is pumped by a pump, a special pump that is often powered (via a belt drive) from the crankshaft, although now electric systems (where the pump has an electric motor) are increasingly appearing.
The ADVANTAGES of this system include sufficient lightening, that is, massive blocks, pistons, crankshafts, etc. are no longer needed. Everything cools quite well anyway
CONS – I personally call it the abundance of attachments (pumps, antifreeze, etc.). And also the neglect of many manufacturers, who strive to make the engine as light as possible, make tablet pistons and thin rings (although they can no longer effectively remove heat into the walls of the cylinder block). Thoughtless relief leads to a decrease in resource.
But there is another, third type of cooling - with the help of oil, which I want to highlight as a separate item.
Cleaning Priora injectors
There are two options for washing injectors: with and without removing them from the car. The removed injectors are washed on special stands using ultrasound, under the influence of which even the oldest contaminants disappear. Ordinary drivers do not have such stands, so below we will consider a more popular option for washing injectors without removing them from the Priora. Here's what you'll need for this:
- liter of special flushing fluid;
- two automobile nipples;
- automobile fuel filter;
- a pair of metal clamps;
- a meter piece of rubber hose with a diameter of 12 mm;
- drill with 13 mm drill bit;
- electric pump;
- two liter plastic bottle.
Flushing sequence
- The bottom and cap are drilled into the plastic bottle.
This is done with a “13” drill. Automotive nipples are inserted into the holes. Ordinary car nipples are inserted into the holes of a plastic bottle - The spool is unscrewed from the nipple inserted into the plug. This must be done so that the flushing liquid passes freely into the nozzles.
- Now a rubber hose is put on the nipple inserted into the plug and secured with a metal clamp.
The second end of the hose is put on the fuel filter and secured with a second clamp. A piece of rope is screwed to the bottle with tape (so that the bottle can be hung on the hood). Priora injectors are washed using a filter and a plastic bottle - The car starts. You must wait until the engine warms up to 90 degrees. After warming up the car turns off. The fuel hoses are removed from the fuel pump, the car starts again and runs until it stalls. All this is done in order to completely relieve pressure in the fuel line.
- Now you need to find the fuel hose with a green button on the clamp, connected to the fuel line.
To remove it, just press the green button and pull it towards you. The green button is clearly visible on the Priora fuel hose - The hose is put on the fuel filter (the clamp with the green button should make a characteristic click).
The main fuel hose of the Priora is connected to the fuel filter for flushing - The washing liquid is poured into a plastic bottle.
- An electric pump hose is connected to a nipple inserted into the bottom of the bottle, after which the bottle is suspended on the open hood of the car.
The device for washing Priora injectors is assembled and ready for use - Using a pump, a pressure of 3 atmospheres is created in the bottle (as the liquid flows out of the bottle, the pump will have to be turned on several more times to maintain this pressure).
- After the required pressure has been created in the bottle, the car starts at idle and runs for 15 minutes.
- After this time, the engine is turned off and cools down for 10 minutes.
- If there is still liquid left in the bottle, the engine starts again and runs until it stalls.
- After this, the flushing system is removed from the car, and the fuel hose is installed in its original place. Injector flushing is complete.
Method for replacing injectors on 8- and 16-valve engines
Car owners cannot always diagnose faults in the fuel system. Often, failures in engine operation or unstable idle speed can be explained by completely different reasons, and not just interruptions in the fuel supply.
Symptoms of a problem
If all car systems are operating normally, then the following symptoms will directly indicate injector problems:
- failures in engine operation;
- increased fuel consumption;
- instability of idle speed;
- loss of power;
- black exhaust gas, etc.
Video: how to replace oil nozzles if they leak
Is it possible to determine the cause of the malfunction yourself?
Failure of injectors is often caused by clogged injectors. When using low-quality fuel, the injector nozzle becomes clogged with gasoline deposits over time, which is why its throughput gradually decreases. Accordingly, the engine no longer receives enough fuel, so the engine power sharply decreases and the car’s dynamics deteriorate.
In addition, the rubber seal or ring may lose its tightness. In this case, the nozzle will leak, due to which the necessary pressure will not form in the system.
It should be noted that the service life of injectors on the VAZ 2110–2112, set by the manufacturer, does not exceed 150 thousand kilometers.
Advantages of oil injectors
The pistons of the cylinder block are cast from a special aluminum alloy. Three piston rings are mounted on each element: at the bottom there is an oil scraper ring, at the top there are two compression rings. On the VAZ 2112 engine model, the pistons have a flat bottom, on which there are four recesses for the valves. The original VAZ 2112 oil injector for cooling the pistons is installed on an engine with sixteen valves. Due to additional cooling of the pistons and lubrication of the cylinders, the engine life is increased. Installing oil cooling nozzles allows you to:
- Reduce wear on cylinders and connecting rods and piston groups.
- The piston is subjected to significantly lower thermal loads, which do not allow changing the geometric dimensions of the parts.
- When starting the engine when it is cold, oil is supplied to the pistons quite quickly.
Replacing oil injectors
The following depends on how well the oil injectors work in the VAZ 2112 unit:
- Lubrication of the cylinder mirror, which protects it from scuffing.
- Cooling the bottom of the piston.
- Removal of excess heat.
The photo shows new and old injectors. Their difference is only in color, but regardless of this, the old ones need to be replaced.
Oil injectors of the VAZ 2112 engine on the left are old, on the right are new
The main reason why oil injectors fail is the destruction of the valve spring. Because of this, the pressure on the crankshaft journals drops, which leads to increased wear on the connecting rod bearings and journals. To replace the oil injectors of a VAZ 2112, you need to use an aluminum or copper drift to knock them out towards the crankshaft.
Tip: Do-it-yourself work must be done carefully so as not to damage the mounting holes.
So:
- The old injector is removed and a new one is installed in its place, on the crankshaft side of the VAZ.
- The new element is pressed in with gentle blows of the hammer. In this case, you need to use a spacer made of soft material.
- The instructions indicate that it must be planted with force, to a certain place. Then the nozzle stops and goes no further.
Advice: You need to make sure that the oil nozzle on the VAZ 2112 does not block the oil channel of the engine block.
Installing an oil nozzle on a VAZ 2112 car
How to change oil nozzles on a 16 valve VAZ 2112 engine can be seen in the video. If clogged oil injectors are replaced in a timely manner, the cost of engine repair will be significantly reduced.
Comments
1. I would be careful when sharpening homemade nozzles. You need to select the thermal expansion of the material so that it does not accidentally jump out of the socket. 2. The direction of the jet at BDC is definitely not necessary there 3. On the other hand, the end of the injectors is soft, its direction can be edited, it’s completely stationary 4. I don’t understand how they are trying to make sure that at TDC the injector hits one end of the piston, BDC to another.
I don’t know what to say. Any ideas for improvement?
Installation of oil nozzles on a VAZ 2112 car
The main unit of the VAZ 2112 car is the engine. Severe temperature operating conditions of the unit lead to its overheating, especially the main elements, which are the pistons. To reduce the temperature while the car is moving, their bottoms are cooled with oil. For these purposes, special nozzles are pressed into the second, third, fourth and fifth main bearing supports. These are tubes with spring-loaded balls inside. When the engine starts running at high speeds, the oil pressure increases, which puts pressure on the balls located in the injectors. The springs begin to compress, holes open in the tubes, and oil from the VAZ 2112 injector gets onto the piston from below. At idle speed, the oil pressure reduction valves, which contain the VAZ 2112 oil injectors, are closed, which ensures normal lubrication of the crankshaft liners.
Advice: When overhauling the engine or repairing it, you need to replace the oil injectors on the VAZ 2112 with new ones. During operation, they wear out, and most of all they become clogged, the valve spring weakens. This leads to a decrease in engine speed, a drop in oil pressure and poor spraying.
Conclusion
Oil injectors are an optional, but very interesting option, which only recently began to be included in the basic versions of many cars. Initially, such injectors were in demand for turbocharged engines, but practice has shown that they have a positive effect on the service life and performance of absolutely all internal combustion engines. Although the failure of injectors does not always affect the performance of the engine, we do not recommend ignoring this point. If your car’s engine is not equipped with oil nozzles, and you plan to use the vehicle for a long time, you should think about installing them. Typically, the installation of oil injectors by a professional does not take much time and is relatively inexpensive.